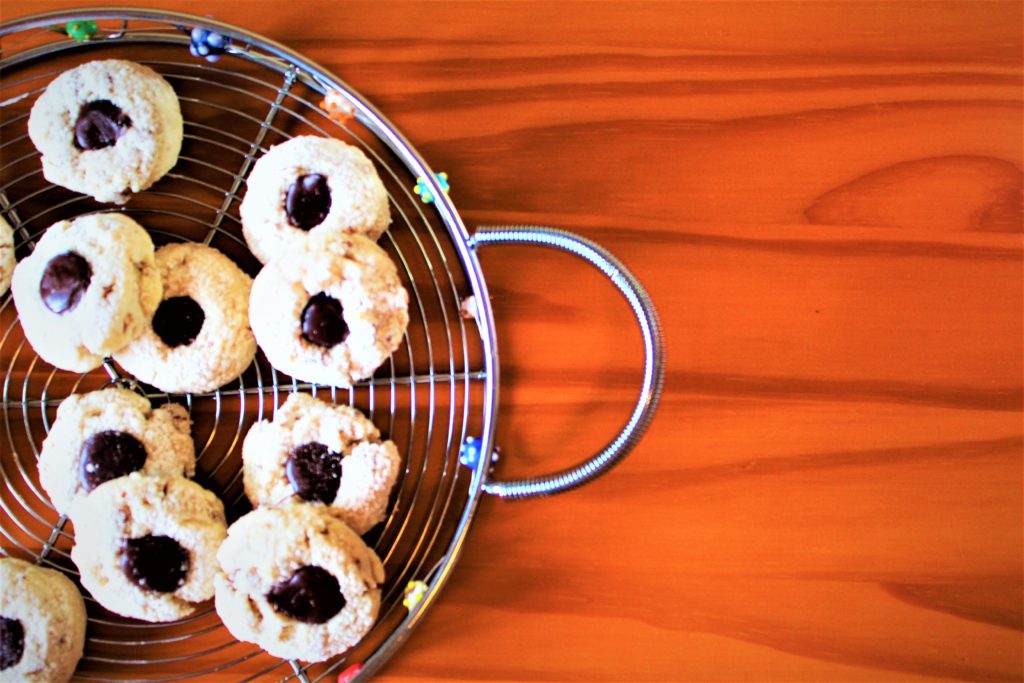
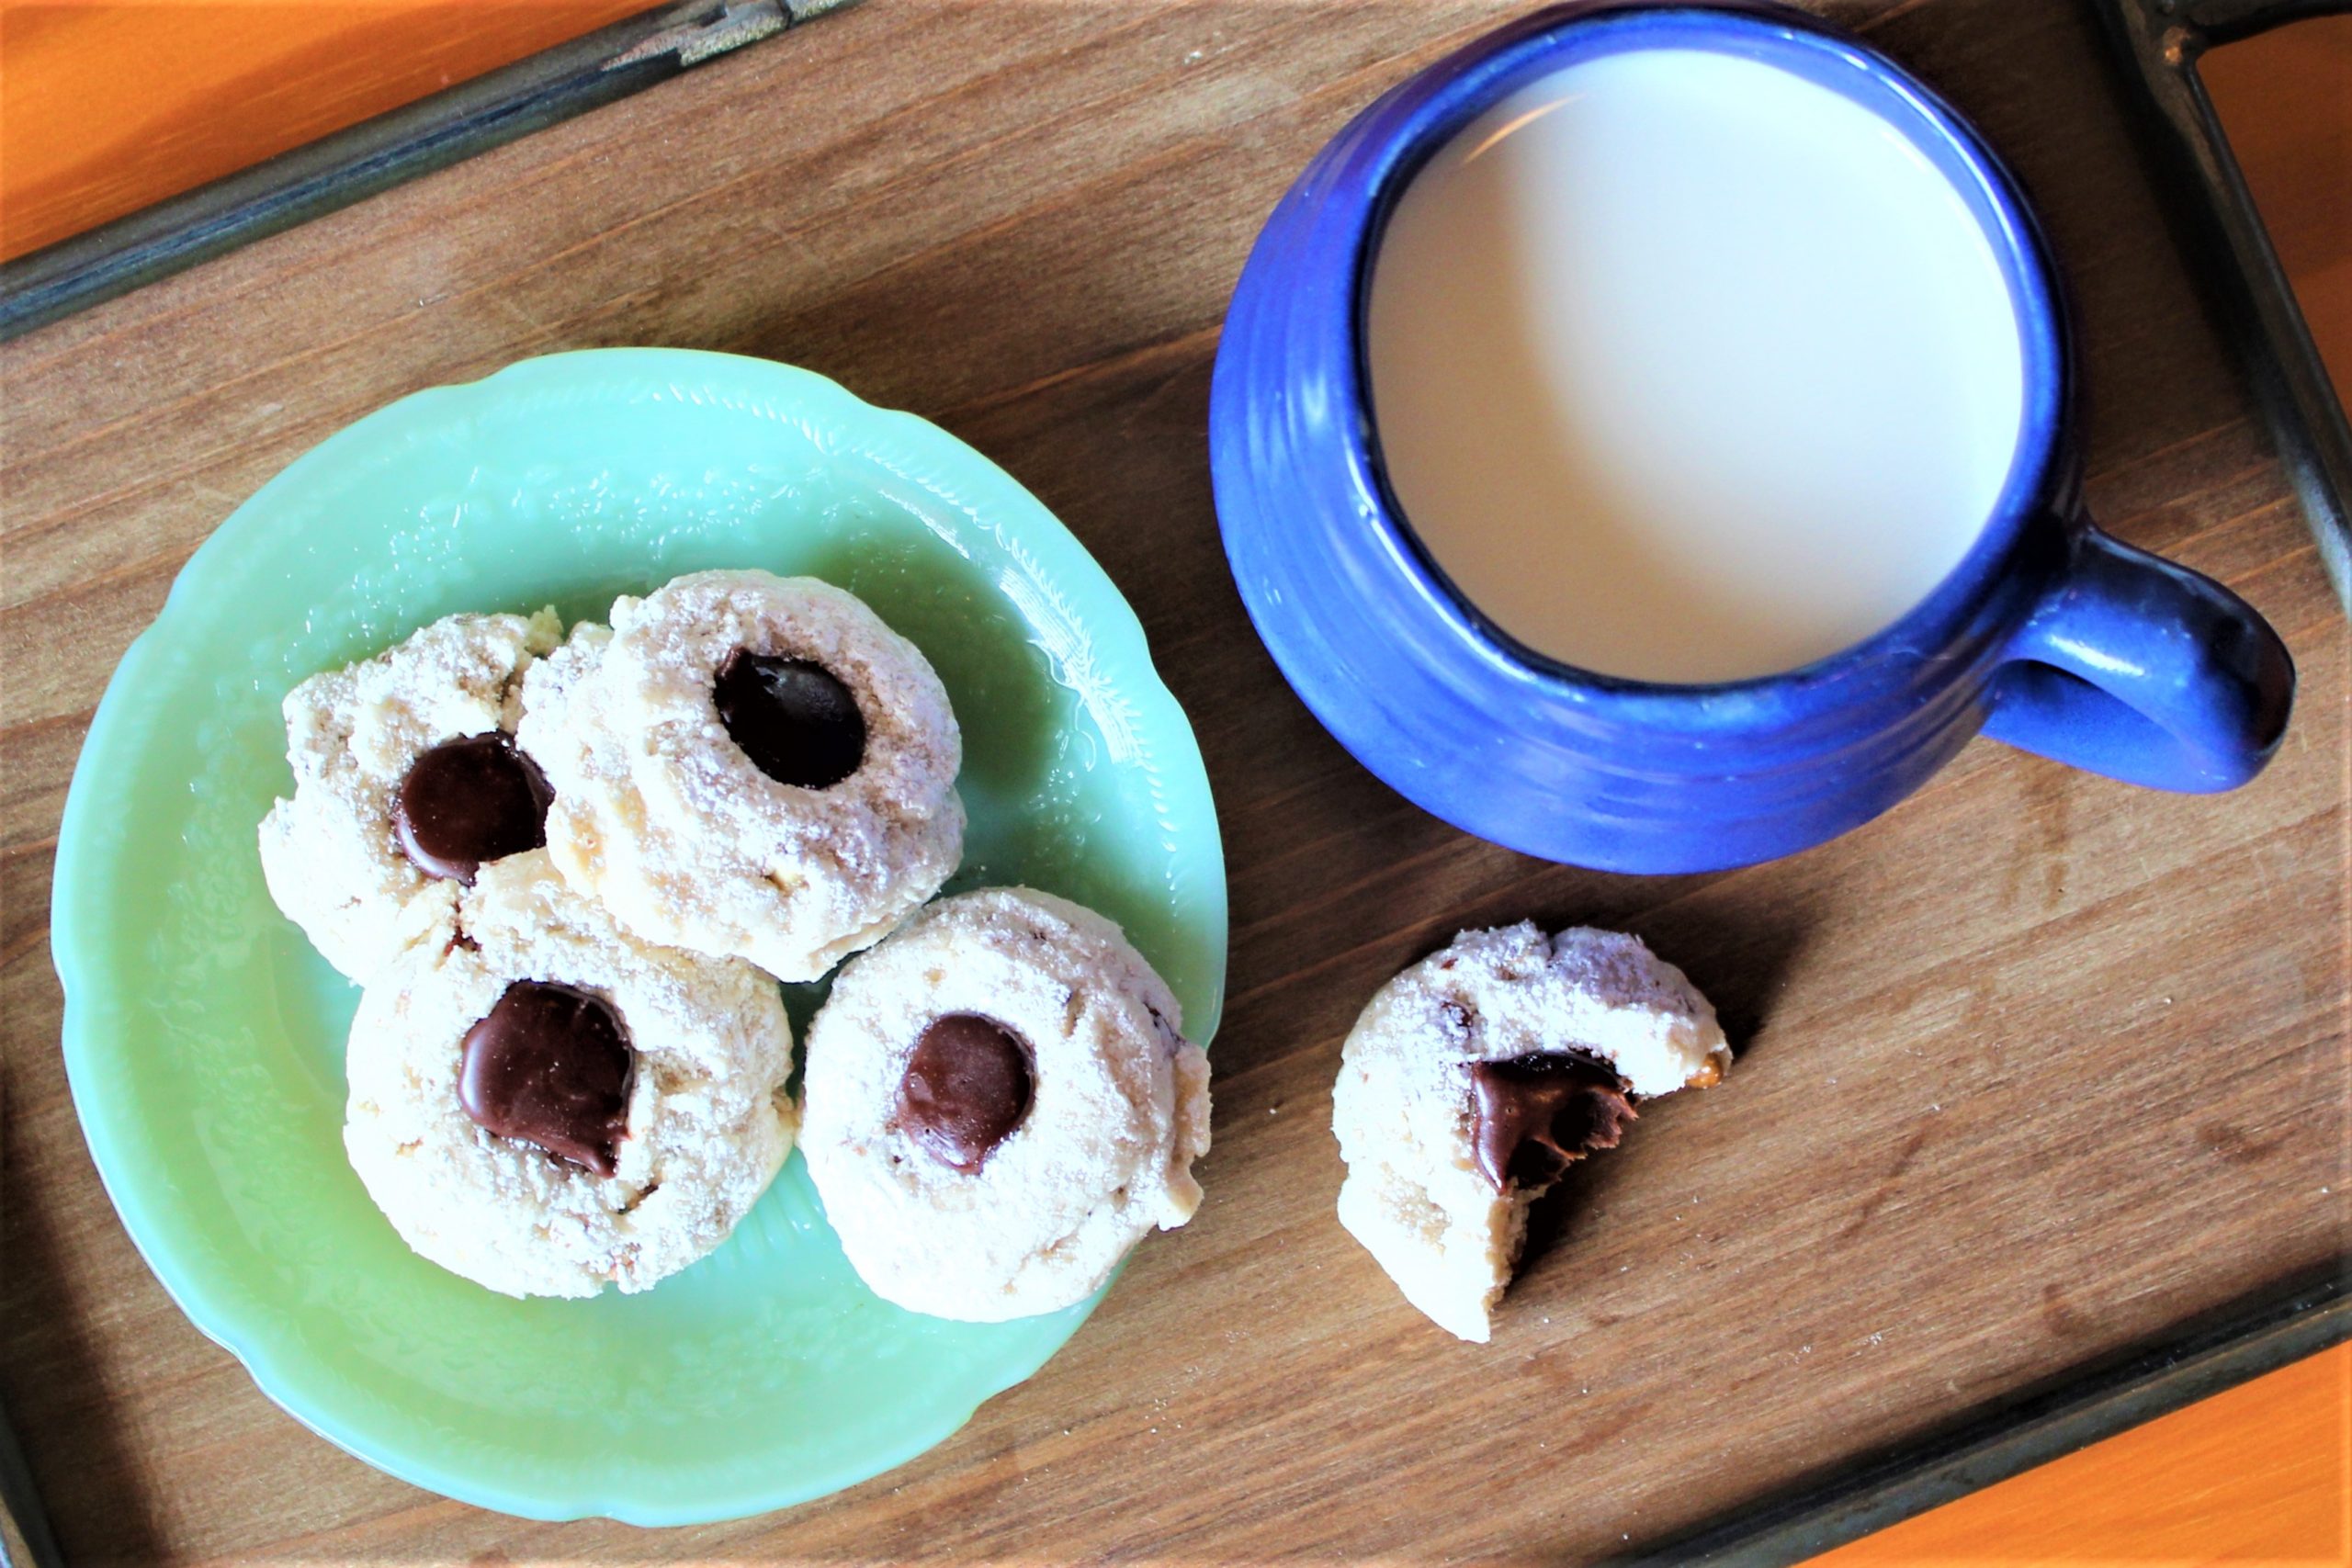
Buckeyes are hands-down my favorite candy. When I was a kid, my mom would make these little guys by the dozens. It’s the peanut butter-chocolate combination that can not be beaten. The salty and sweet flavor translates perfectly in this decadent fudge. I hope you …
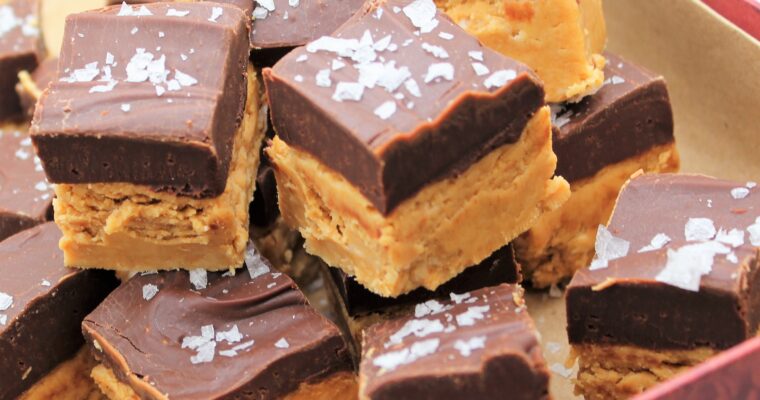
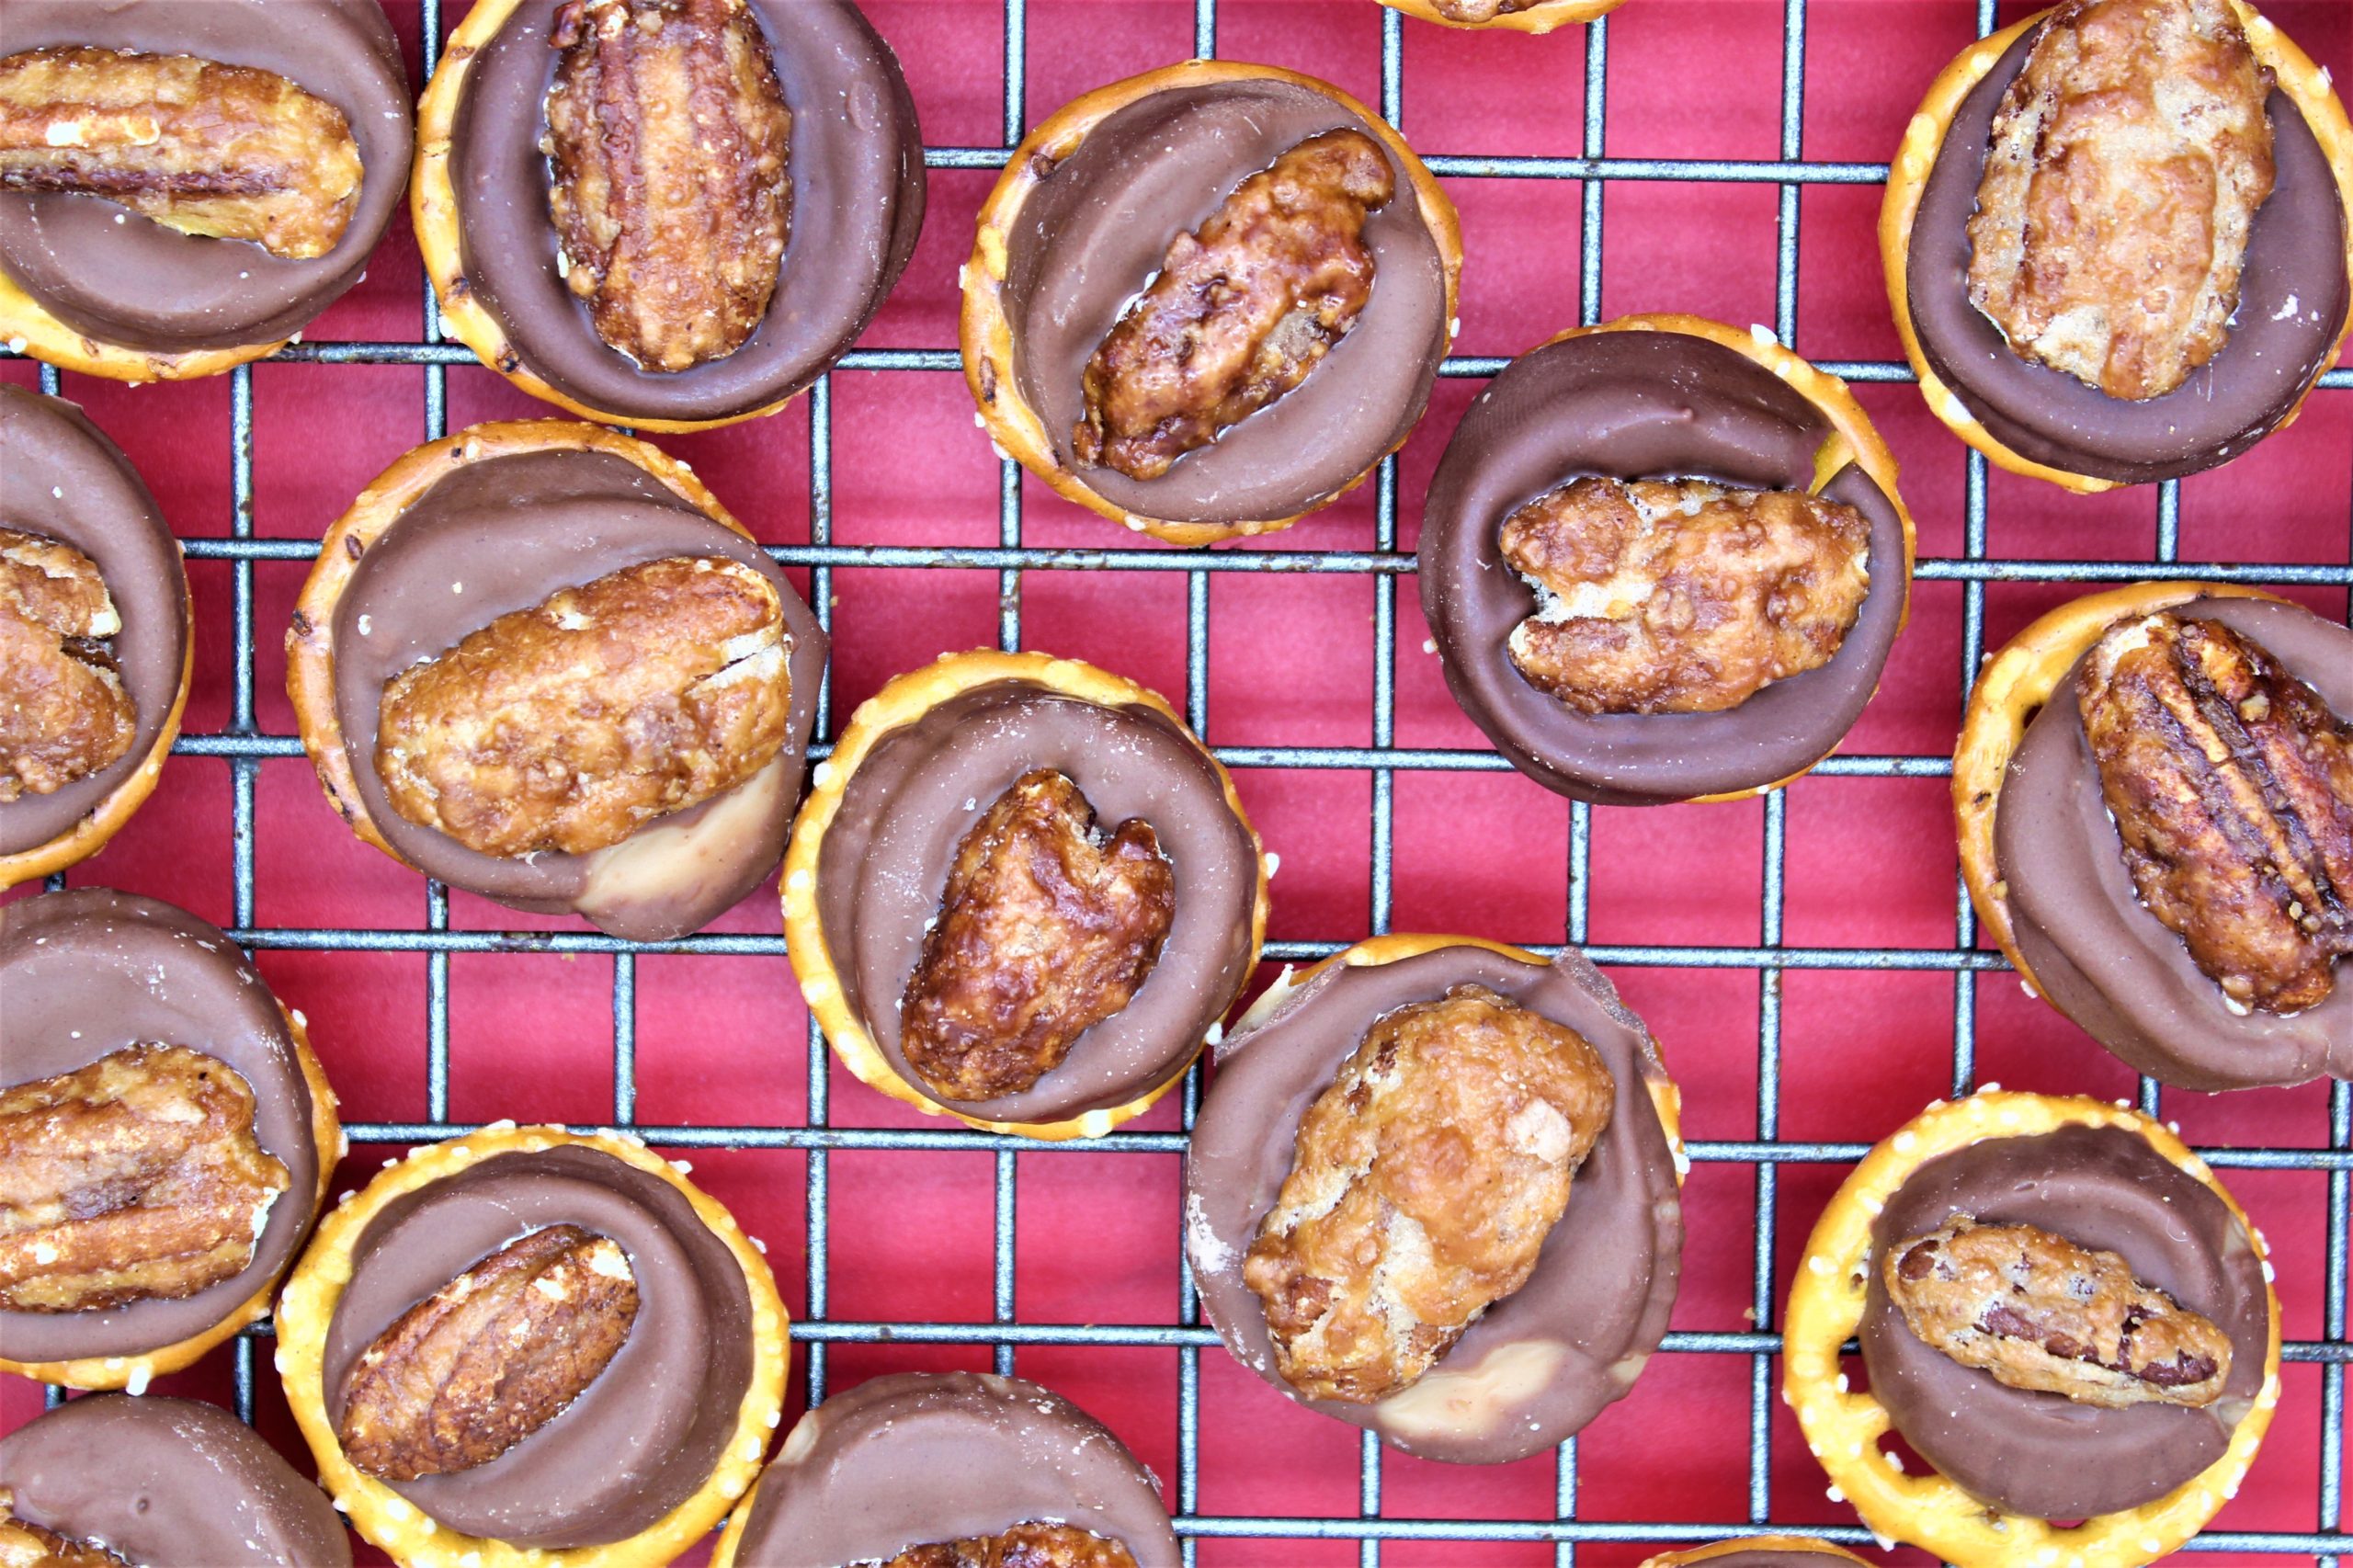
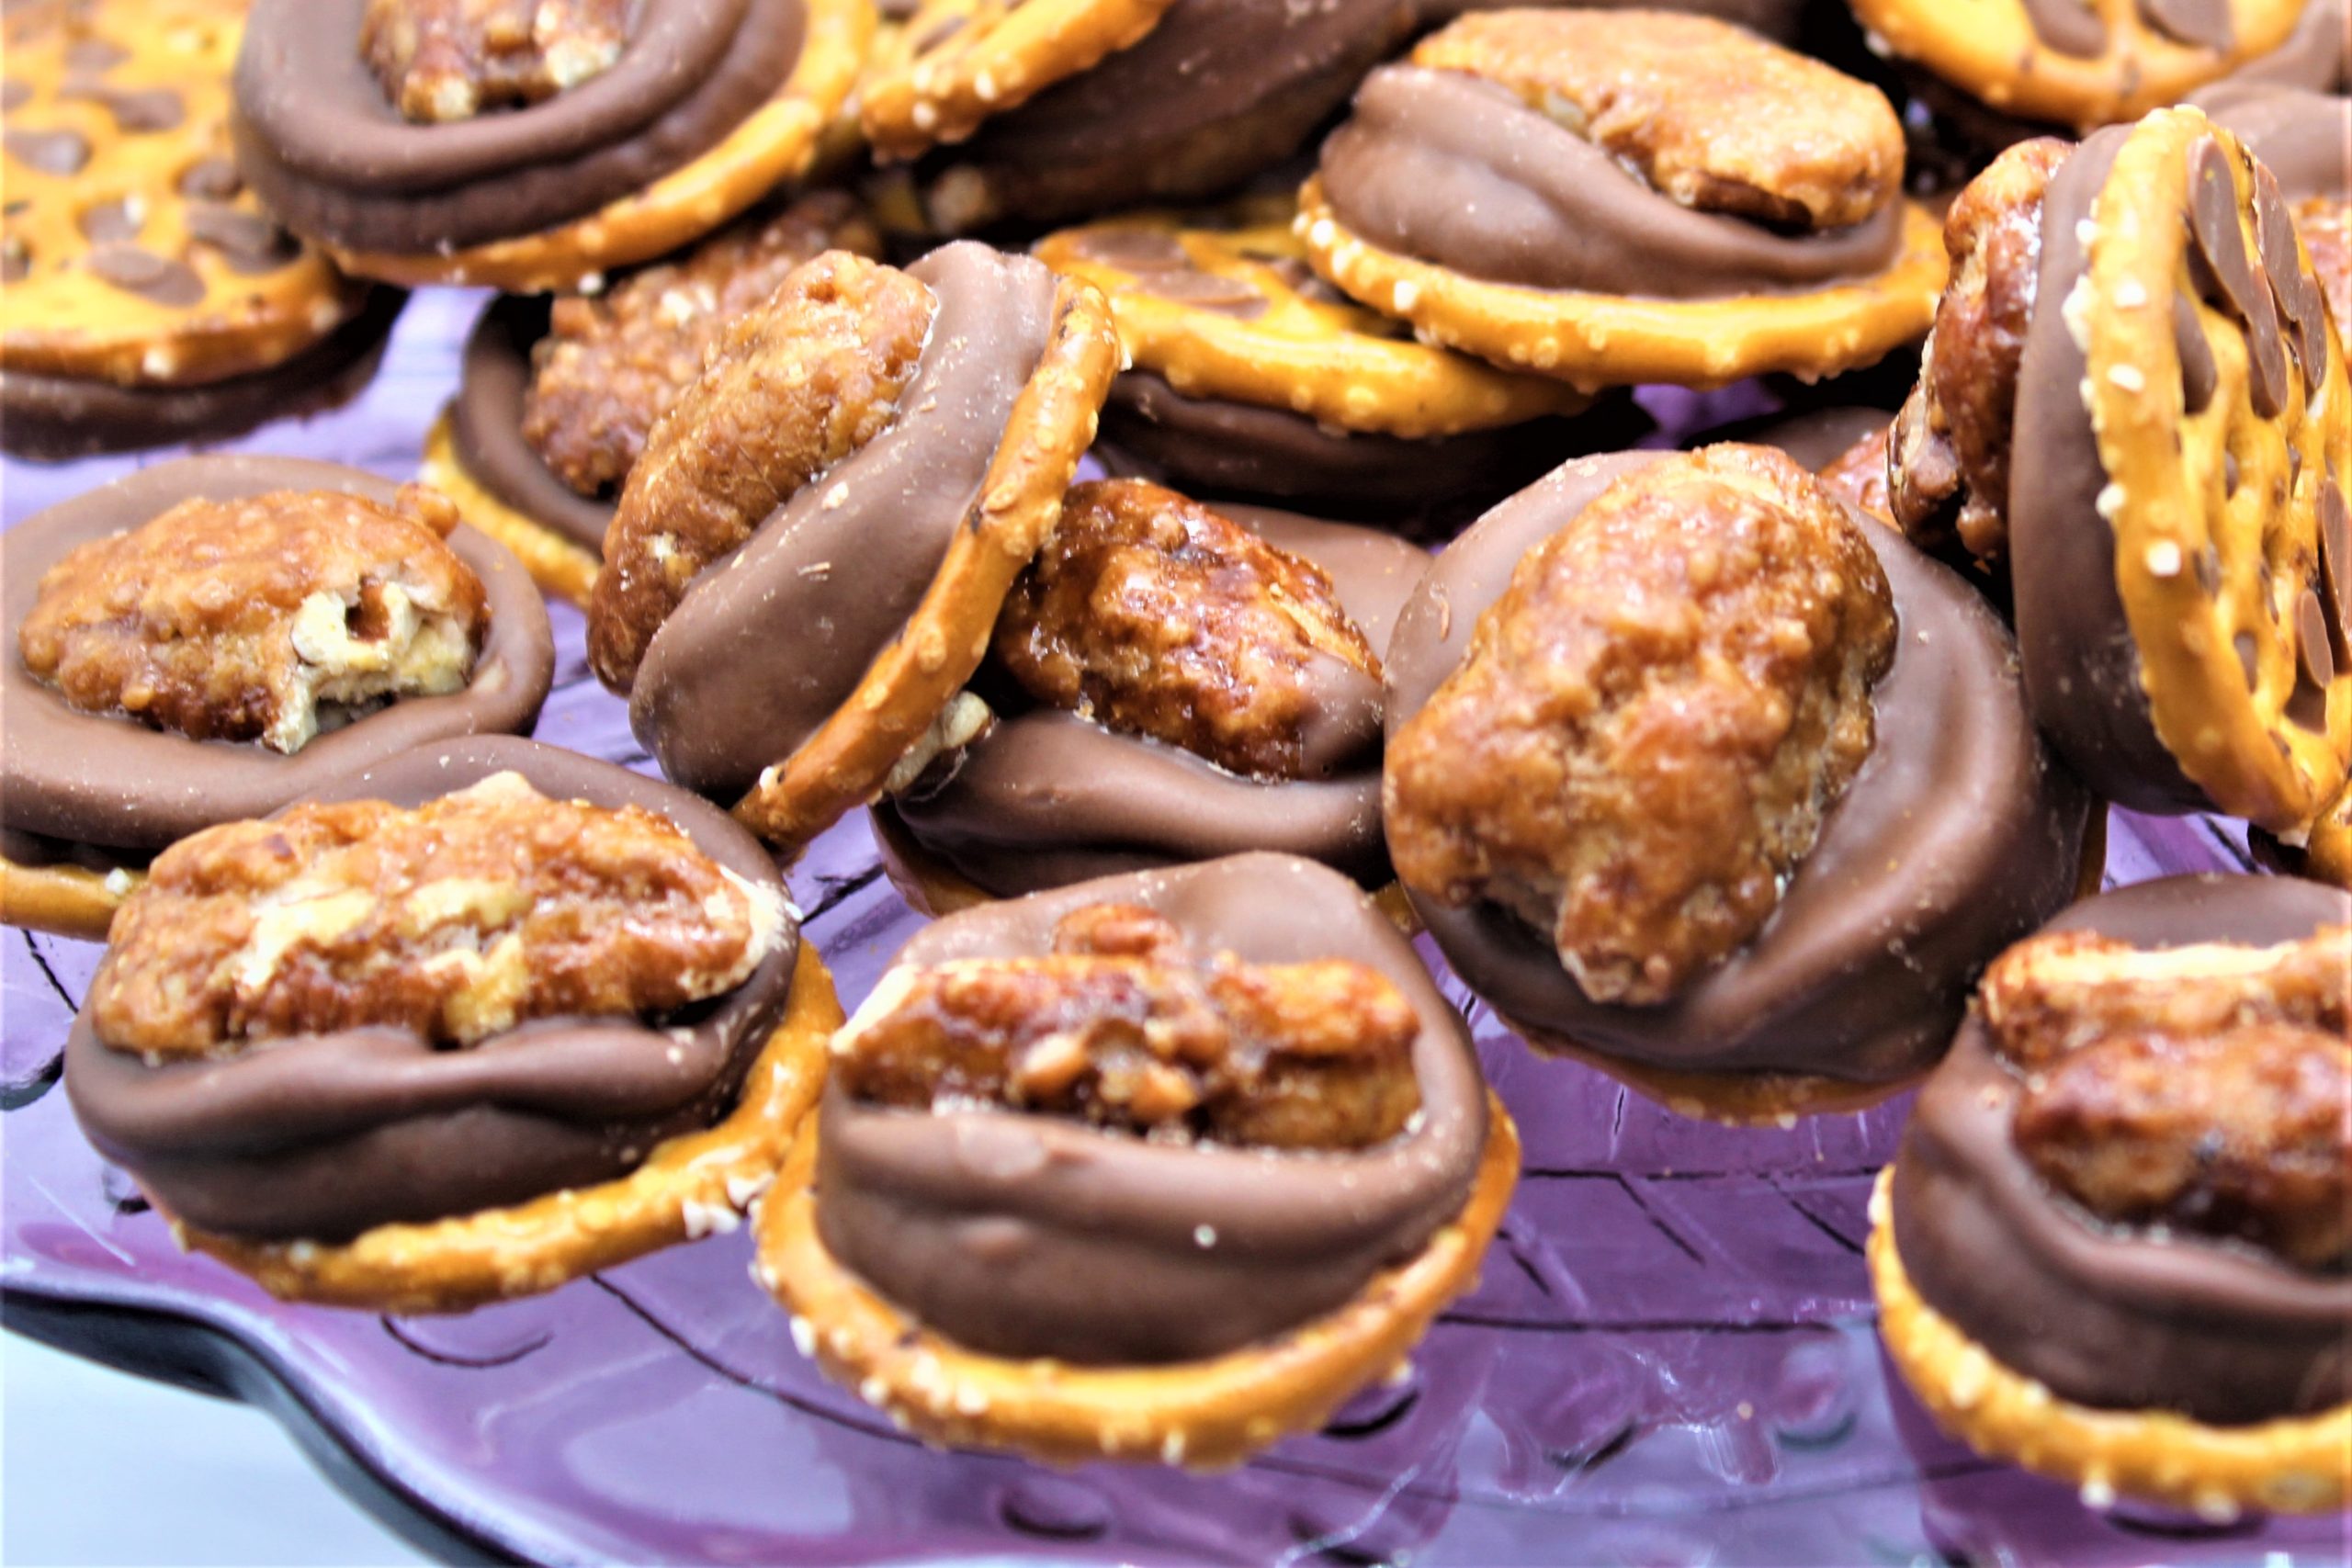
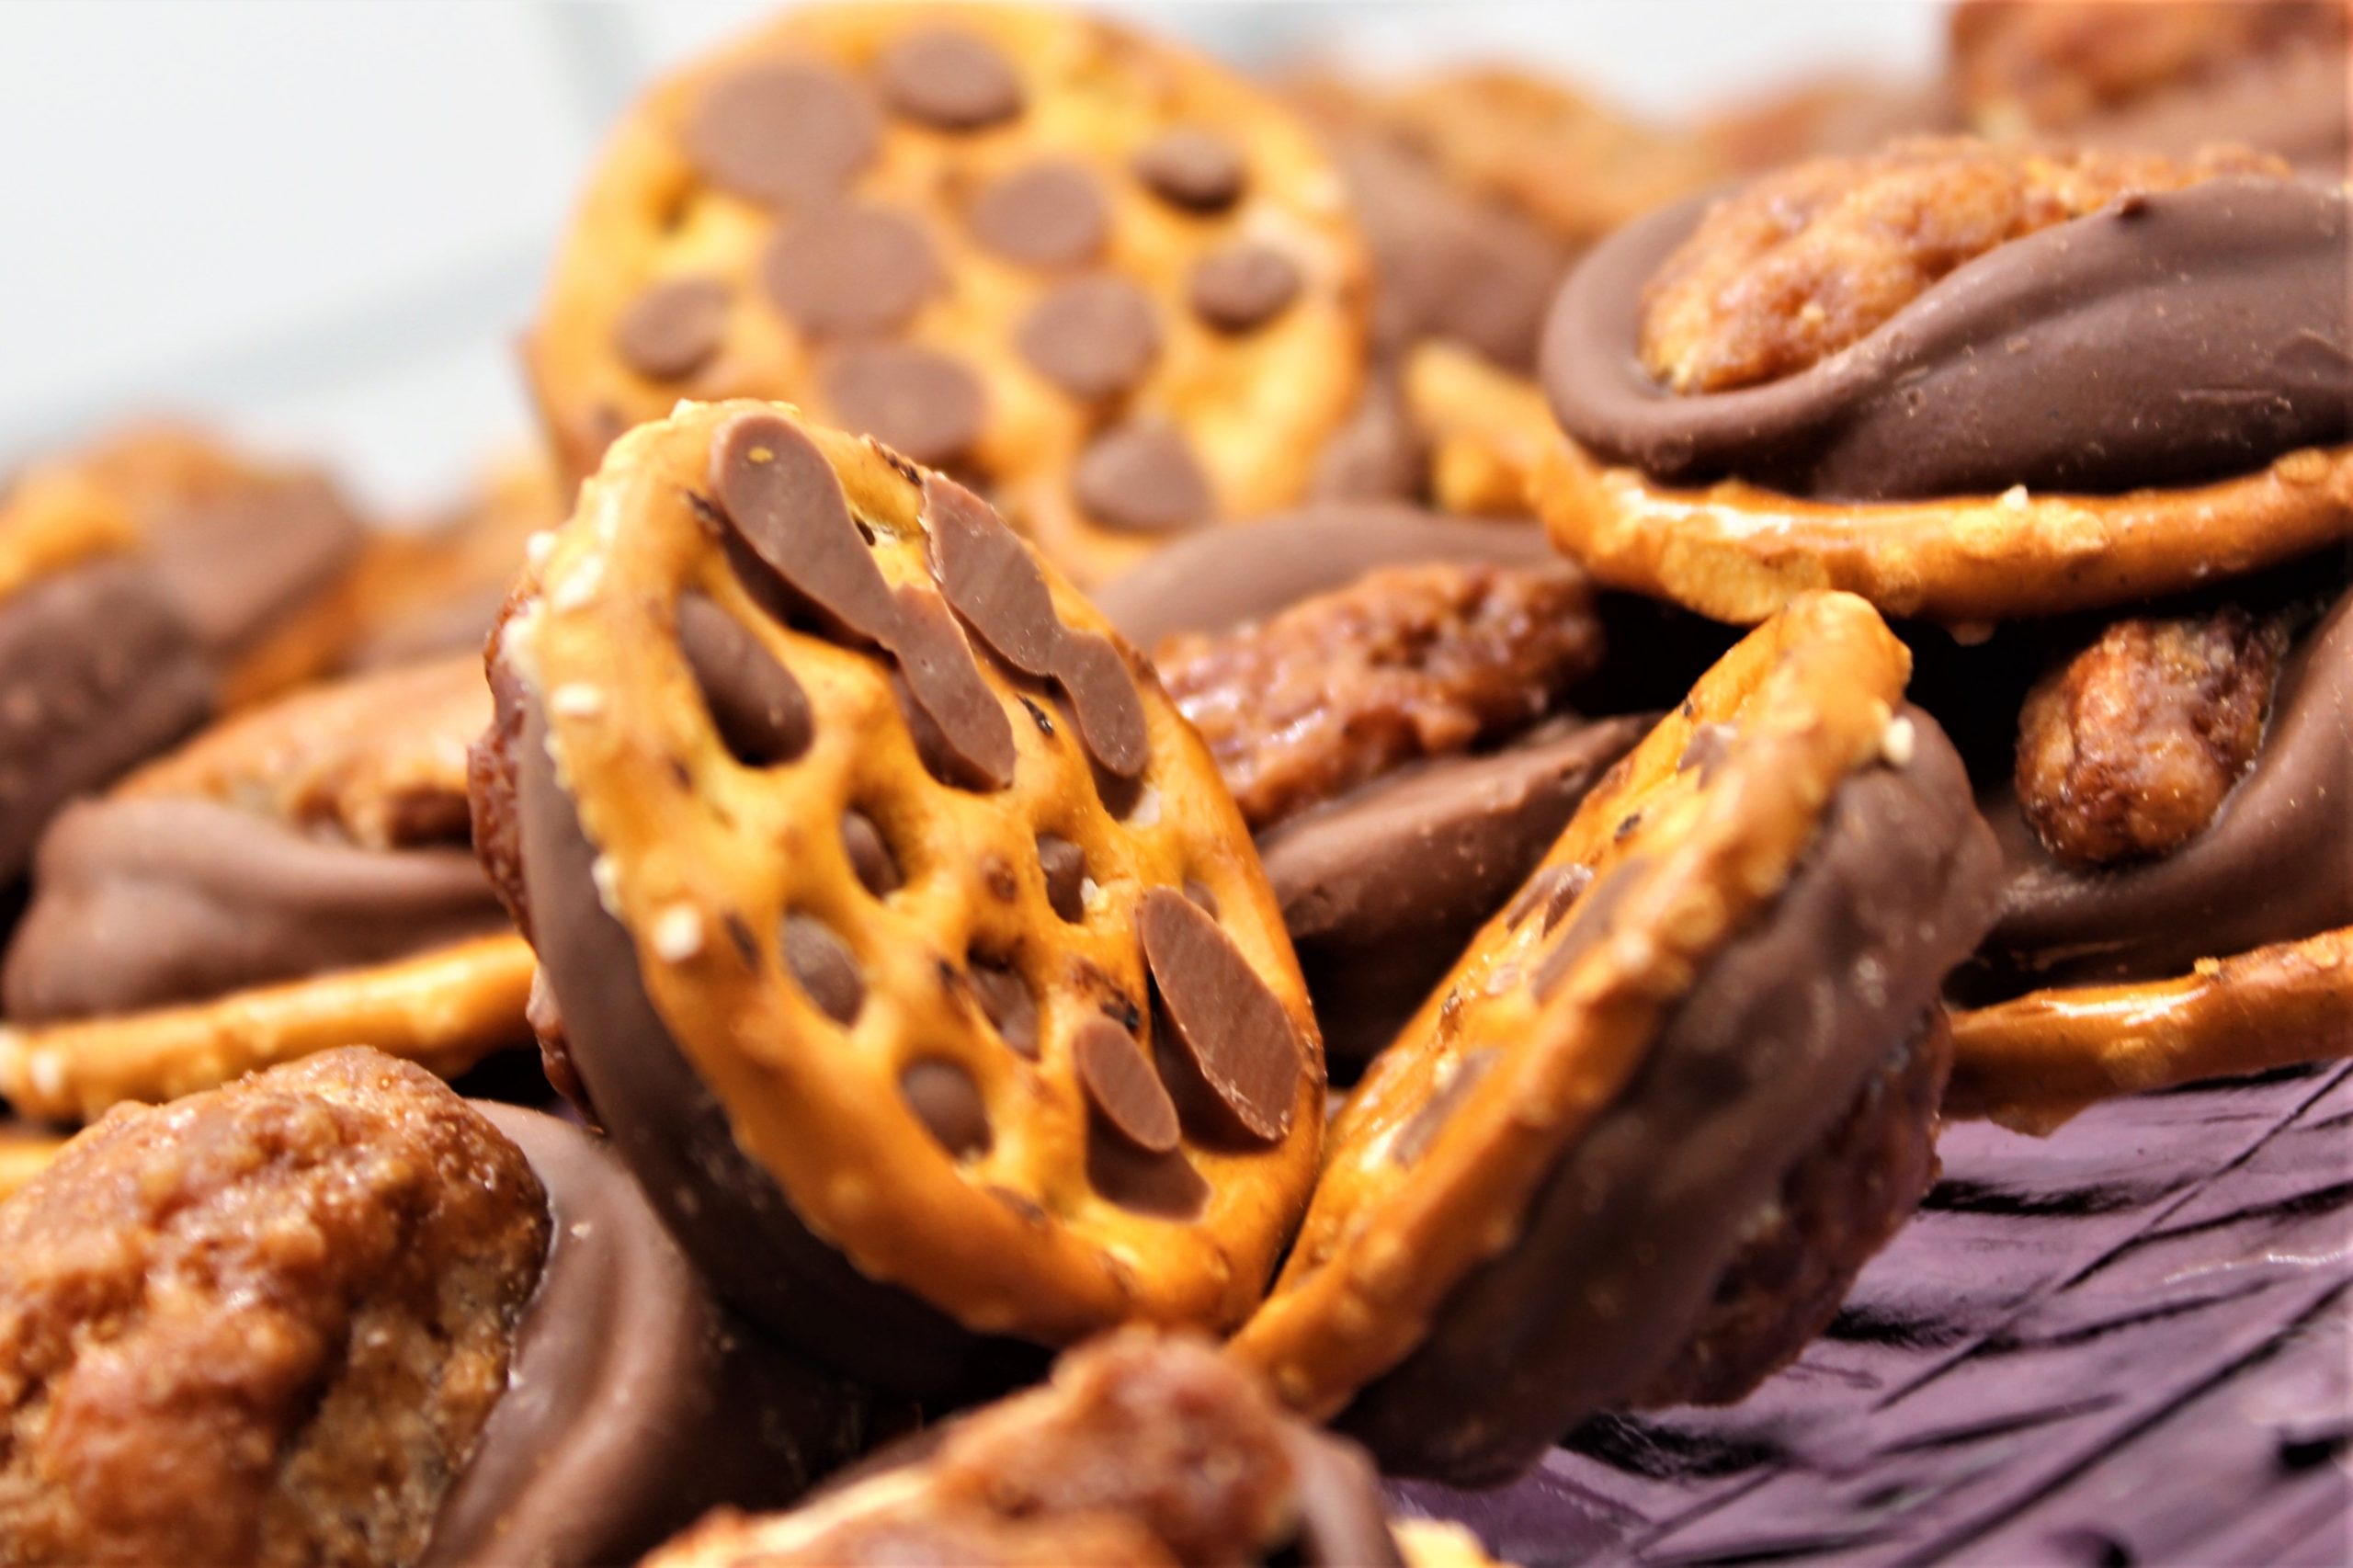
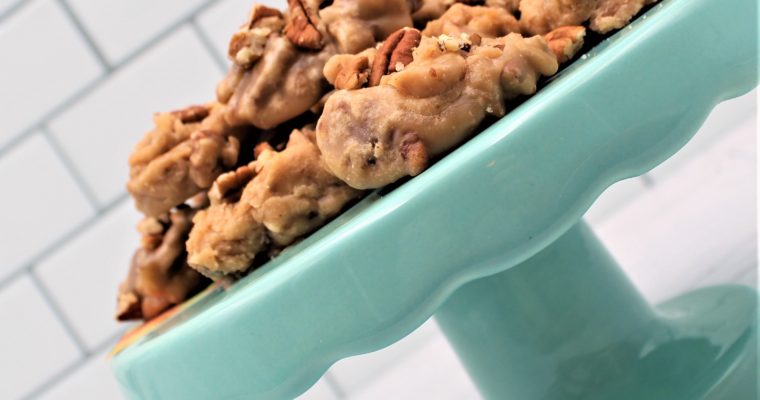
I love caramel turtles! When I see a package of them at the grocery store, I always throw it in my cart. Something about milk chocolate, caramel, and nuts mixed makes the perfect bite.
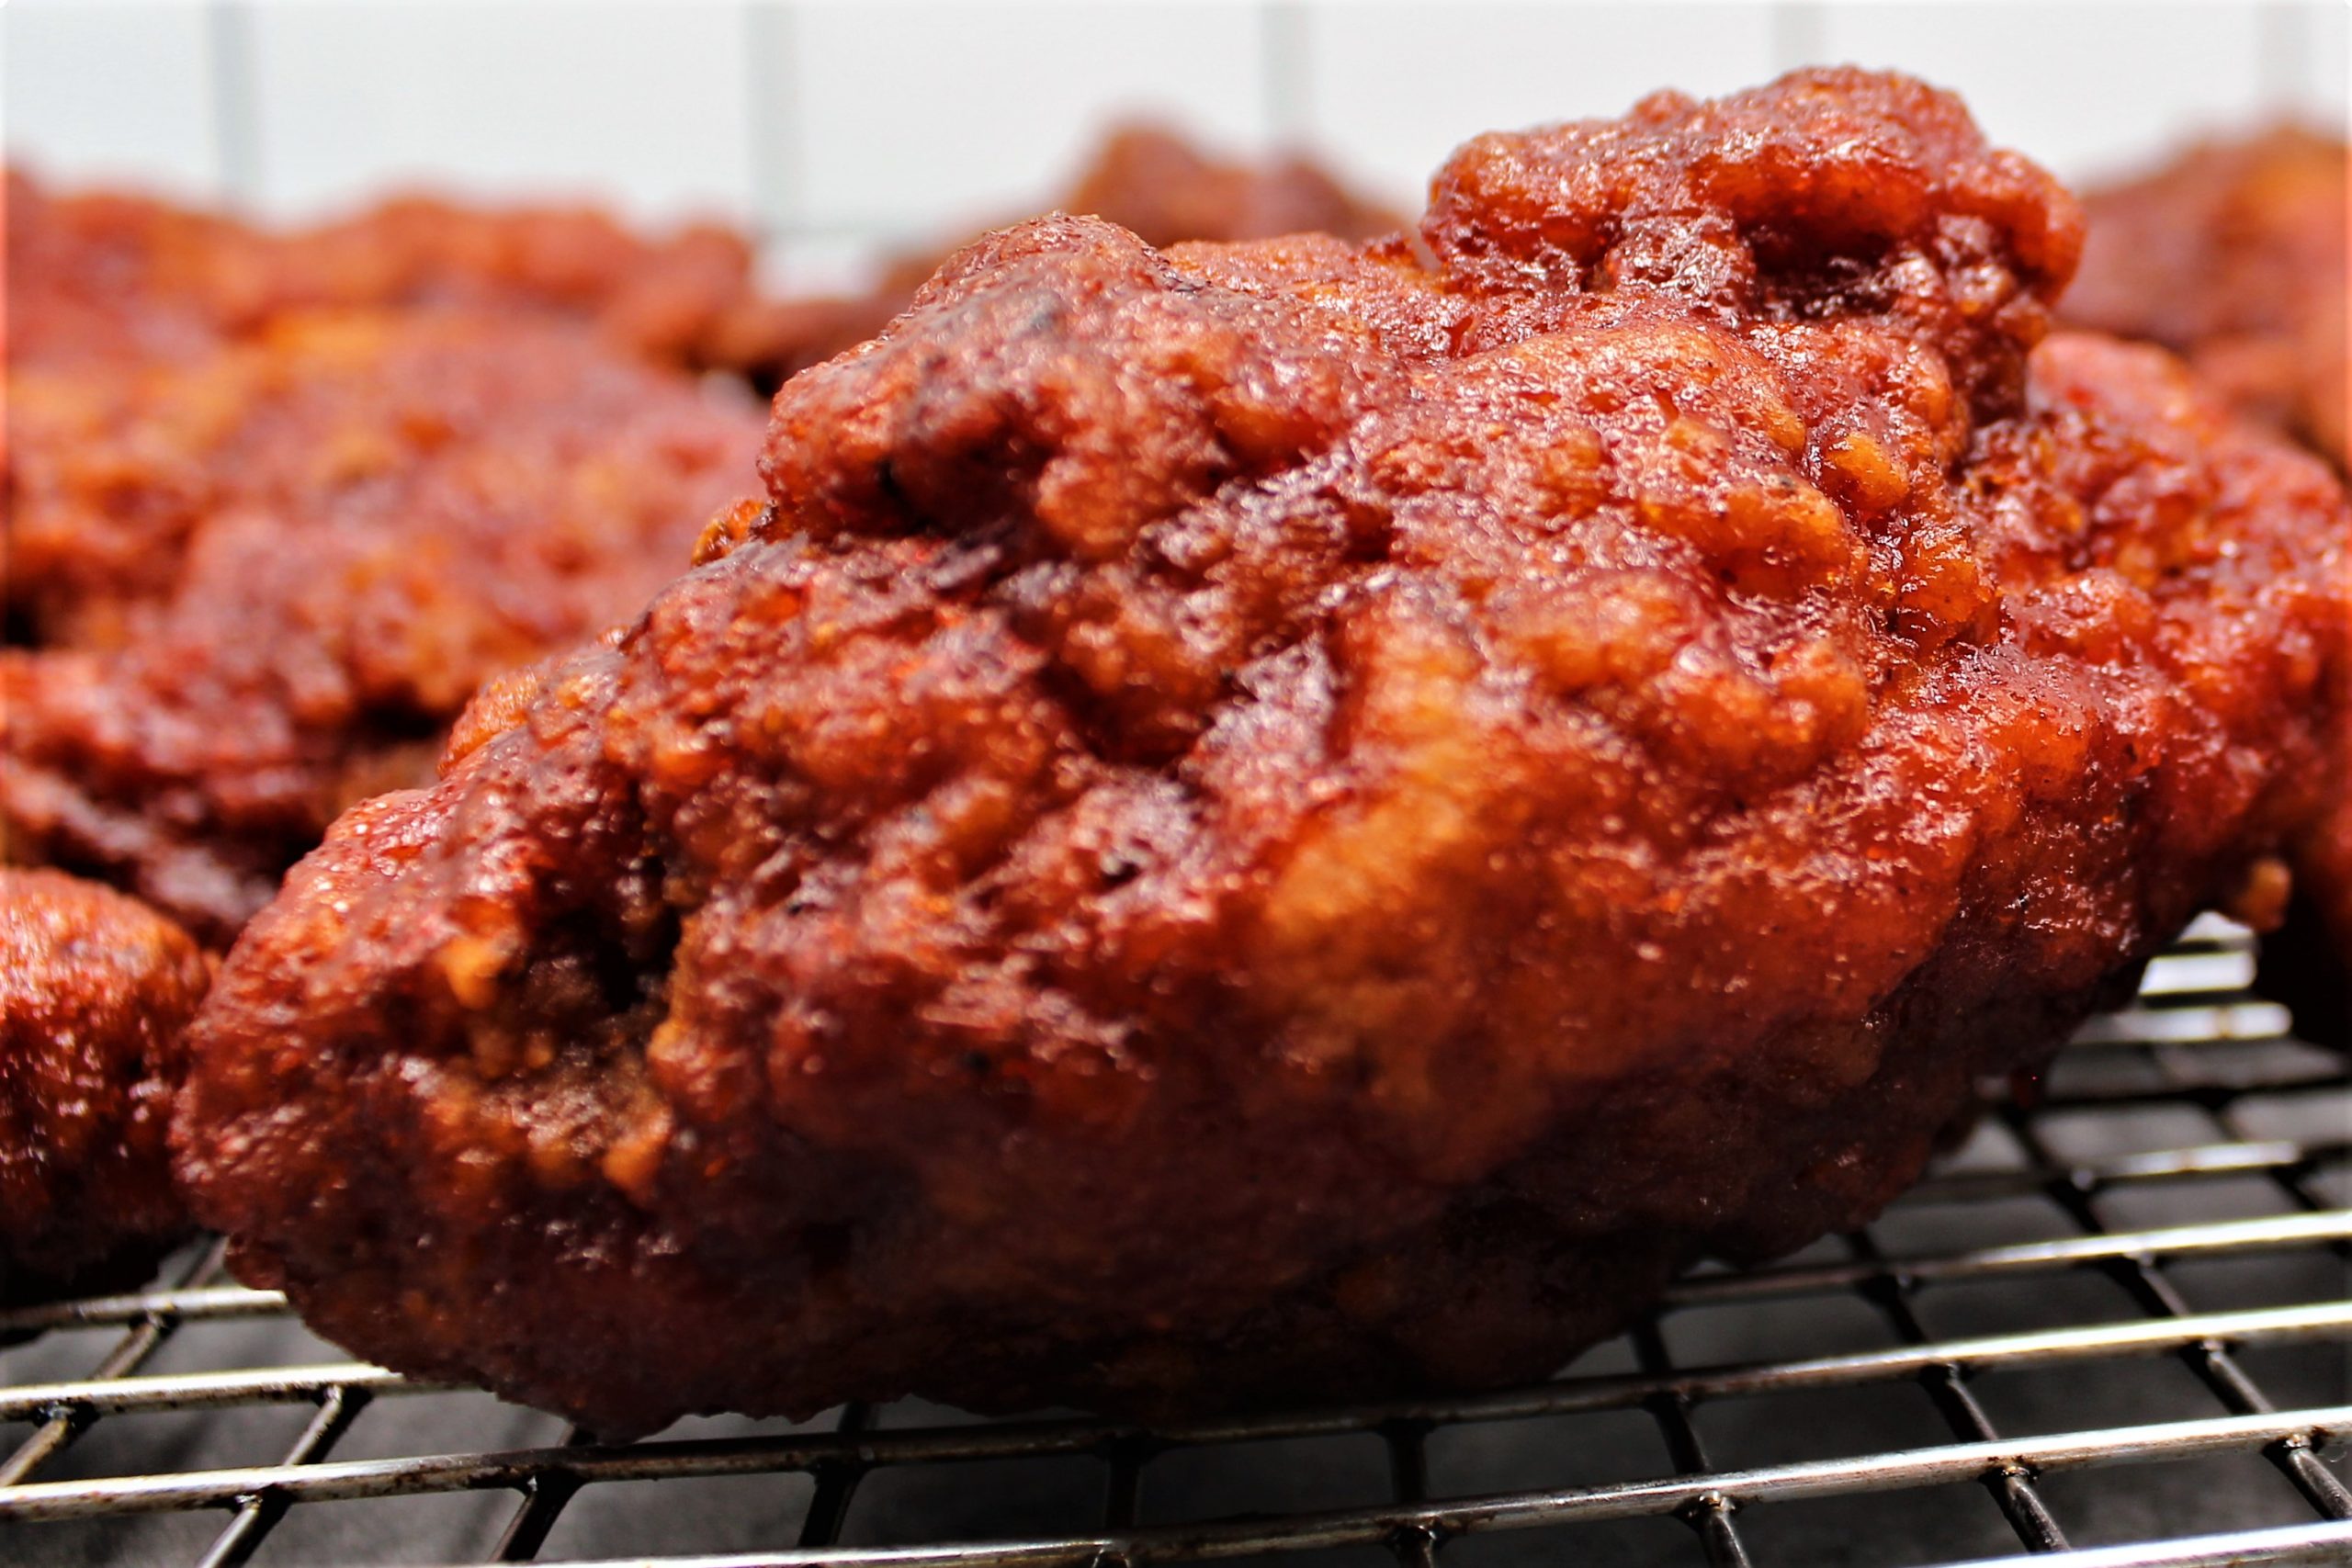
This recipe is perfect for those who do not enjoy making candy. No thermometer is needed, no special equipment, and very little time.
Finding pretzel rings is the only issue I have had making these little turtles.
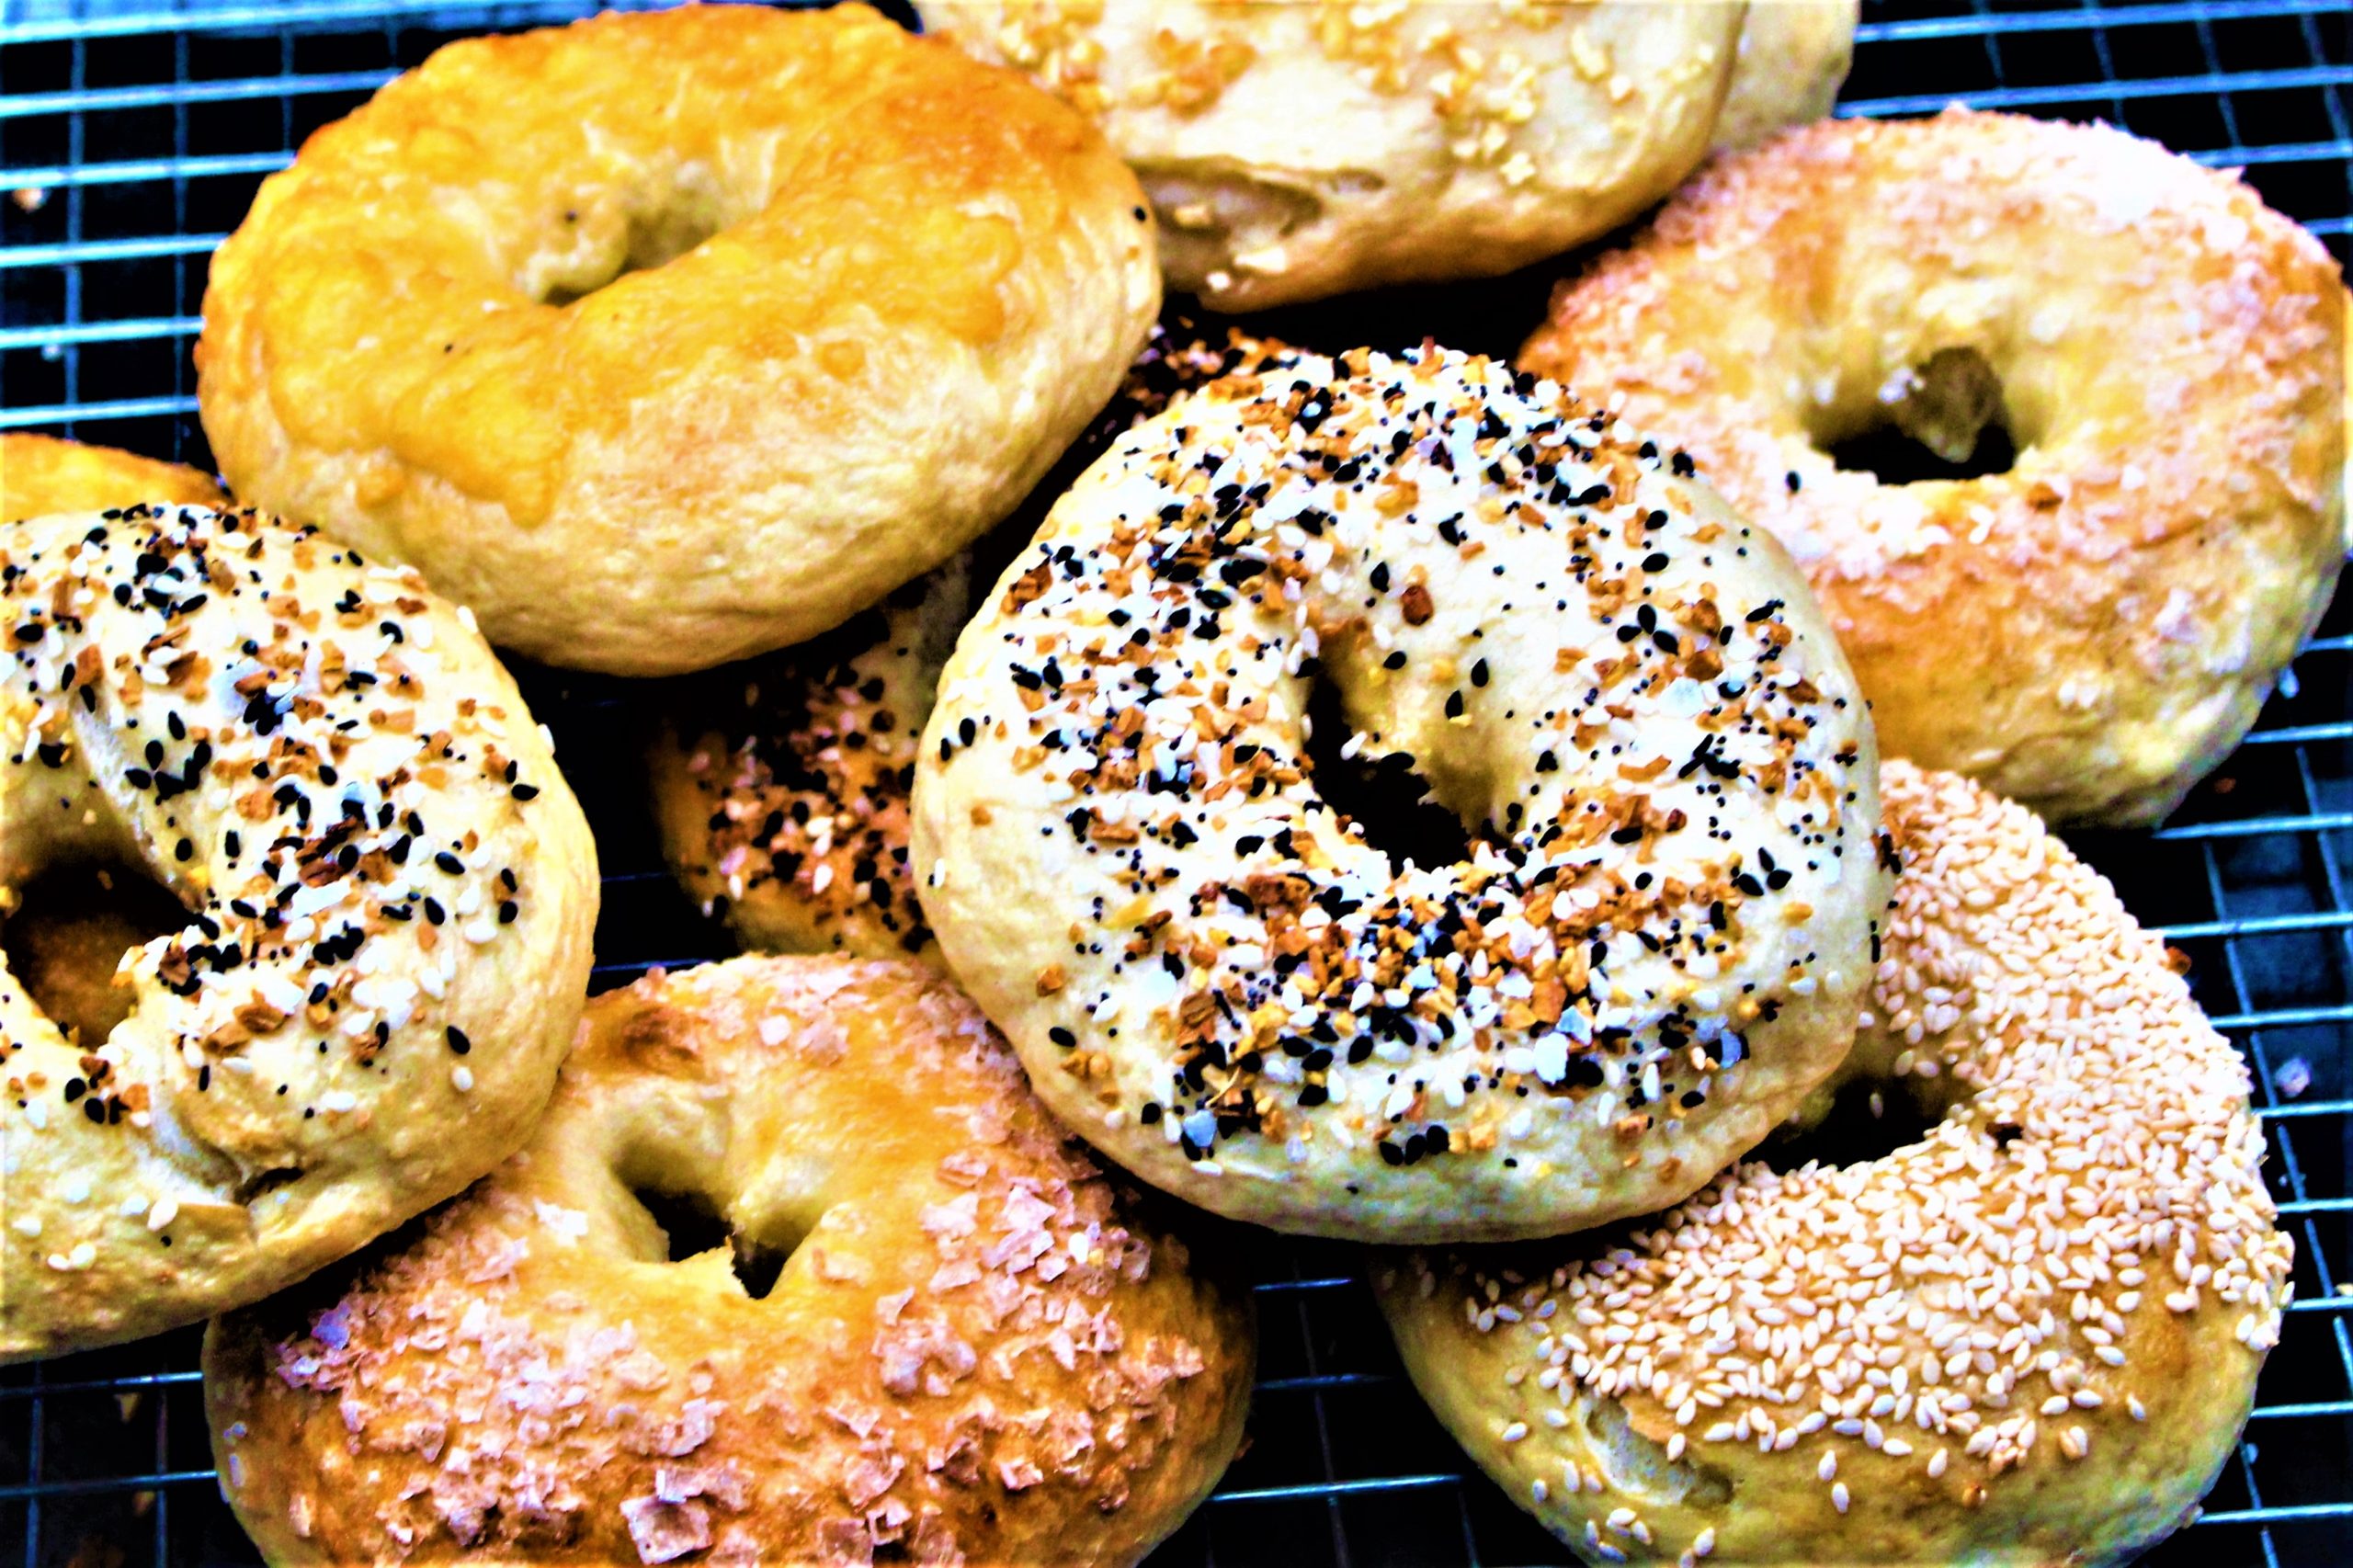
In the snack aisle, there is never a shortage of pretzels. They come in all shapes and sizes. There are pretzel rods, pretzel sticks, and of course, the traditional form of pretzels which is tied in a bow.
The Pretzel circle has to be the least produced pretzel product in America. I am confused about why they are hard to find; pretzel circles are used in many candy recipes. So I would assume there is a market for them.
If you’re making this recipe around Christmas, make sure you find your pretzel circles a few months prior and put them in the freezer. It’s the only way I know to have them when you need them.
My pretzel turtle recipe makes the perfect sweet snack. Turtles are perfect for gift-giving or just having around in a candy dish. They are sweet, crunchy, and the caramel and chocolate make the perfect combination.
I hope you give these guys a little try. He will be addicted like I am, for sure. So don’t wait too long to get to the store, or write your congressman asking for more pretzel circles to be made. Enjoy!
Classic turtle candy taste in a new way. Welcome to your new addiction.
Course
candy
Cuisine
American
Keyword
pretzel tutrles
Prep Time10minutes
Cook Time4minutes
Servings50turtles
AuthorDoug Bakes Staff
Ingredients
Candied Pecan Ingredients
6tablespoonsbrown sugar
1 1/2teaspoonsground cinnamon
1/2teaspoonsalt
1/2teaspoonvanilla
1/2tablespoonswater
2cupspecan halves
Turtle Ingredients
20Rolo candy pieces, unwrapped
20Pretzel circles
20Candied Pecans
Instructions
Candied Pecan Instructions
Line a baking sheet with parchment paper.
Add brown sugar, cinnamon, salt, vanilla, water to a medium pan. Place the pan over medium heat, often stirring until the brown sugar melts into a sauce; this takes about 1 minute.
Add in the pecans and stir to coat brown sugar sauce.
Continue cooking, stirring the entire time, until the pecans look coated and smell a little nutty, and this takes 2 to 3 minutes.
As the pecans heat up in the pan, they will slowly become shiny. Pay close attention, so the nuts do not burn.
Transfer the pecans to the baking sheet and spread them into a layer.
Allow the pecans to cool, and then break them apart before serving.
Turtle Instructions
Preheat oven to 250 degrees and line a cookie sheet with foil.
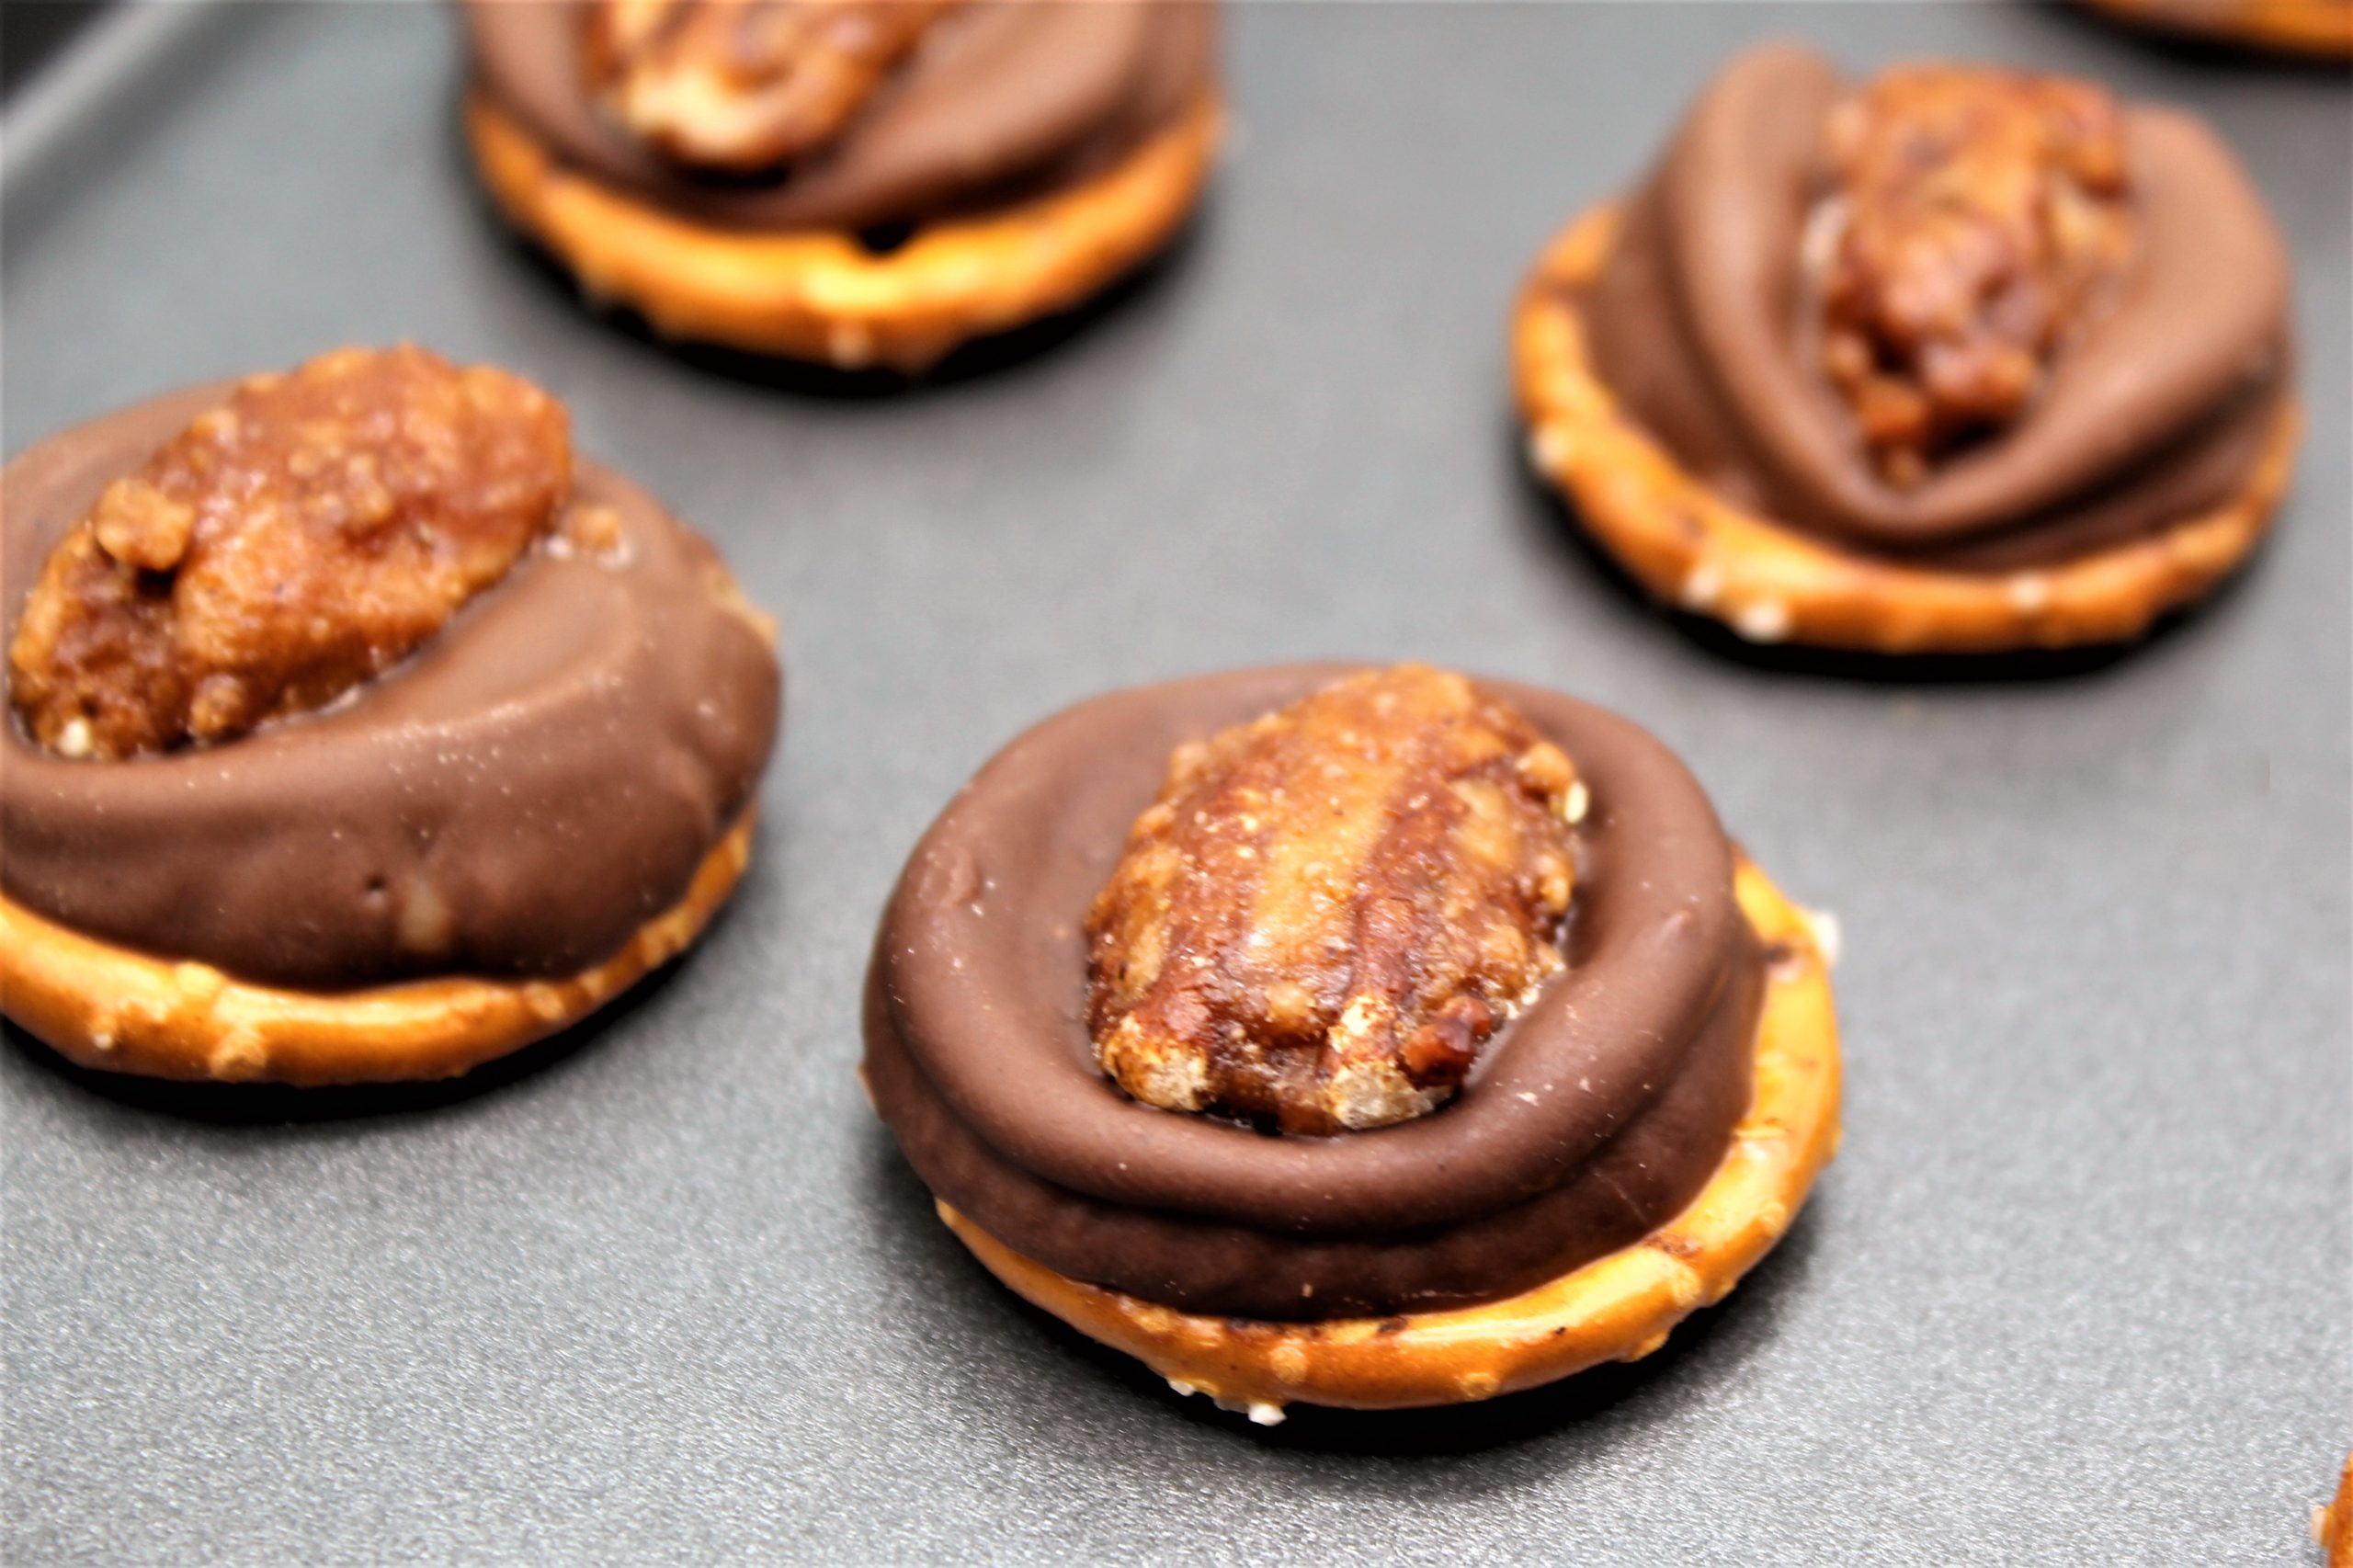
Place 1 Rolo on each pretzel. Place in oven for 4-5 minutes or until Rolos become soft.
Immediately after removing pretzels from oven, place a pecan halve on each Rolo and very lightly press down to spread chocolate/caramel over pretzel
Let stand or place in refrigerator until chocolate/caramel hardens.
Goodies will keep for a good while in an air tight container.
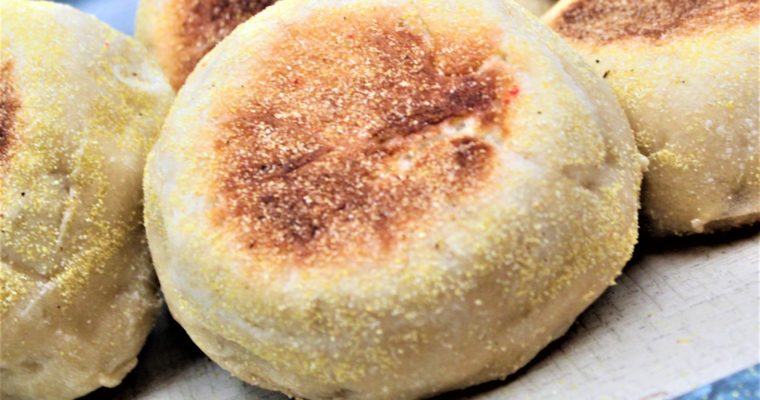
My pizza muffins are an elevated version of the classic English muffin pizza. Made with homemade dough, they are buttery, saucy, and perfect as a portable snack or lunch.
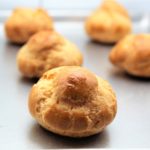
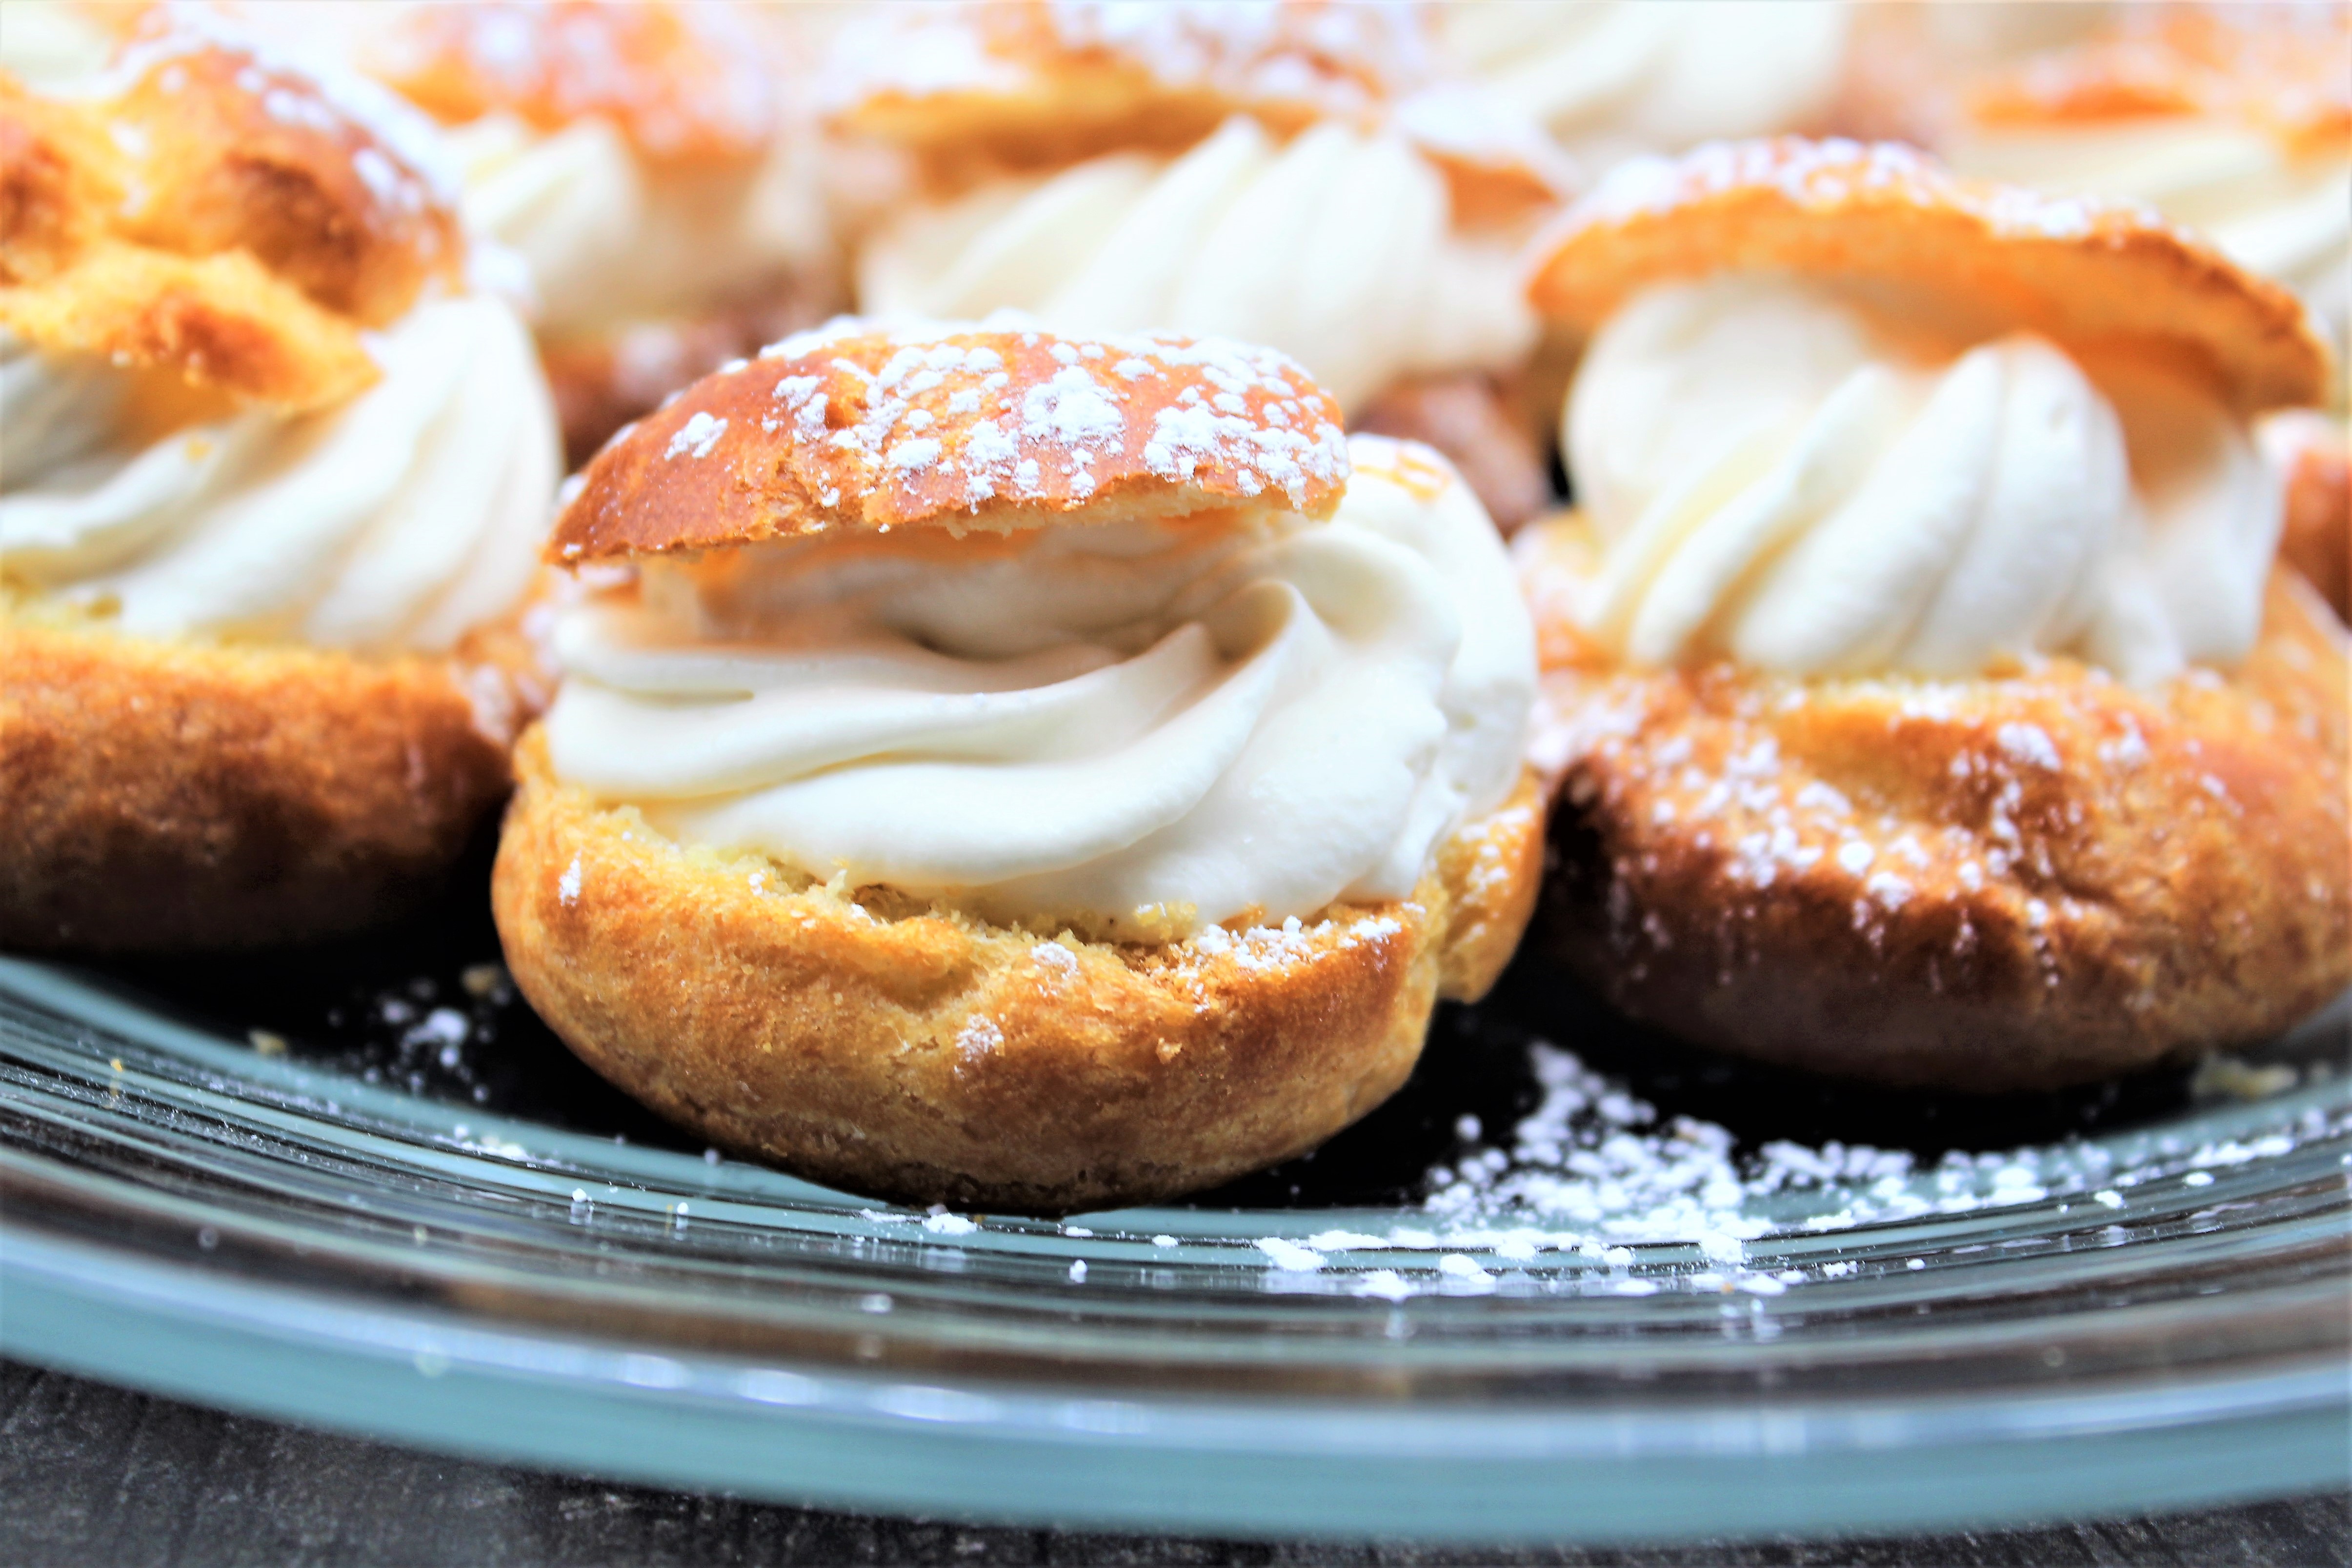
Who doesn’t love Chocolate Eclairs or cream puffs? Both of these well-loved pastries start with Choux Pastry.
It is one of the most popular French pastries. It is famous worldwide. French pastries, in general, can be intimidating to make, but there seems to be something very approachable about Choux pastry.
All of the different recipes that I found say it’s easy to make pastries from this process. I did not find it so easy; The dough is very straightforward and not complicated; however, the process can be.
When baking Choux Pastry, several techniques can be used. For me, it was trying to figure out which one works best.
Some methods call for cooking the pastry shells at a high temperature and then turning the oven off and leaving the door open for them to cool and dry. This method did not work for me. The result was flat pastry shells that were good for nothing but the trashcan.
What worked for me was baking at a high temperature, reducing the heat, and baking until dry. Make sure that the Eclair, puffs, or whatever you are baking, do not over brown.
My recipe for Choux Pastry produces a crisp, buttery shell perfect for any filling, savory or sweet. I have used this successfully for cream puffs, eclairs, and even ham puffs, which are my favorite three.
I hope you give this recipe a try. Perhaps my method will not be your favorite, but you never know until you try. Enjoy!
This "mother" dough recipe is the building block to many French Style bakery items. If you learn this technique, you can make everything from Eclairs to Cream Puffs.
Course
Dessert
Cuisine
French
Keyword
choux dough, dougbakes.com, french pastry
Prep Time20minutes
Cook Time35minutes
Servings24puffs
AuthorDoug Bakes Staff
Ingredients
1/2cupwater
1/2cupwhole milk
8Tbsp.unsalted butter
1tspgranulated sugar
1/4tspsalt
1cup flour
4eggs, room temperature
Instructions
Preheat oven to 425˚F. Line a baking sheet with parchment paper.
Combine water, milk, butter, sugar, and salt in a medium pan.
Bring to a slight boil over medium-high heat. As soon as it boils, please remove it from the heat to stop the cooking.
All at once, stir in the flour and mix with a wooden spoon until incorporated.
Place the pan back over medium-high heat, constantly stirring for 2 to 3 minutes to release moisture, and start cooking the flour. A film will form on the bottom of the pan, and the dough will create a smooth ball.
Transfer dough to the bowl of a stand mixer, and mix on medium speed for a minute so the mixture can cool slightly.
Add eggs, one at a time, mixing on medium speed, allowing each egg to incorporate between additions.
Beat a minute longer until the dough is smooth and forms a ribbon when the paddle is pulled up.
For puff style choux, Fill a piping bag with a 1/2" round tip with the dough. Pipe in two-inch circles.
For Éclair style choux, Fill a piping bag with a 1/2" round tip with the dough and pipe in a four-inch line.
Bake at 425˚F for 10 minutes in the center of the oven. Without opening the oven, reduce the temperature to 325˚F and bake 20-22 min longer or until golden brown on top.
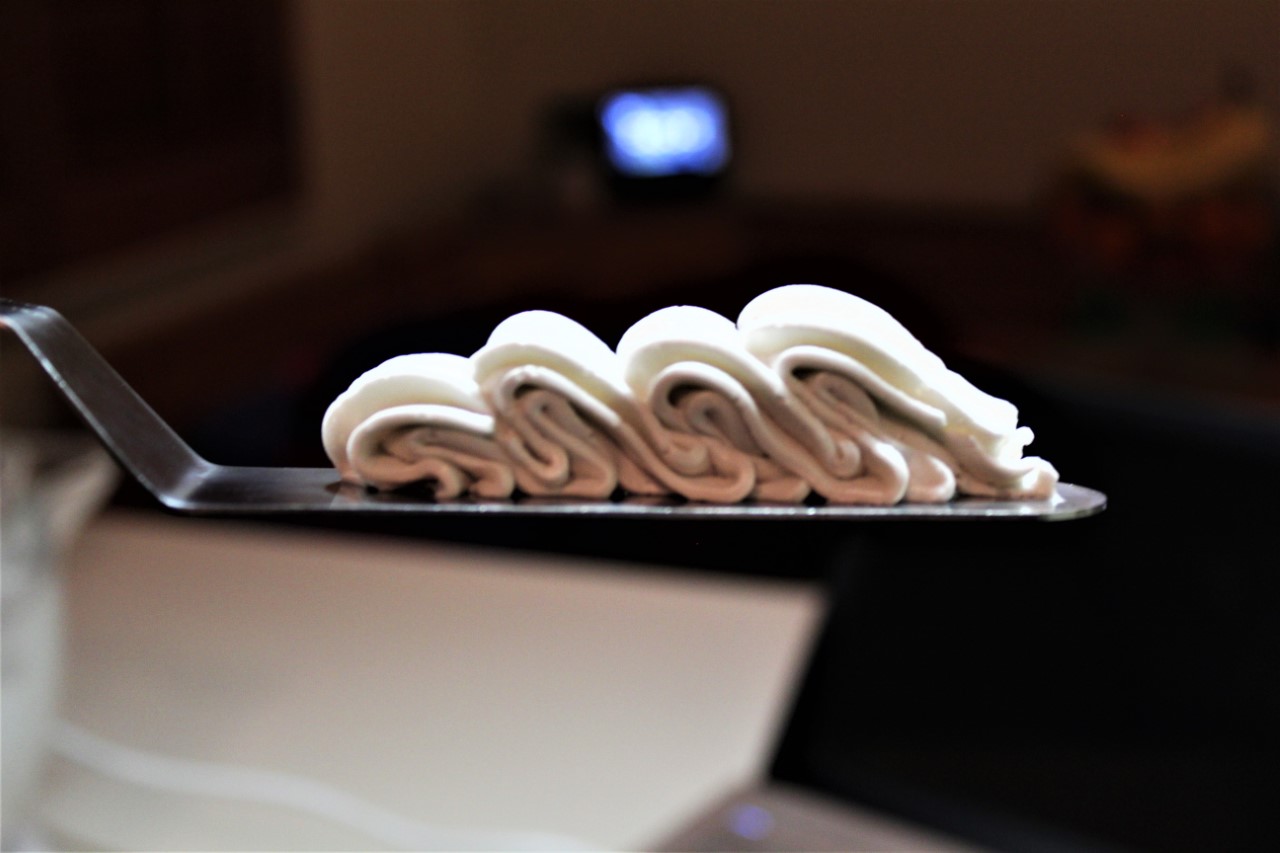
Cream puffs are a classic French pastry famous the world around. They are crisp on the outside, and the Chantilly cream filling is lightly sweet, creamy, and delicious. If you have not had a cream puff fresh from the oven, you do not know what you’re missing.
Choux pastry is the foundation to cream puffs. The French dough is made of a few simple ingredients, but it all comes down to technique.
And researching and trying different recipes, the only one that worked well for me was this recipe.
Some of the recipes I tried instructed me to leave the door of the old oven open after they were finished baking to dry them out. But unfortunately, I did not have much luck with that.
For me, just baking the choux pastry at a high temperature and halfway through baking, turning the oven down and finishing them off in a cooler oven.
I hope you give my Chantilly cream puffs to try; you can trust this recipe.
Preheat oven to 425˚F. Line a baking sheet with parchment paper.
Combine water, milk, butter, sugar, and salt in a medium pan.
Bring to a slight boil over medium-high heat. As soon as it boils, please remove it from the heat to stop the cooking.
All at once, stir in the flour and mix with a wooden spoon until incorporated.
Place the pan back over medium-high heat, constantly stirring for 2 to 3 minutes to release moisture, and start cooking the flour. A film will form on the bottom of the pan, and the dough will create a smooth ball.
Transfer dough to the bowl of a stand mixer, and mix on medium speed for a minute so the mixture can cool slightly.
Add eggs, one at a time, mixing on medium speed, allowing each egg to incorporate between additions.
Beat a minute longer until the dough is smooth and forms a ribbon when the paddle is pulled up.
Fill a piping bag with a 1/2" round tip with the dough.
The puffs should be 1 1/2" diameter and 1/2" tall rounds. Smooth down any tips on the puffs by wetting a finger and lightly smoothing them down.
Bake the puffs at 425˚F for 10 minutes in the center of the oven. Without opening the oven, reduce the temperature to 325˚F and bake 20-22 min longer or until golden brown on top.
Transfer to a wire rack to cool completely
Instructions for Chantilly Cream
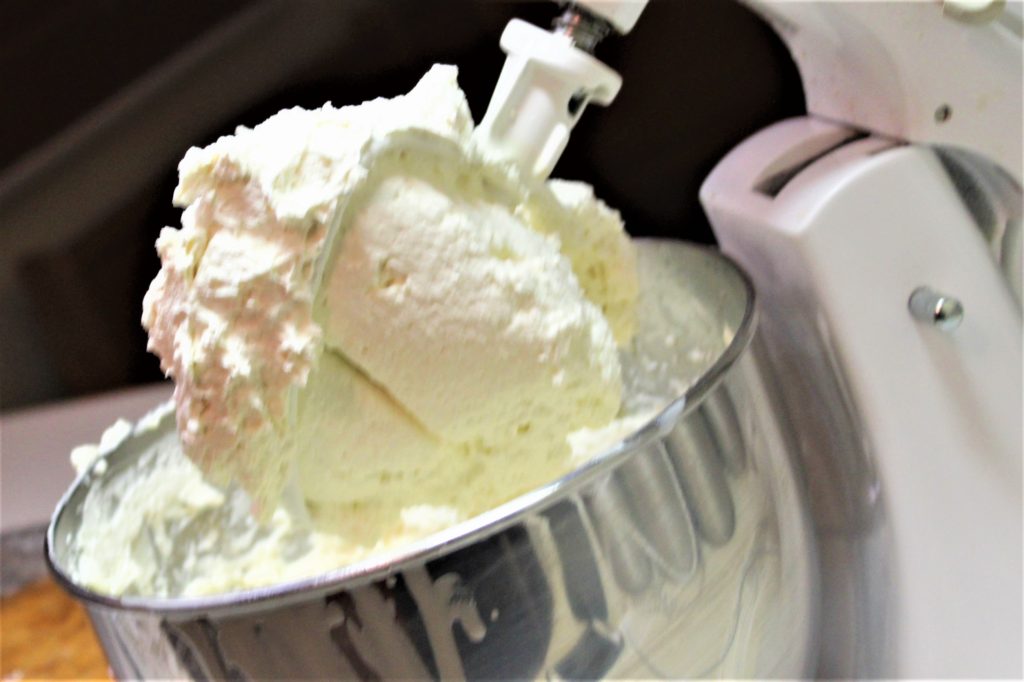
In the bowl of a stand mixer, combine heavy cream, sugar, and vanilla.
Beat on medium-high speed using the whisk attachment until the mixture becomes fluffy with stiff peaks; this will take about 2 minutes. Fit a pastry bag fitted with a large open star tip with the Chantilly Cream.
Once cream puffs are completely cooled, fill them with the Chantilly Cream by cutting off the puffs' tops and piping the cream inside using the pastry bag. Once the puffs are filled, replace the tops lightly on top, like a hat.
The first time Dale and I went to New York City was about ten years ago. It was in February and very cold. We were staying five days, and if we were to do everything on our schedule, we’d probably still be there.
We stayed at the Marriot Marquis right in the center of Times Square. I loved the city. I loved the energy and the business of the whole town.
The first morning of our trip started by grabbing coffee in the hotel’s lobby. Next, we planned on stopping at a bakery for breakfast. So, with our itinerary for the day and our hands; We set out to explore the city.
As we walked down the busy sidewalk, Dale pointed out a bakery that seemed very busy, which we considered a good thing.
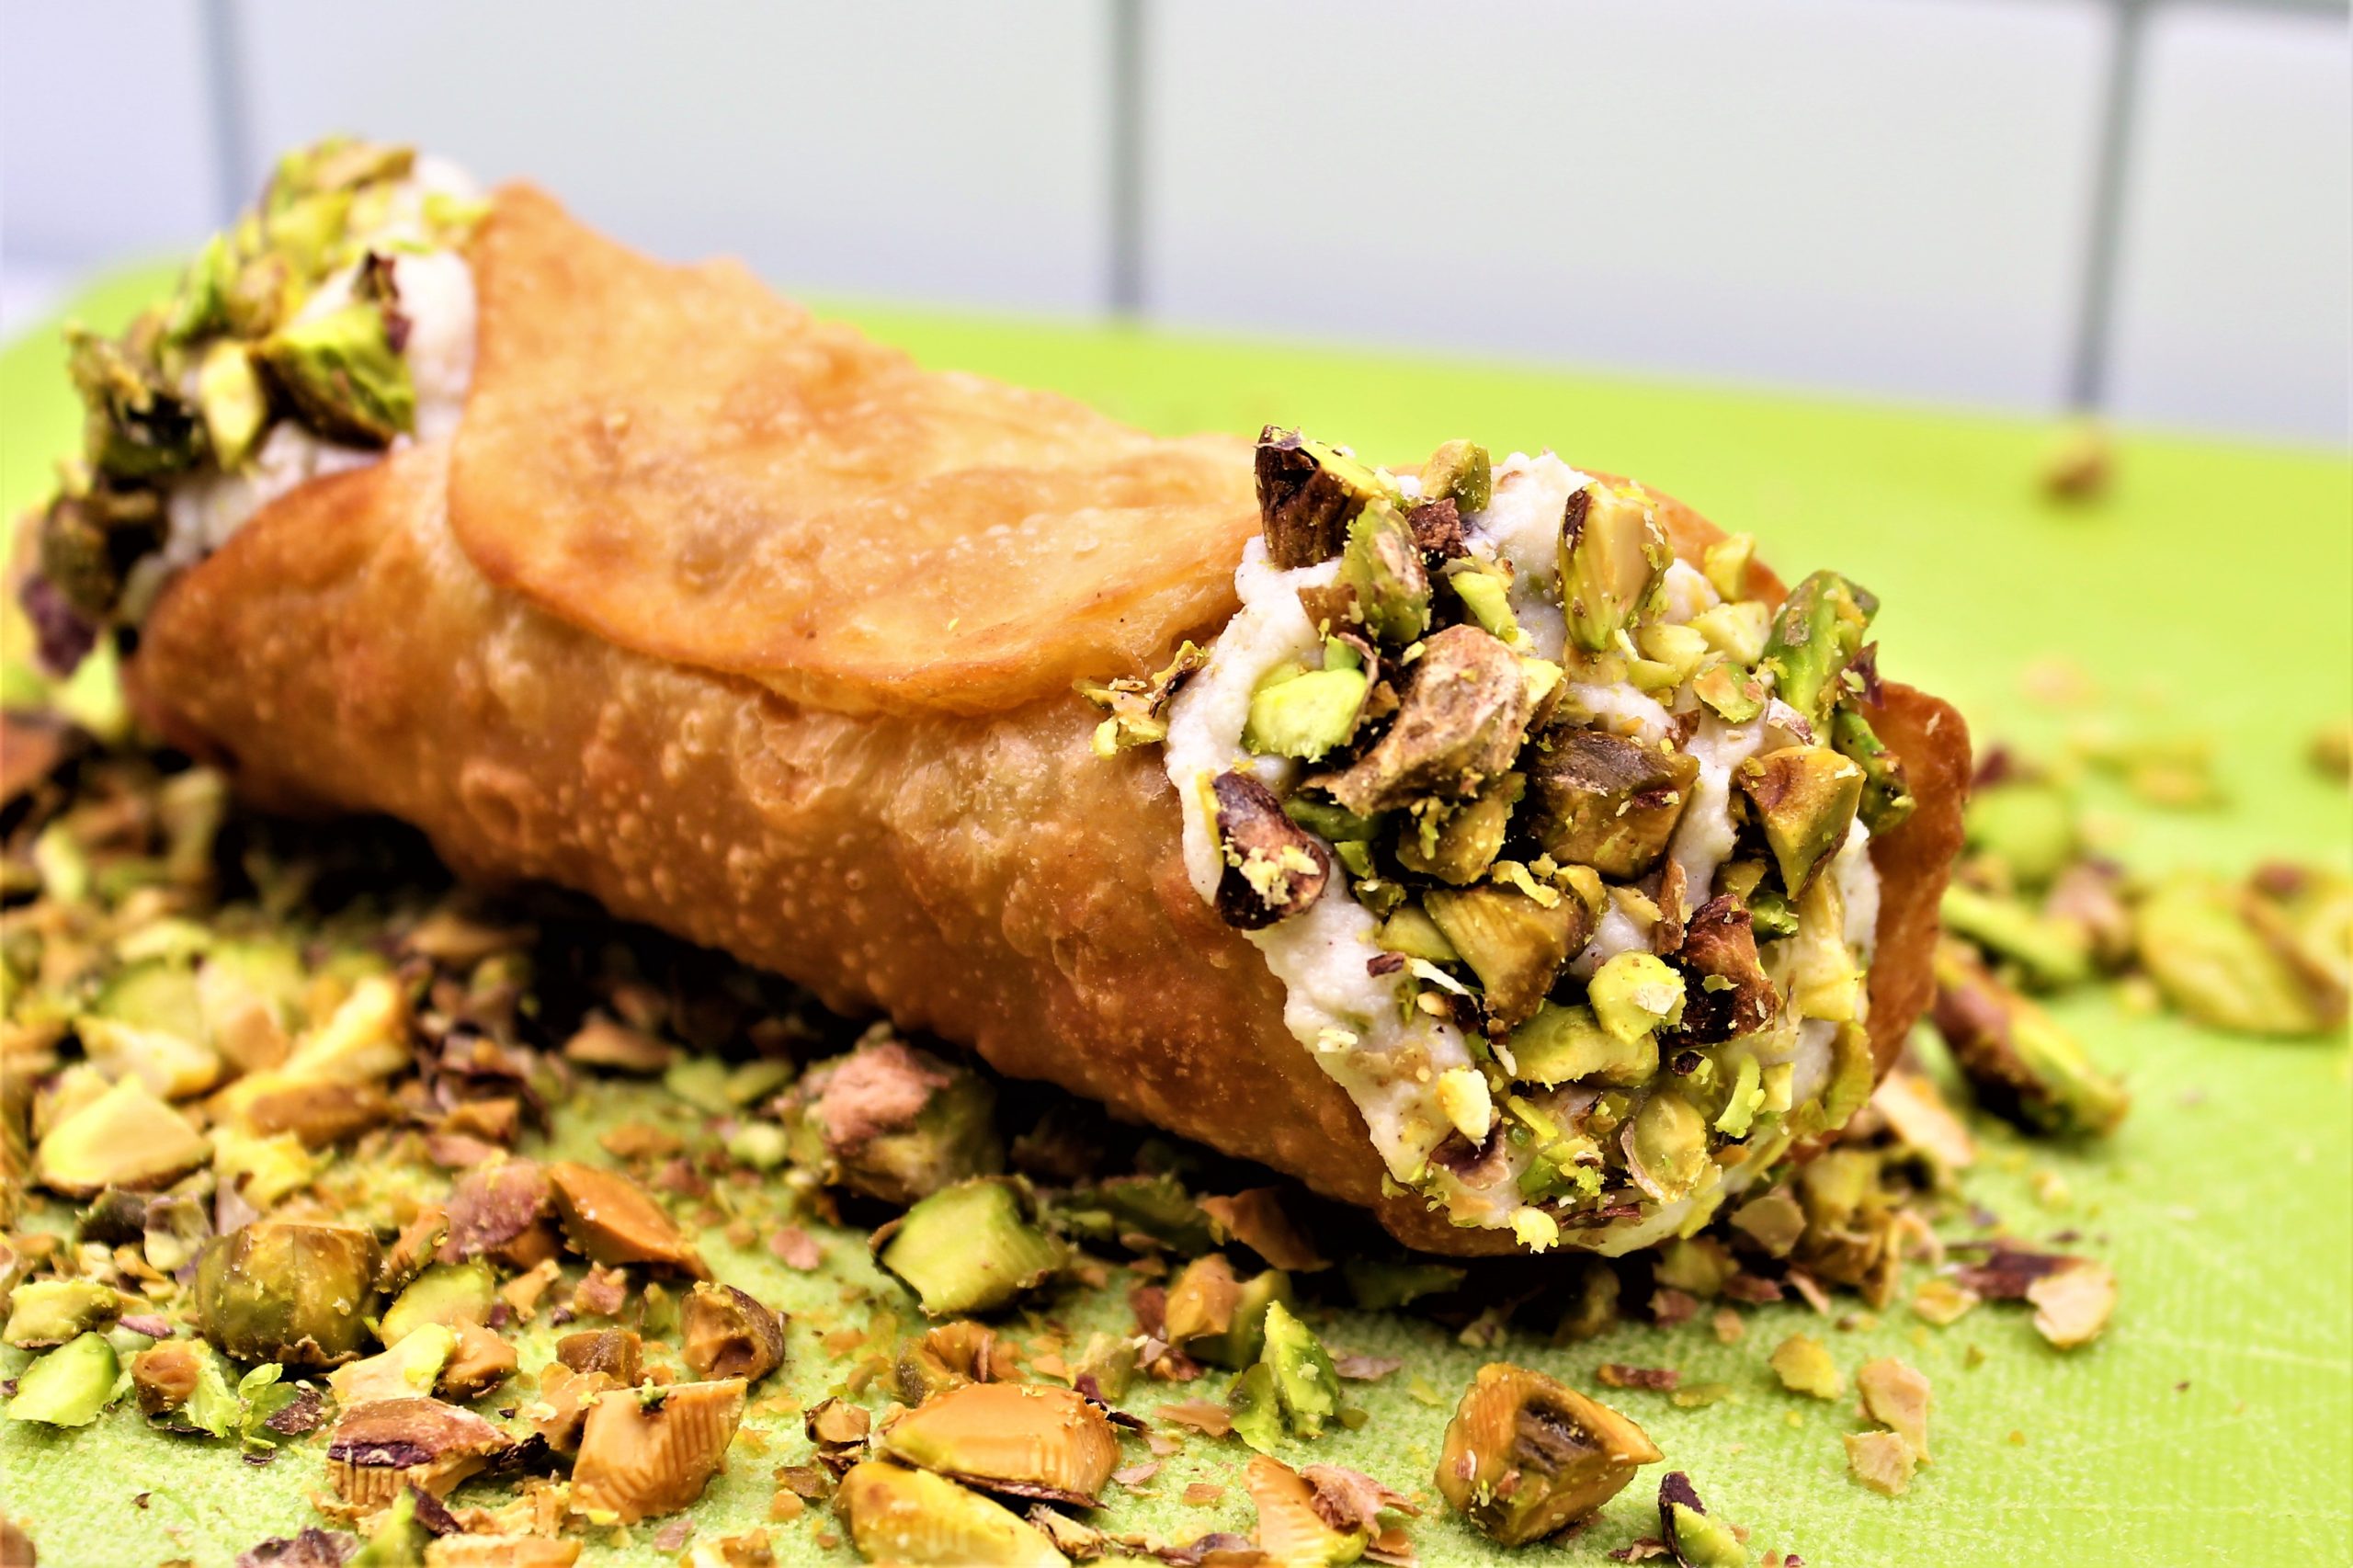
Without hesitation, we went into the shop and were amazed by the dozens of various pastries. Dale stayed at the back of the shop, and I got in line to buy doughnuts.
The man behind the counter was a little more aggressive than I’m used to in Indiana, and I was overwhelmed. In addition, he was agitated with the amount of time it took me to make a decision. He was freaking me out, and without knowing why, I said, “I’ll take 12 cannoli! What we would we do with 12 cannoli? I have no idea, but we were about to find out.
At the back of the store, I returned to Dale with two boxes of cannoli, which cost $60.
Dale asked where his donut was, and I said, “I have good news and bad news, The good news is we each have six cannoli, and the bad news is, we are not getting donuts. “
We carried those boxes of cannoli all over the city that day. I pleaded with Dale several times to toss them in the trash, but my frugal husband would not hear of it. Dale said, “no, we spent $60 on cannoli, and we are going to eat $60 worth of cannoli.”
Our cannoli road the subway, they went to the Statue of Liberty, went to the Empire State Building, And even took a tour of 30 Rock!
When we returned to the hotel that night, we each had a cannoli, and I have to admit they were perfect, but not worth $60. or carrying them around all day.
On the last day of our trip, we were packing, and we still had eight cannoli that, at this point, seemed a little questionable as to whether we should be eating them. We decided to leave them and head back to Indiana, where there were no cannoli.
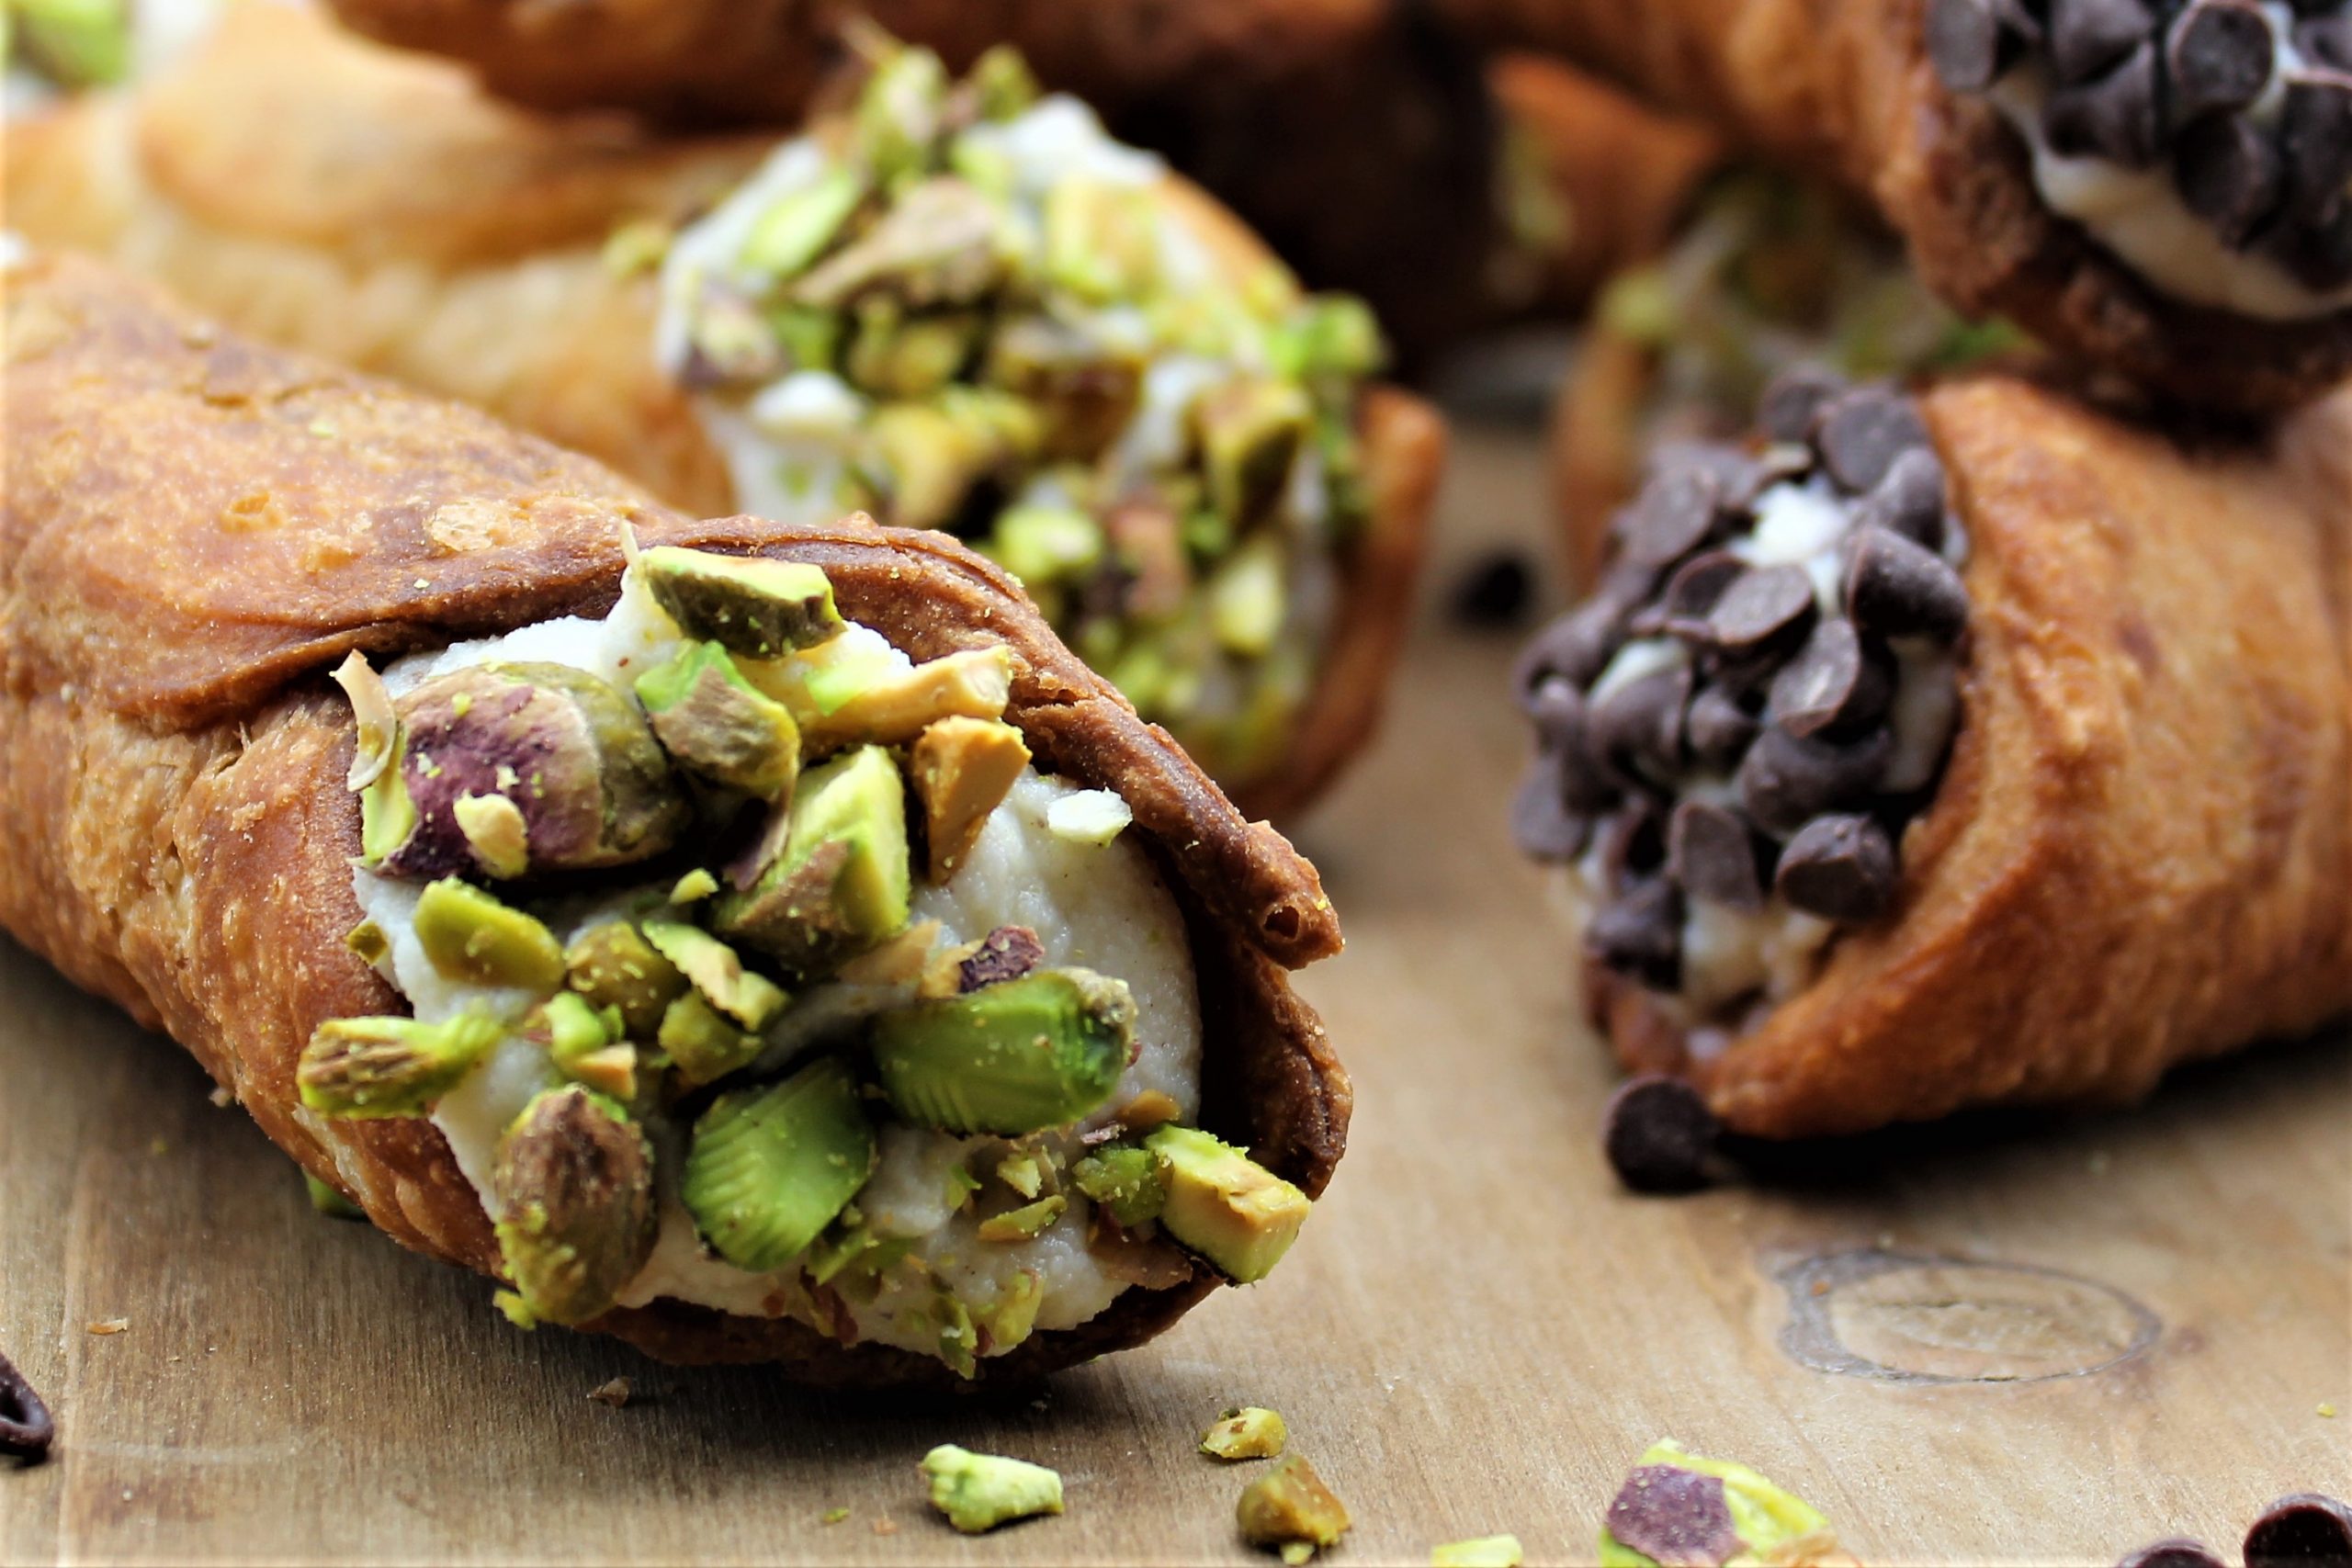
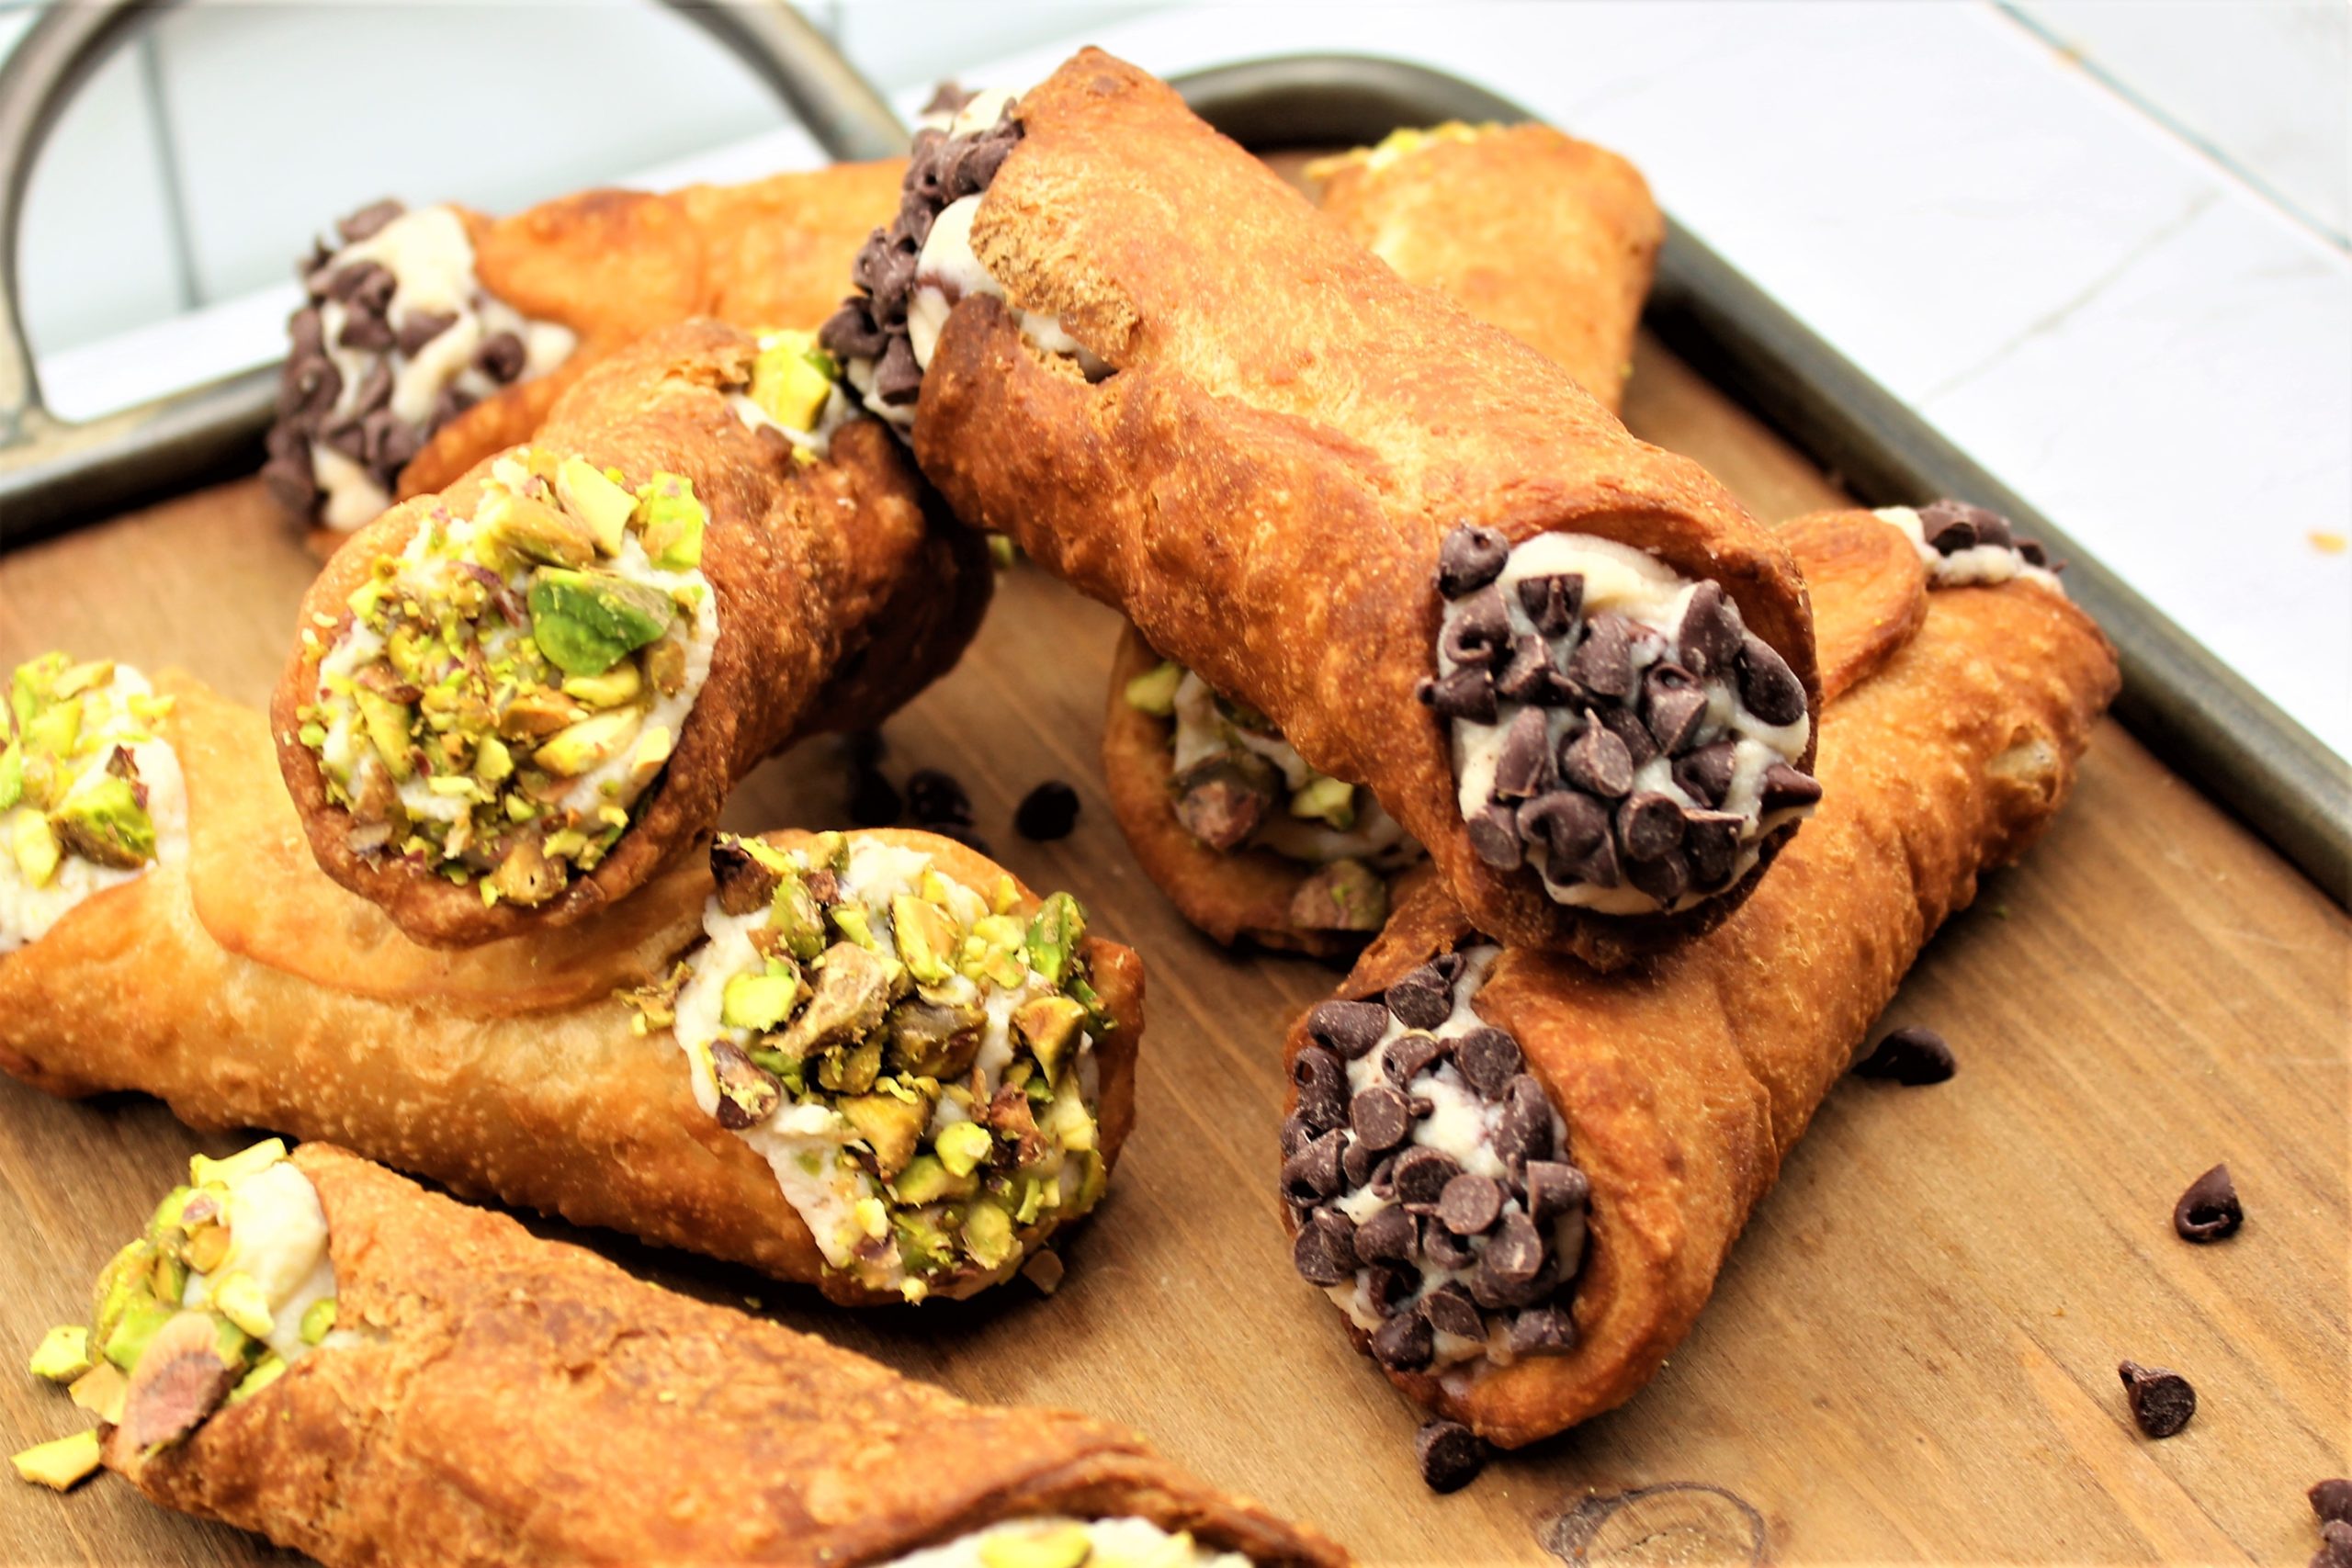
Recently I have been craving cannoli and decided that the only way I would get a good one was to make it. This recipe has gone through several variations, but I believe this one is as good as in a cannoli and the big apple.
These cannoli are crispy on the outside and velvety smooth on the inside. The pistachios add a crunch and a saltiness that complements the filling.
I hope you try this recipe; you will agree that cannoli is a good thing.
There is no intimidation here from a man behind a busy counter. No One’s going to stare you down until you have more than you need.
I would not change anything about my first experience with cannoli except putting them on the subway; that was a little gross.. Enjoy!
These cannoli are crispy on the outside and velvety smooth on the inside. The pistachios add a crunch and a saltiness that complements the filling.
Course
Dessert
Cuisine
Italian
Keyword
cannoli recipe, dougbakes.com, new york styl cannoli
Prep Time20minutes
Cook Time2minutes
Servings12cannoli
AuthorDoug Bakes Staff
Ingredients
Ingredients for the cannoli shells
2cupsall-purpose flour
2Tbspsugar
1/4tspsalt
2Tbspunsalted butter cut into pieces
1/2 cupmarsala wine
2yolks and reserve white for brushing
8cupsvegetable oil for frying
Ingredients for the filling
32ounceswhole milk ricotta strained until dry
1cuppowdered sugar
1/3cupmini chocolate chips, or pistachios
1tspvanilla
Instructions
Cannoli Shell Instructions
Add the flour, sugar, and salt to a food processor and pulse to combine.
Sprinkle in the cold butter cubes, and pulse until the mixture is in small pieces.
Add the yolks and marsala to the processor, and pulse until the mixture comes together into a dough.
Turn the dough out on a lightly floured counter and knead for 4 minutes, or until the dough becomes smooth and has elasticity.
Cover and rest at room temperature for an hour, You can make the filling while the dough is resting. Meanwhile, make the filling.
Once rested for an hour, Roll dough to about 1/8 an inch thick and 4-inch circles from the dough.
re-roll scraps, but let them rest on the counter for 10 minutes before rolling again.
Heat the oil, 2inches deep in a large pot over medium heat using a thermometer to 360F. Keep a close eye on the temperature during frying and adjust as you go.
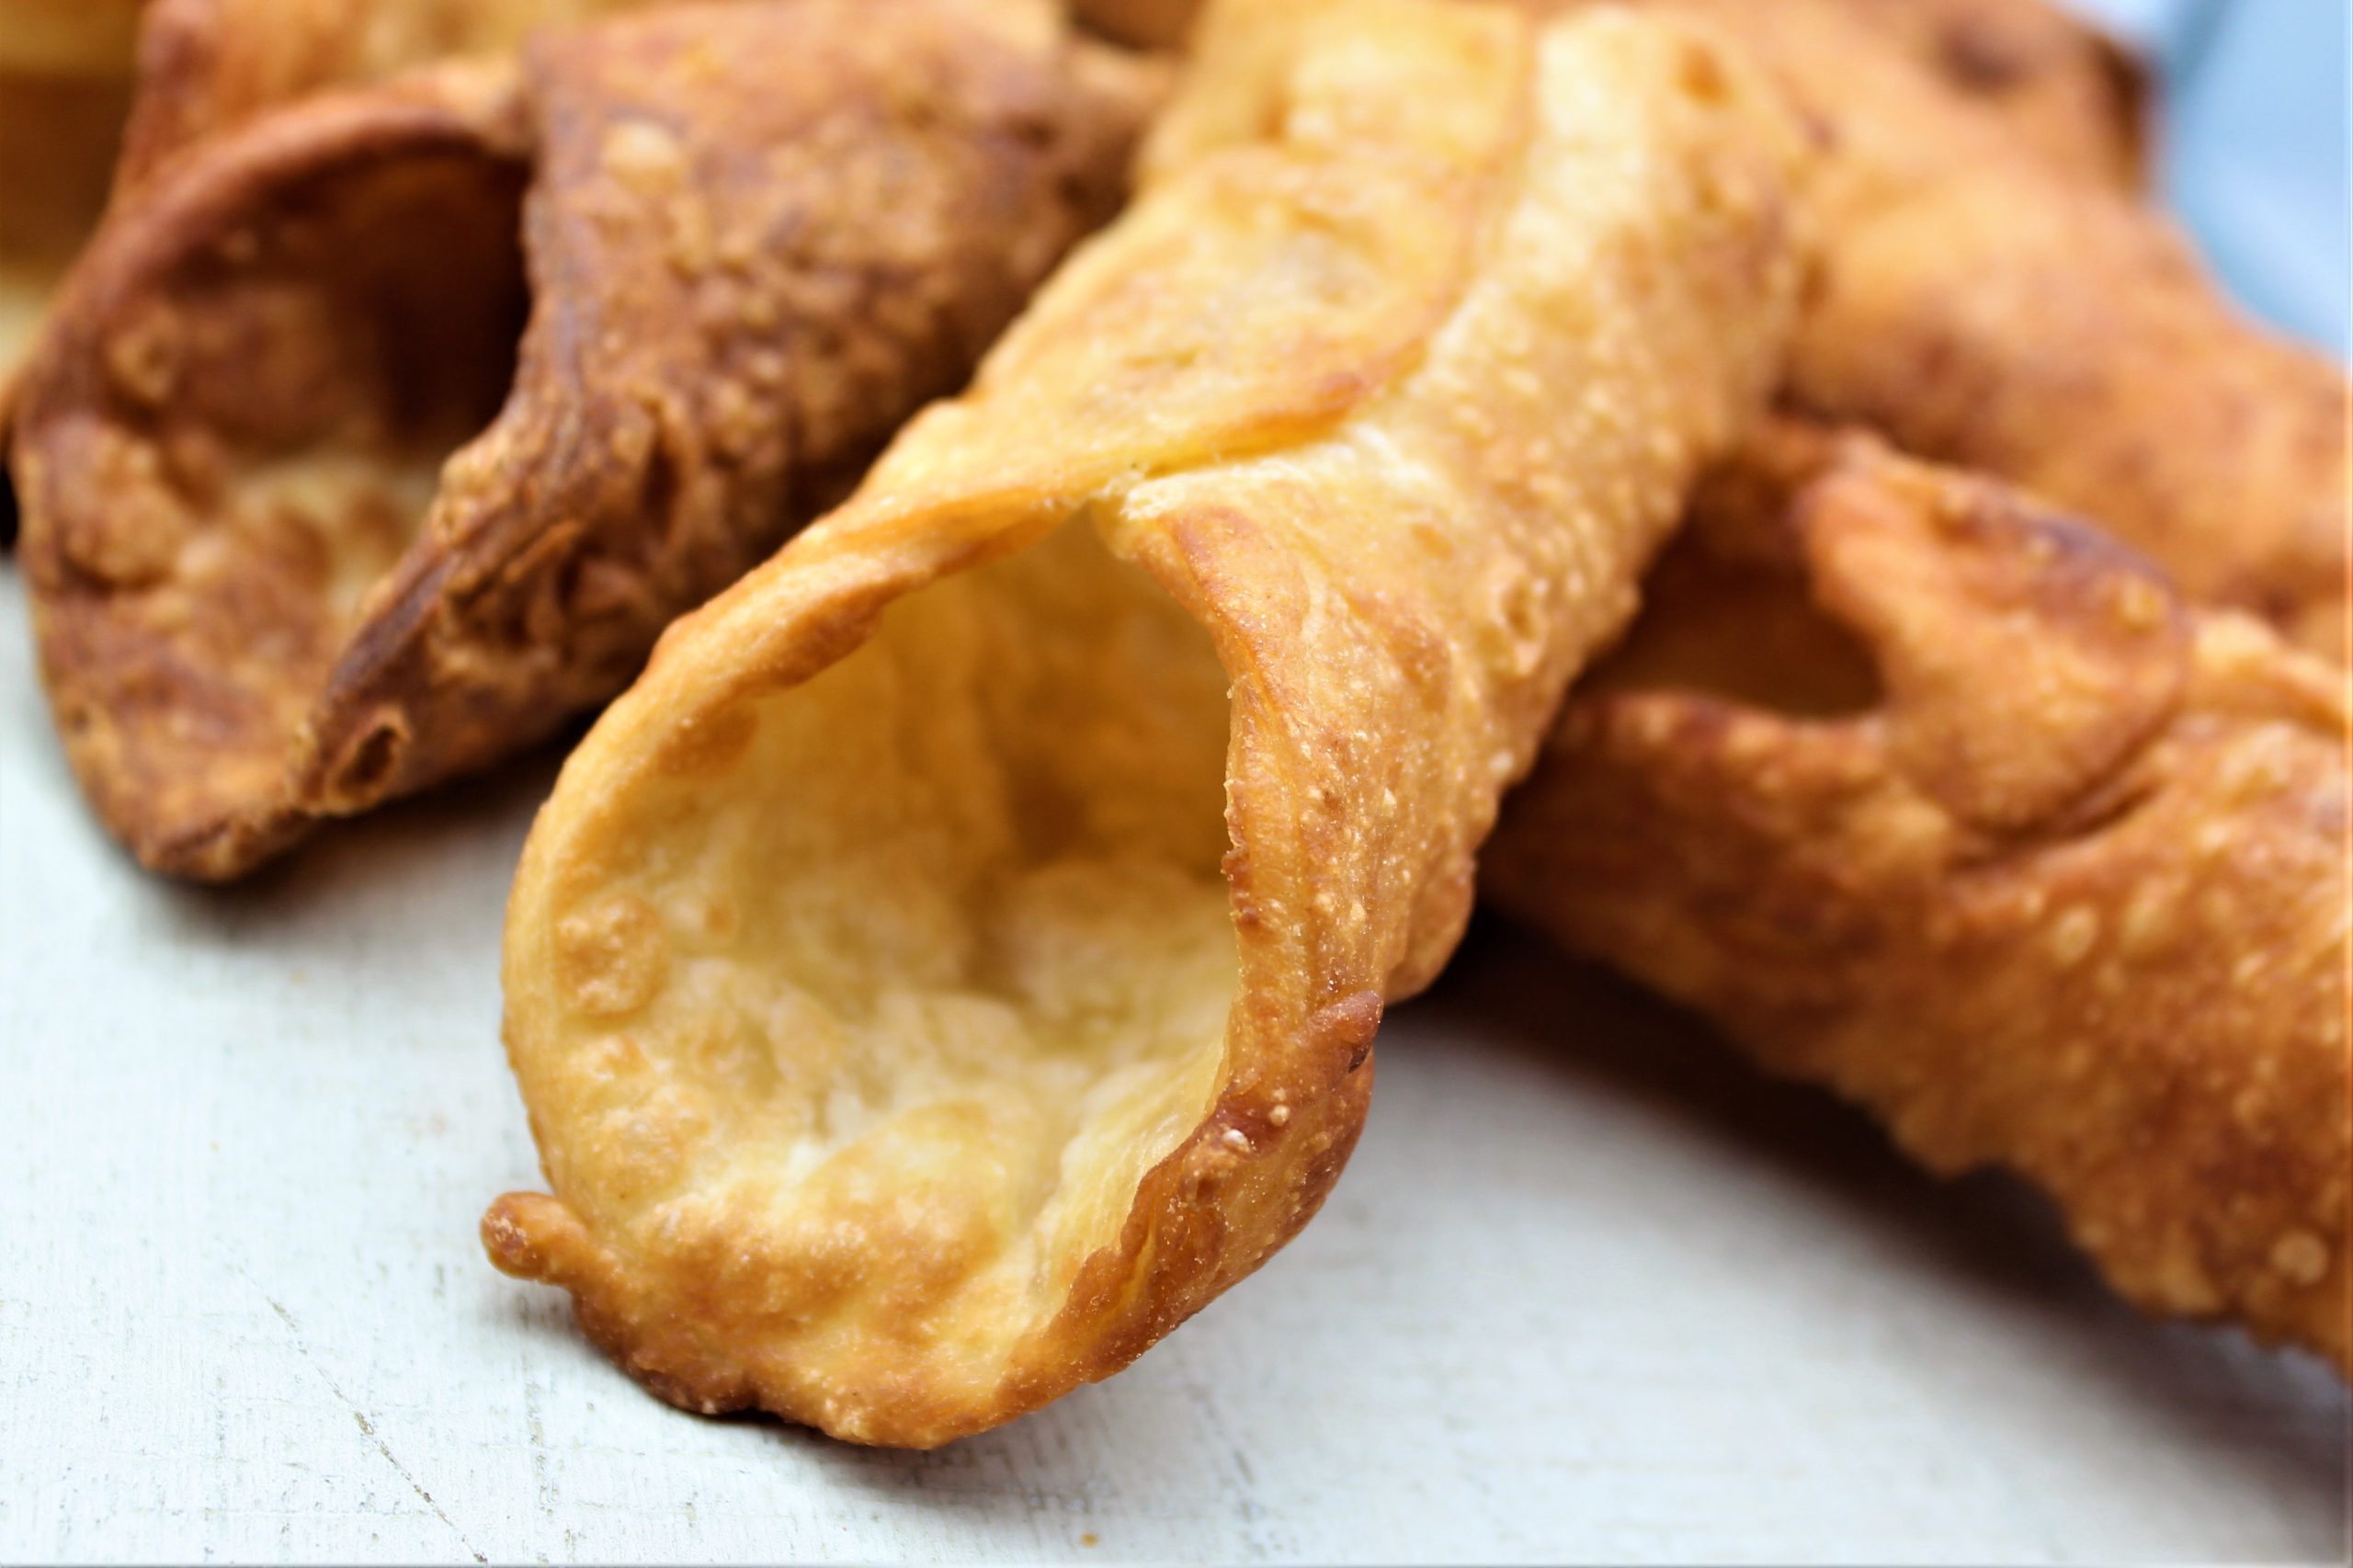
Wrap the dough circles around the metal cannoli forms (I found mine on Amazon), use your finger to apply egg white to the ends that overlap, and press together.
If you don't seal them well, they will open up in the deep fryer, which is not good.
Fry the shells in groups of three for about two minutes.
Remember that adding more shells to the oil will drop the temperature. Frying in small batches makes it easier to maintain the correct temperature.
Fry until golden, then use tongs to transfer to a wire rack lined with paper towels.
Remove the metal form immediately by using oven mitts. Wrap the vertically oriented shell in a paper towel, and use gentle pressure to press down and loosen it from the metal form.
Cannoli Filling Instructions
Remove excess water from the ricotta by placing it in a cheesecloth and squeezing out the liquid.
Combine the drained ricotta, sugar, cinnamon, vanilla, and mini chocolate chips in a bowl, then mix, chill filling if not using immediately.
Transfer to a piping bag, cut off the tip, and fill the shells when ready to serve the cannoli shells.
Once filled, press more chocolate chips onto the ends and dust with powdered sugar.
I have wanted to make a coffee cake for quite a while. The thing that has been holding me back is that I have not had a lot of coffee cake in the past. I know this does not count, but I love little Debbie …
I will start by saying, this is an old recipe. I found it in one of my mom’s recipe boxes.
It has an unfortunate name, and people have searched for something better to call it over time. I have heard them called Polish Disasters, which isn’t much better than Polish mistakes, and also, they are frequently called Hanky-Panky.
It’s an awful name. I will continue to call them Polish Mistakes. When I was young, my mom would make Polish mistakes frequently. However, we were not an appetizer type of family, so I cannot recall why we often had them.
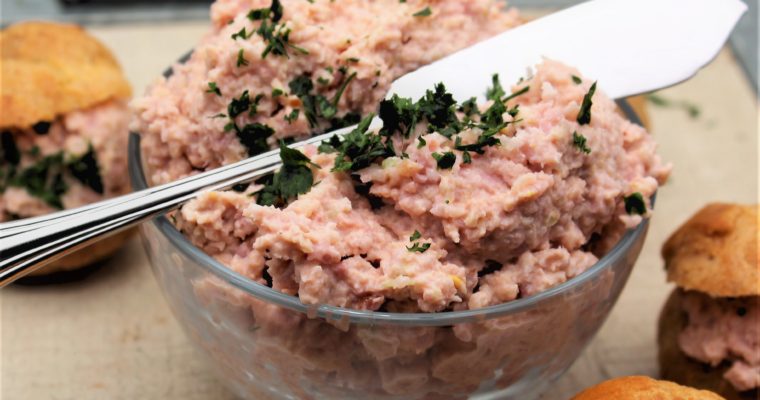
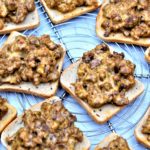
Polish mistakes are a mixture of ground beef and sausage. A block of Velveeta cheese is mixed in and melted throughout the mixture. Worcestershire sauce ads a blast of umami flavor, and oregano rounds out the taste altogether. I make this appetizer occasionally, and Dale, my husband, loves it. Although I don’t think I’ve ever made them for a party or anything like that, I guess just like my mom, I would serve them for dinner because, why not? Enjoy!
Polish mistakes are a mixture of ground beef and sausage. A block of Velveeta cheese is mixed in and melted throughout the mixture. Worcestershire sauce ads a blast of umami flavor, and oregano rounds out the taste altogether.
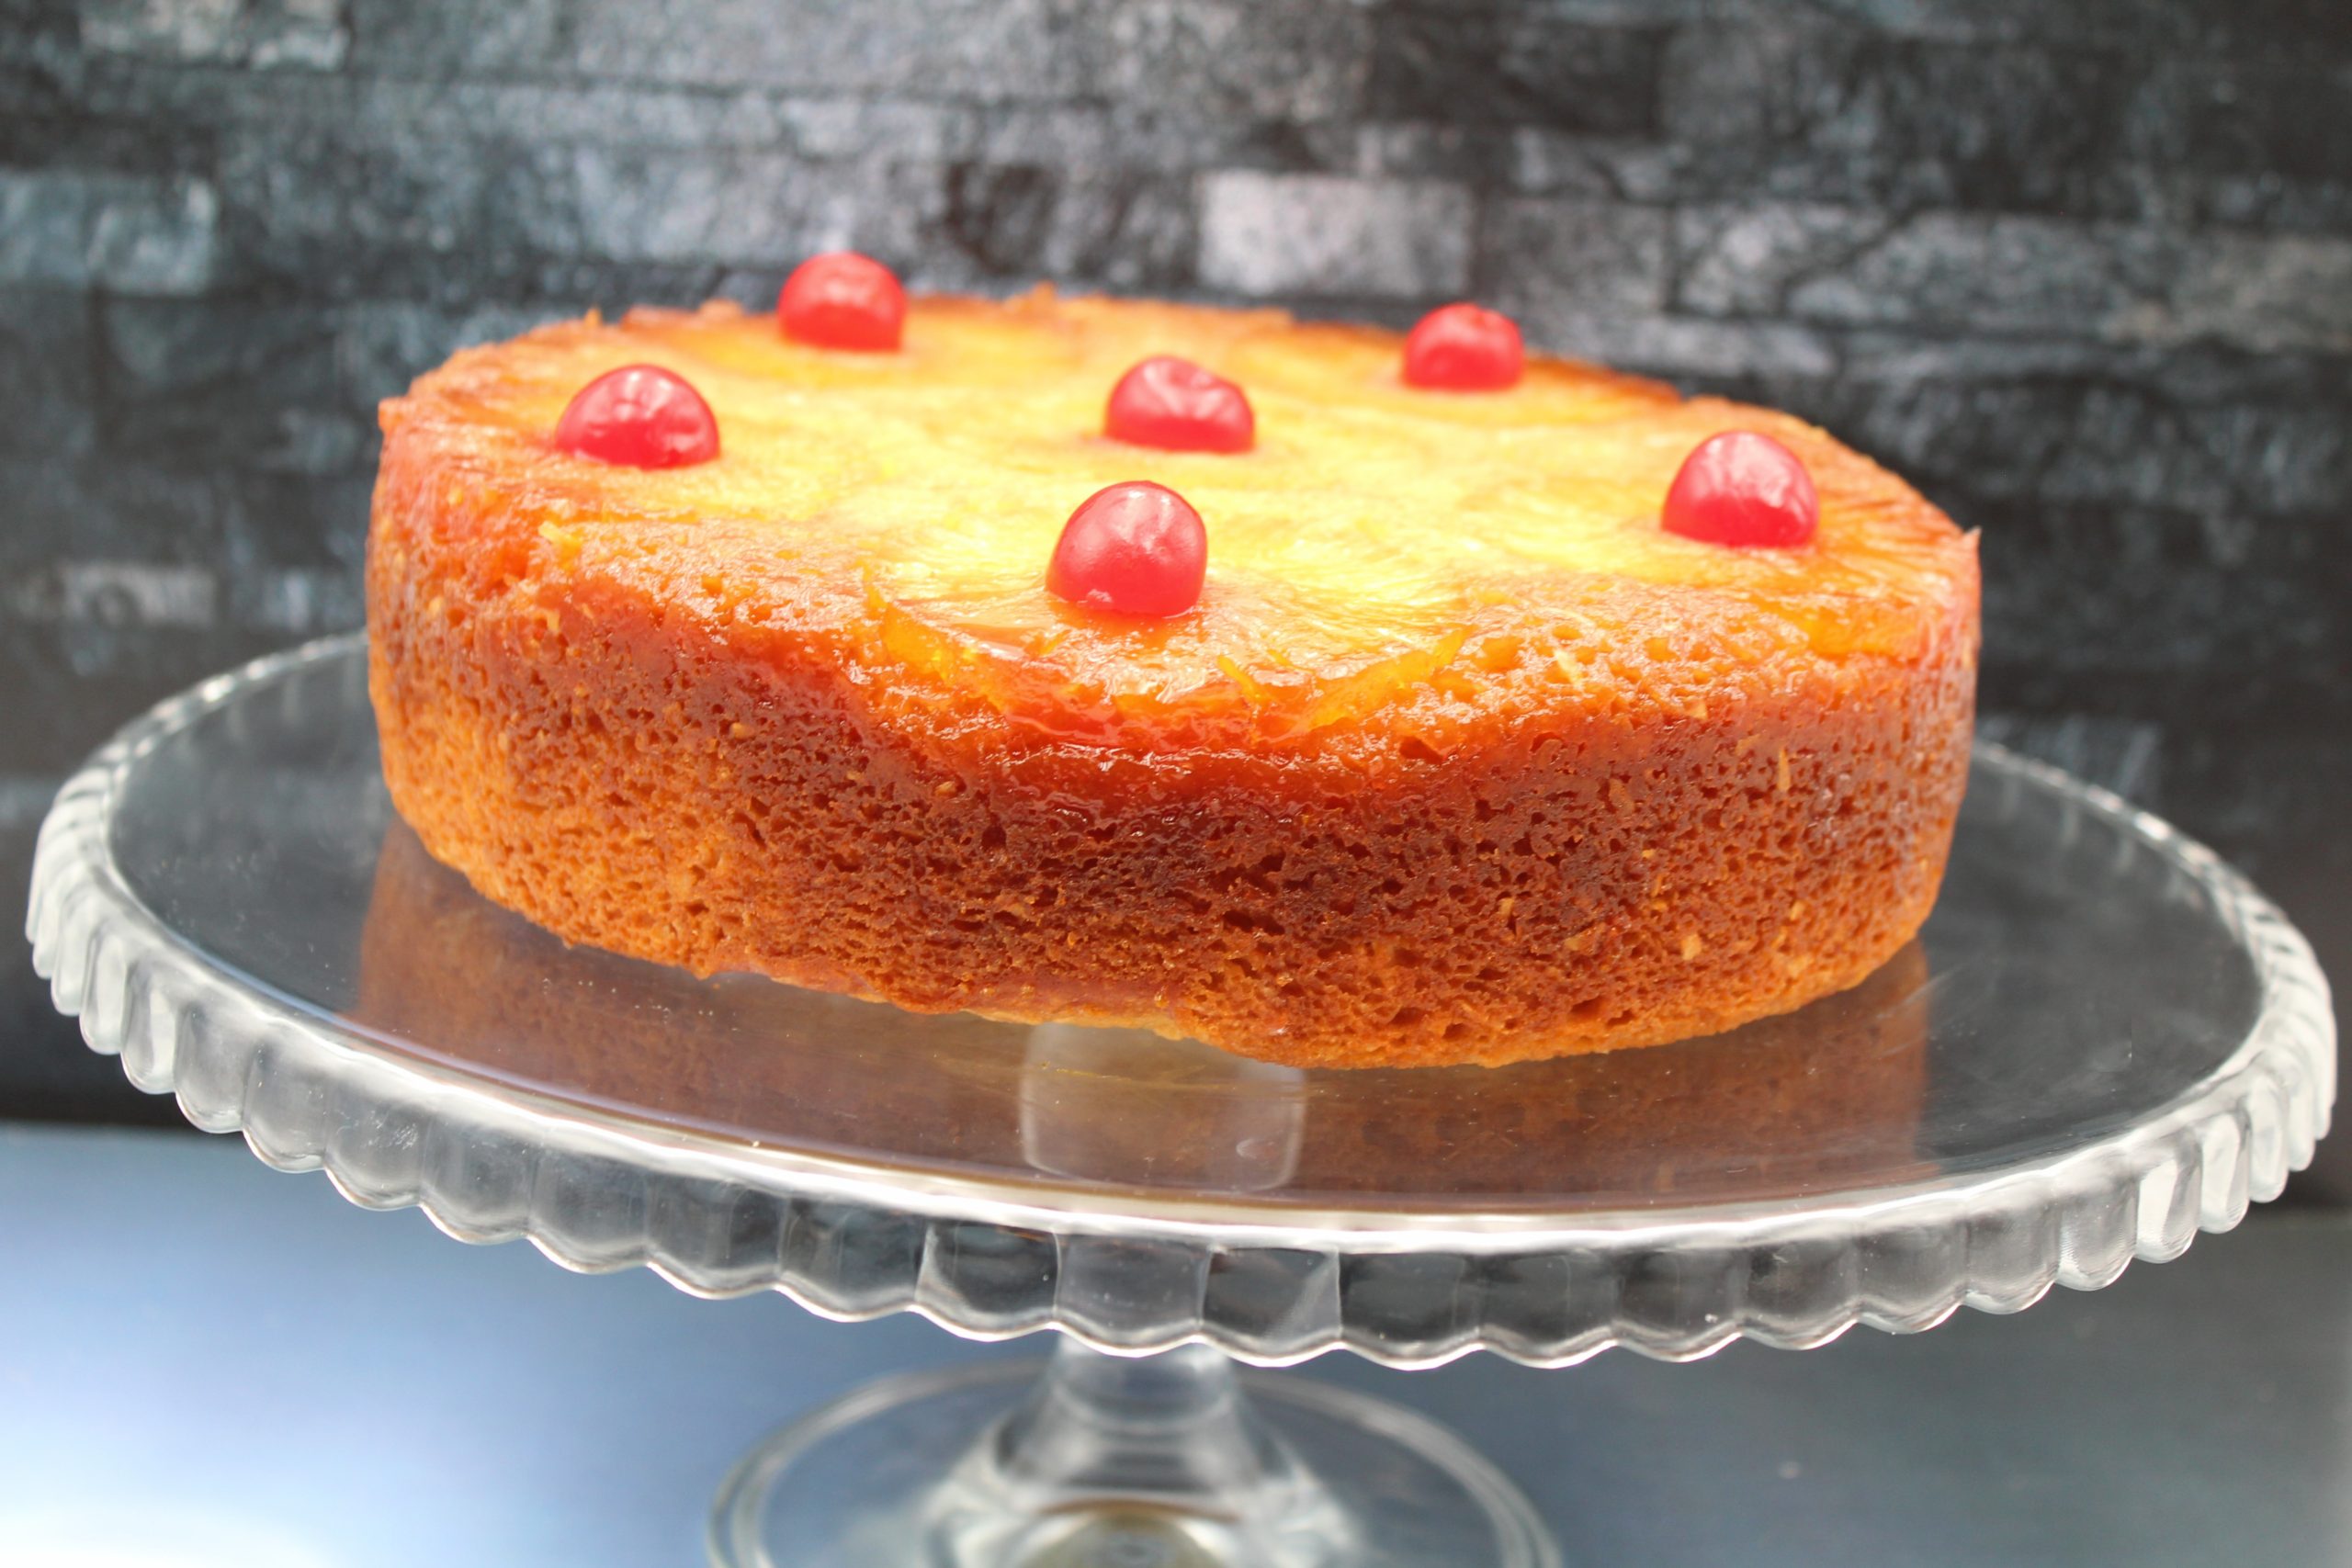
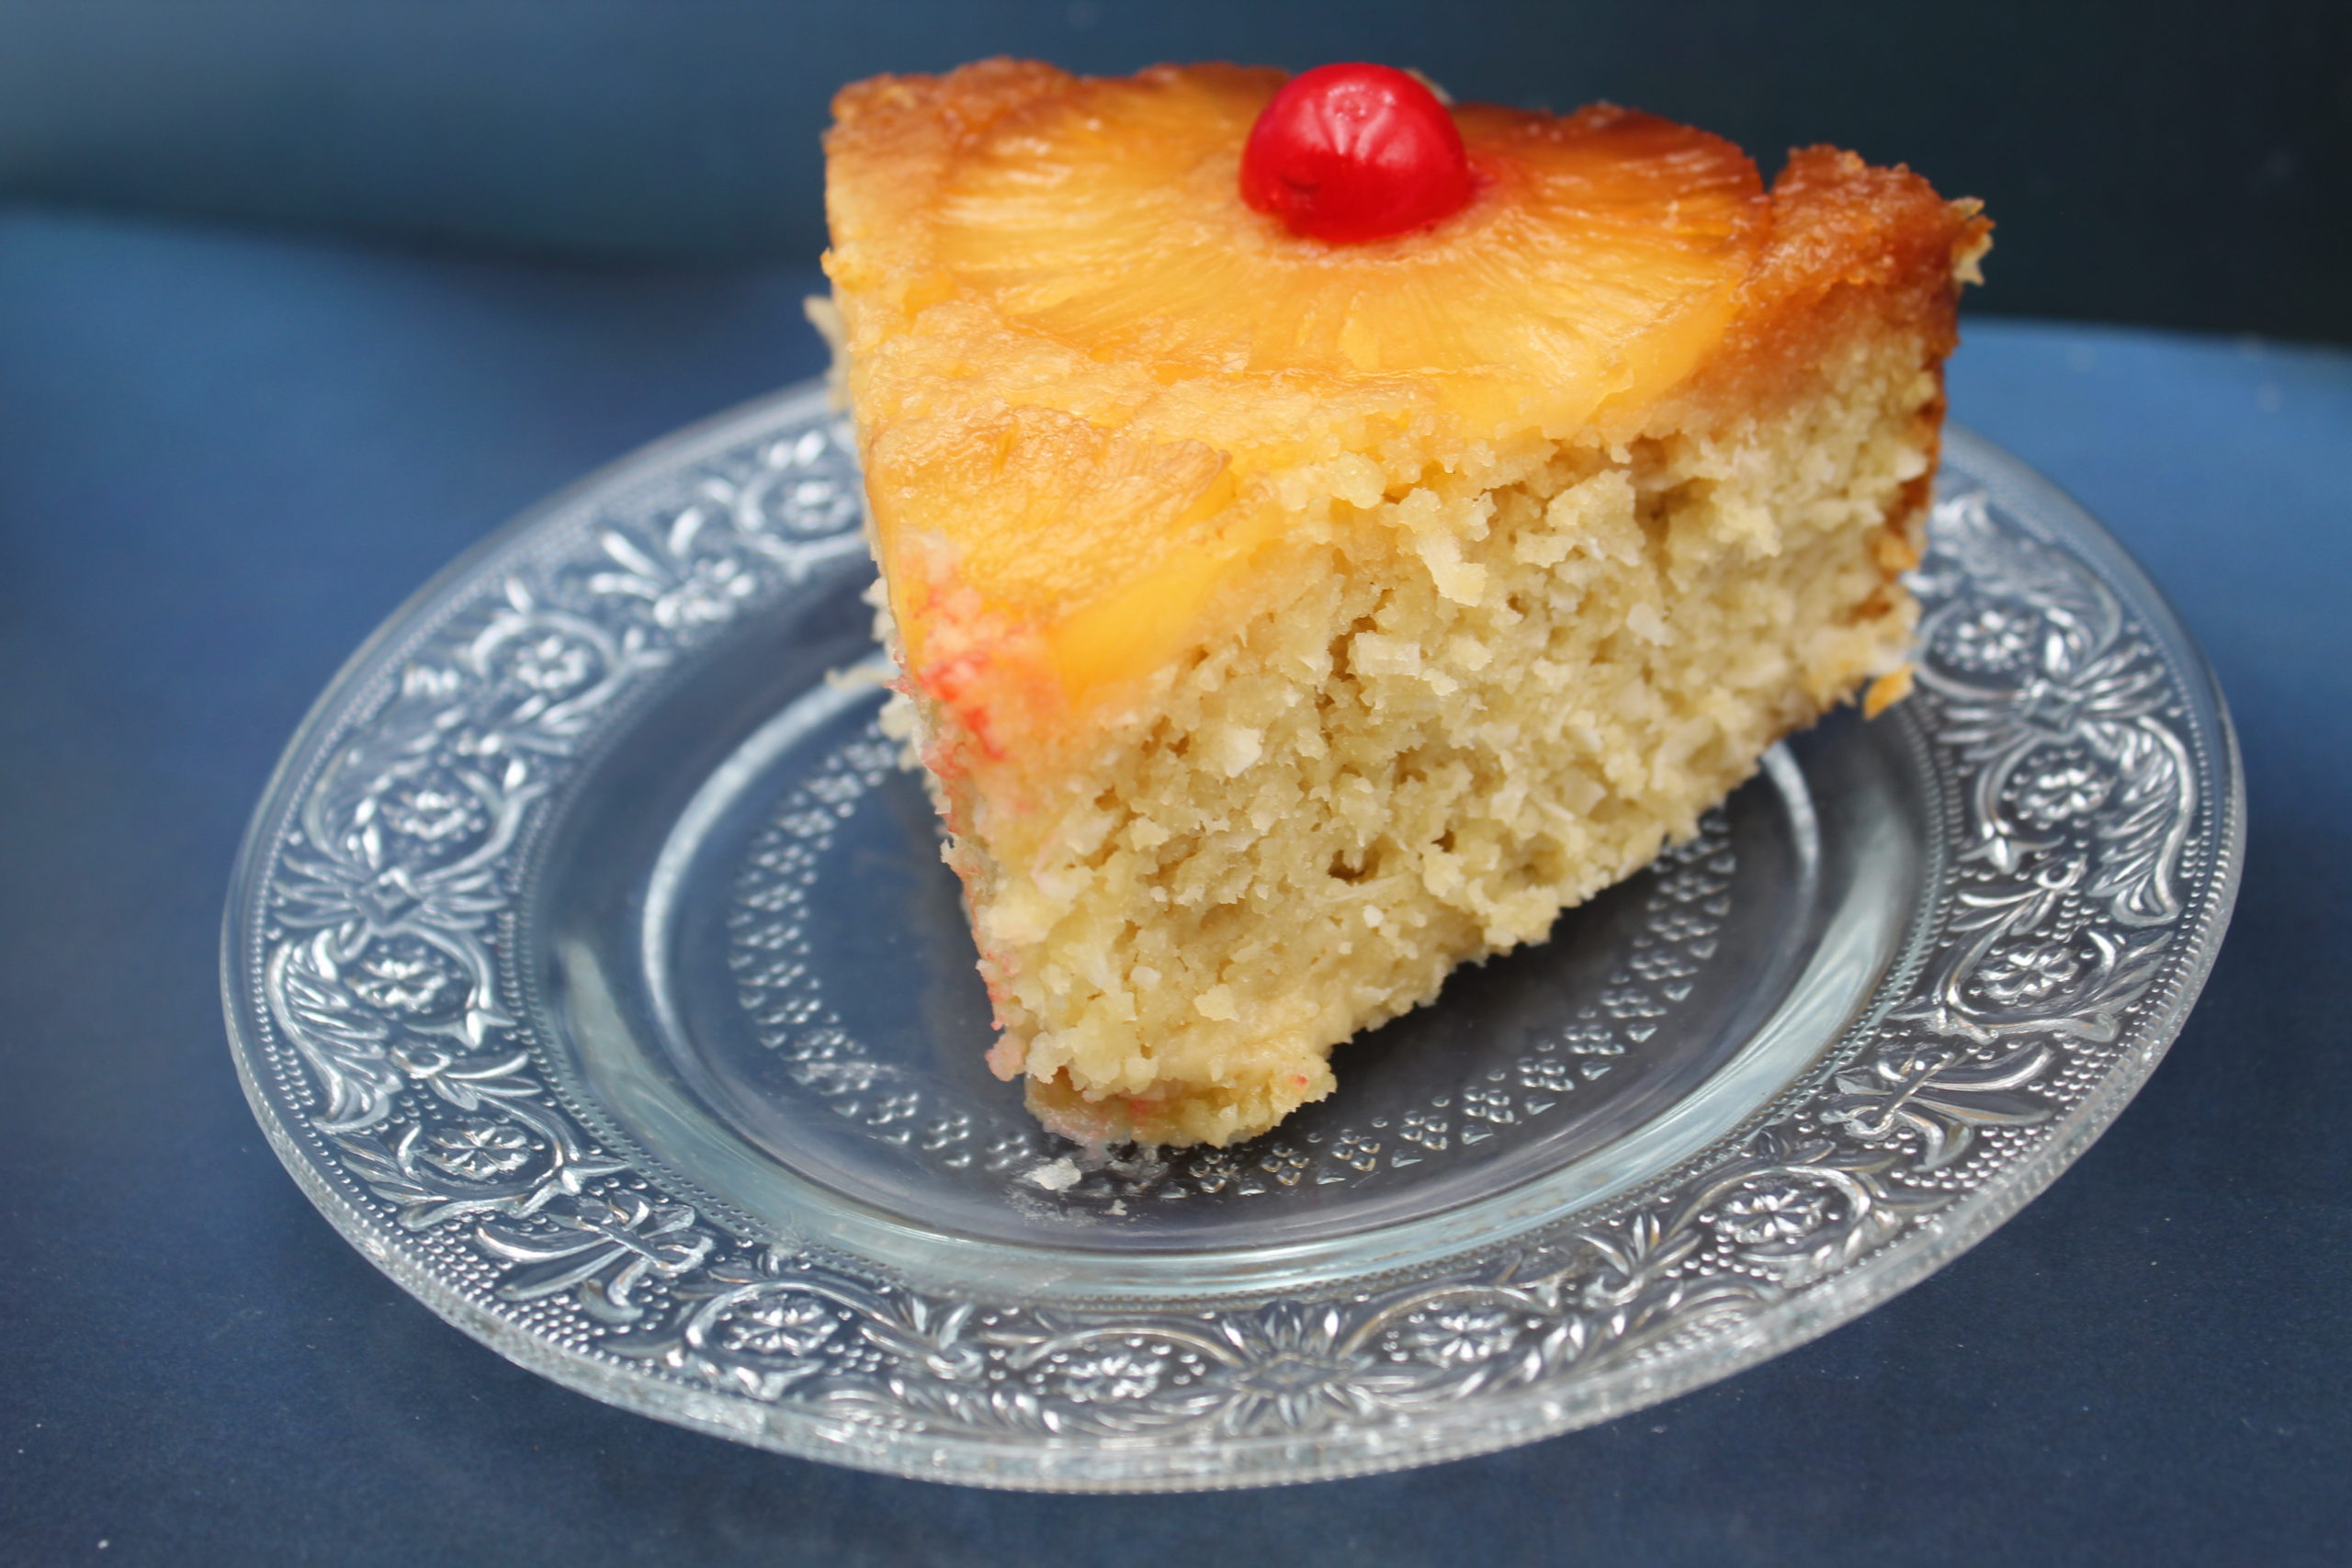
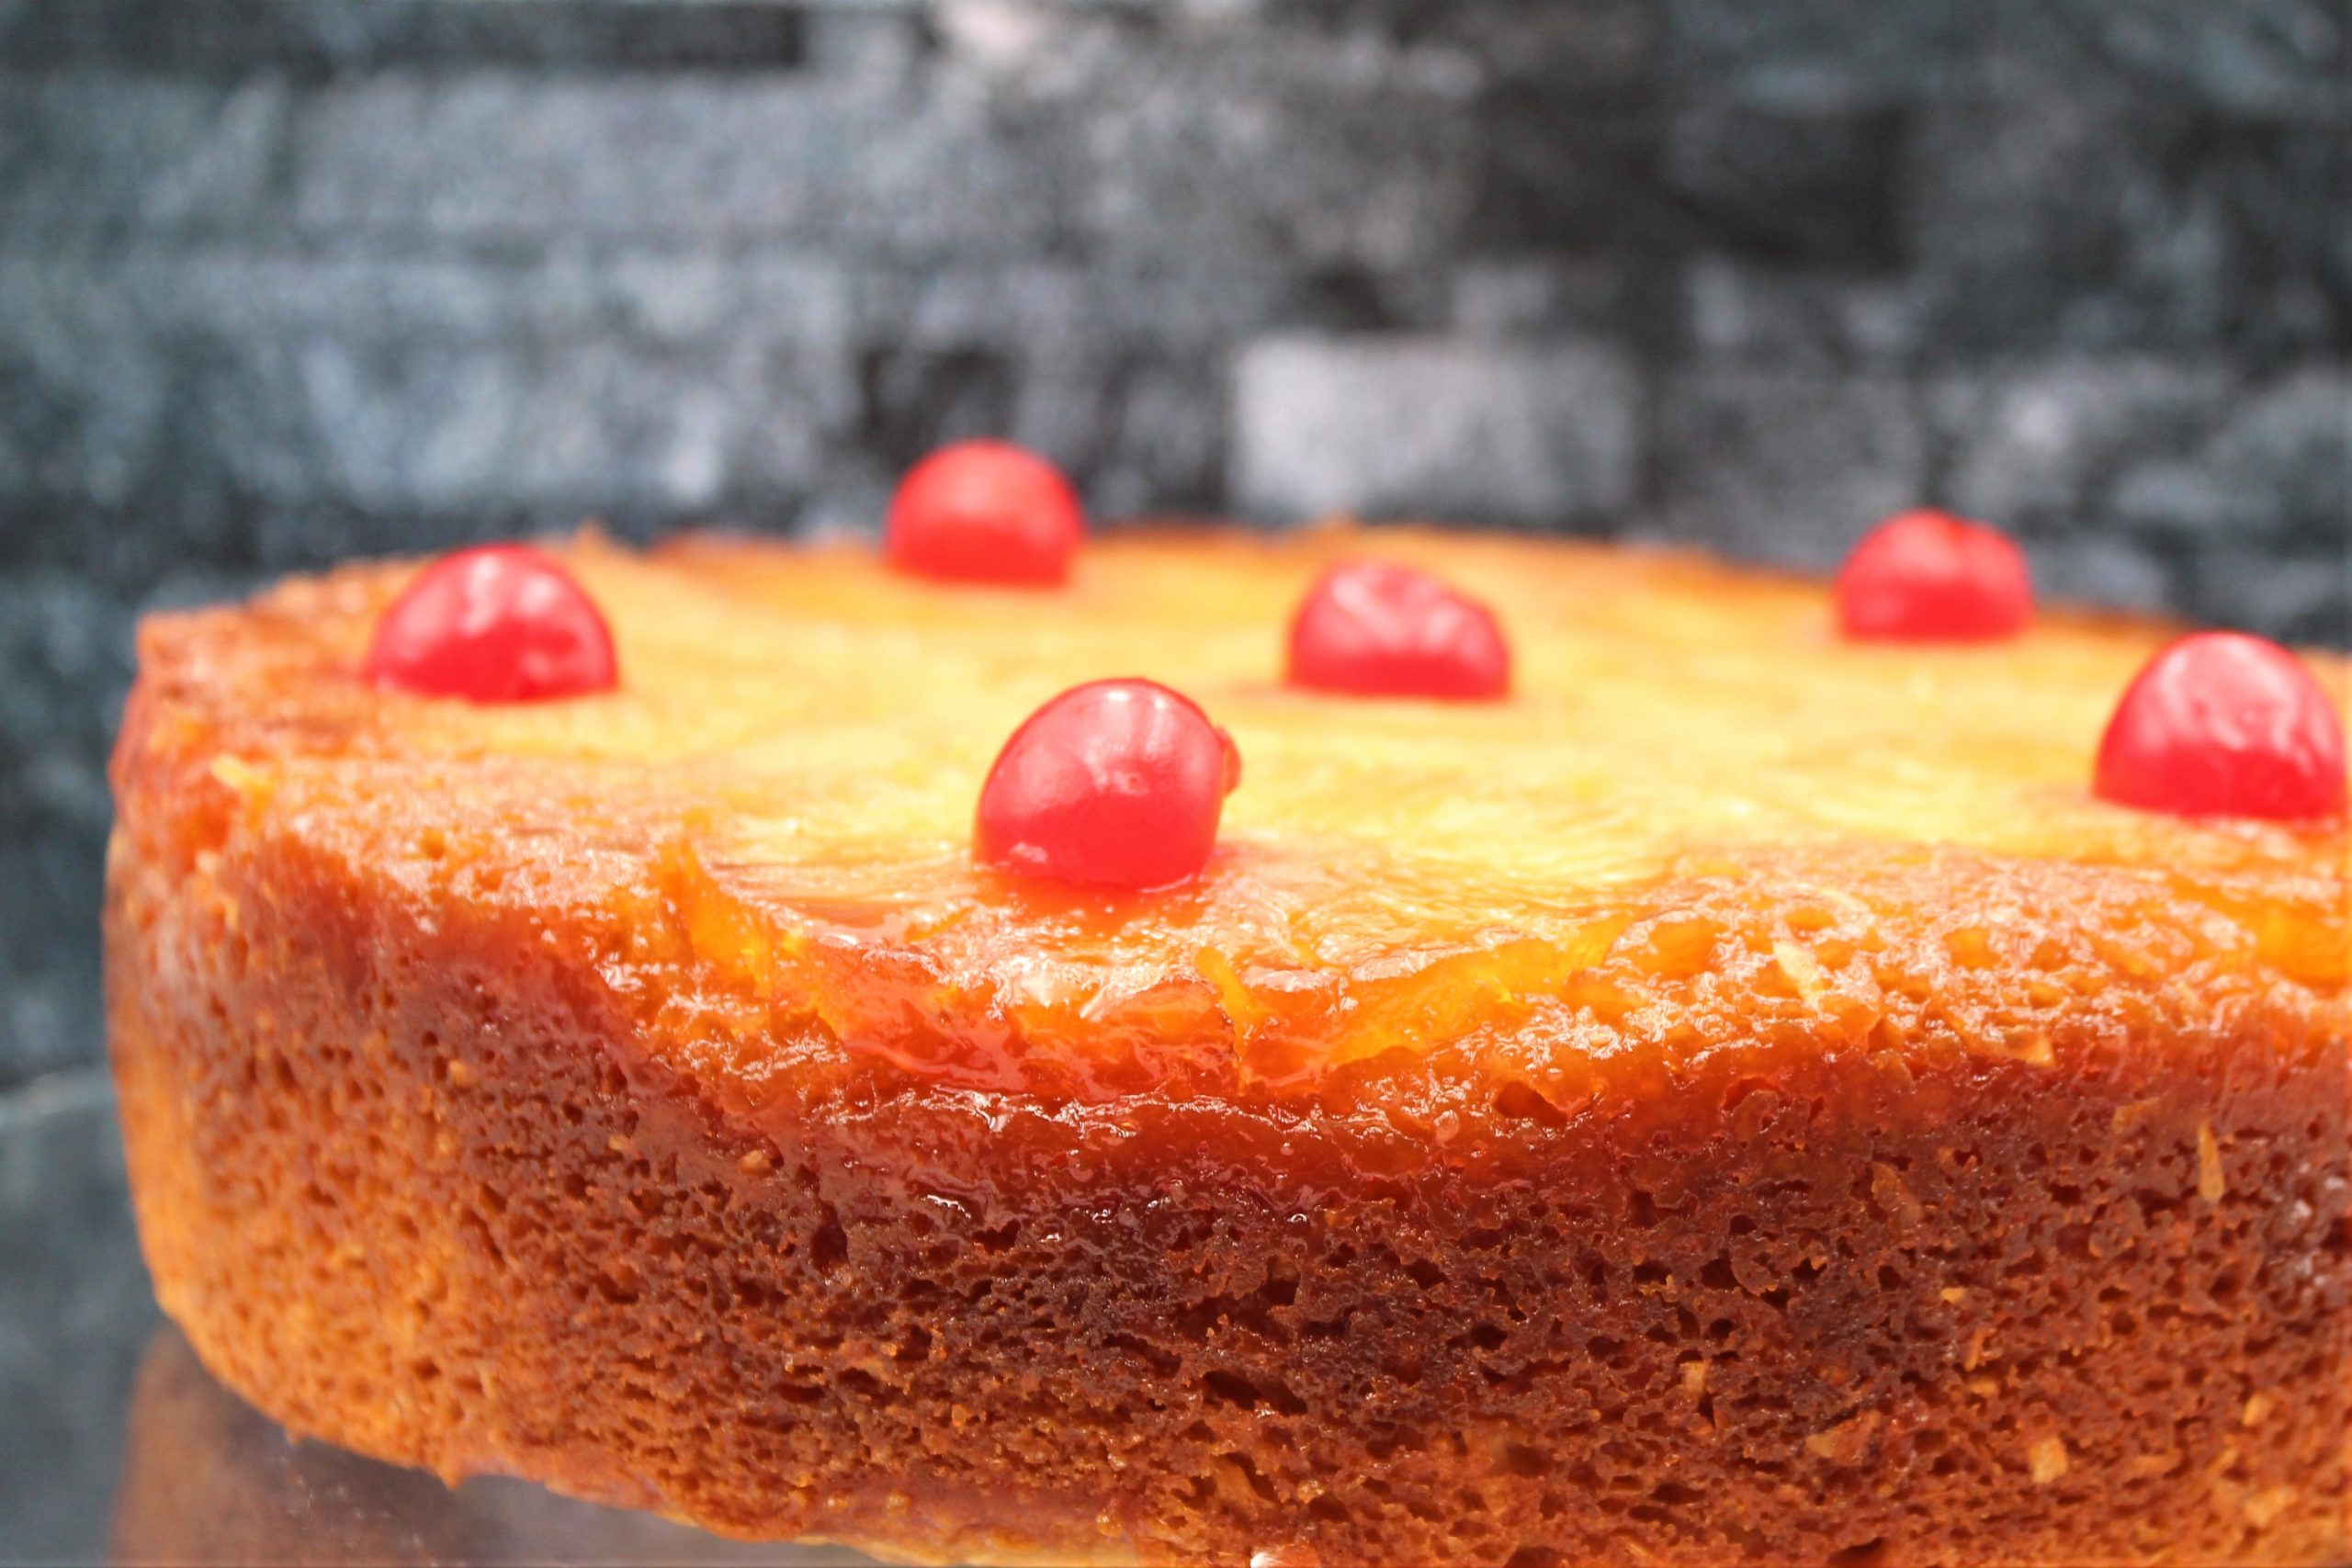
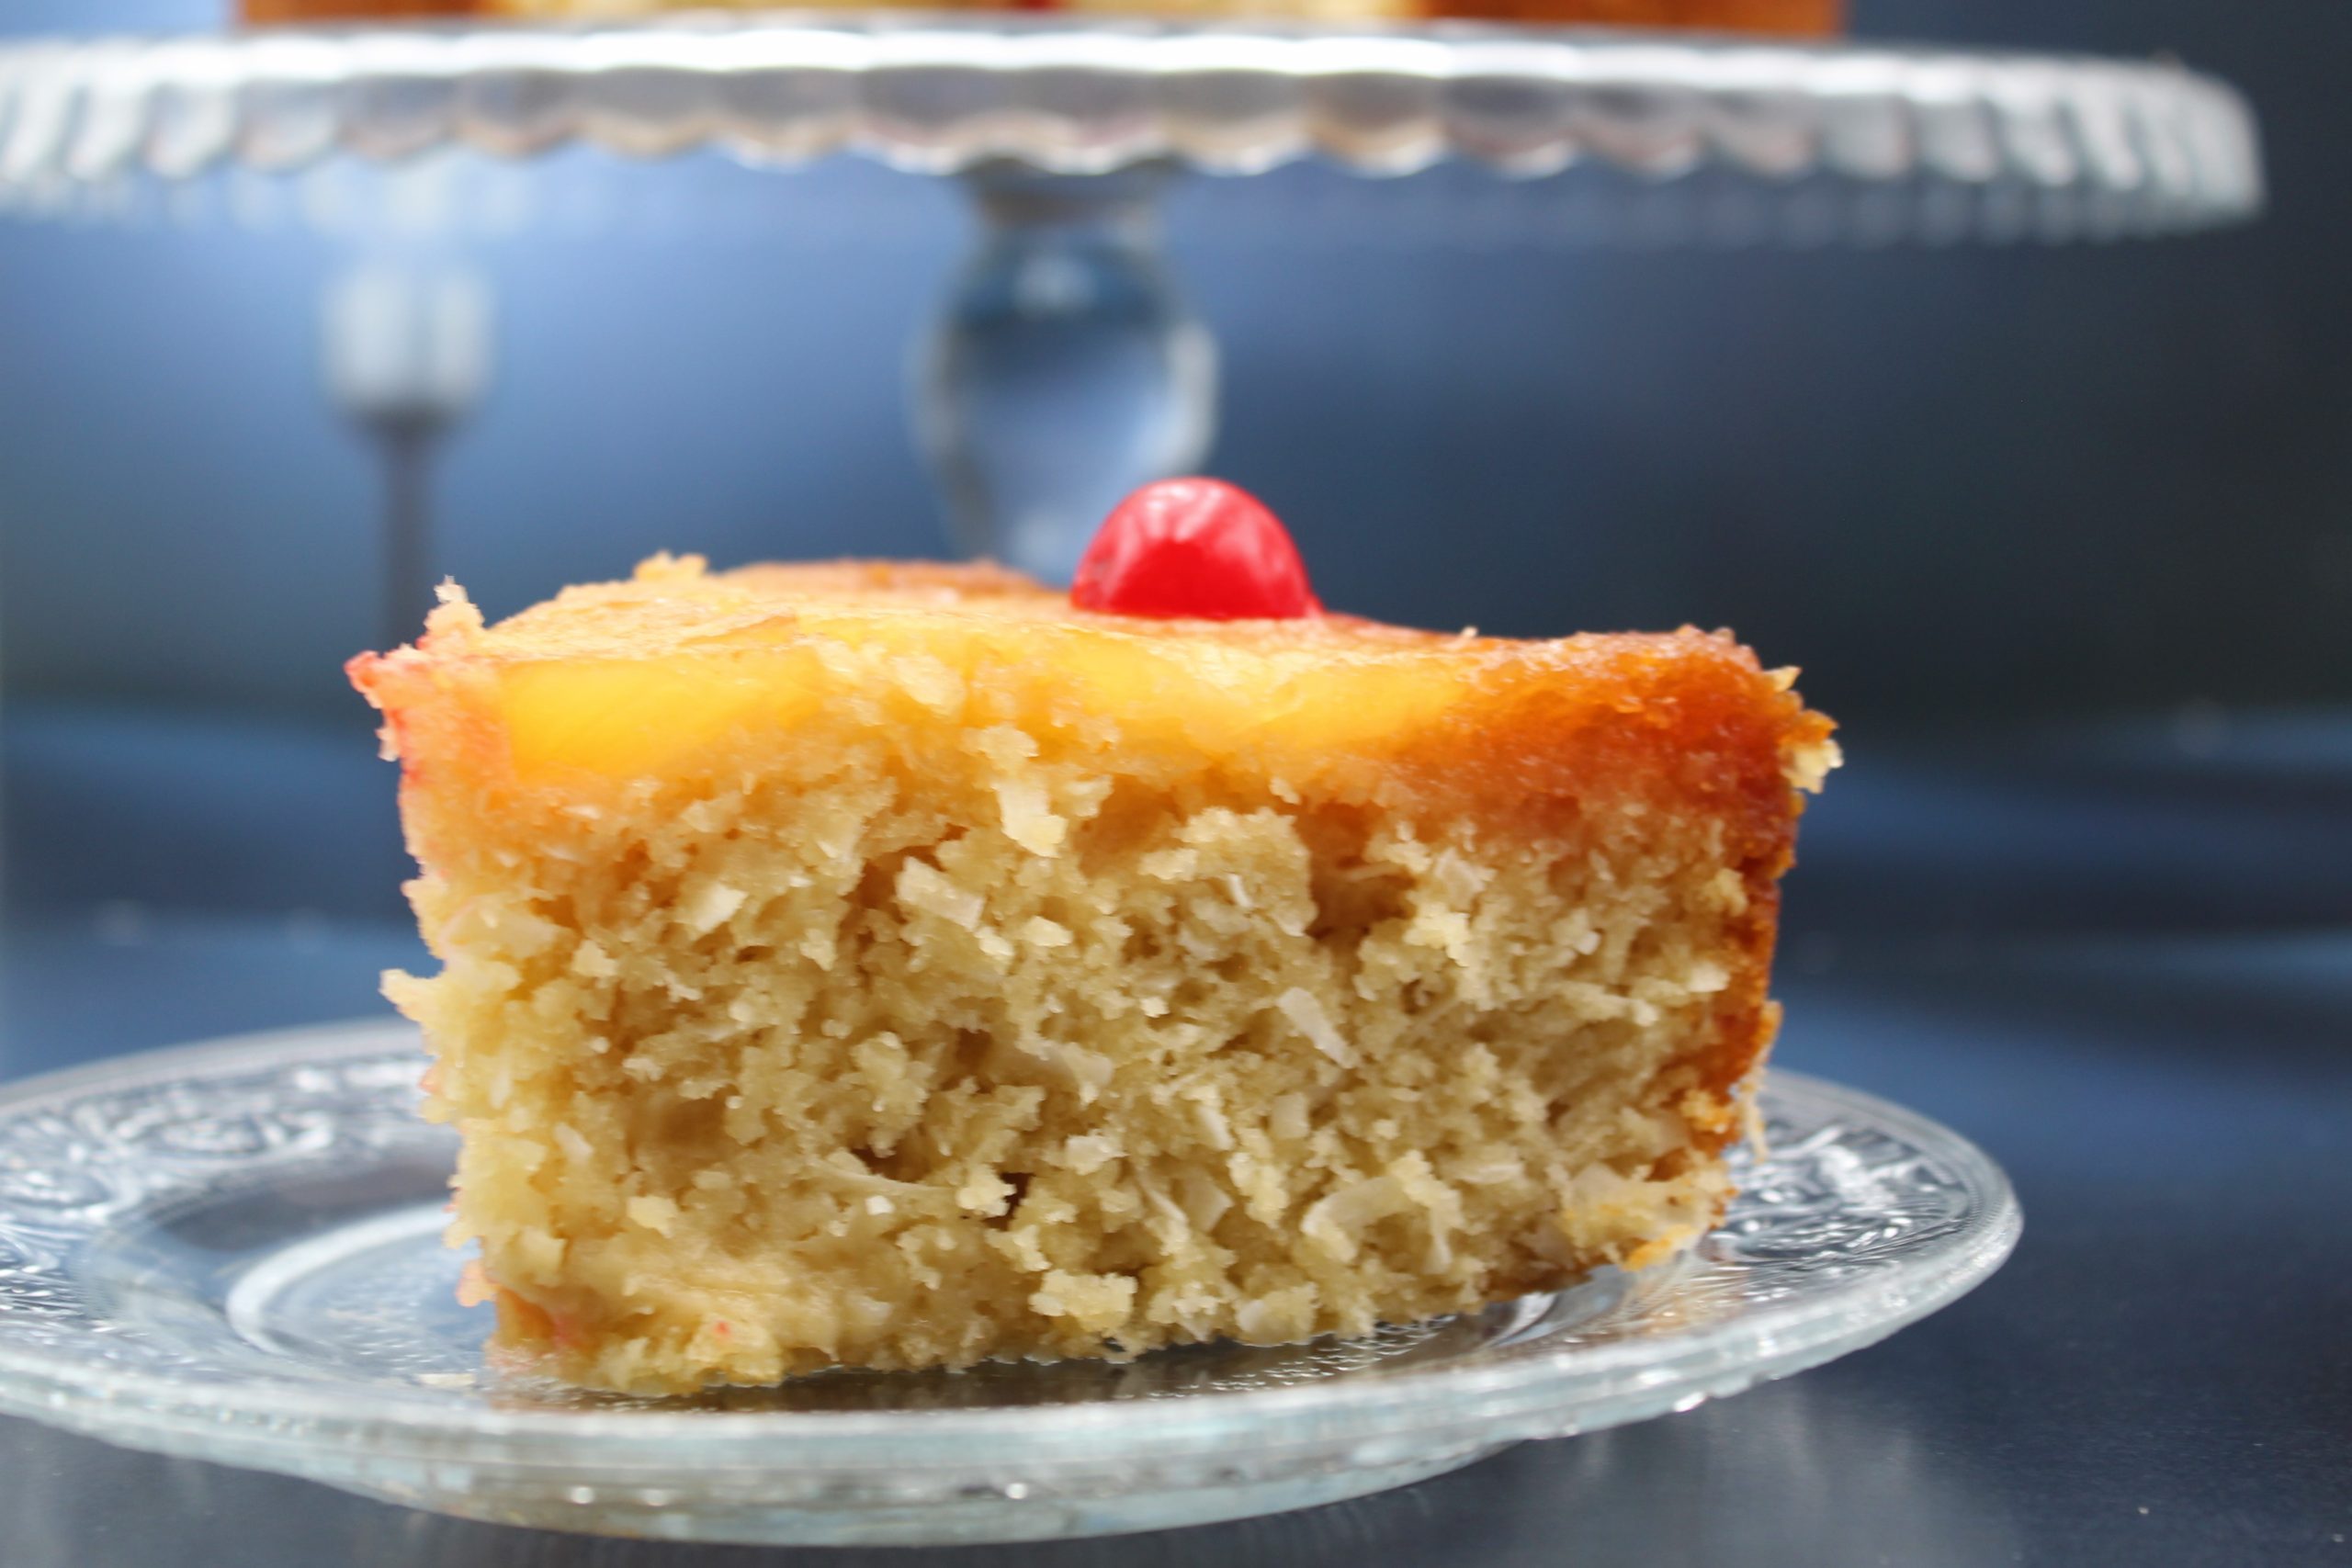
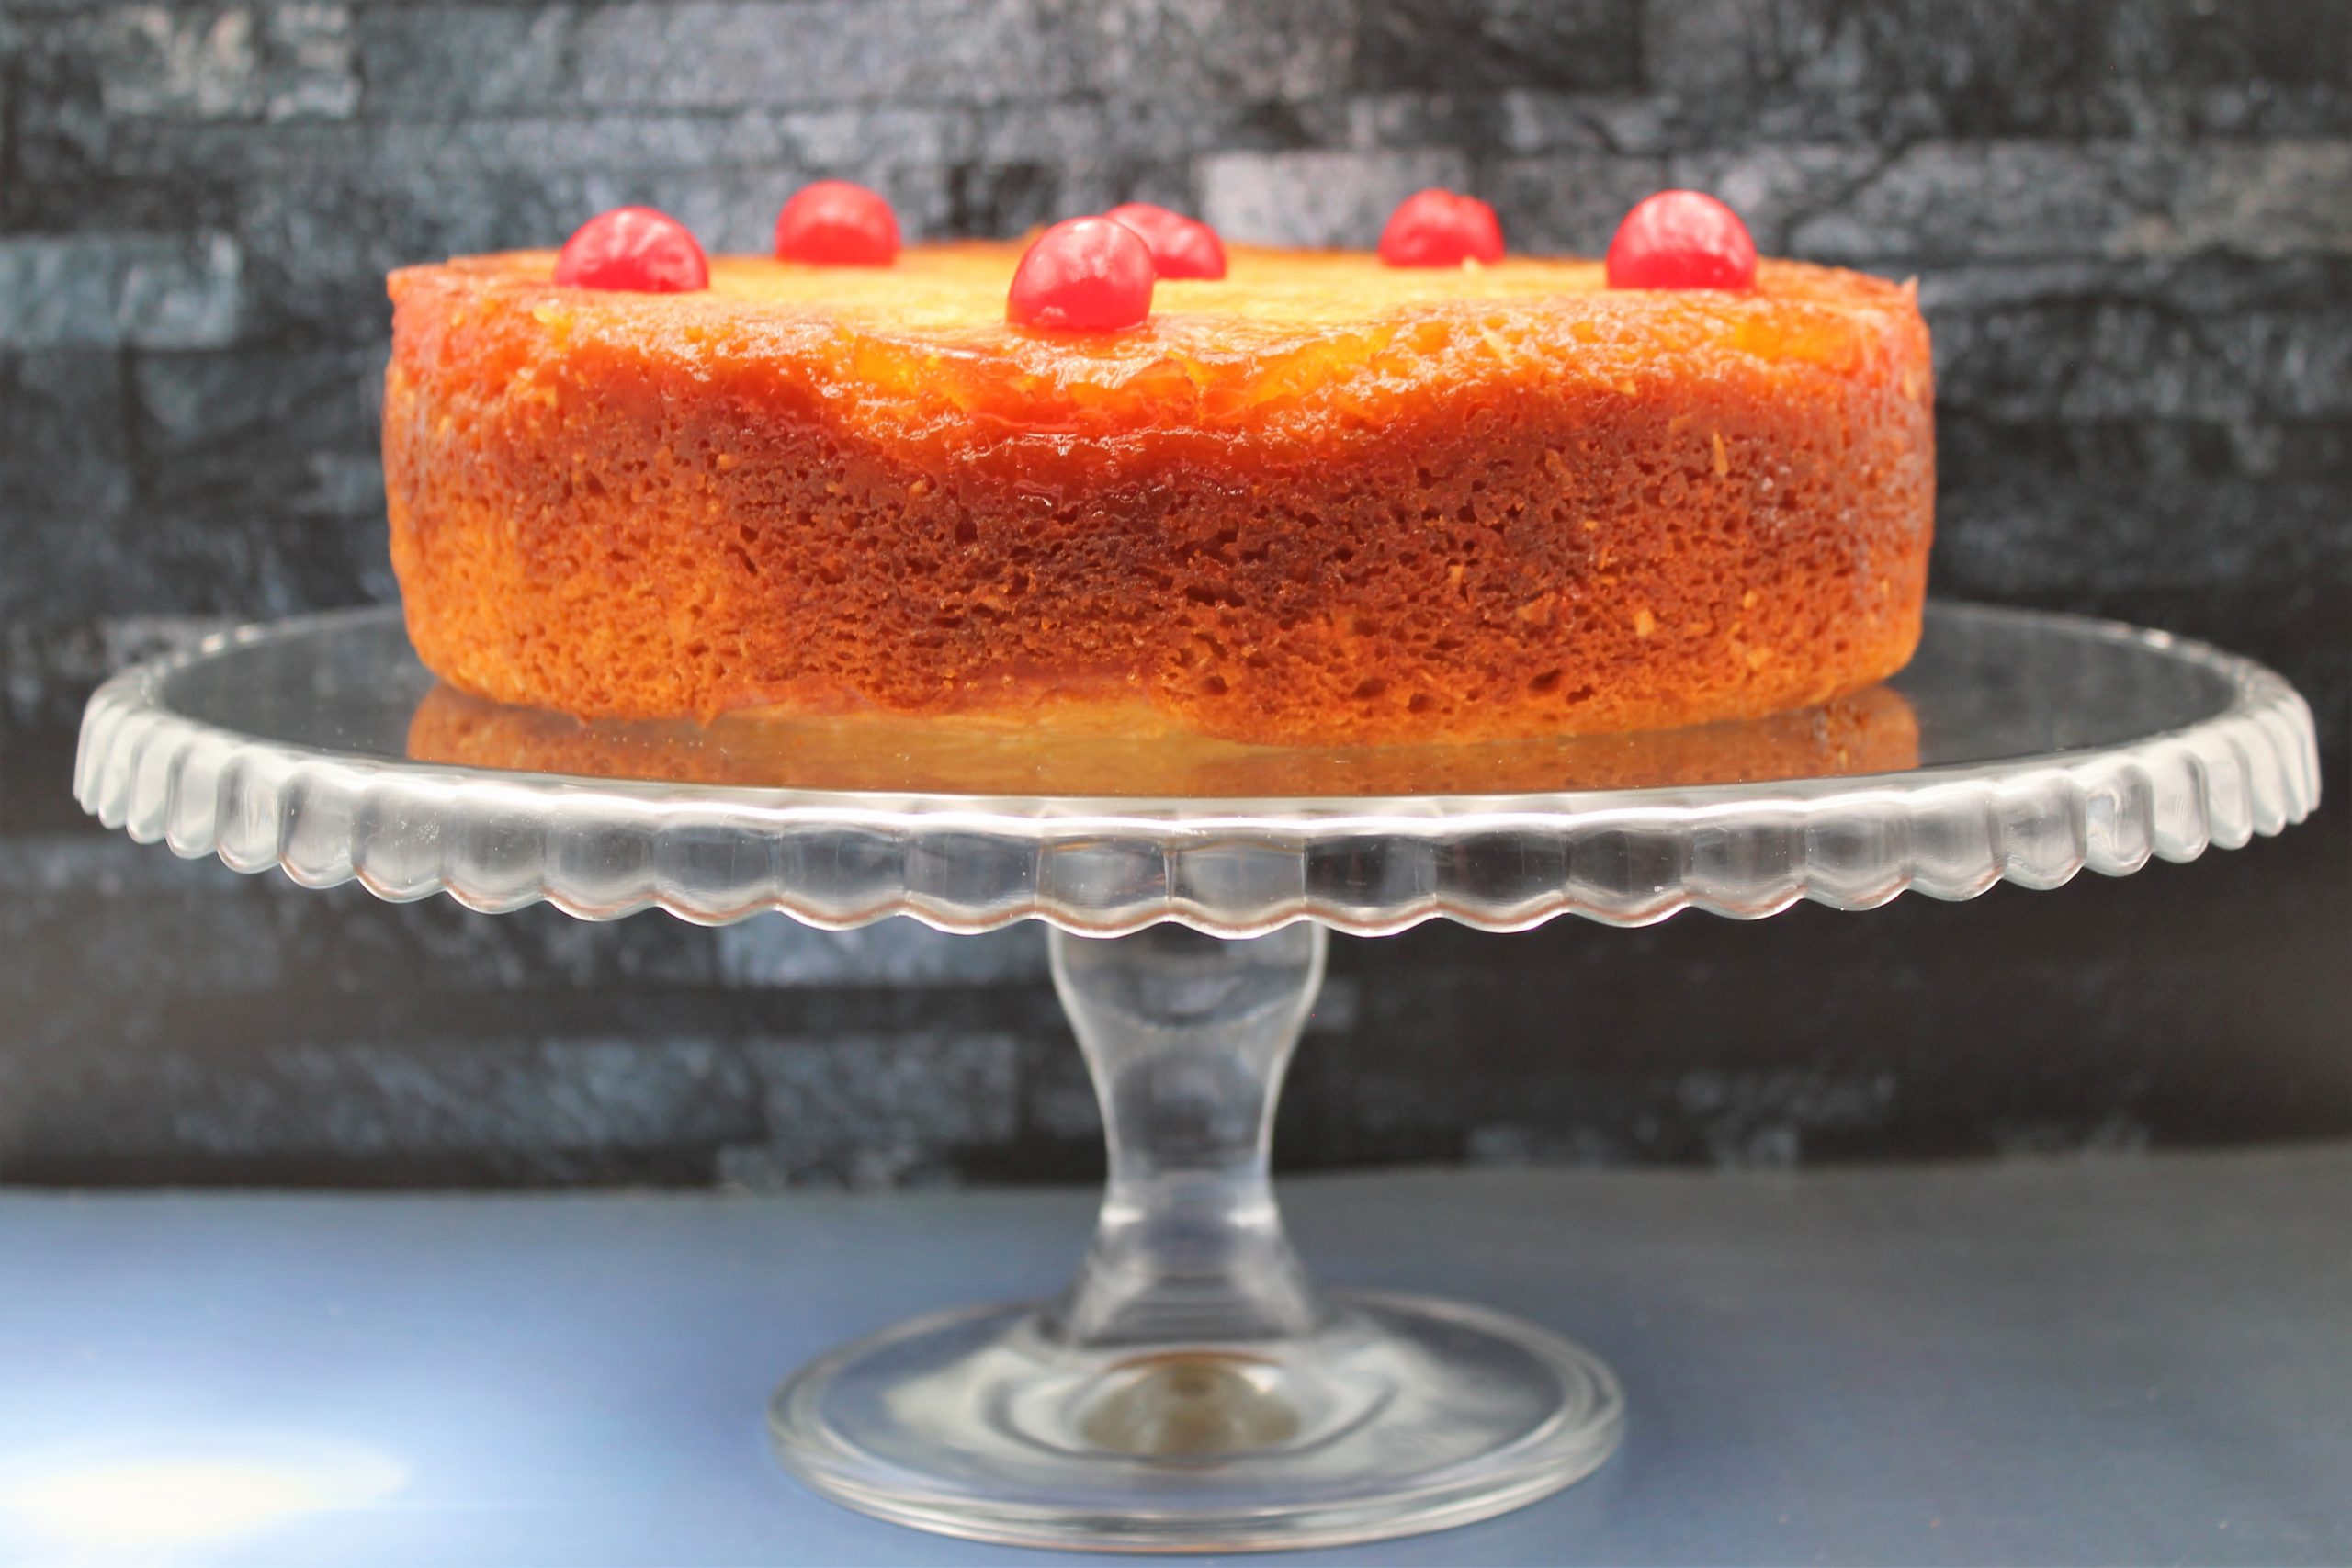
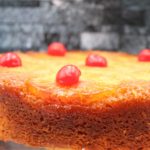
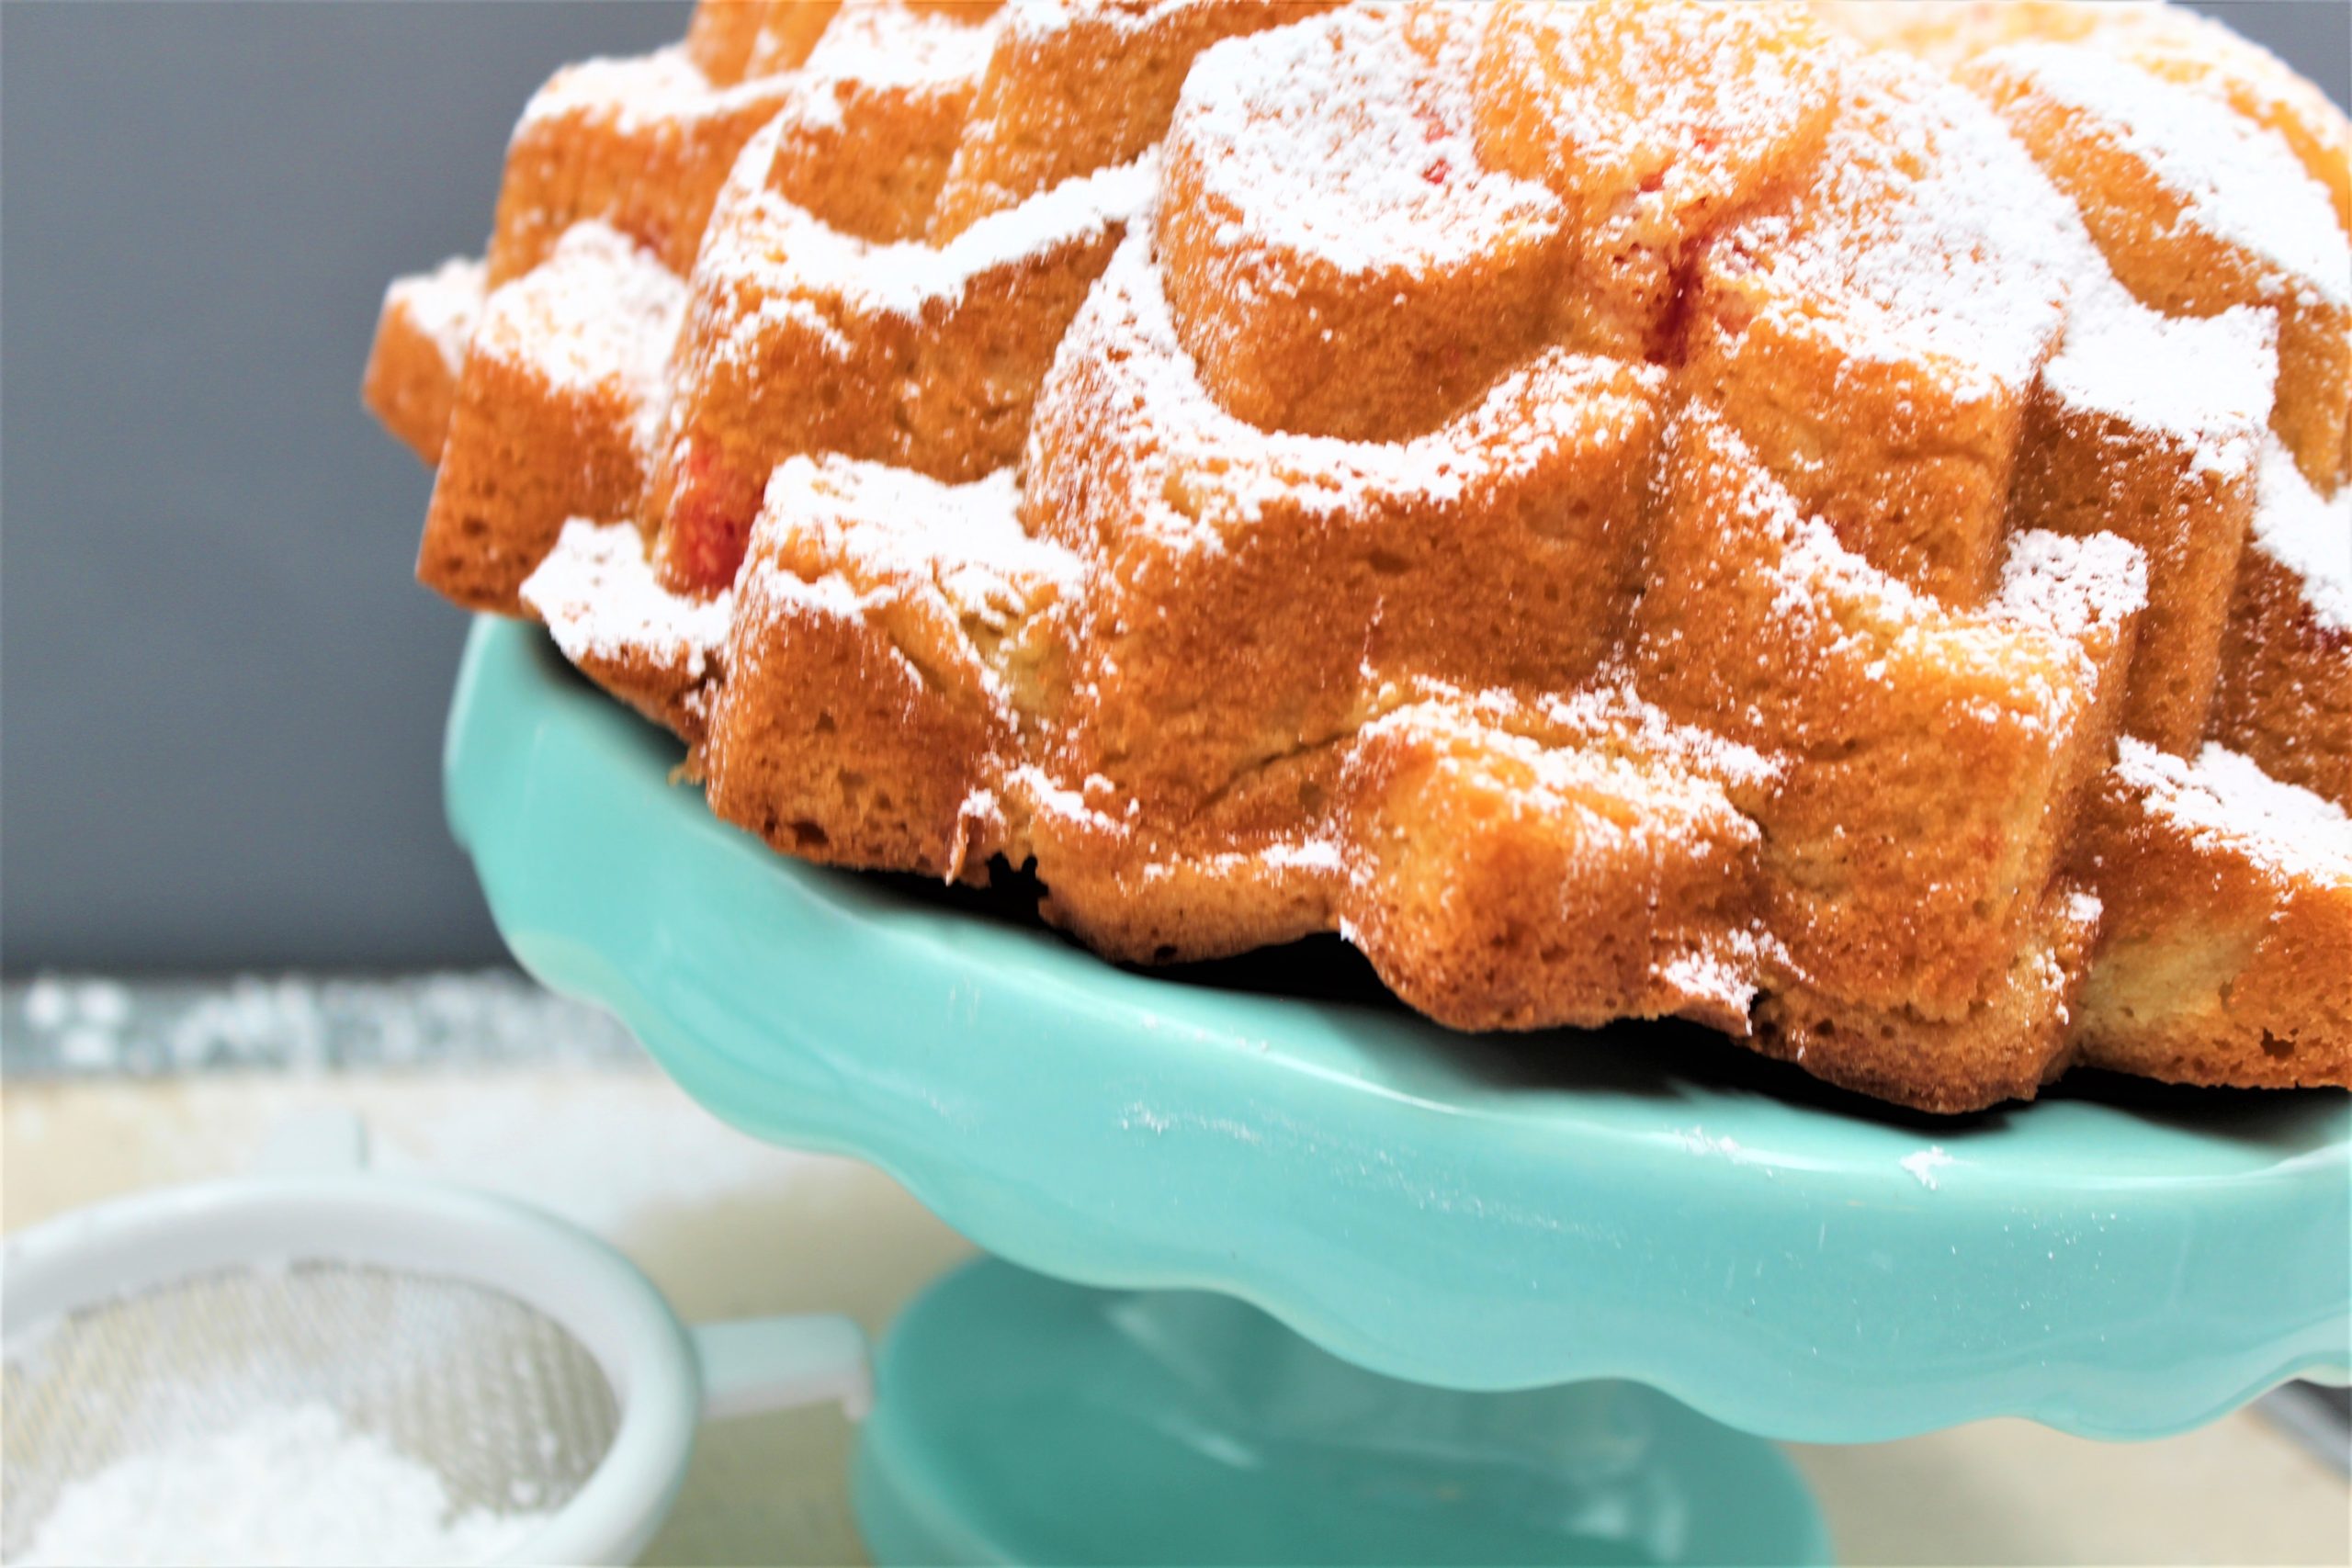
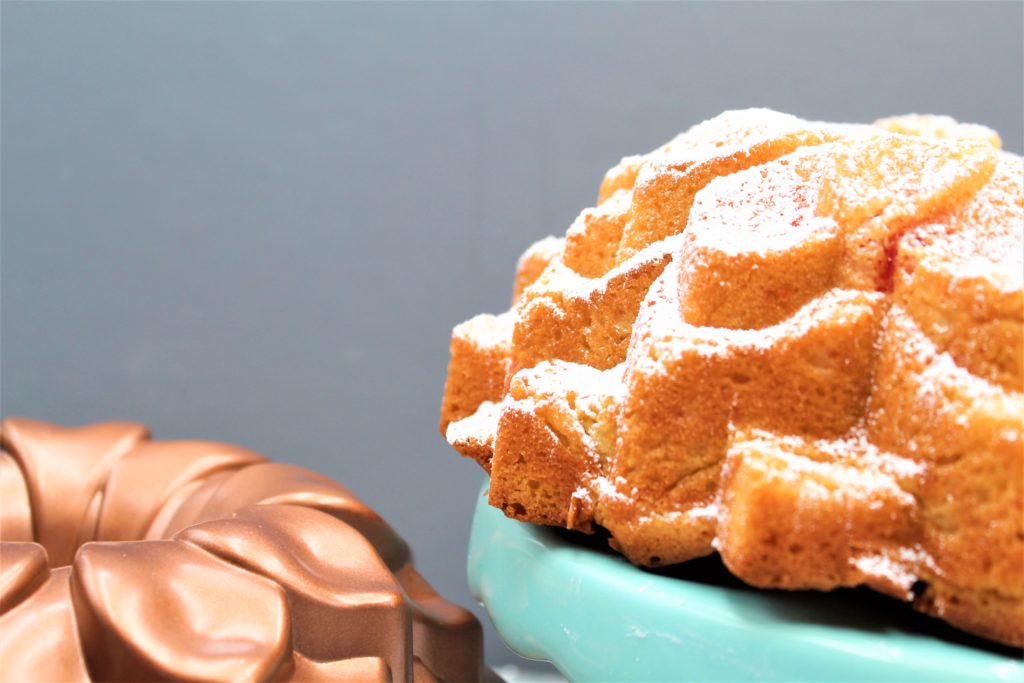
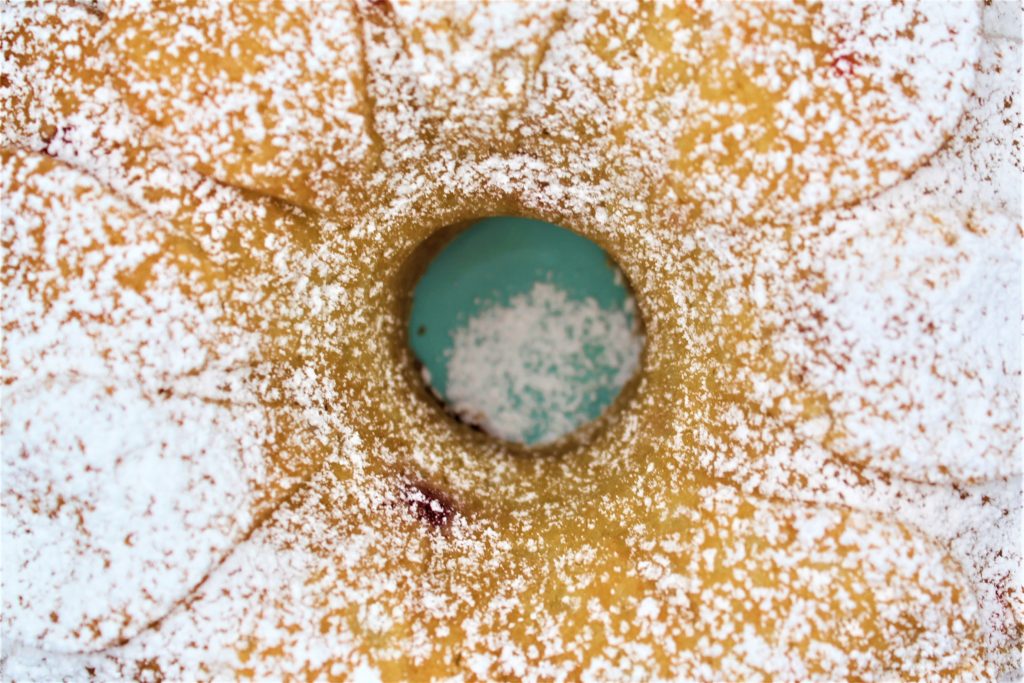
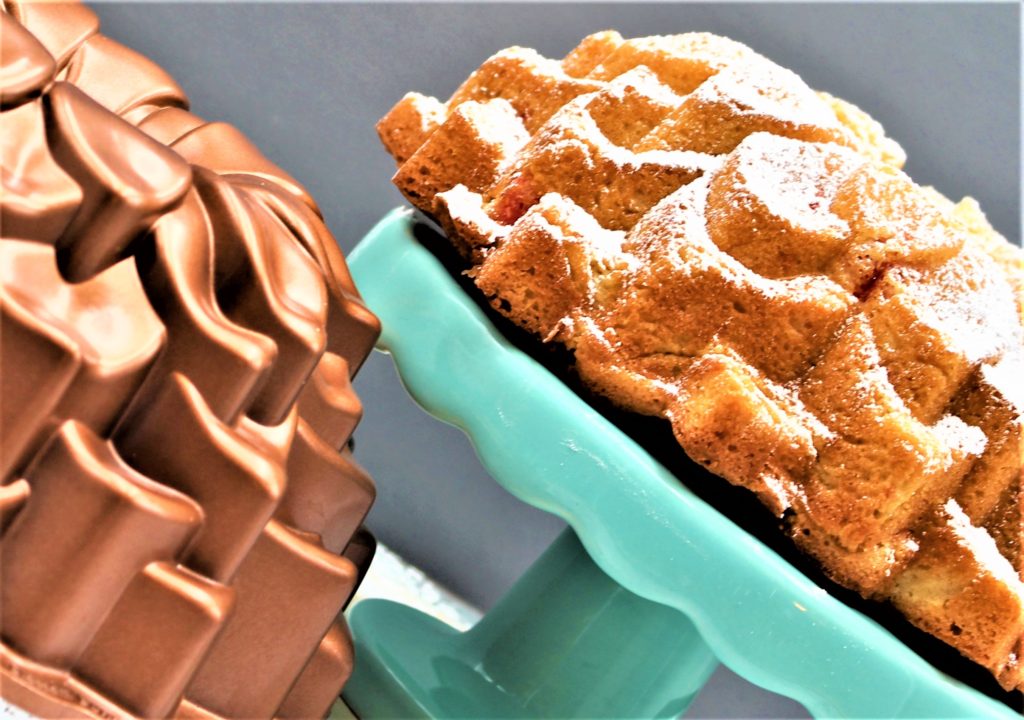
The first time I made a Pineapple Upside Down Cake was about 20 years ago. It was the first time I ever attempted to make ANY cake. It seemed easy enough, no frosting, no fuss; make it in the pan, flip it over, and you have the perfect cake.
As you probably guessed, It didn’t work out quite that well. Half of it stuck inside the pan when I flipped the cake over.
I was able to pry out the stuck cake and smoosh it with the rest of it. I wish I could say that was the only issue, but the cake was dry. So I would say that overall, it was a cake fail.
Fast forward 20-ish years, and I’m back trying to perfect the Pineapple Upside Down Cake.
Since that first attempt, I have learned a lot about baking, and I believe this recipe makes the best cake. The Coconut in the batter adds a tropical taste that pairs well with the pineapple and the cherries.
This time around, I used a springform pan because I believed I could get it out of the pan, and I was correct. It came out perfectly. This Pineapple Upside Down Cake is one of the best cakes I have made.
I hope you give it a try. Remember, even if it sticks a pan, it’s still worth eating. Enjoy.
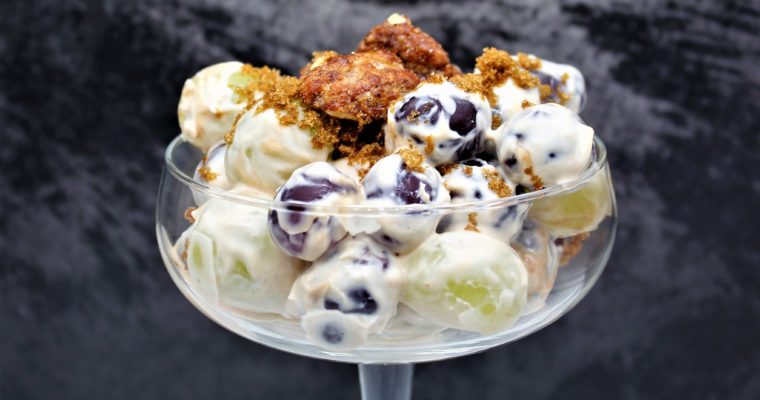
The original recipe called for semi-sweet chocolate chips; however, I prefer milk chocolate. As a result, the creaminess and chocolatey flavor come through and have a less harsh semi-sweet chocolate taste.
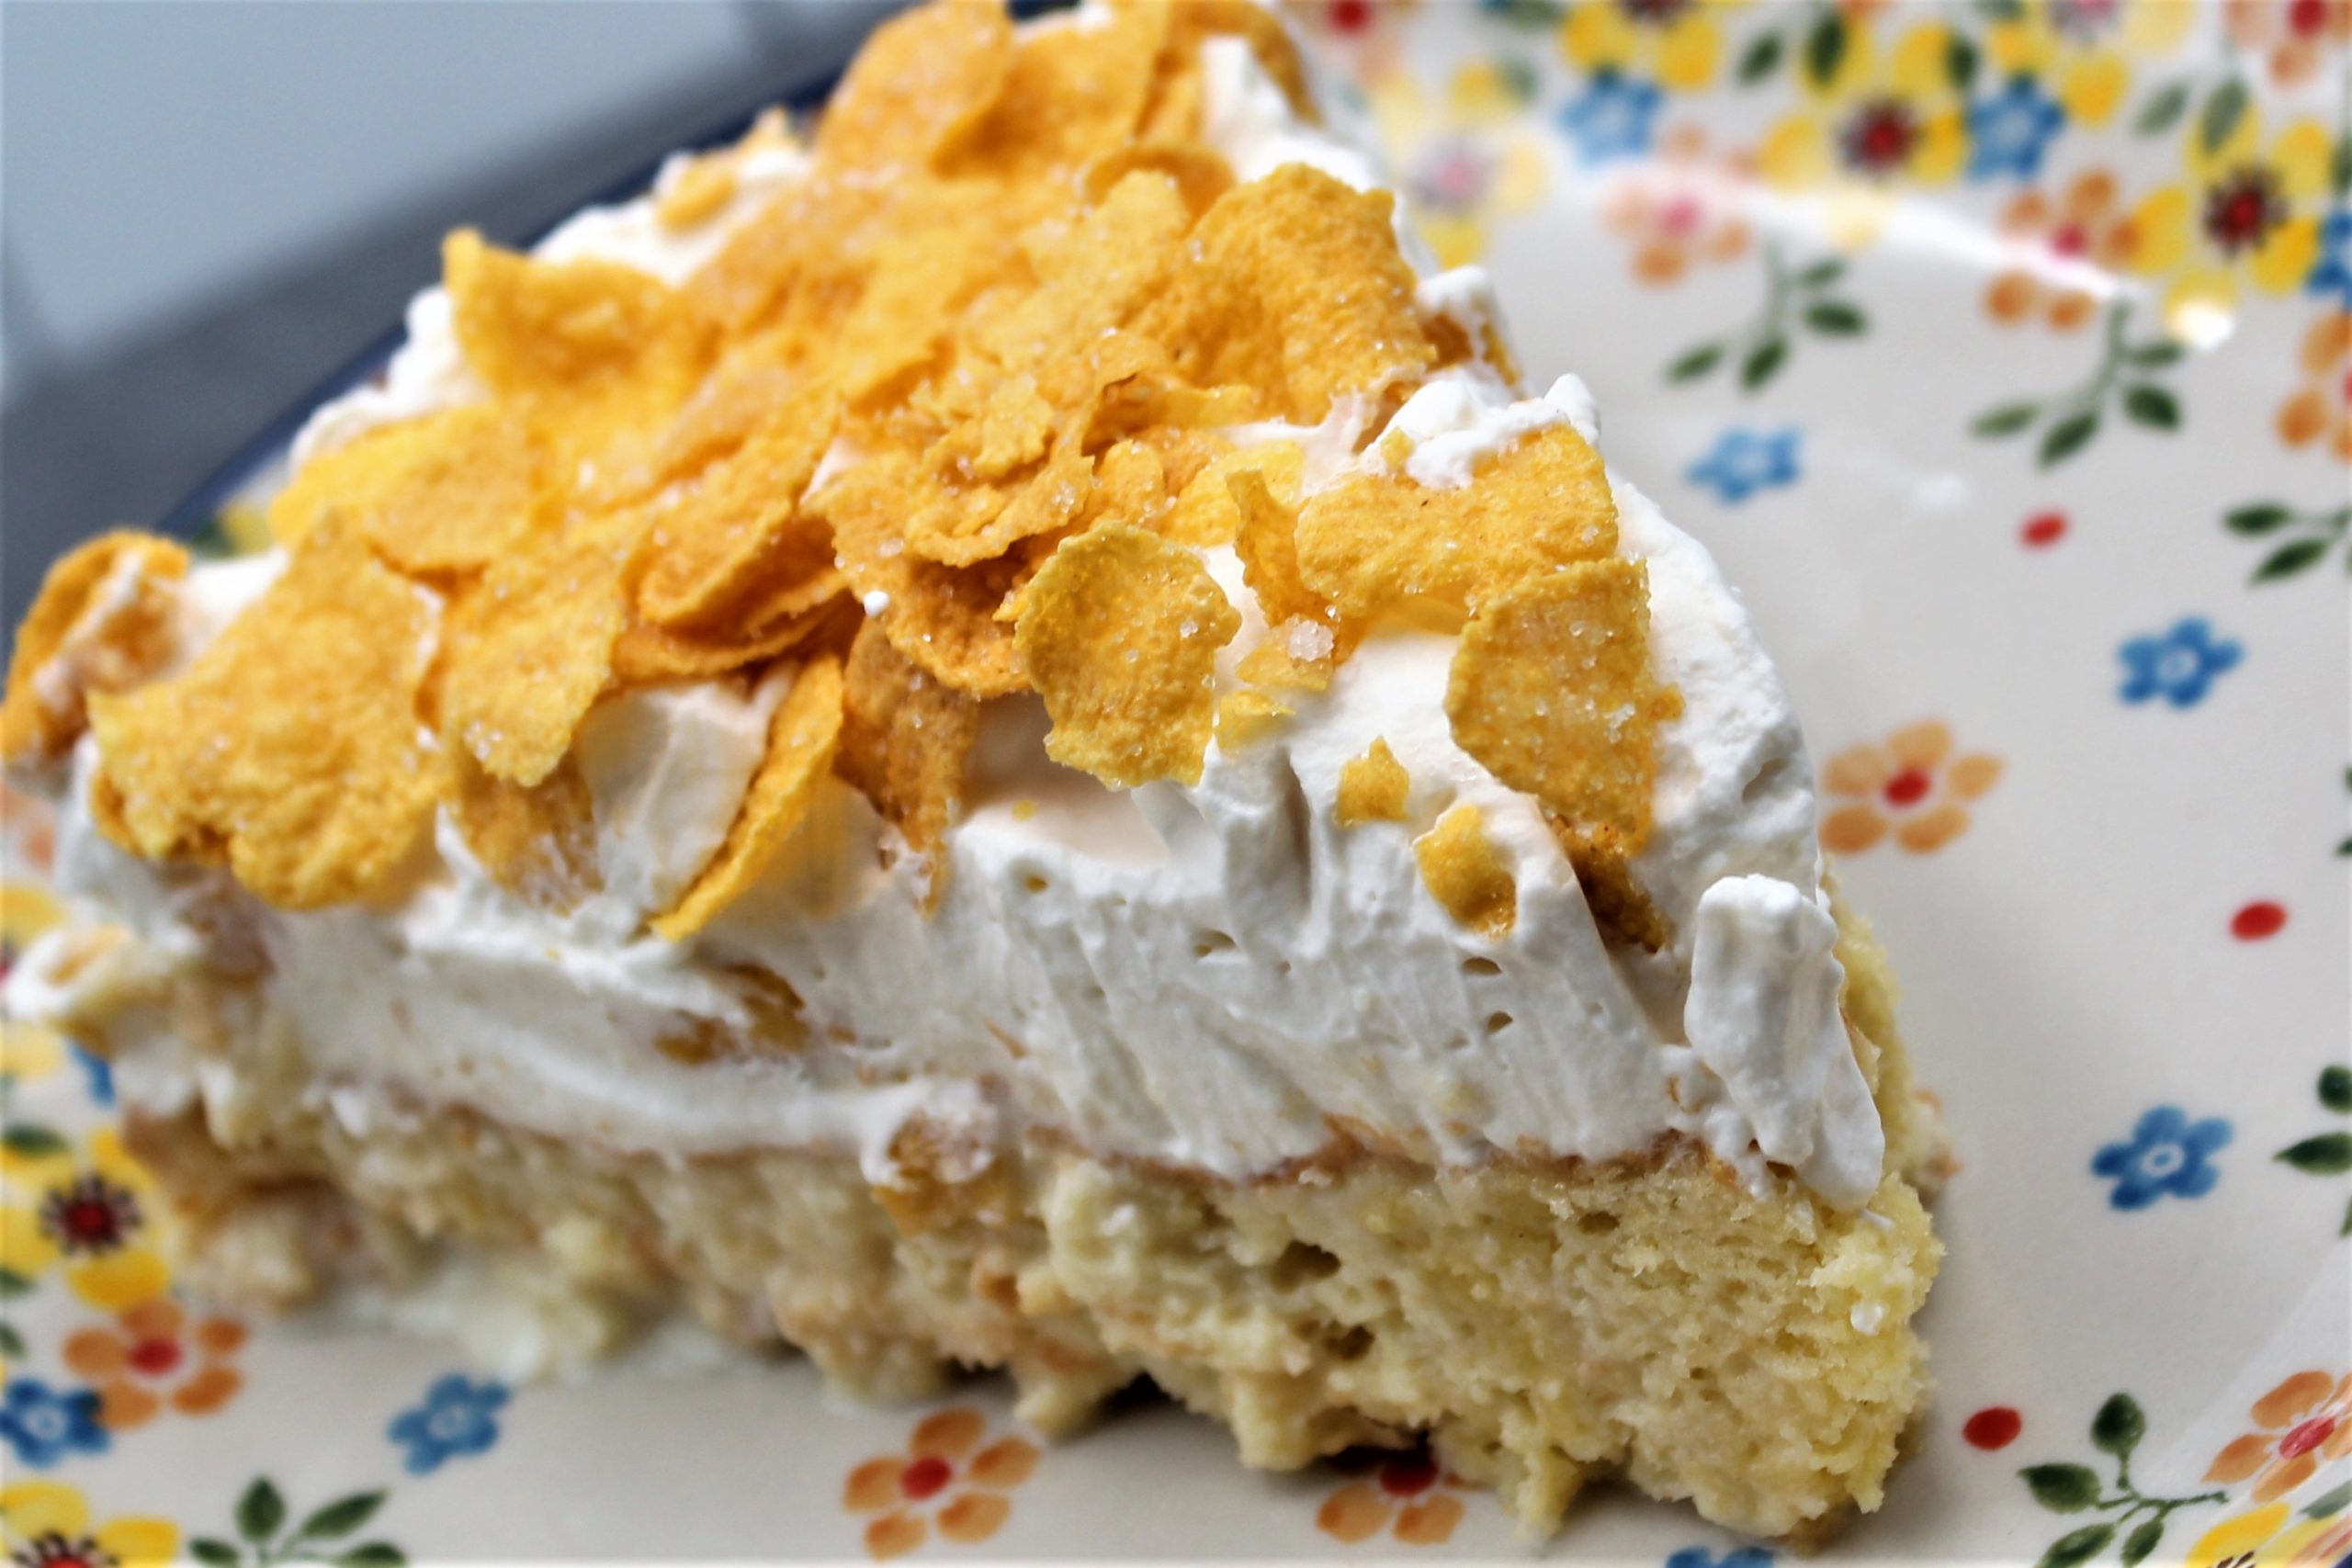
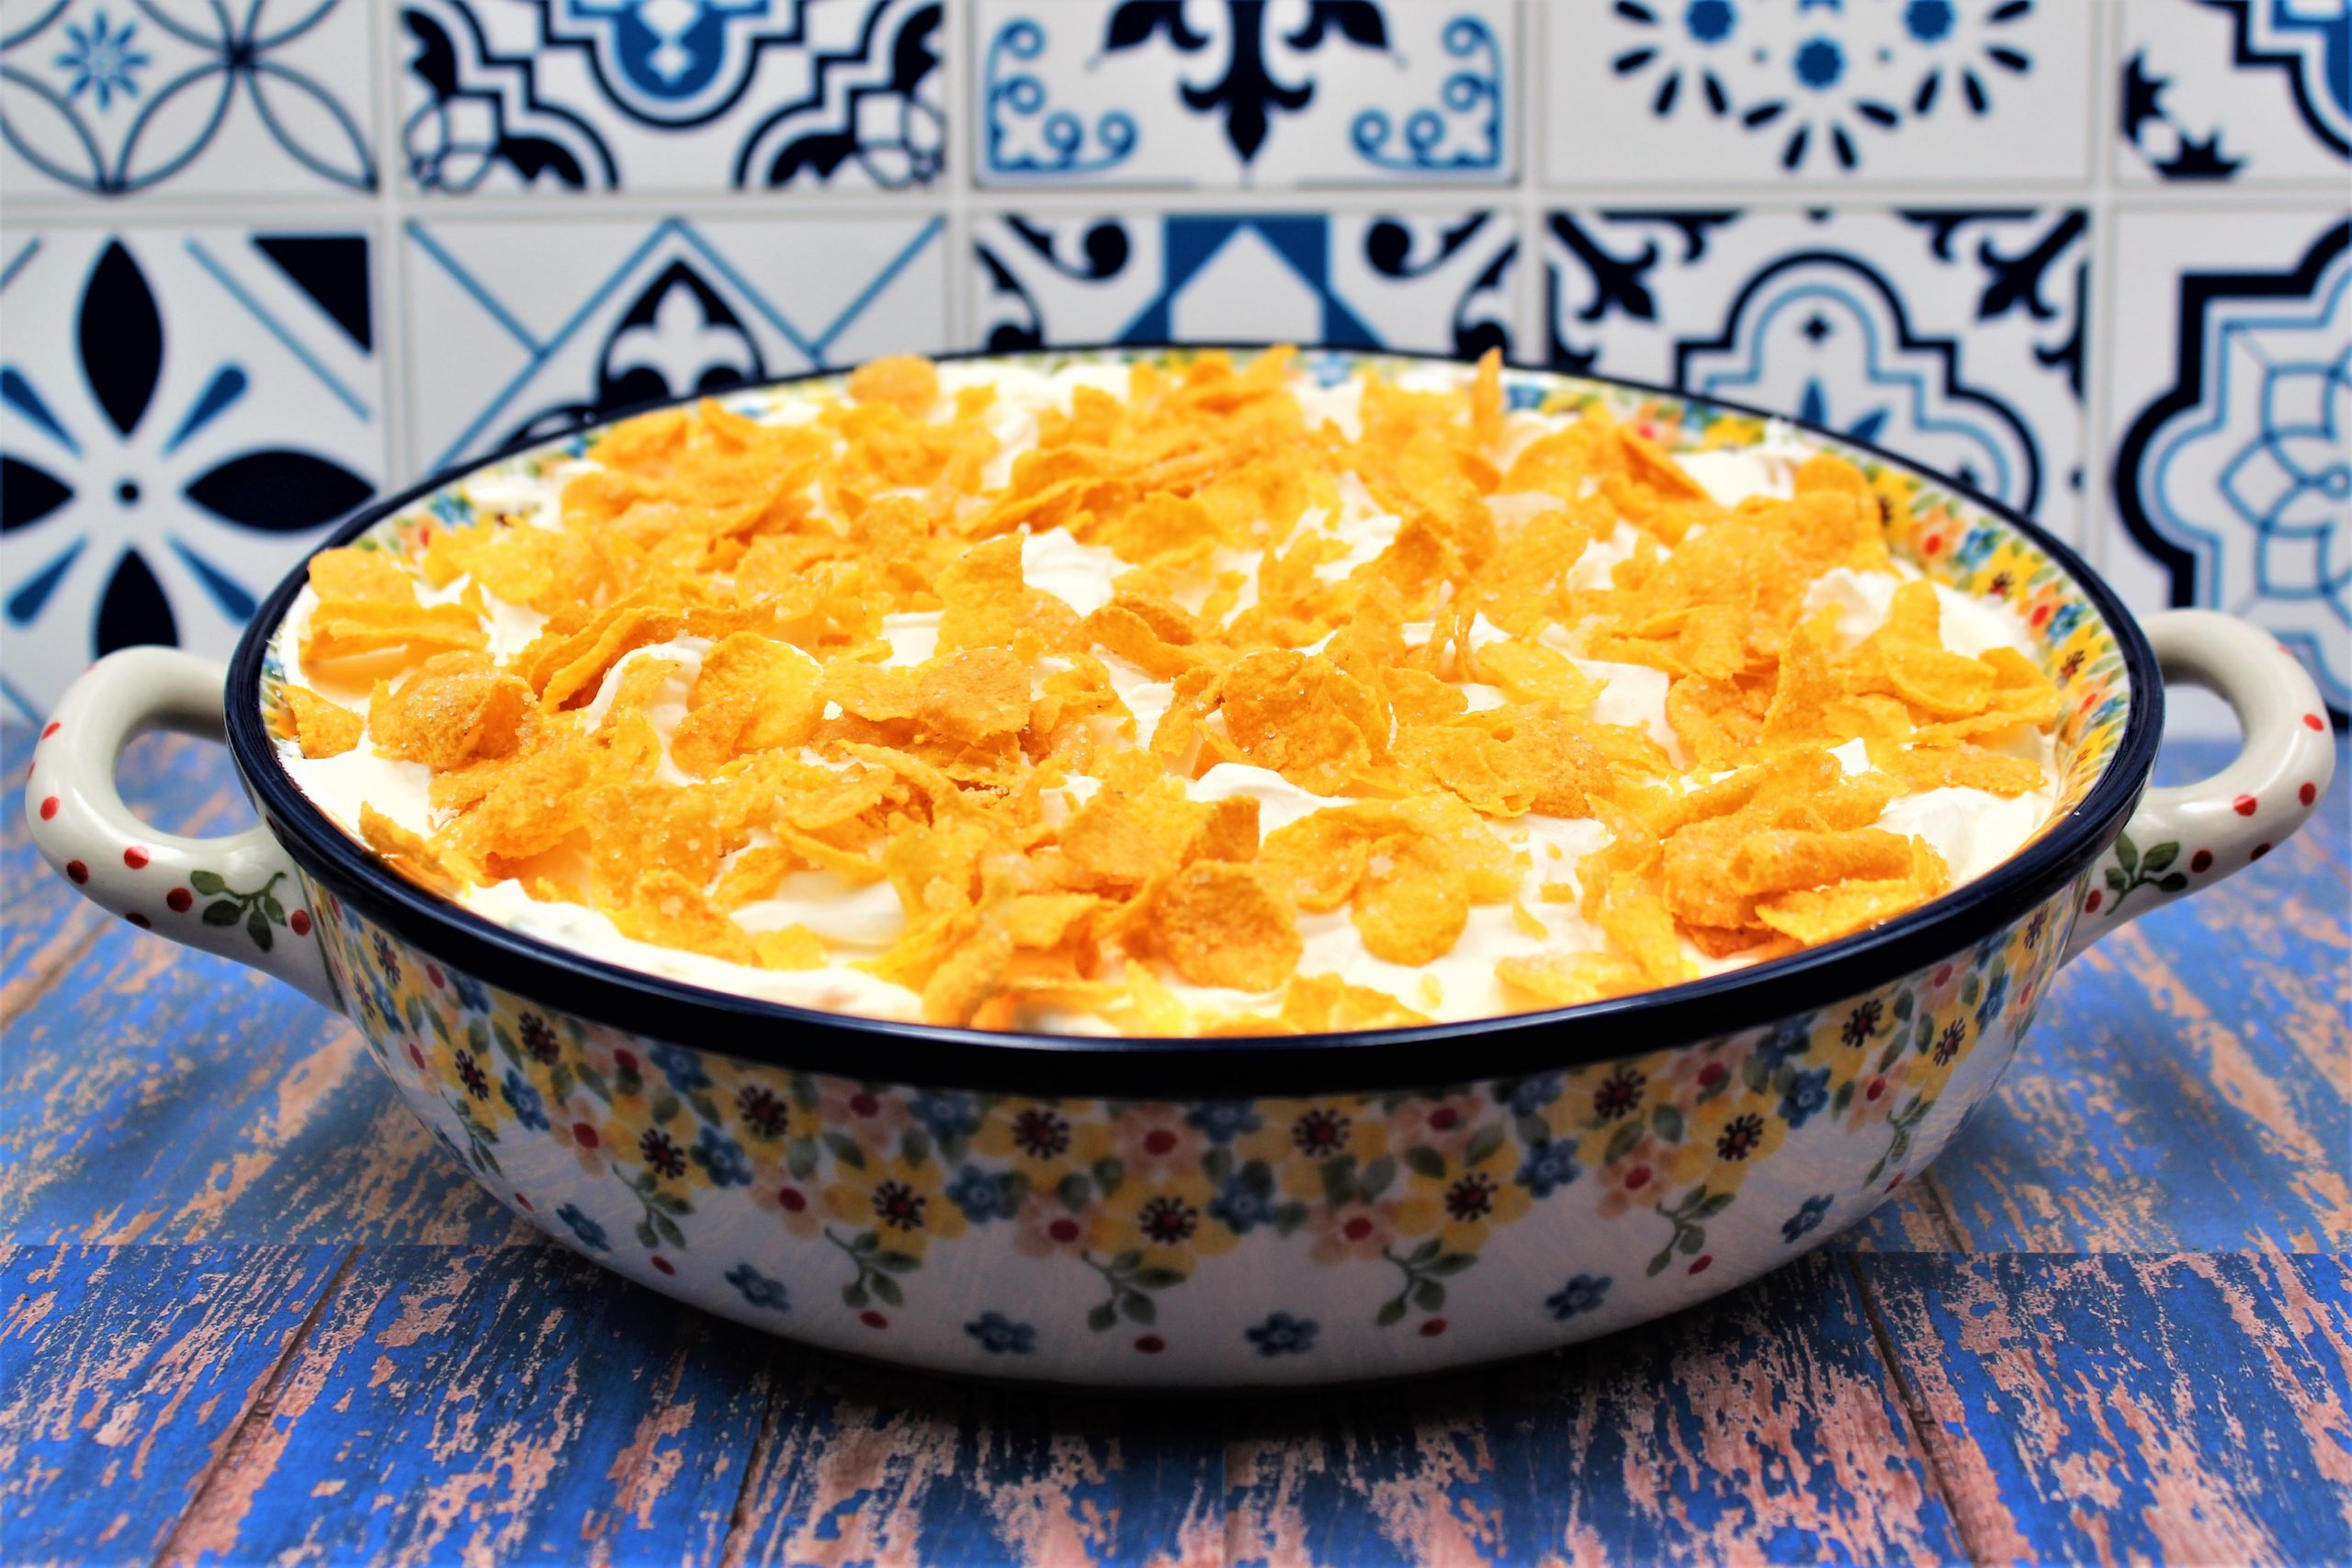
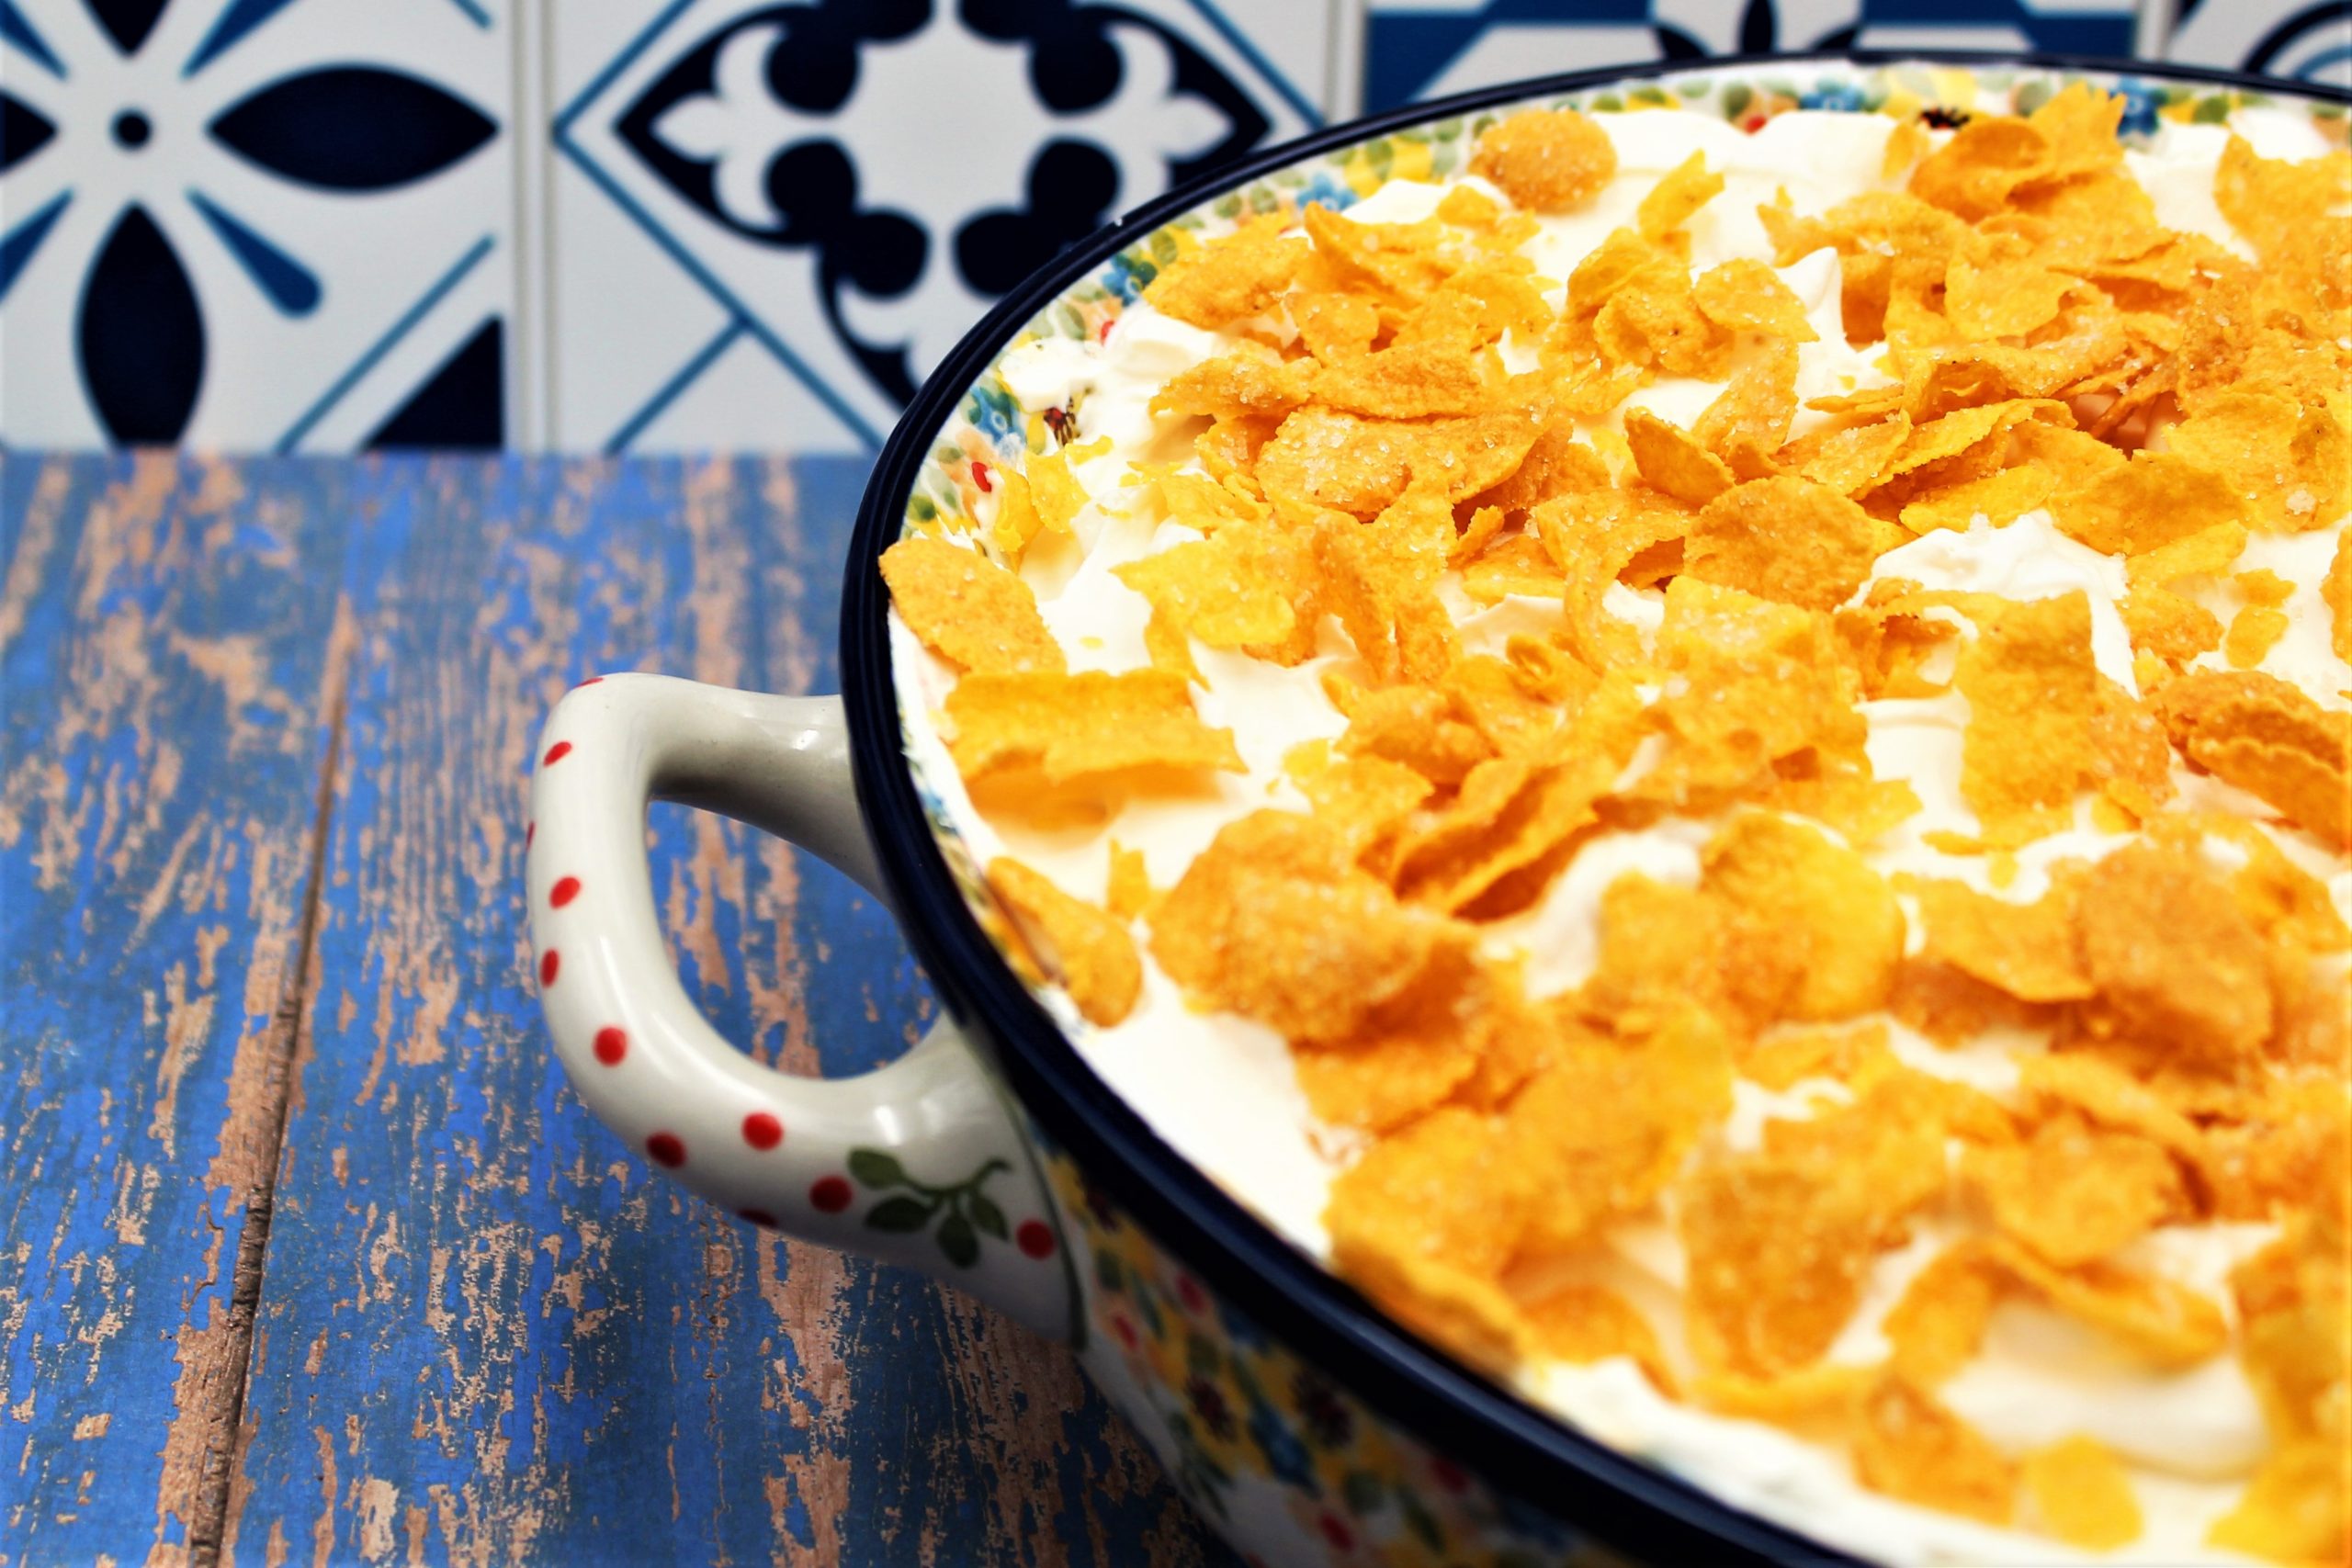
The grapes are juicy, and the sauce that coats them is creamy and tangy. The candied Pecan topping is outrageous. These elements together make one of the best dishes I have ever tasted.
THREE YEARS AGO, I WAS A HORRIBLE BAKER when I started this website. Most of what I made came from a box. I am not saying there’s anything wrong with cake mixes. However, I was raised by a mother on a farm that made everything from scratch.
My mother was a fantastic baker who could make and bake anything, and it would turn out perfectly every time. Because we were a family of seven, she baked all the time. As they say, practice makes perfect.
Along with working on the farm, growing an enormous garden, and canning dozens of vegetables, she was active in several organizations and frequently took baked goods to events they hosted. Mom took pride in the fact that the buzz would generally be around what she contributed to the meal.
It was rare that someone did not ask her for the recipe for the item she brought. Someone asking for the recipe was so common that she would write out recipe cards before leaving for the event. Then, she could hand it to them on the spot when someone asked.
I guess you could say I have been chasing my mother’s cooking/baking my entire life. I am a good cook, but a baker? Let’s say I’m getting better.
My strategy for improving my baking was developing this website, where I could visibly see my progress and keep the recipes that I perfected and one location.
I believe, With a few simple base recipes and practice, anyone can learn to bake from scratch. I am a good example.
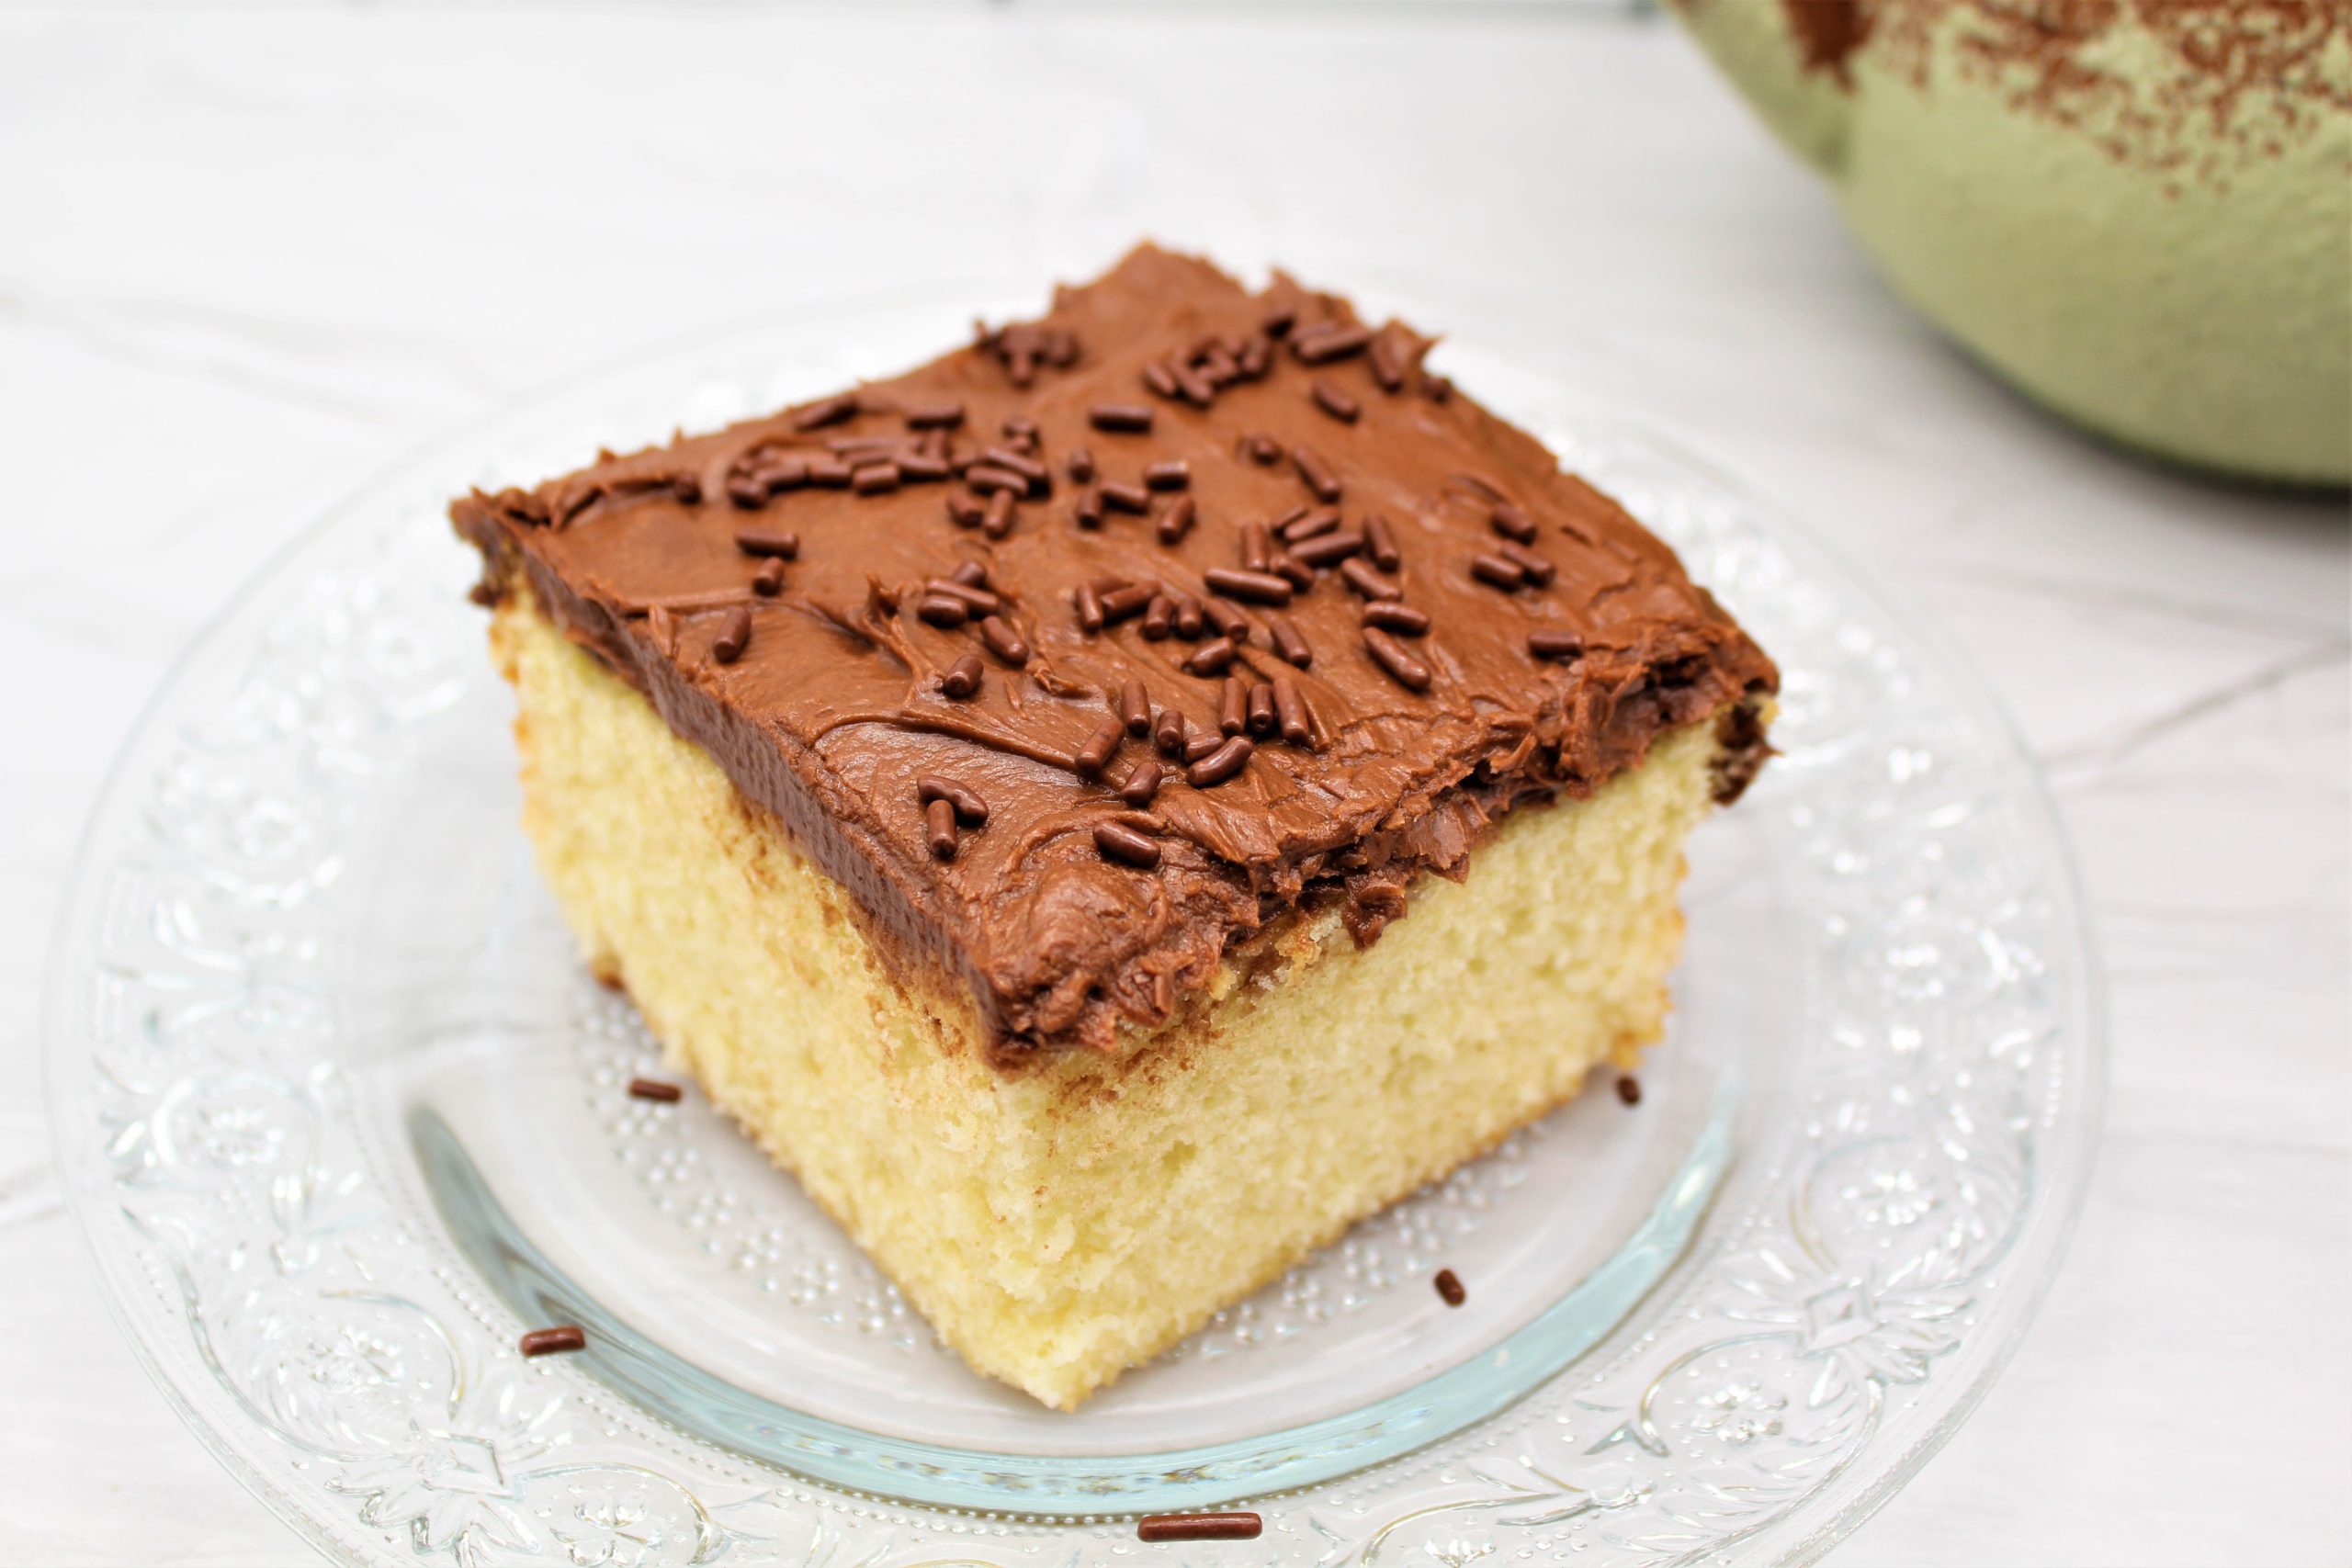
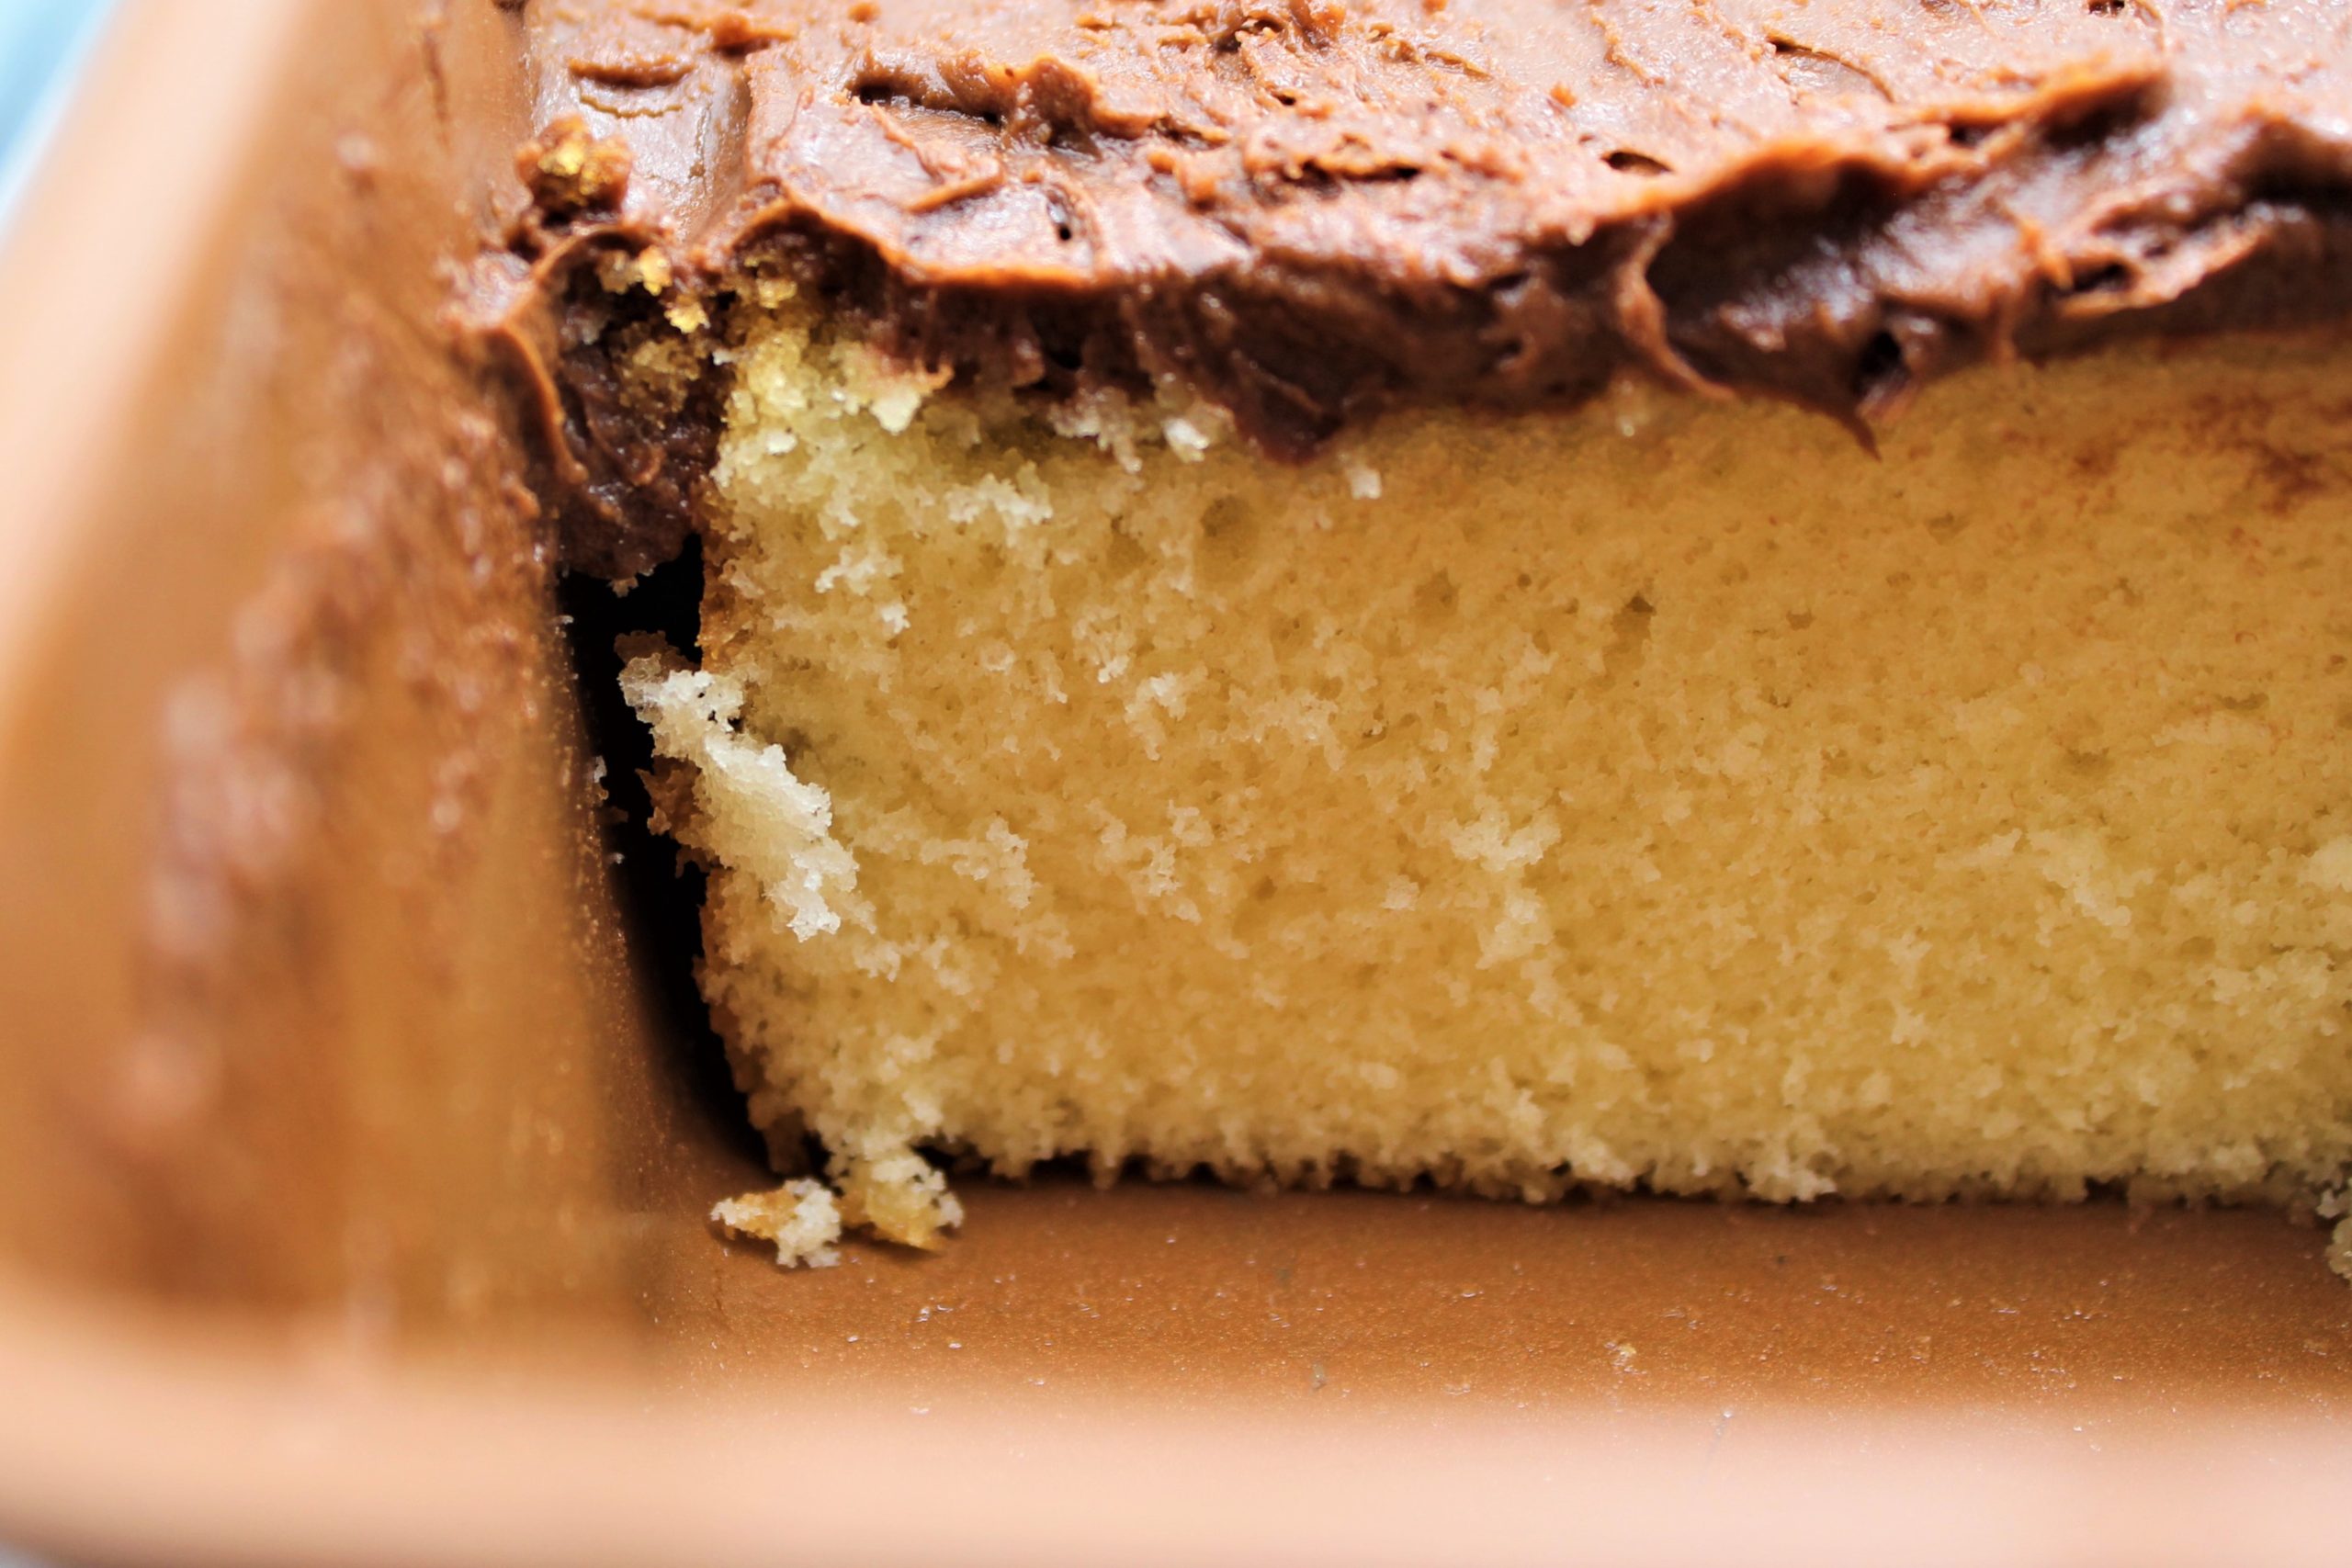
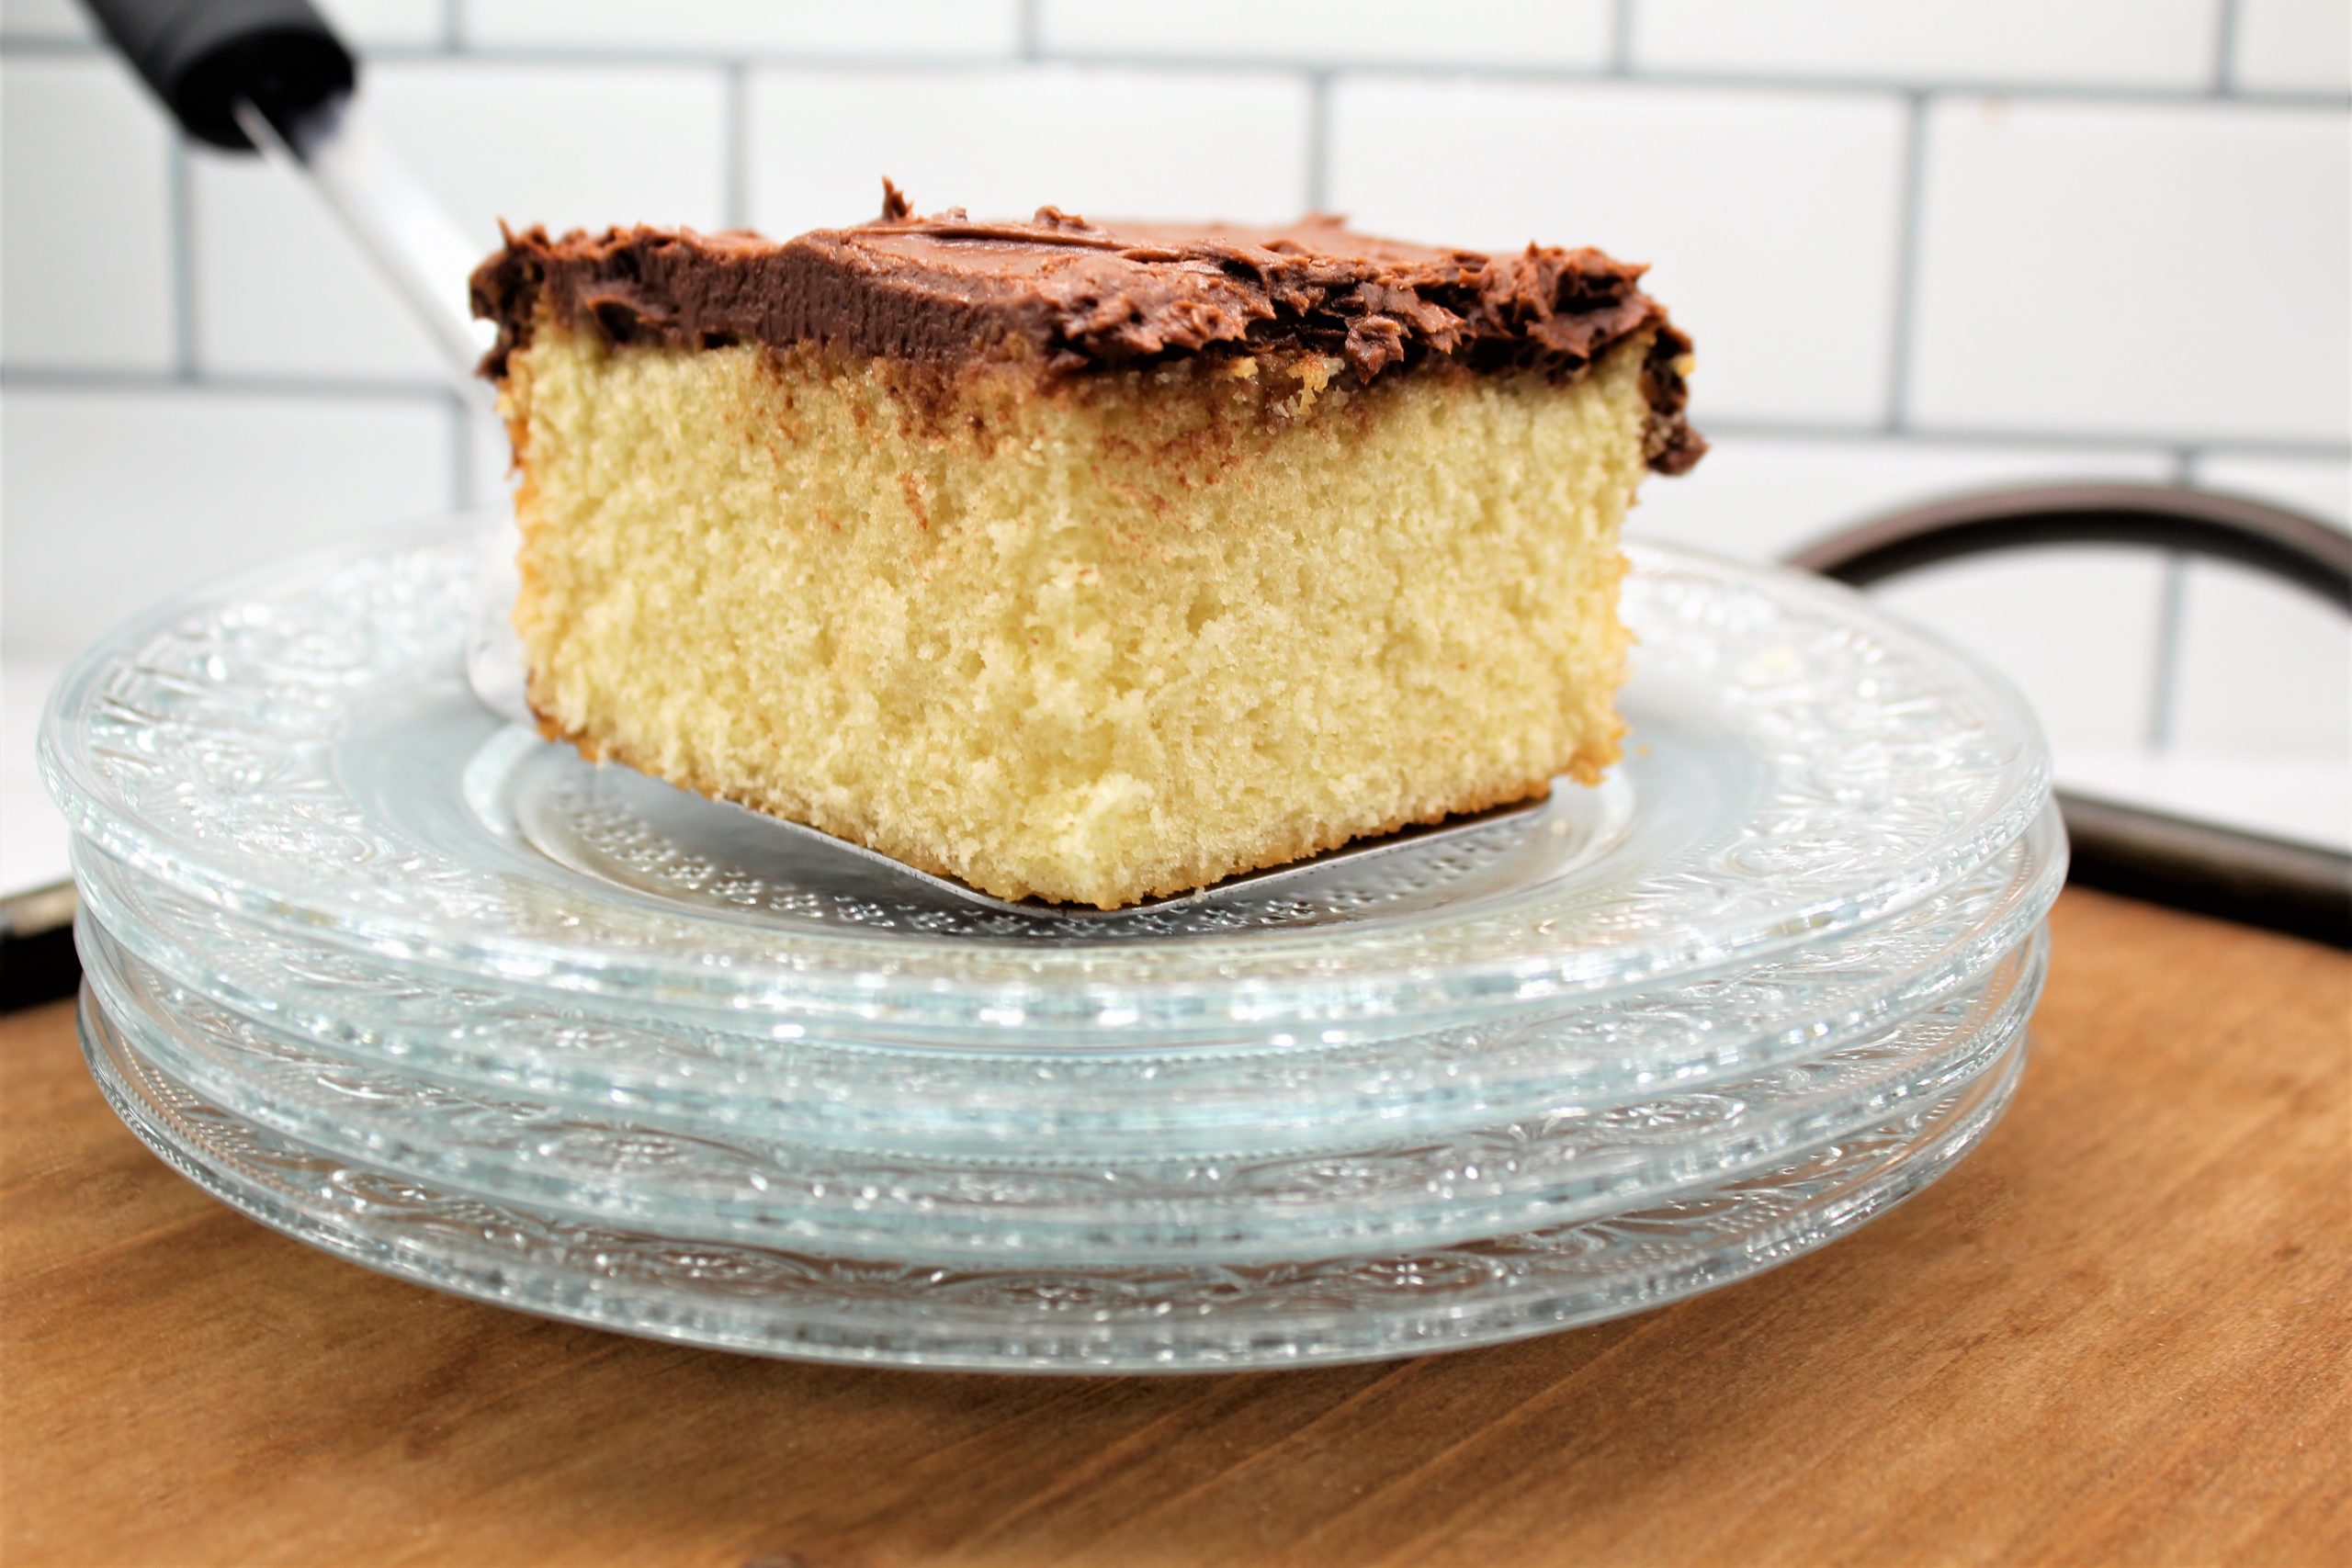
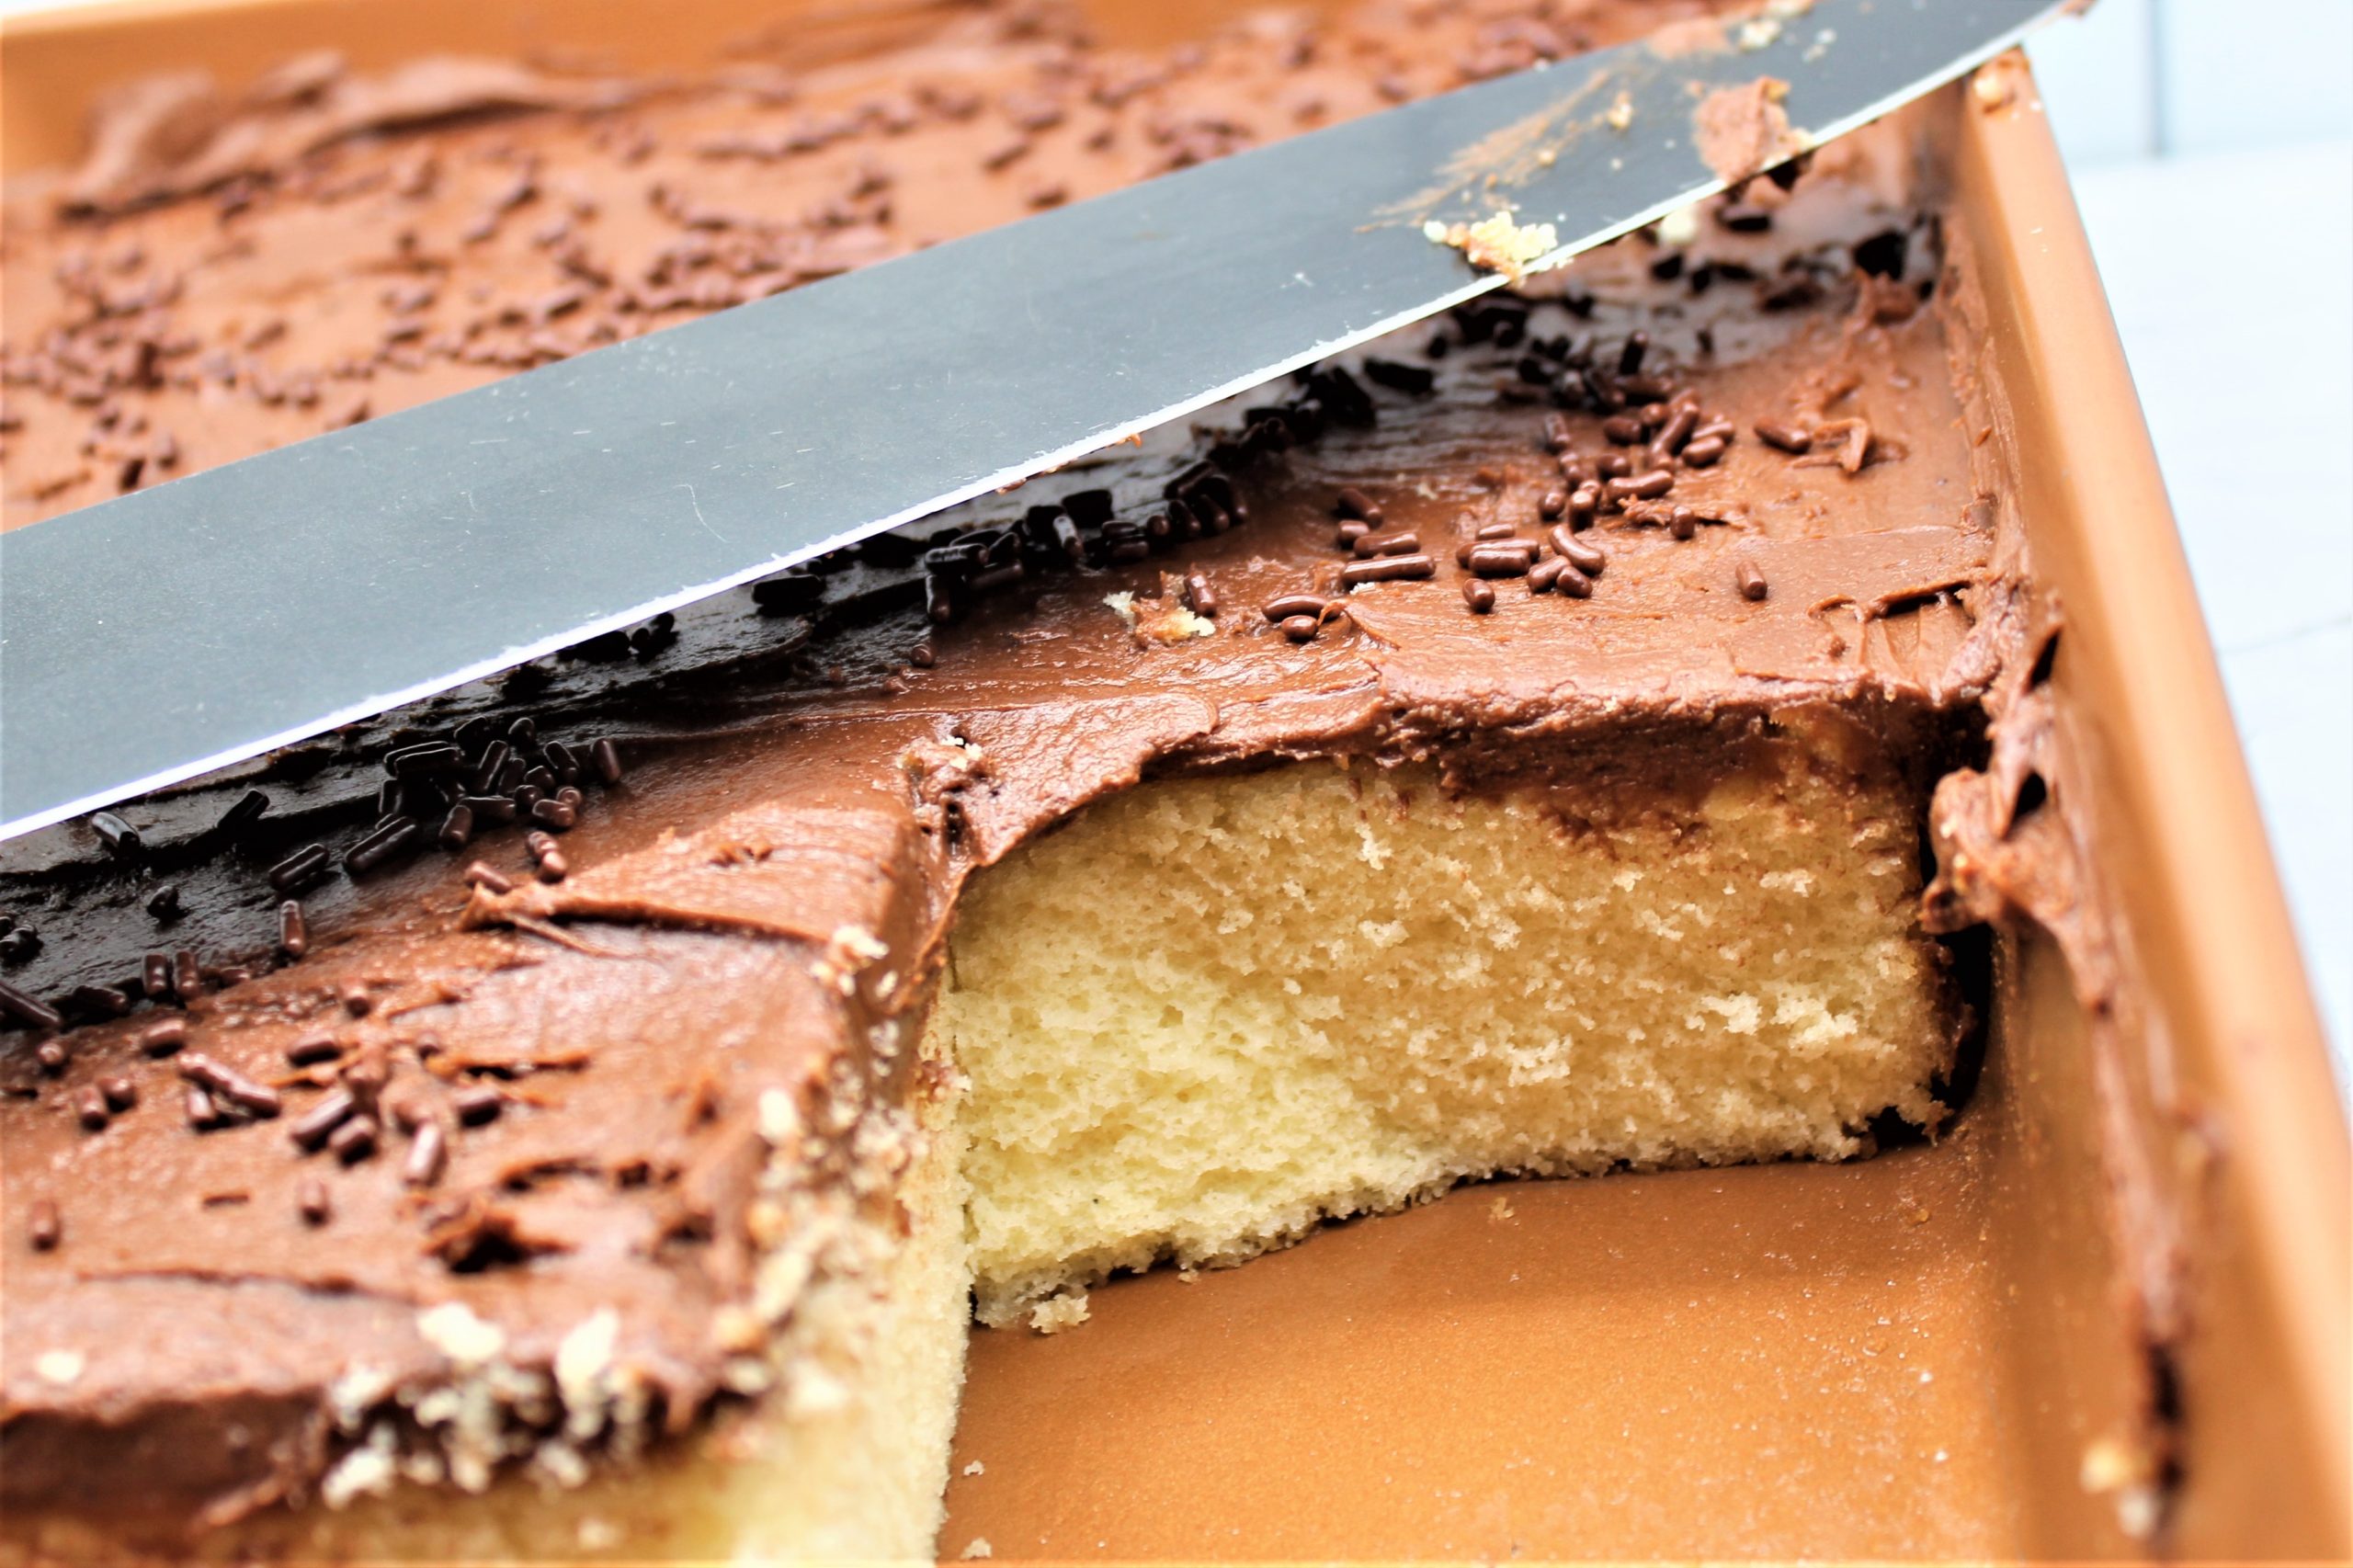
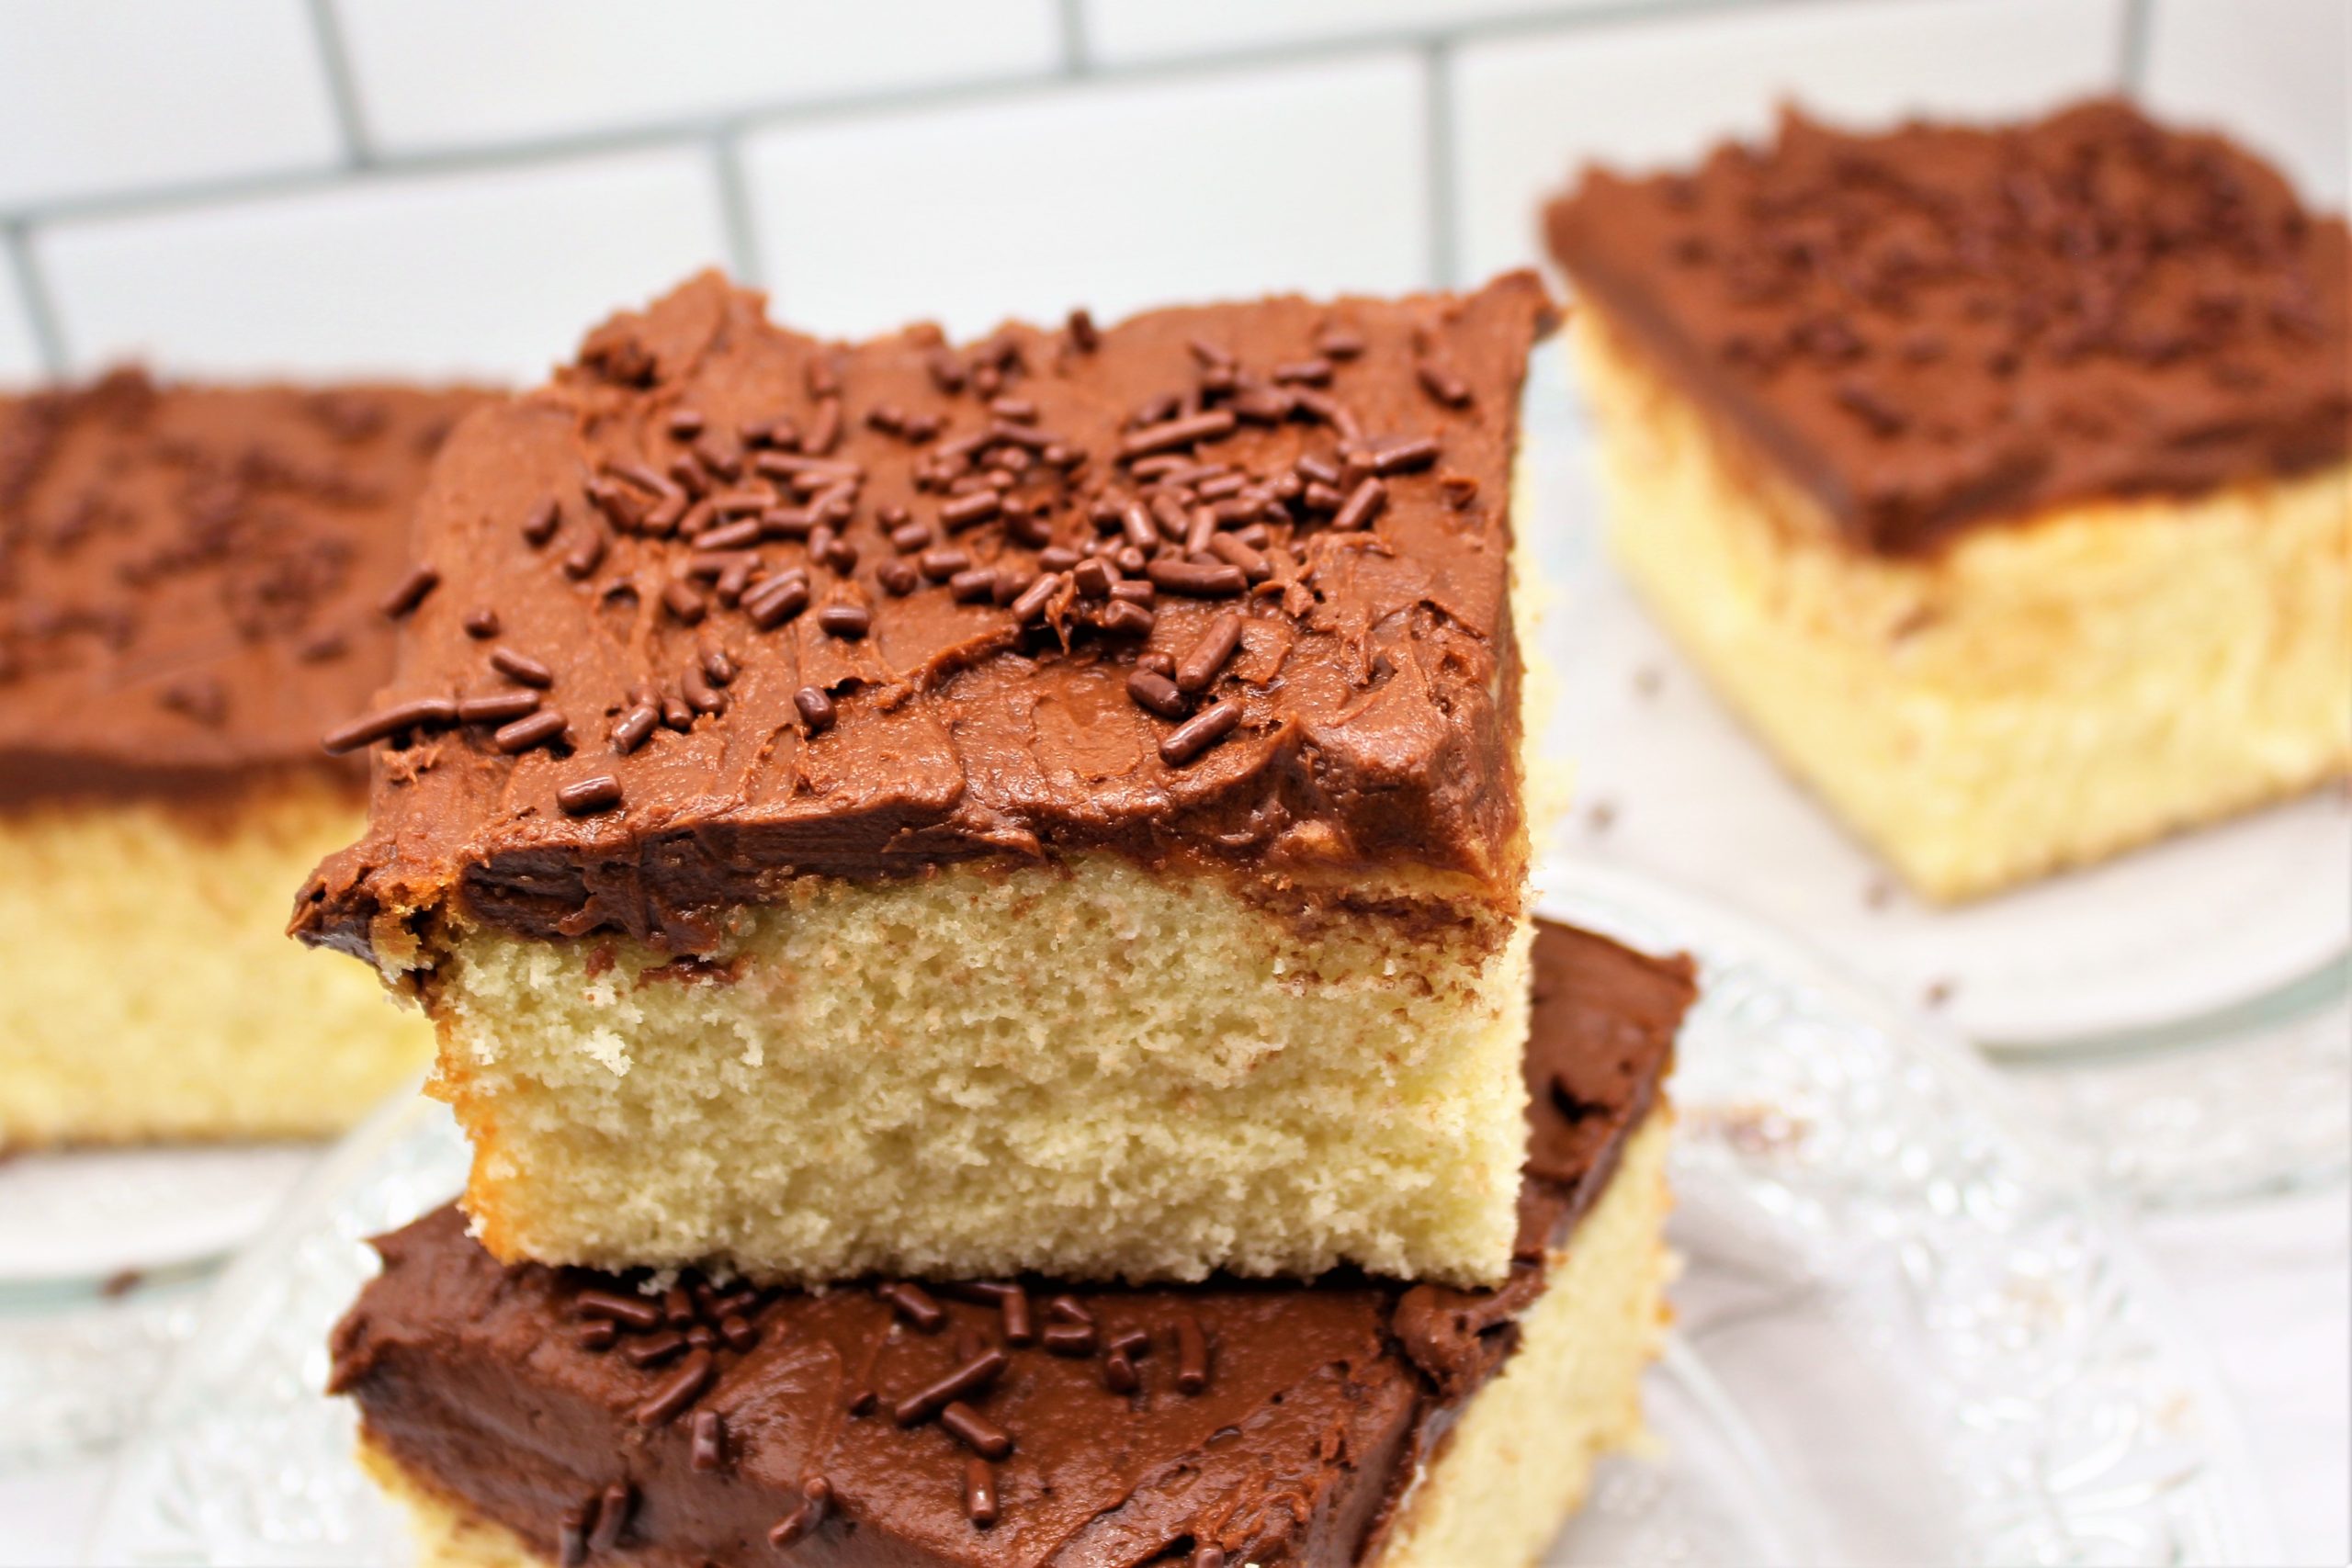
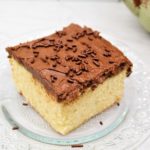
My yellow sheet cake with chocolate frosting is a basic recipe that you can build on to create many different things.
This recipe is all you need, whether you need a cake to take to a fancy event or cupcakes for a birthday party.
The yellowcake is moist and light. The use of cake flour helps the cake from drying out and keeps it fresh for a few days.
The chocolate frosting combines milk chocolate and cocoa, developing a rich deep flavor.
I guess my thought is, Perfecting essential recipes like this is a building block, and soon, maybe I can carry recipe cards in my pocket because someone believes they must have it in their recipe box. Enjoy!
The yellowcake is moist and light. The use of cake flour helps the cake from drying out and keeps it fresh for a few days. The chocolate frosting combines milk chocolate and cocoa, developing a rich deep flavor.
Course
cake
Cuisine
American
Keyword
sheet cake and fudge frosting, Yellow Sheet cake
Prep Time20minutes
Cook Time25minutes
Servings24pieces
Ingredients
Cake Ingredients
4cupsall purpose flour
2 1/2teaspoonsbaking powder
2 teaspoonssalt
1/4teaspoonbaking soda
1 1/4 cupsunsalted butter, softened
2 cupssugar
2eggs, at room temperature
4egg yolks, at room temperature
4teaspoonsvanilla
1 2/3cupsbuttermilk, at room temperature
Frosting Ingredients
1cupbutter, room temperature
6ouncescream cheese, room temperature
2poundspowdered sugar
2tablespoonscocoa powder
1/2cupmilk
1teaspoonVanilla
2cupsmilk chocolate , chopped
Instructions
Cake Instructions
Preheat oven to 350 degrees F
Lightly spray and flour a 9X13 baking pan
In a mixing bowl, whisk flour, baking powder, salt and baking soda.
In the bowl of a stand mixer beat the butter and oil on medium speed until smooth.
Beat in the sugar on medium until fluffy, 3 minutes.
Add the eggs and 3 yolks, one at a time, beating after each addition.
Beat in the vanilla and the remaining egg yolk.
Add ⅓ of the flour and mix just until blended.
Add half of the buttermilk and blend.
Add another ⅓ of the flour and beat on low until blended.
And then beat in the remaining flour.
Pour the batter evenly into the 9x13 pan.
Frosting Instructions
In a bowl, of a stand mixer to beat the butter and cream cheese at medium speed until creamy.
add the powdered sugar and cocoa powder, beat on low speed until blended.
Increase speed to medium, and gradually add in milk and vanilla, beat until smooth.
Microwave the chocolate on medium for 30 second intervals until smooth, stirring at 30 second intervals.
Gradually add melted chocolate to the mixture; beat until smooth.
Frost the cake using an offset spatula covering the entire cake.
My recipe coconut buttermilk pie is the best that I have tasted. It is rich without being overly sweet. The custard is creamy and accentuates the coconut.
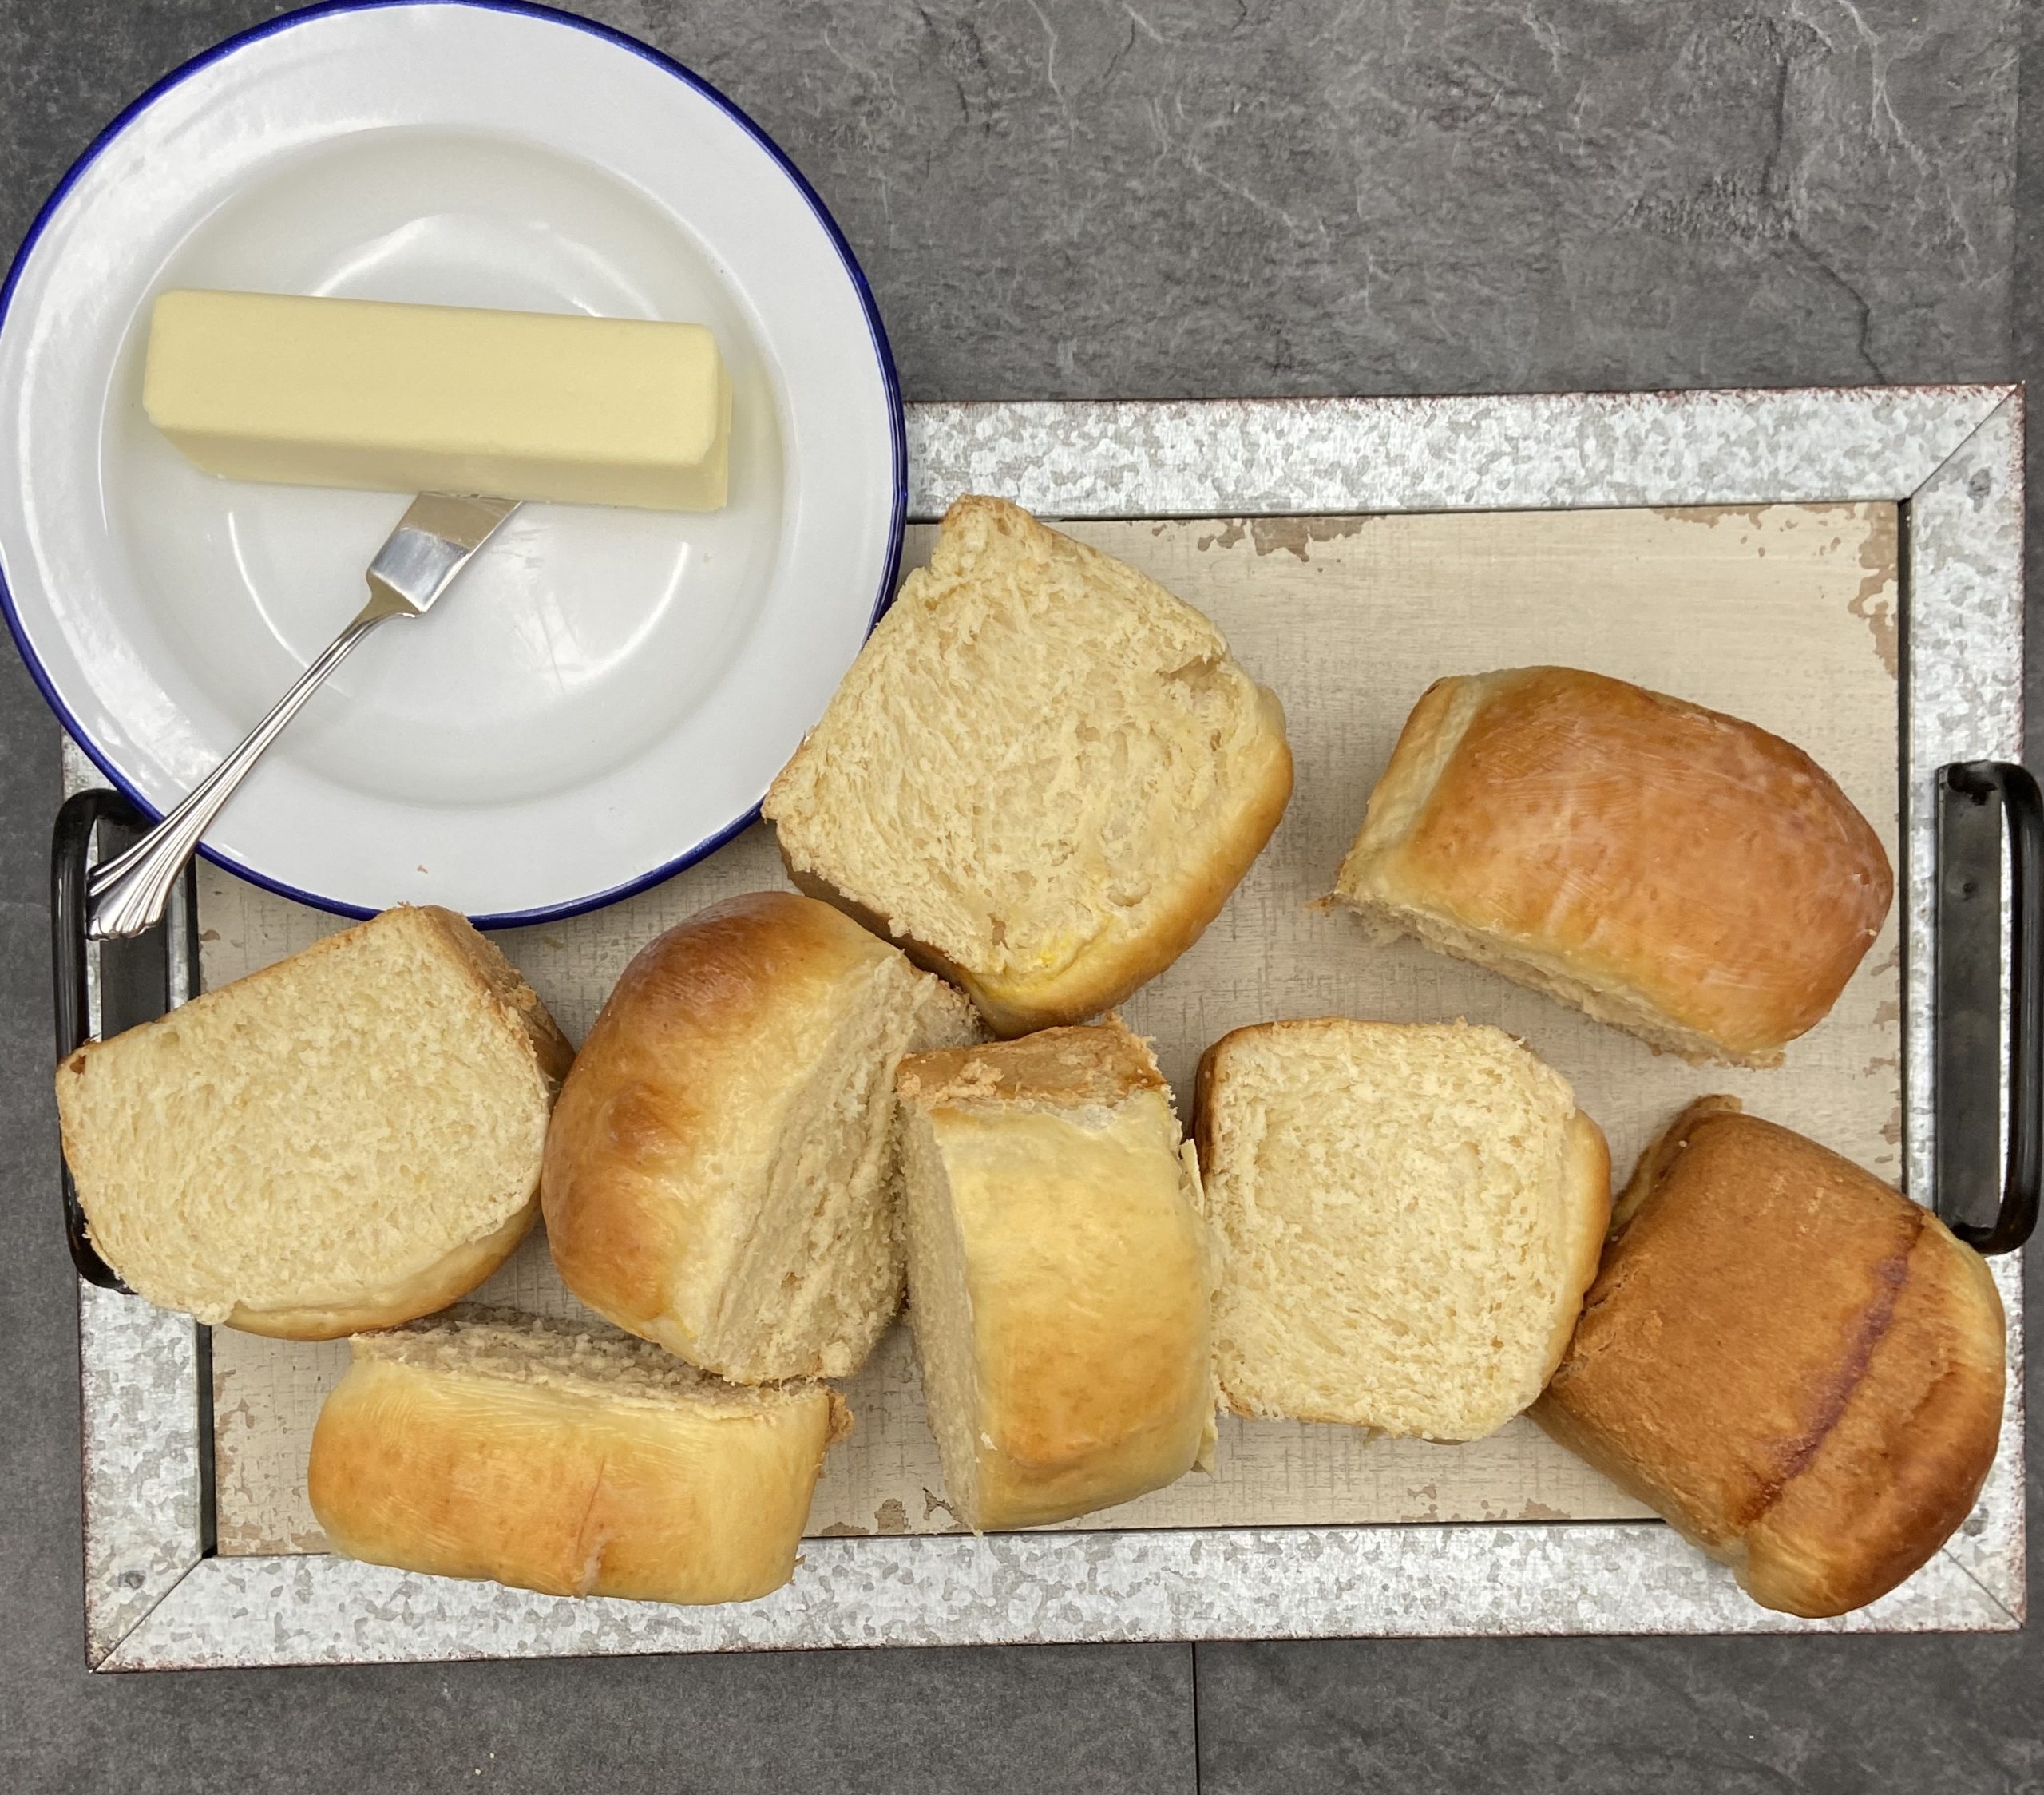
It is the perfect bread alongside a large bowl of beef stew. The combination of the tangy buttermilk in the bread with the hearty beef flavor of stew, yes, it’s the perfect comfort food for me.
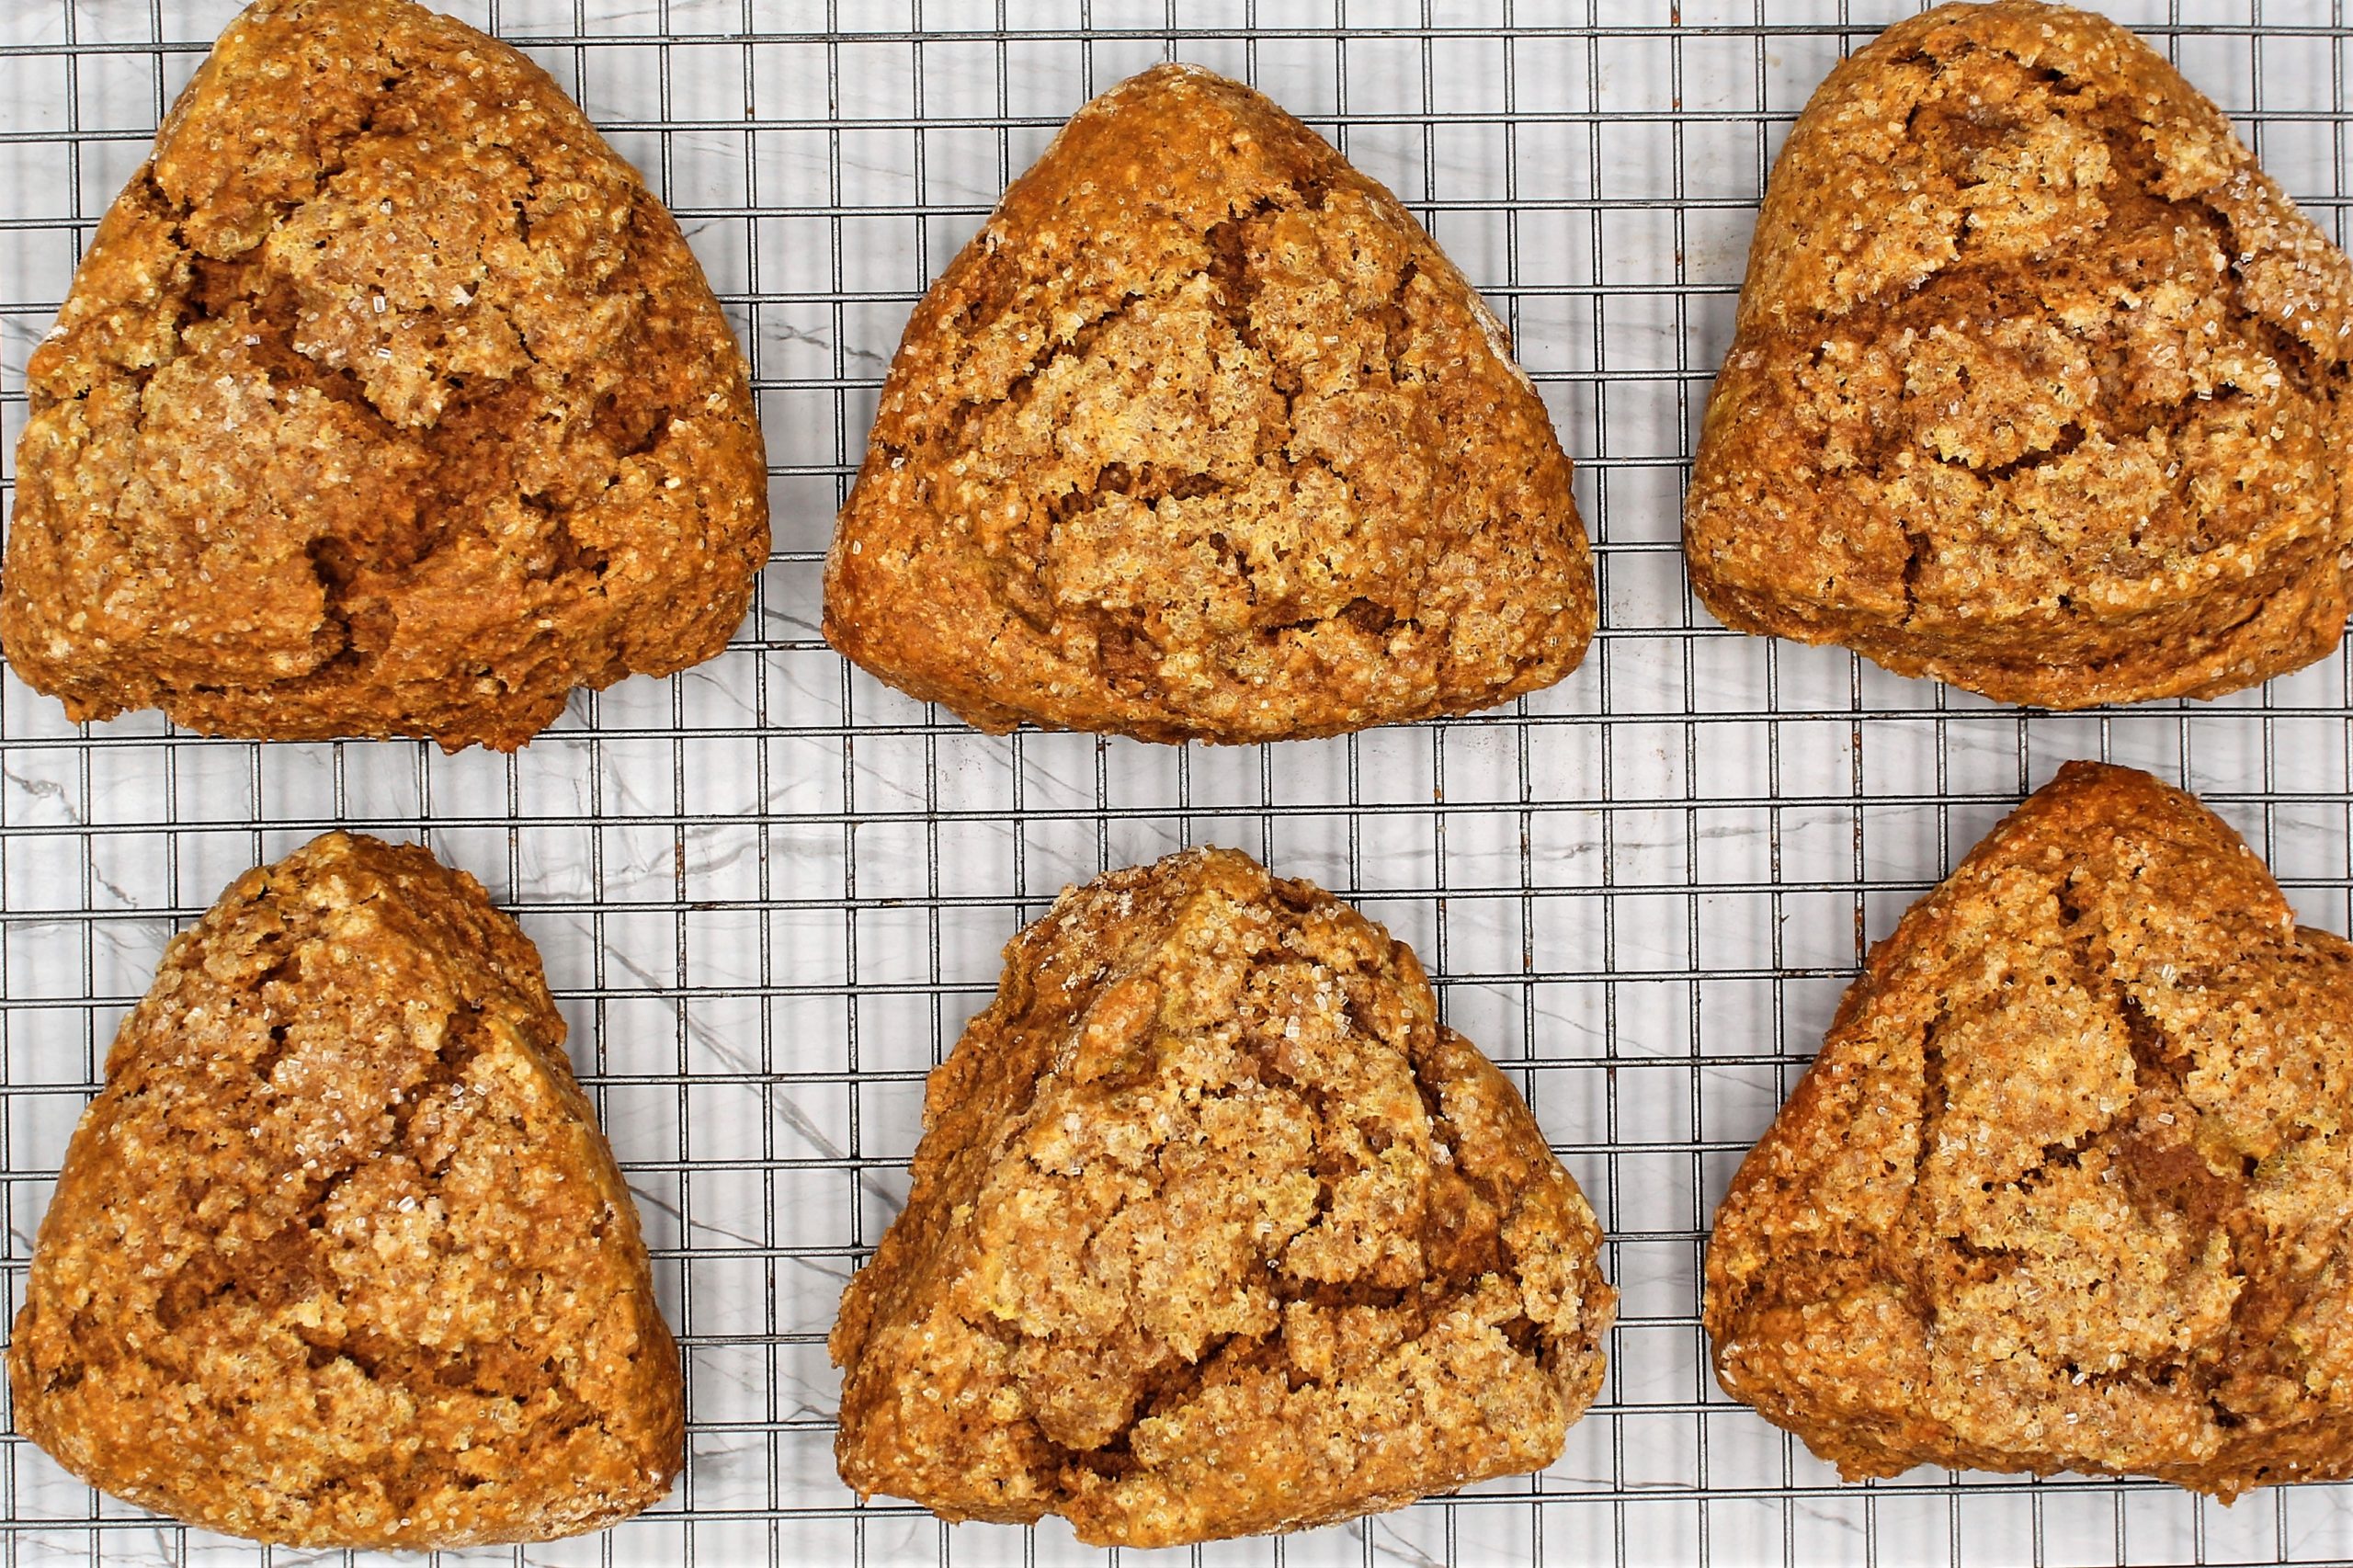
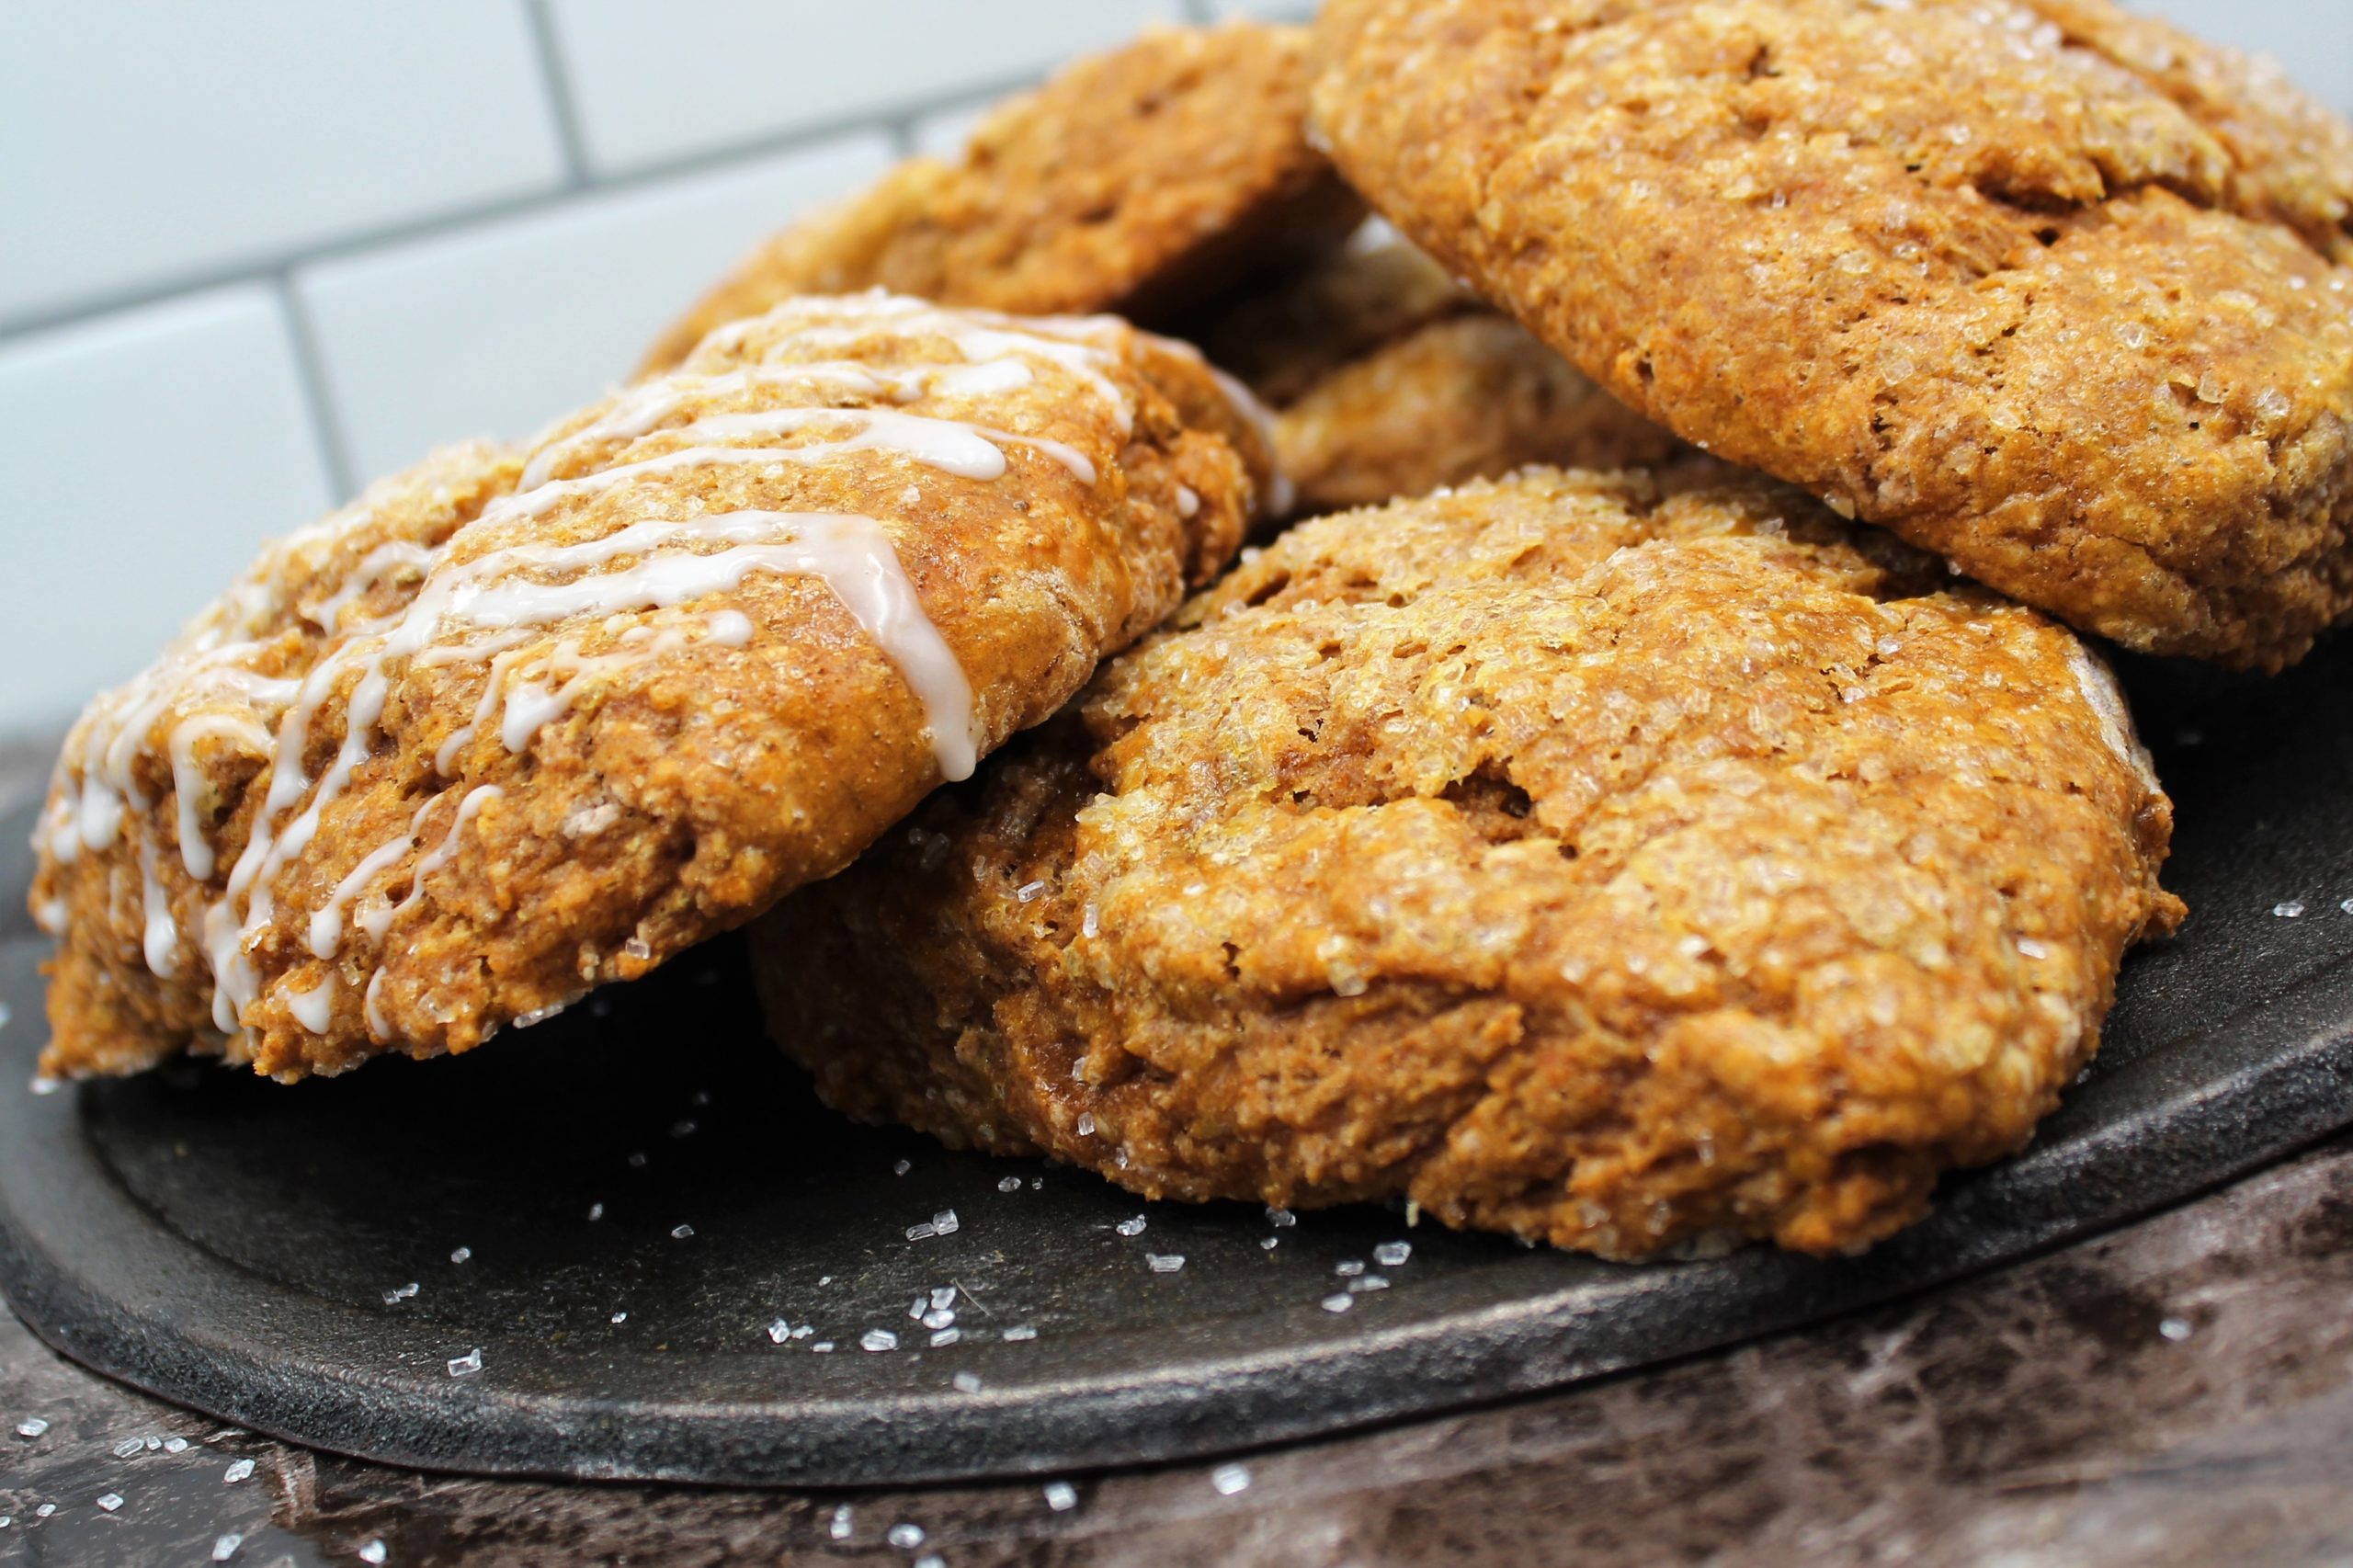
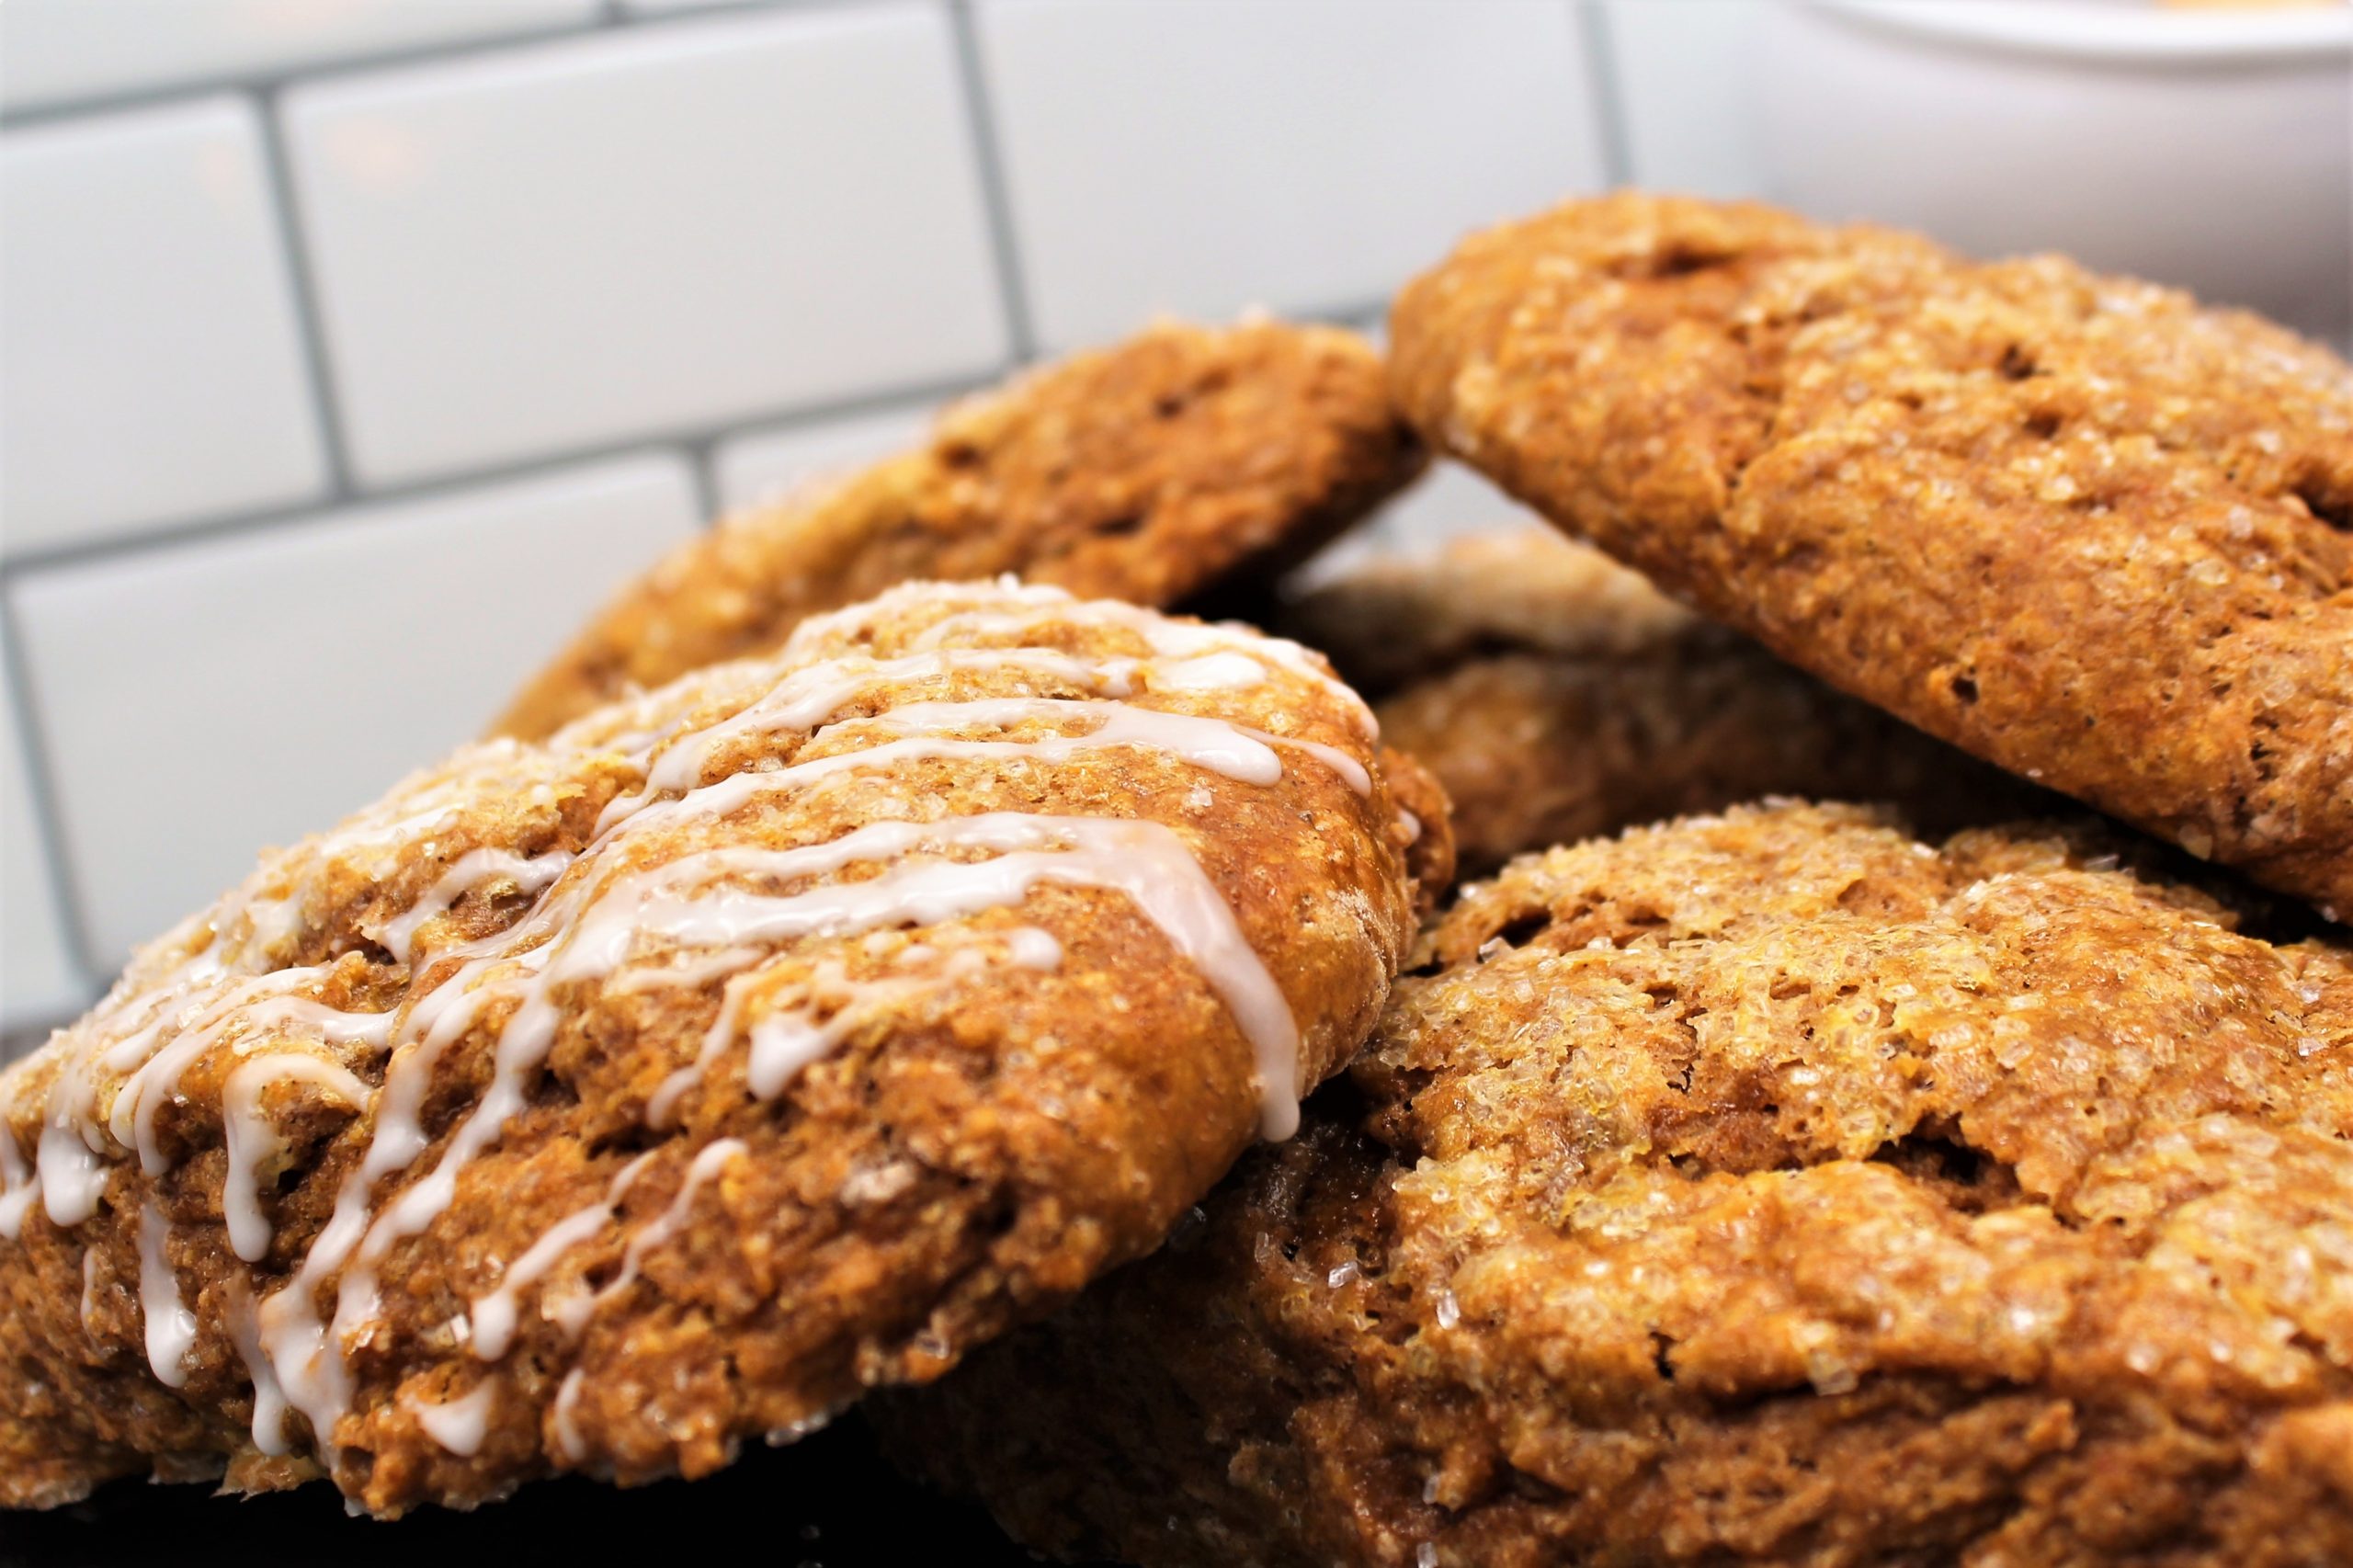
I started developing this recipe in August. I wanted to have my Pumpkin Spice Scone recipe perfected and posted by Thanksgiving. So, as with all projects, I gathered all the ingredients I would need, made a list, and headed to Kroger.
As I headed down the baking supply aisle, there was a huge empty shelf. Yes, you guessed it, there were no cans of pumpkin in sight. So I asked a gentleman stocking shelves nearby, and he said they hadn’t received pumpkin in months.
I left the store determined to find the elusive canned pumpkin, because after all, what is Pumpkin Spice Scones without pumpkin?
After four stops at various grocery stores, I found the motherload of canned pumpkin. There must have been 200 cans on display. I loaded up my cart and headed back home for a nap!
After my frustrations subsided, I began working on my Pumpkin Spice Scones. I believe scones should be dense but moist. To achieve this, I added buttermilk. Buttermilk adds moisture as well as a tang that gives these Pumpkin Spice Scones a delicious twist.
After several tries and over a dozen cans of pumpkin, I have made an excellent version of a fall favorite that until now was only available at overpriced coffee shops.
My Pumpkin Spice Scones are moist and have a slight tang from the buttermilk. The combination of spices creates a warm aroma and a remarkable flavor that begs for a hot cup of coffee.
So, the next time you are at the grocery store, head down the baking aisle and grab a few cans of pumpkin for your pantry. You never know if it will be there when you need it. Enjoy.
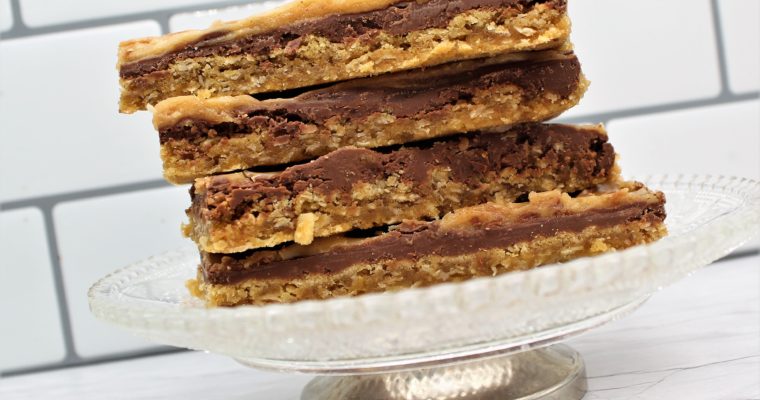
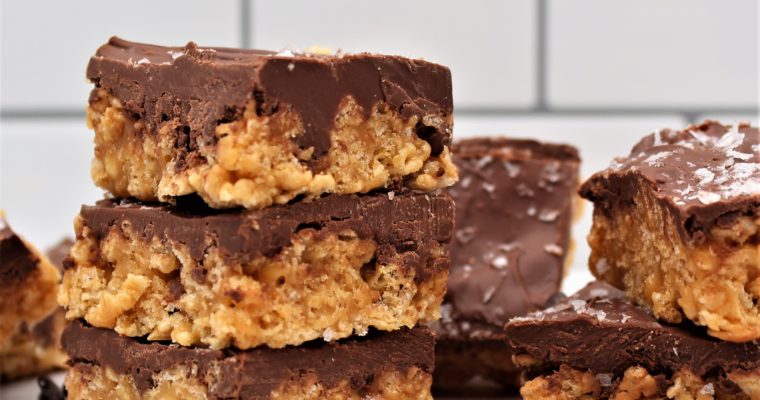
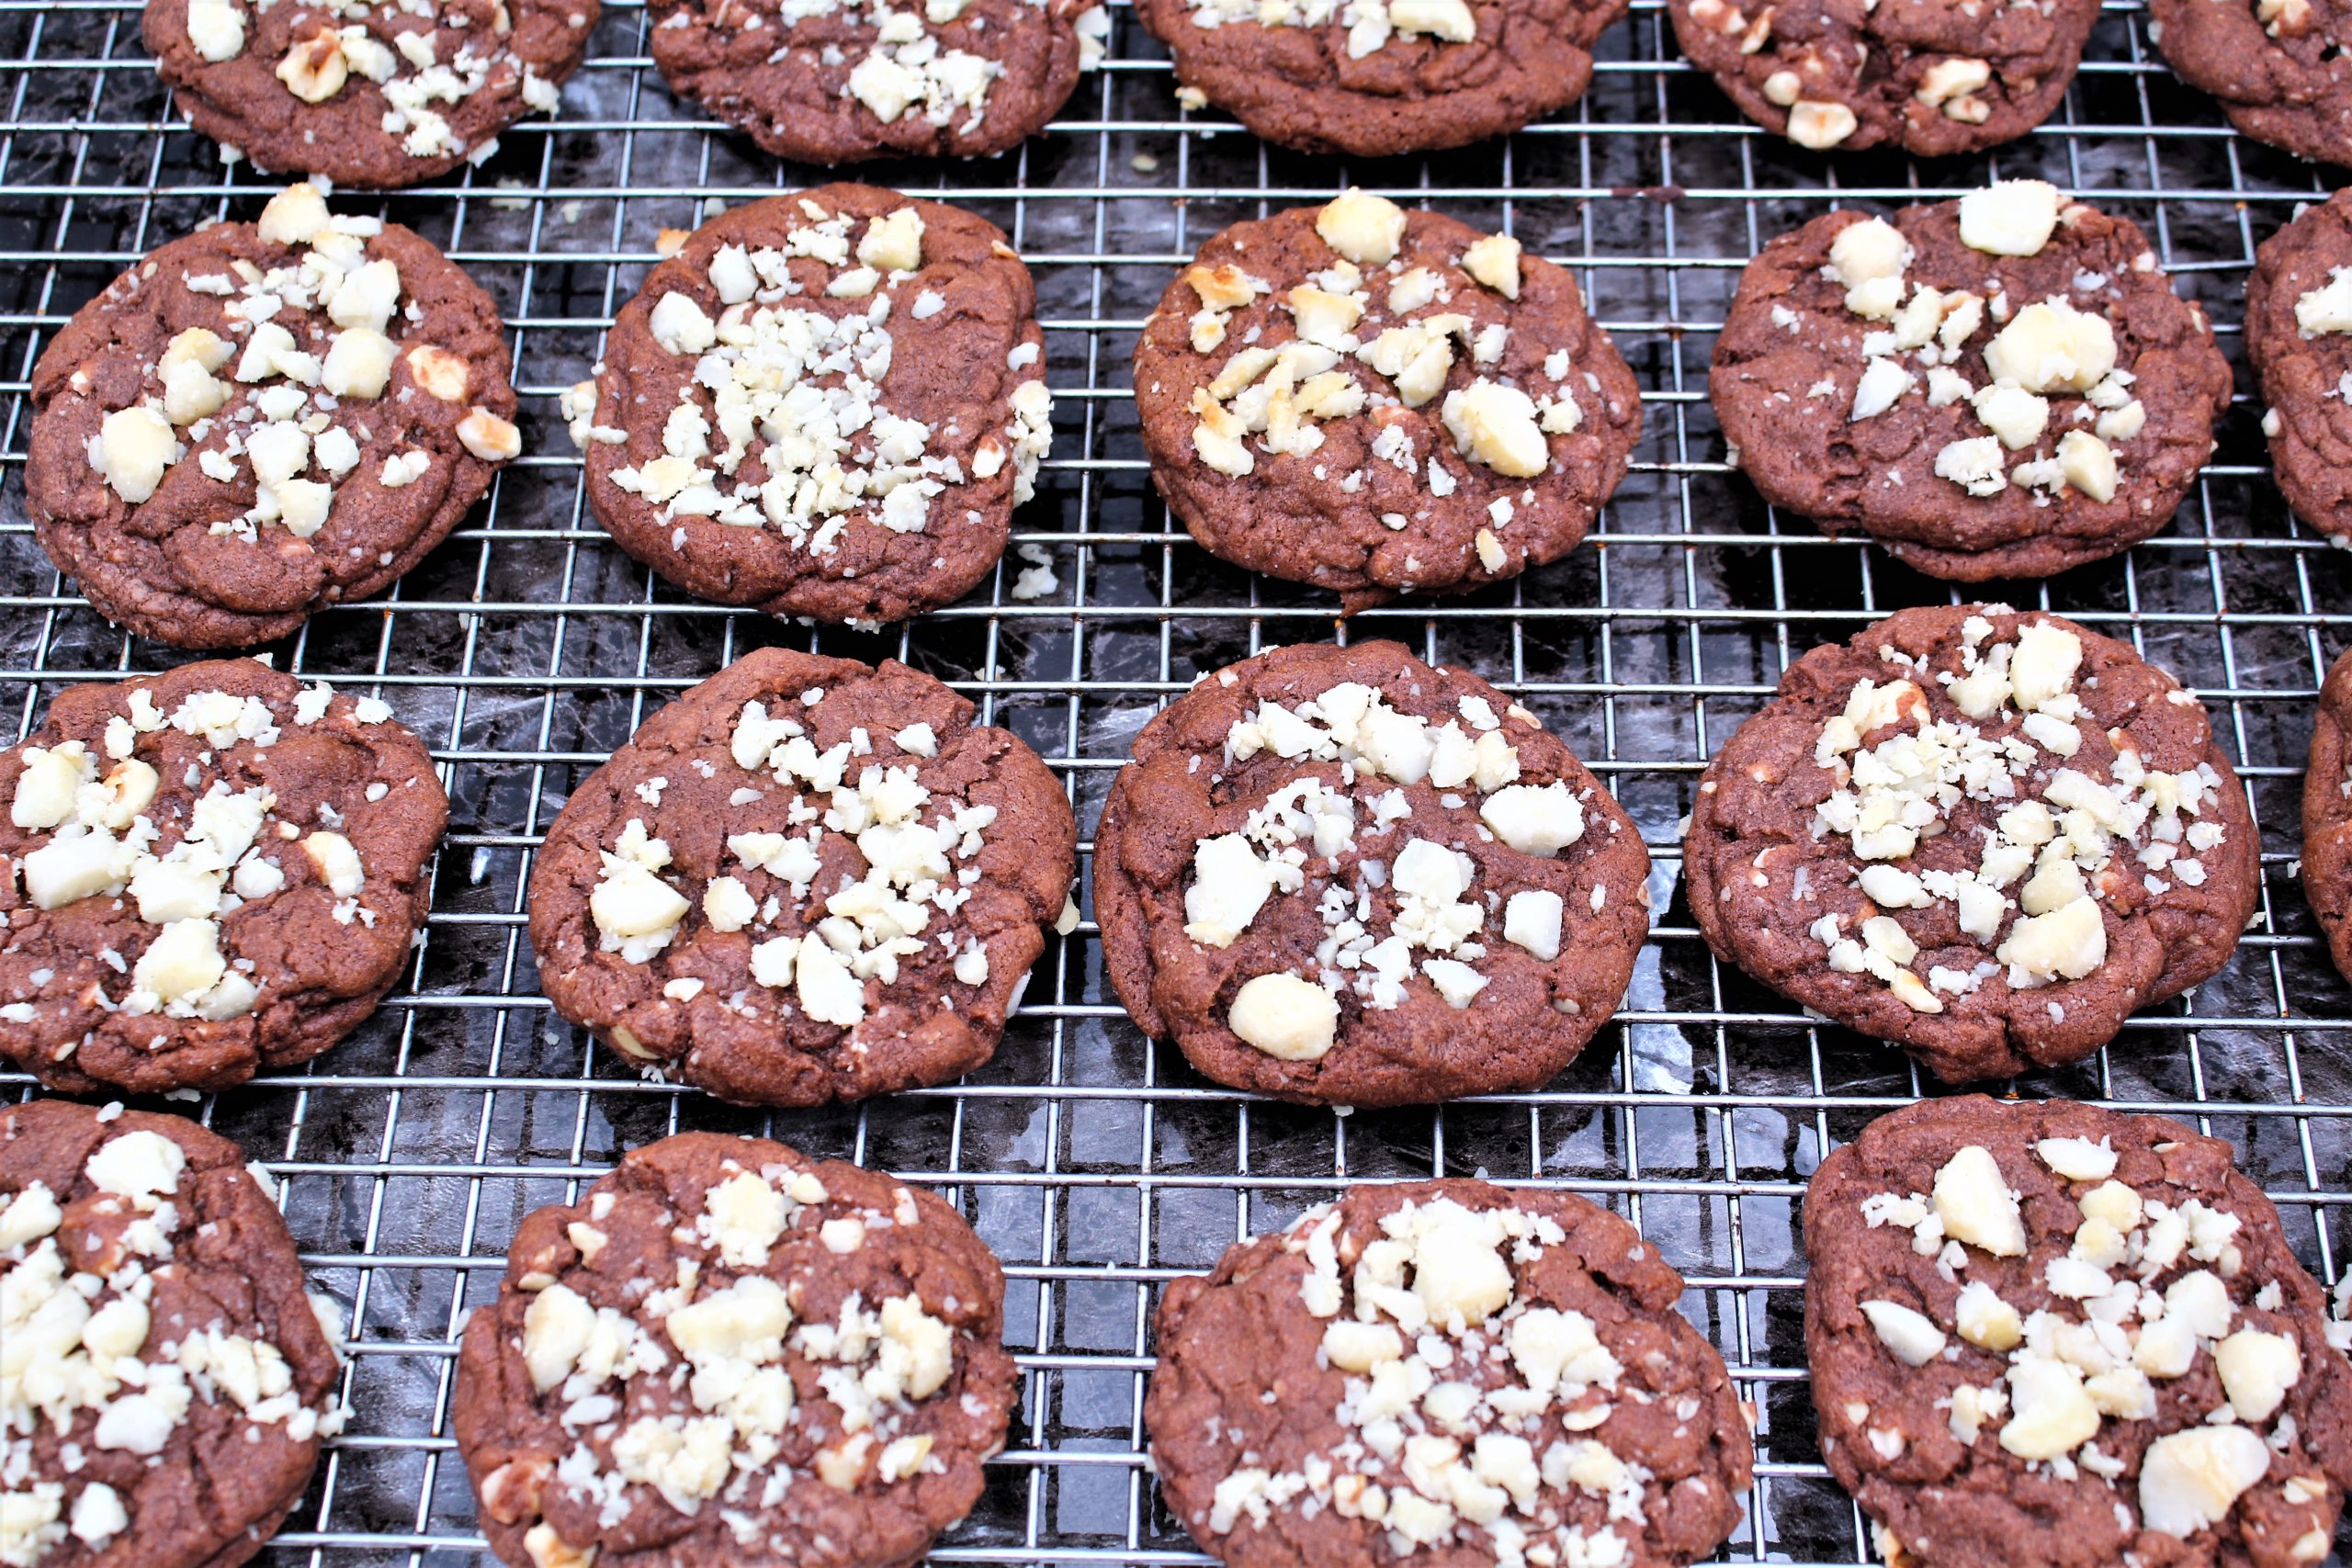
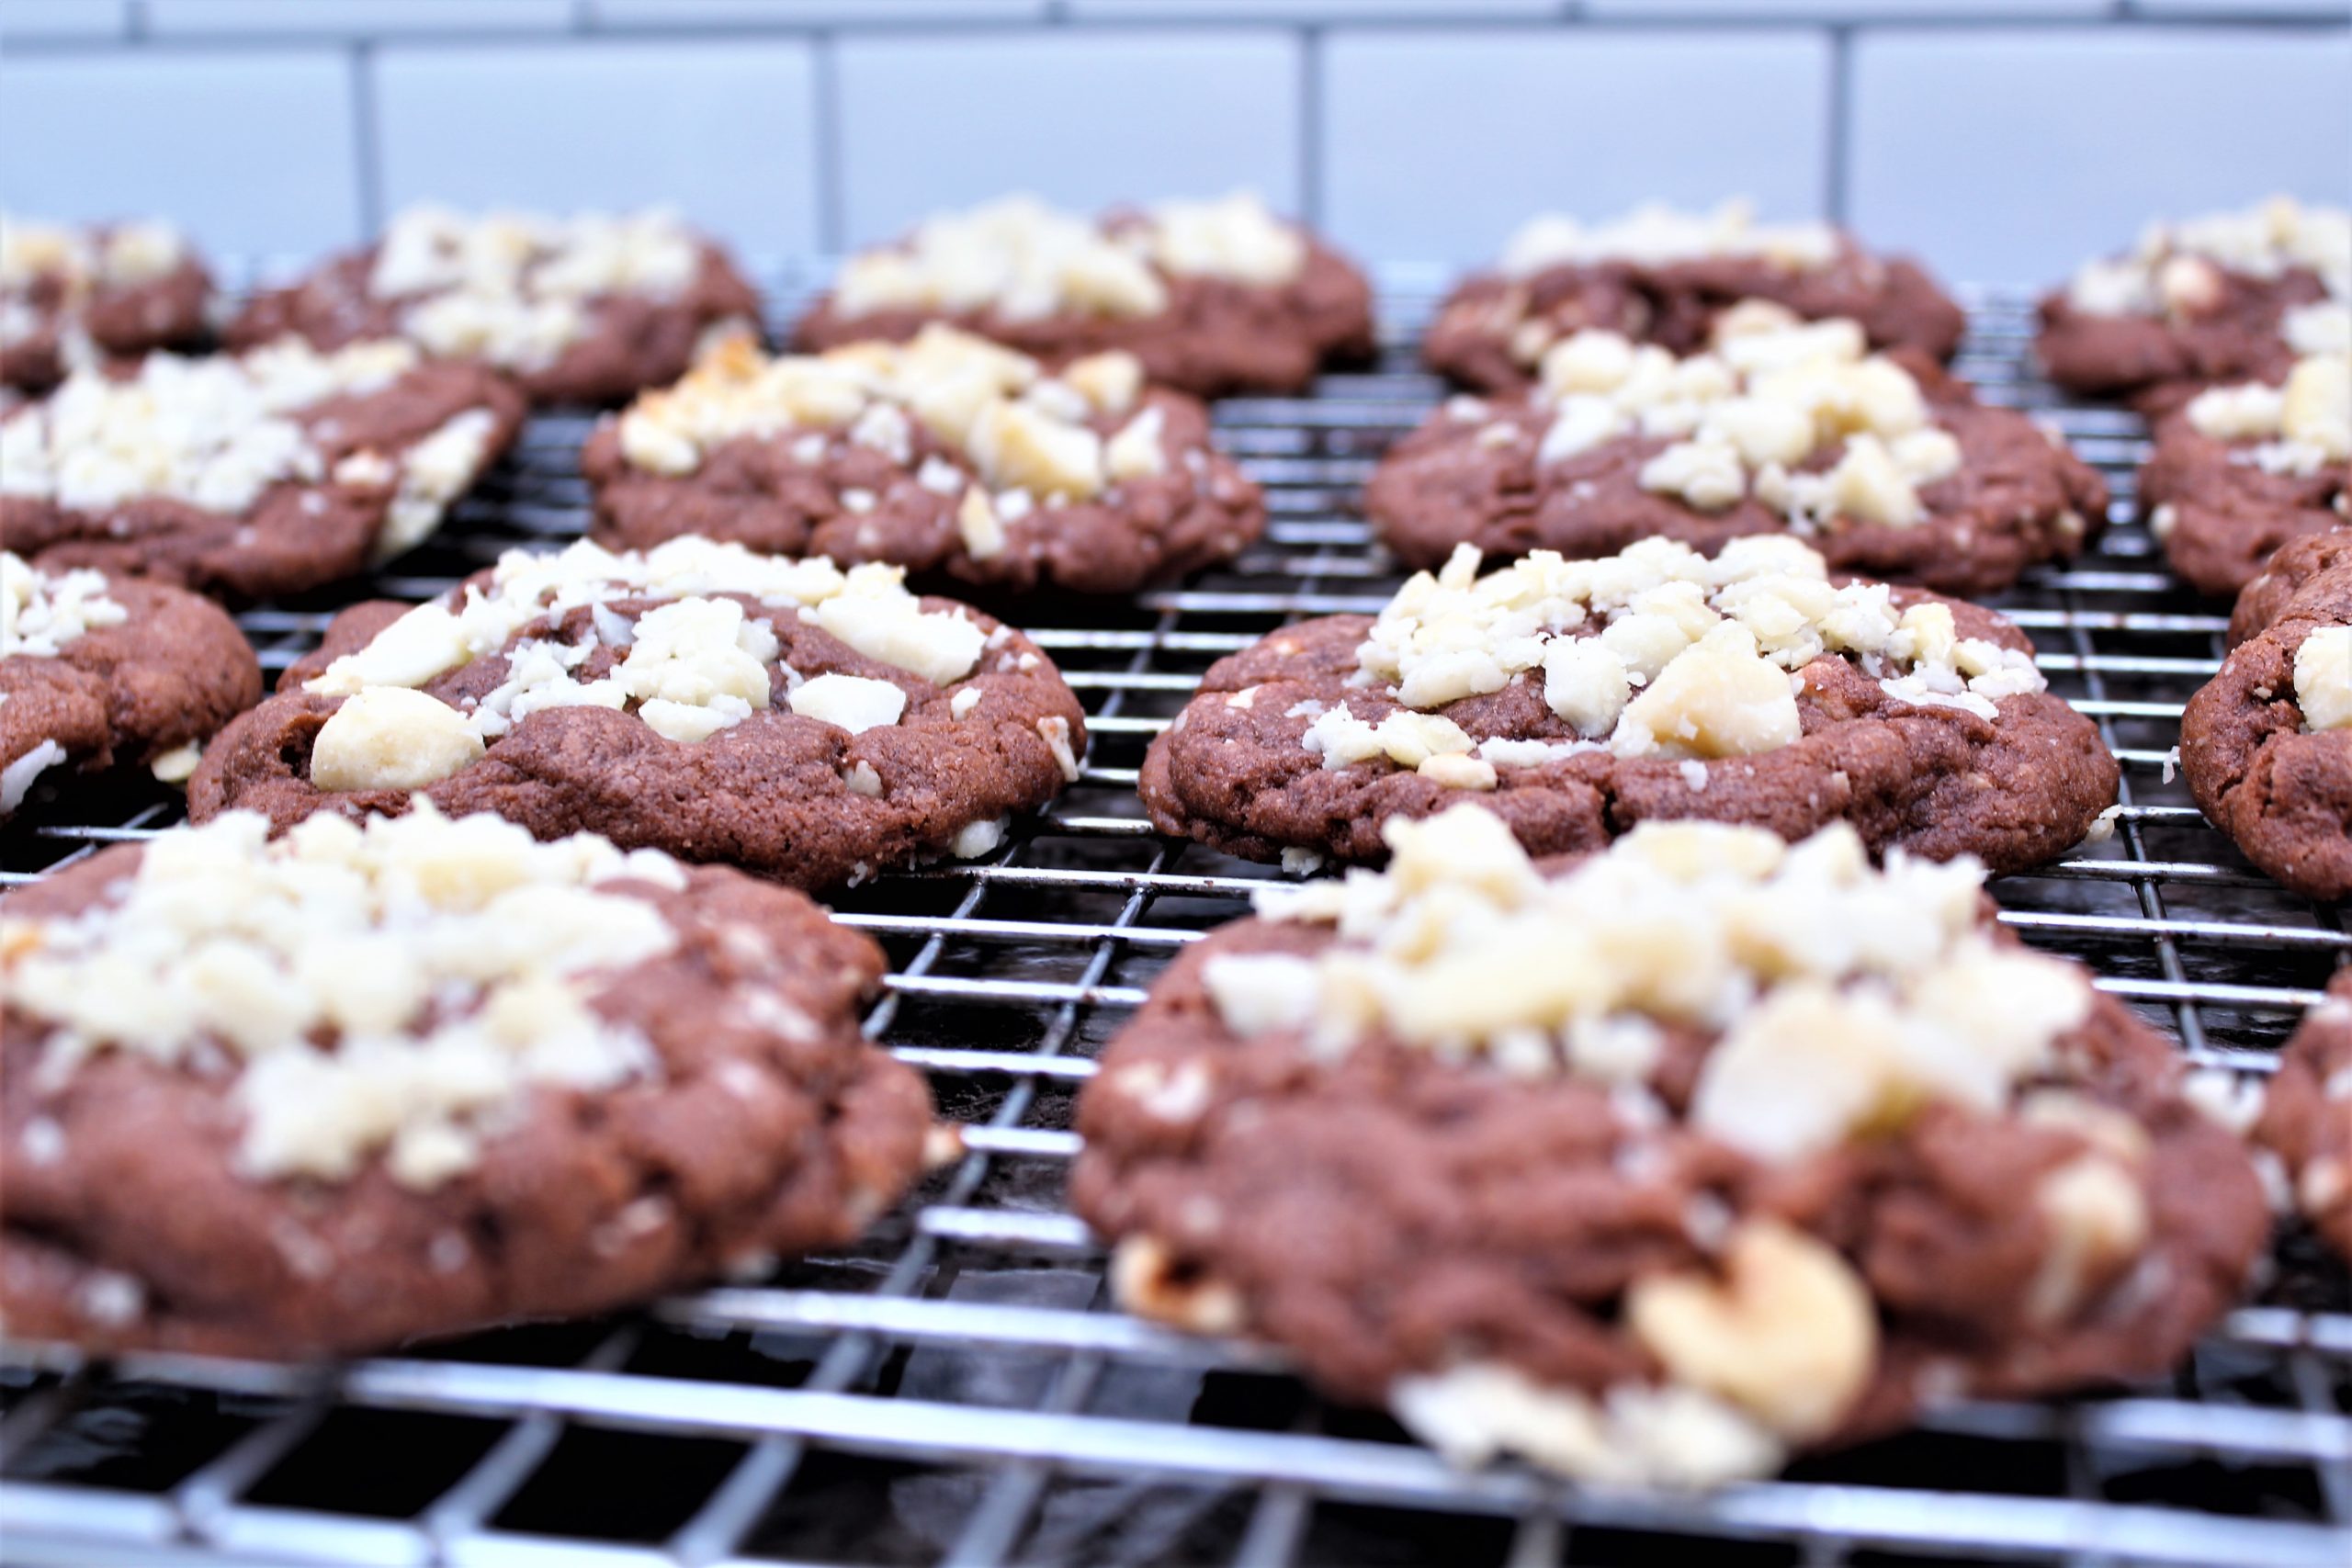
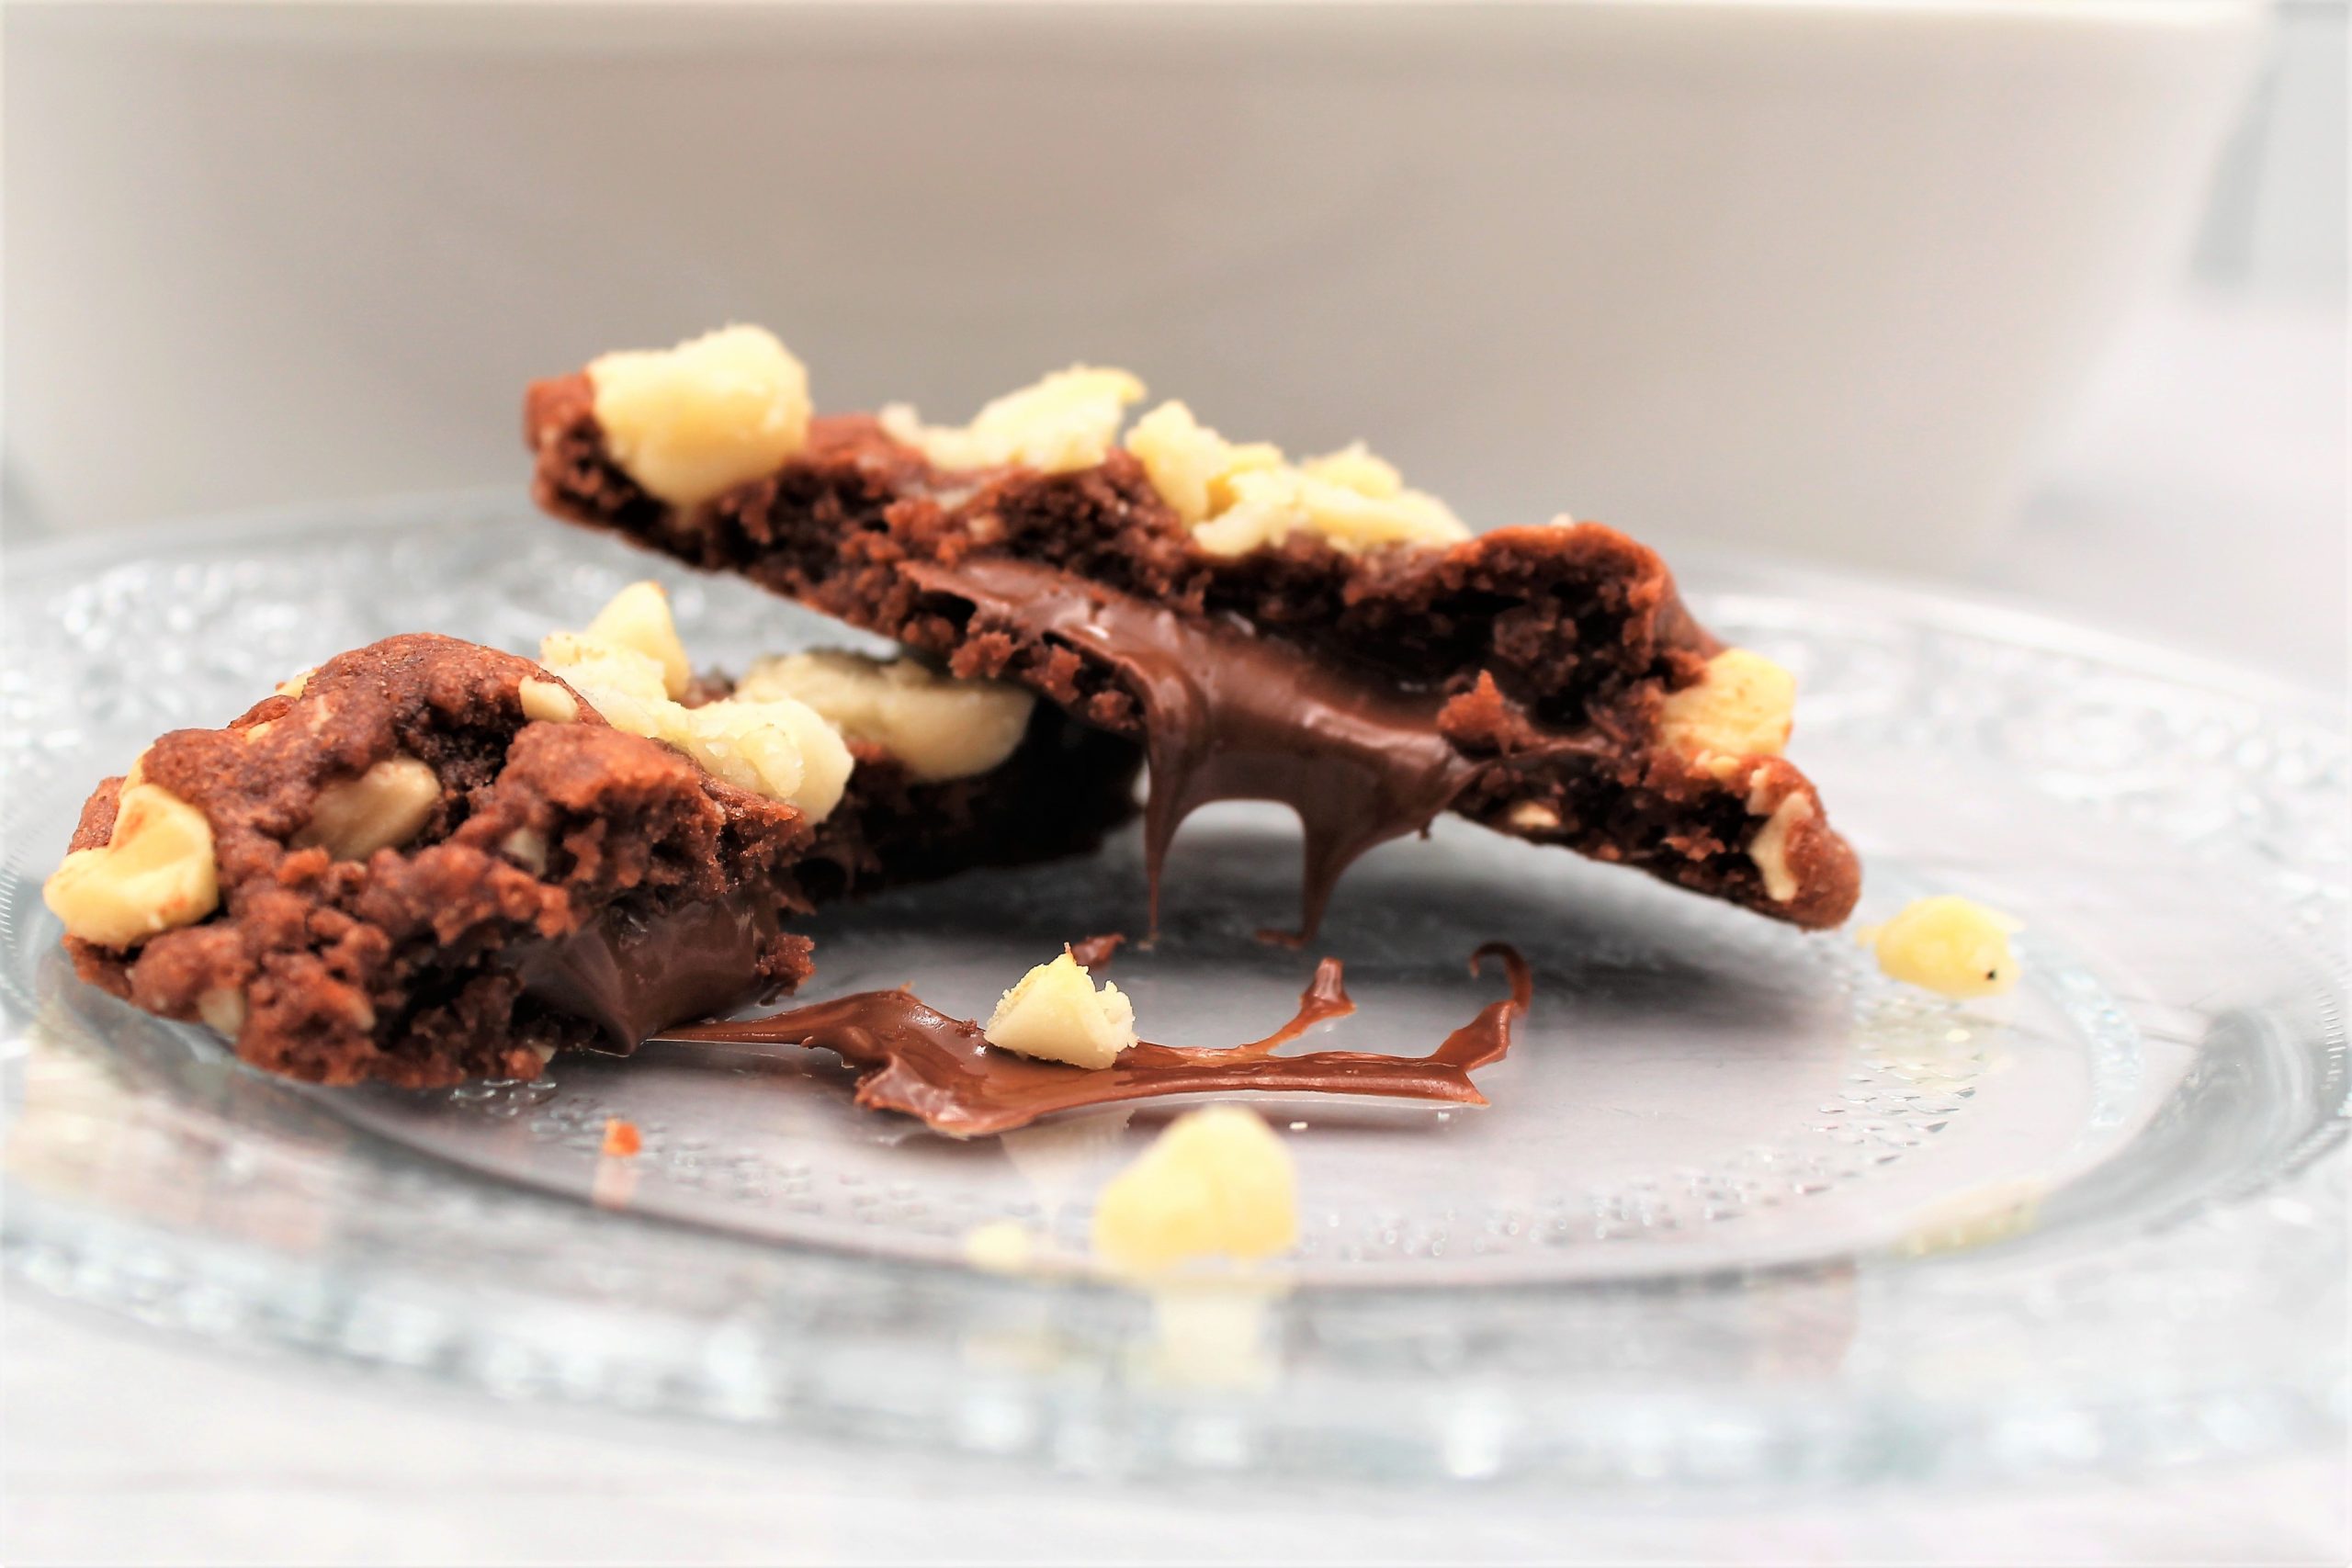
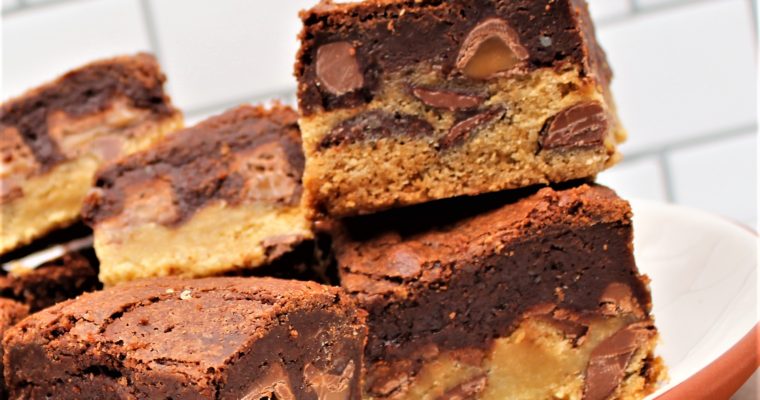
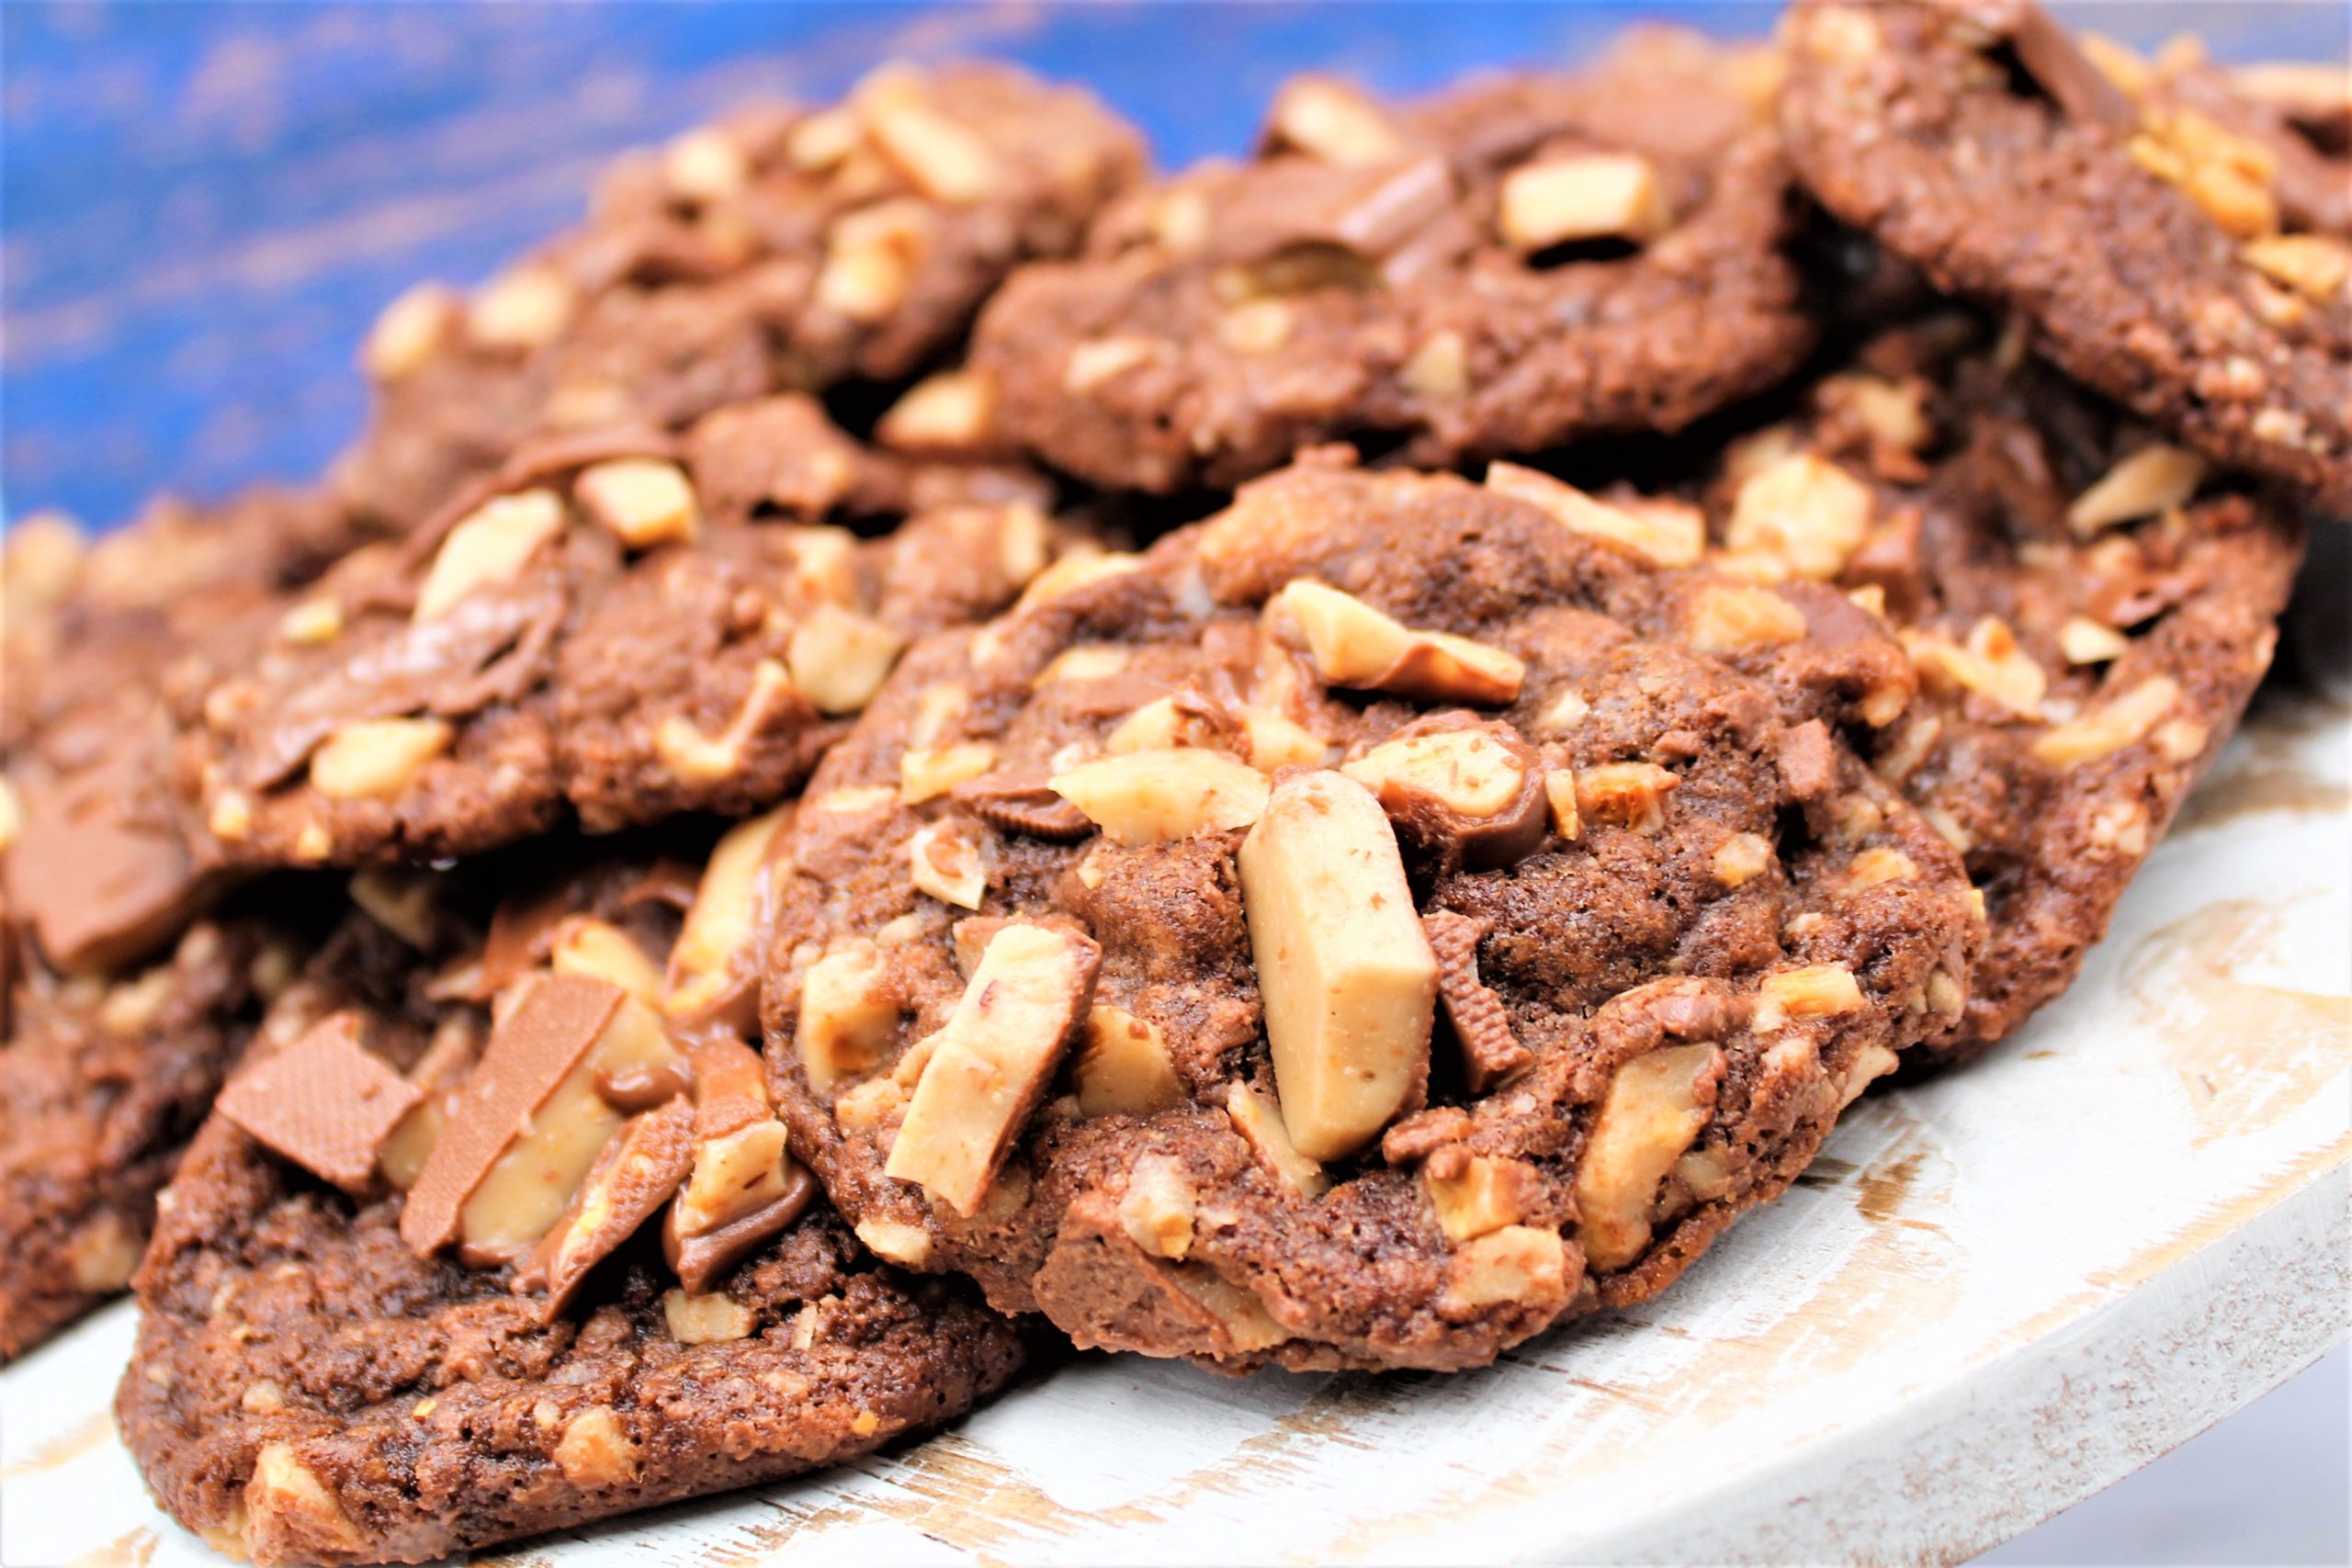
These Peanut butter cups and Pretzel cookies are moist and tender.
The peanut butter flavor works well with pretzels and chocolate chunks. I add flaky sea salt on top for good measure.
It seems that over the past several years, people have become obsessed with Nutella. I see recipes on the Internet that use Nutella when peanut butter was used.
I have never been crazy about it, but I wouldn’t say I like it either. I think it’s a texture thing. Nutella is very sticky, and I kind of find that off-putting.
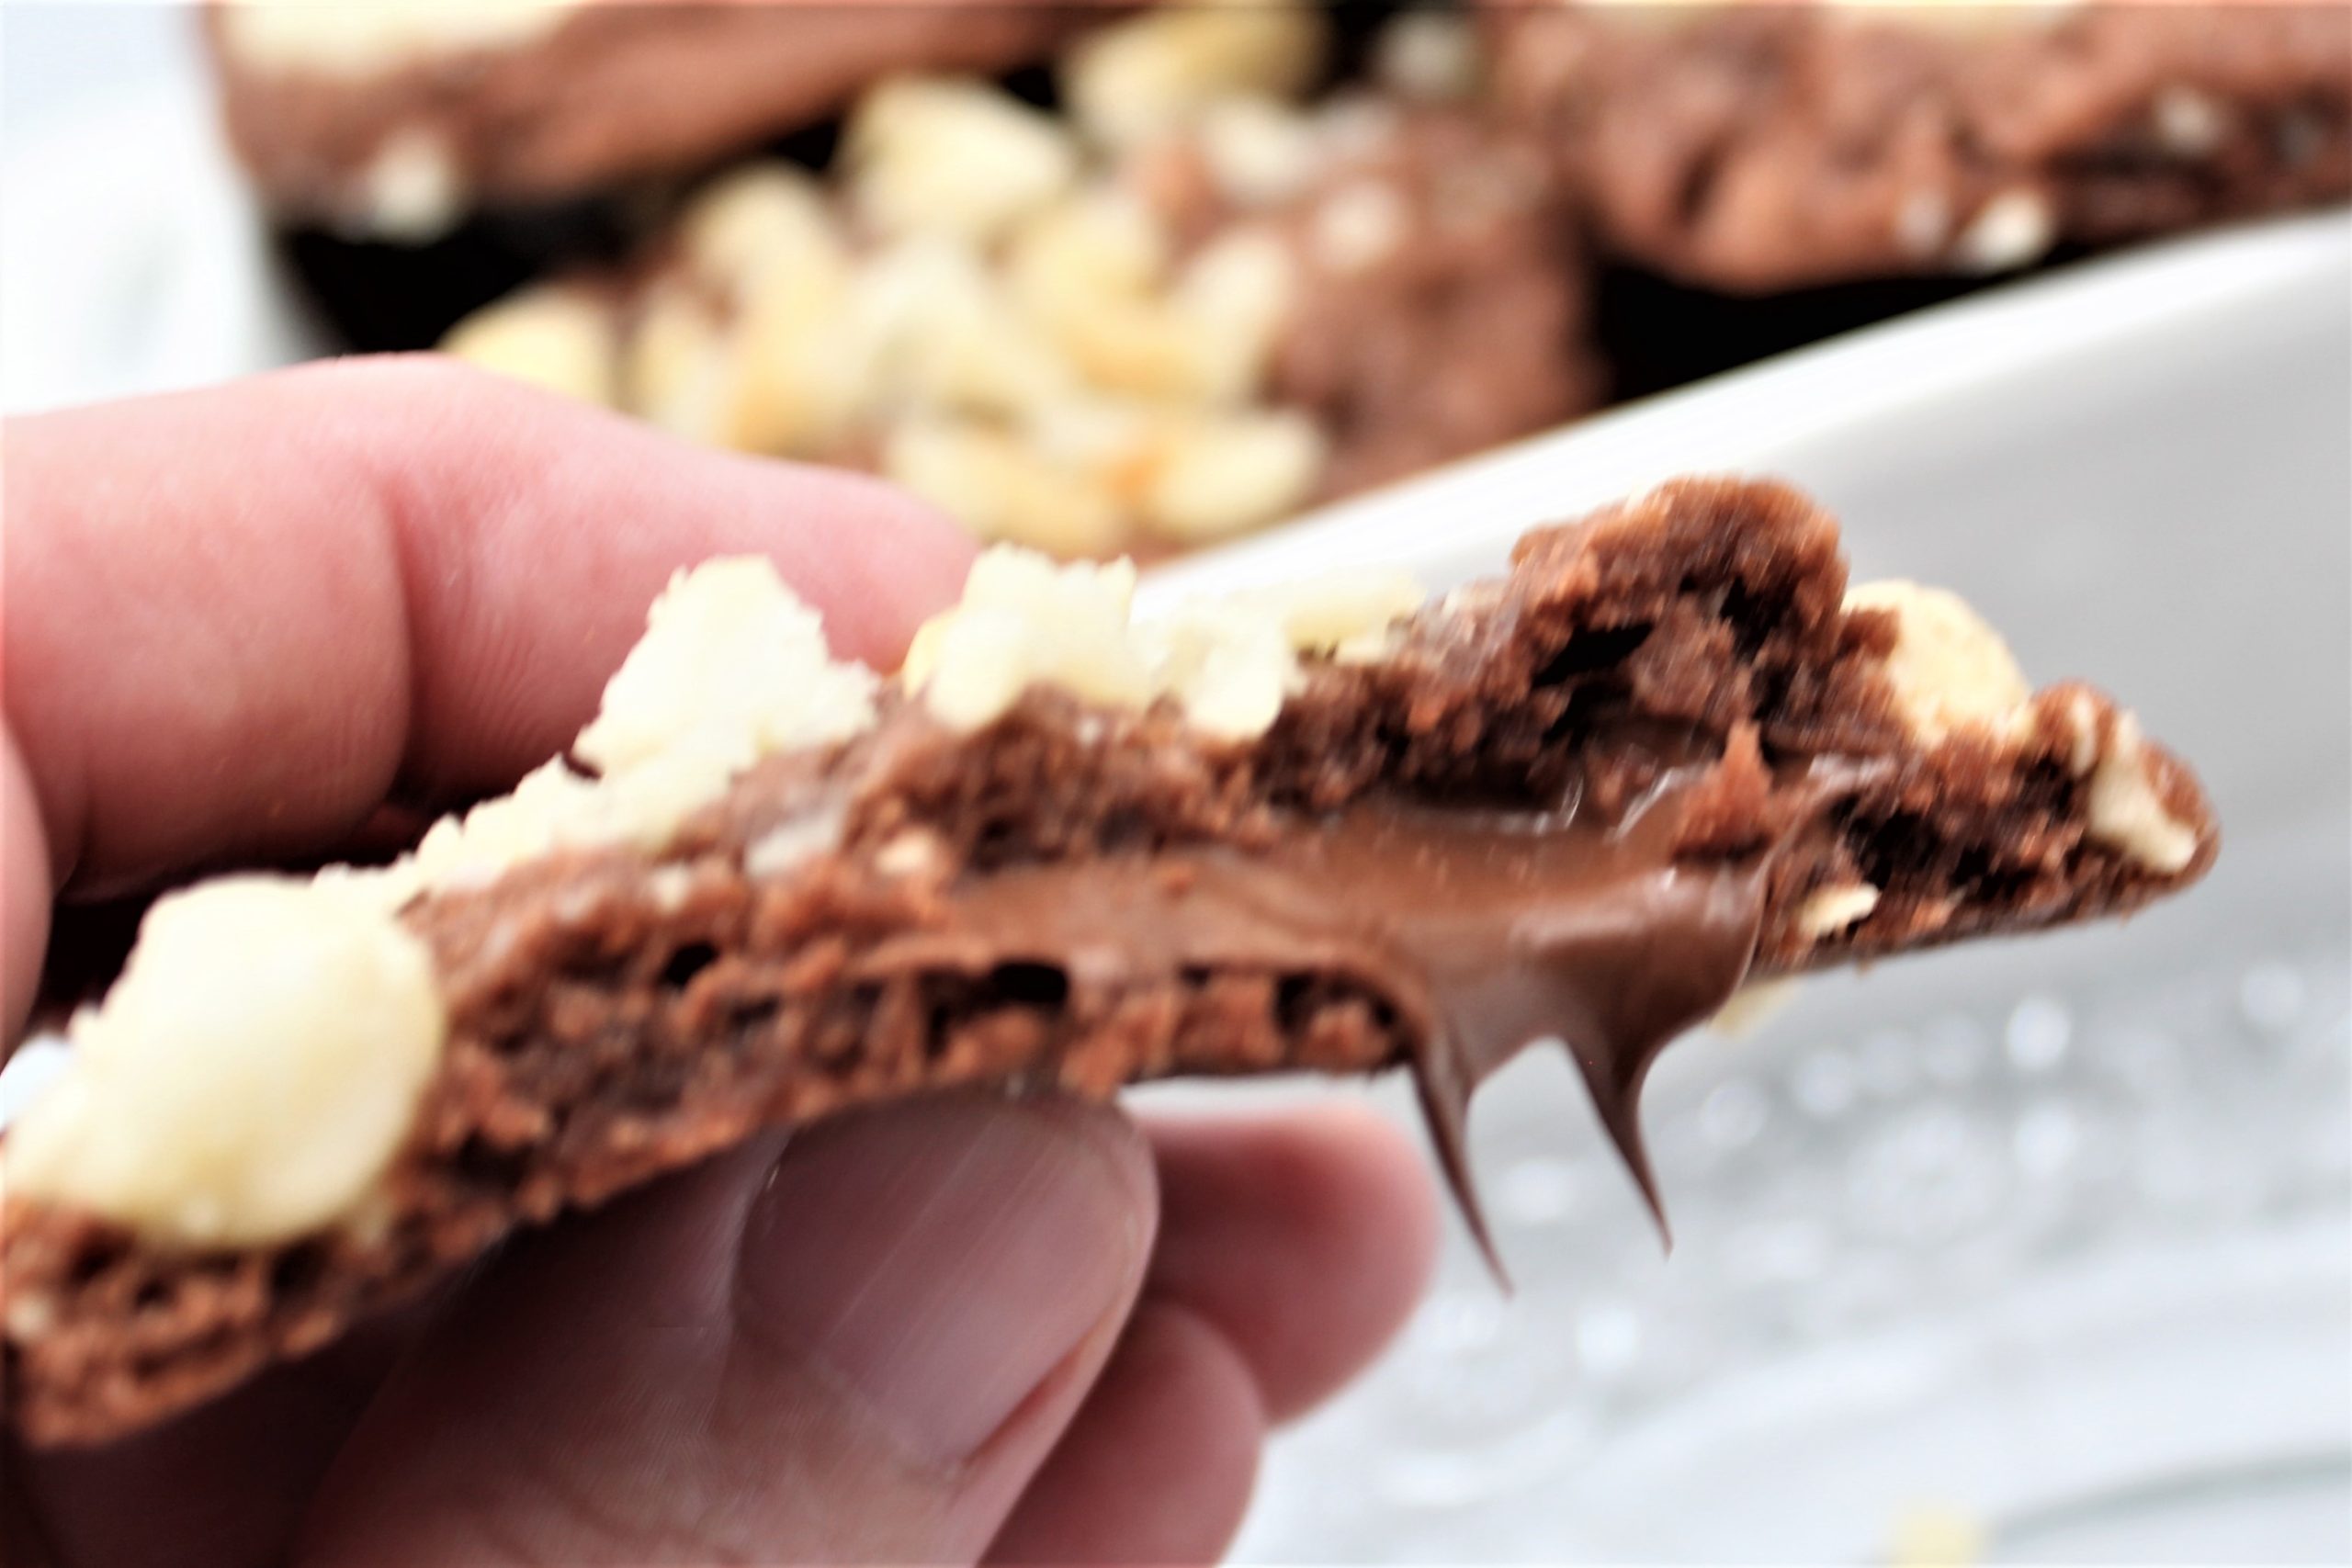
When creating this recipe, my challenge was figuring out how to stuff the cookie with Nutella and not make a huge mess or drive myself crazy.
After different attempts, the answer came to me from the dollar spot at target. A couple of years ago, I had purchased two silicone mini ice trays. They were two for a dollar, and I never used them until this project.
Are used a pastry bag to pipe the Nutella into the ice trays and freeze it.
When I was ready to stuff the cooking, all I had to do was pop it out of the tray and cover it with cookie dough. It could not be simpler than that.
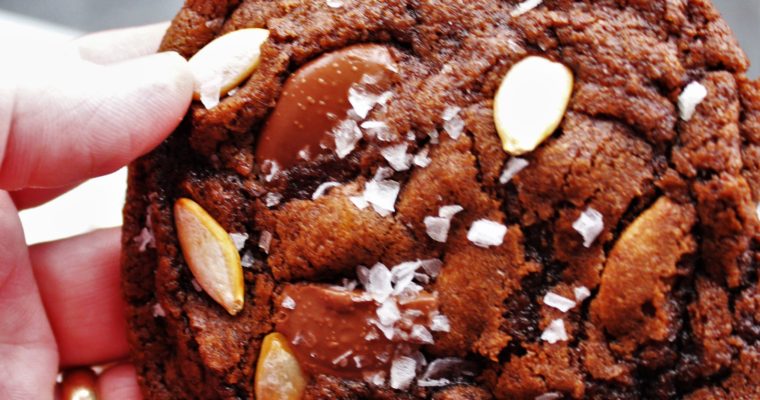
My Nutella stuffed fudge cookies are pretty unique. It’s rich, decadent, and that Nutella center is perfect.
You might want to make a double batch; once you taste this cookie, you’ll be glad that you have extra. Enjoy!
Soft and rich, these Nutella Stuffed Chocolate Fudge Cookies are in a class by themselves.
Course
Cookies
Cuisine
American
Keyword
Nutella Stuffed Cocolate Fudge Cookies
Prep Time25minutes
Cook Time15minutes
Servings24cookies
AuthorDoug Bakes Staff
Ingredients
Nutella Center Ingredients
1cupNutella Spread
Cookie Ingredients
2 1/4cupsall-purpose flour
1teaspoonbaking soda
1/21/2 teaspoon salt
1cupunsalted butter, softened
3/4cupbrown sugar
1/4cup granulated sugar
1boxChocolate instant pudding mix 3.4 oz
2 eggs
1teaspoonvanilla extract
1cupmacadamia nuts, chopped
Instructions
Nutella Center Instructions
Using a silicone mini ice cube tray, pipe Nutella into each cavity with a pastry bag.
Once the tray is completely filled, freeze for at least two hours.
Cookie instructions
Preheat oven to 350 degrees. Line baking sheet with parchment paper.
In a medium bowl, whisk together flour, baking soda, and salt and set aside.
In a mixer, cream butter and sugar for 3 minutes. Once combined, add the pudding, vanilla, and eggs and beat on high for 2-3 minutes.
Add half of the dry ingredients to the wet ingredients and turn the mixer on low, then Turn the mixer to high and mix until combined. Add the rest of the dry ingredients and mix until dough is combined. completely.
Add Macadamia Nuts, and stir until mixed in well.
Using a cookie scoop, Form two tablespoons of batter into a ball.
Make a hole in the dough ball and insert a frozen Nutella cube, and, using hands, cover the cube and form back into a ball.
Place on a cookie sheet and allow two hours to chill in the refrigerator.
Once chilled, place on a rimmed baking sheet, two inches apart.
Bake for 8-10 minutes, or until slightly golden and just set on the top. Cool on the baking sheet for 5 minutes then transfer to a baking rack to cool
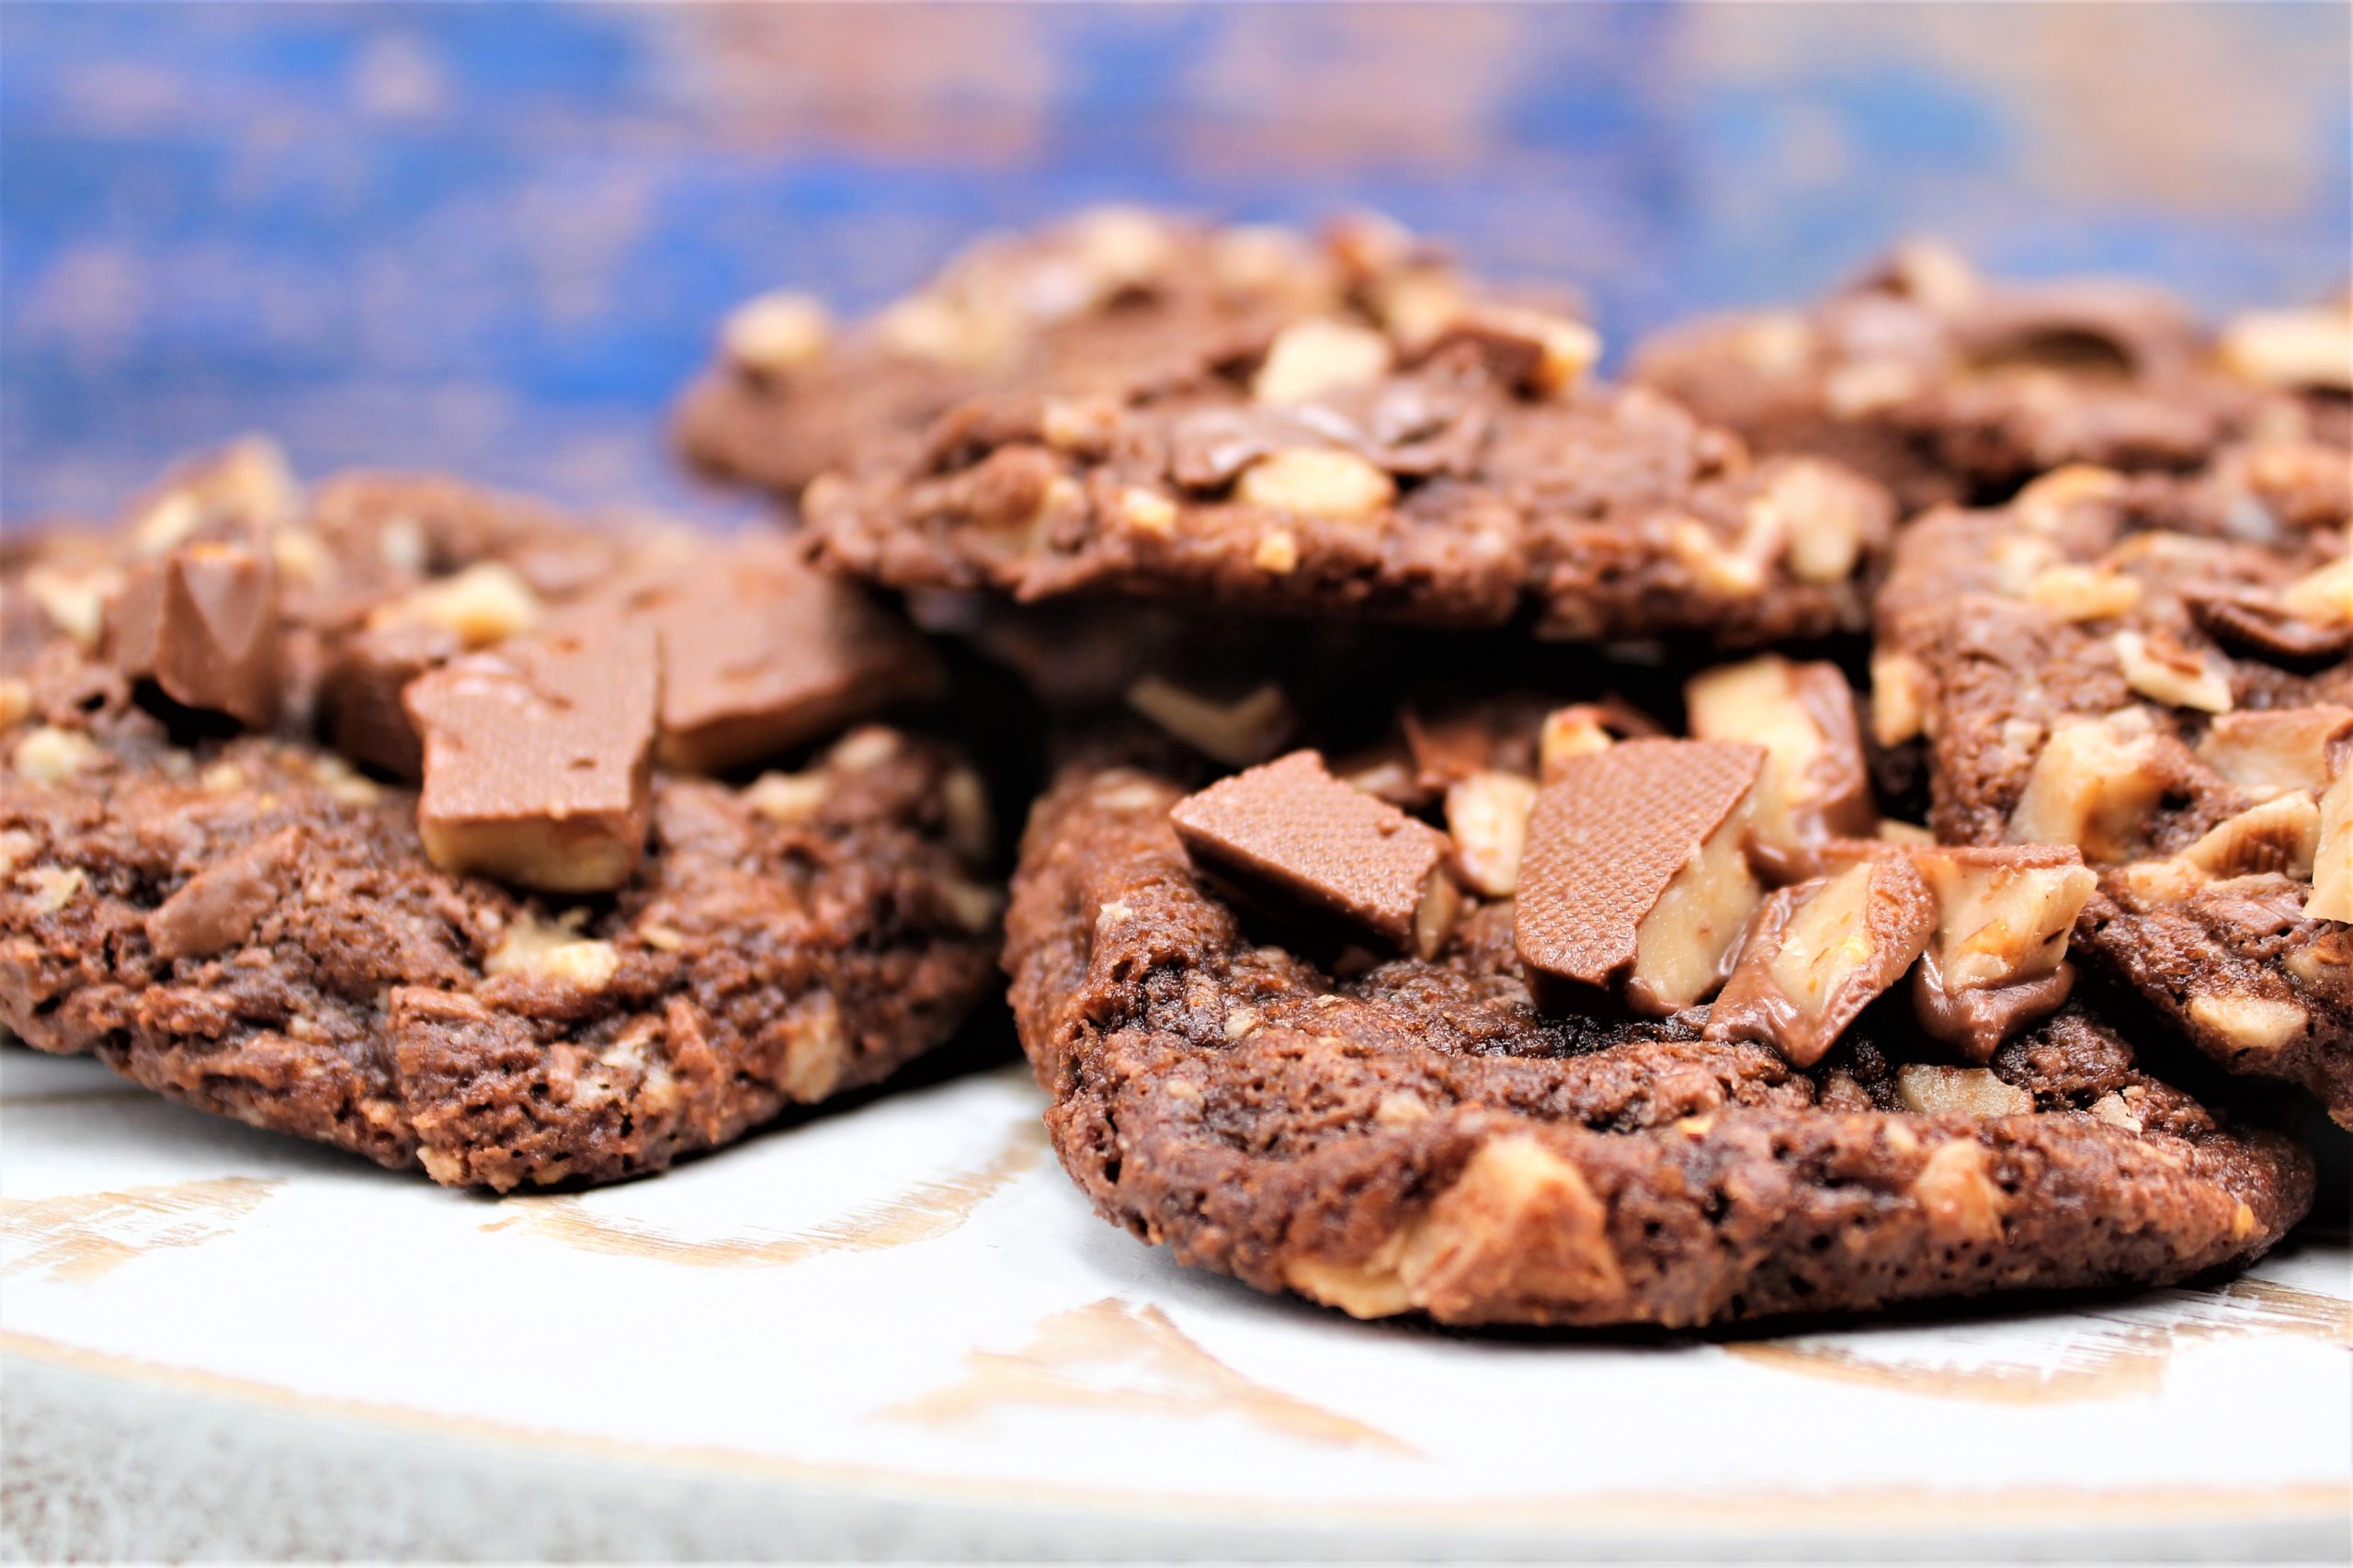
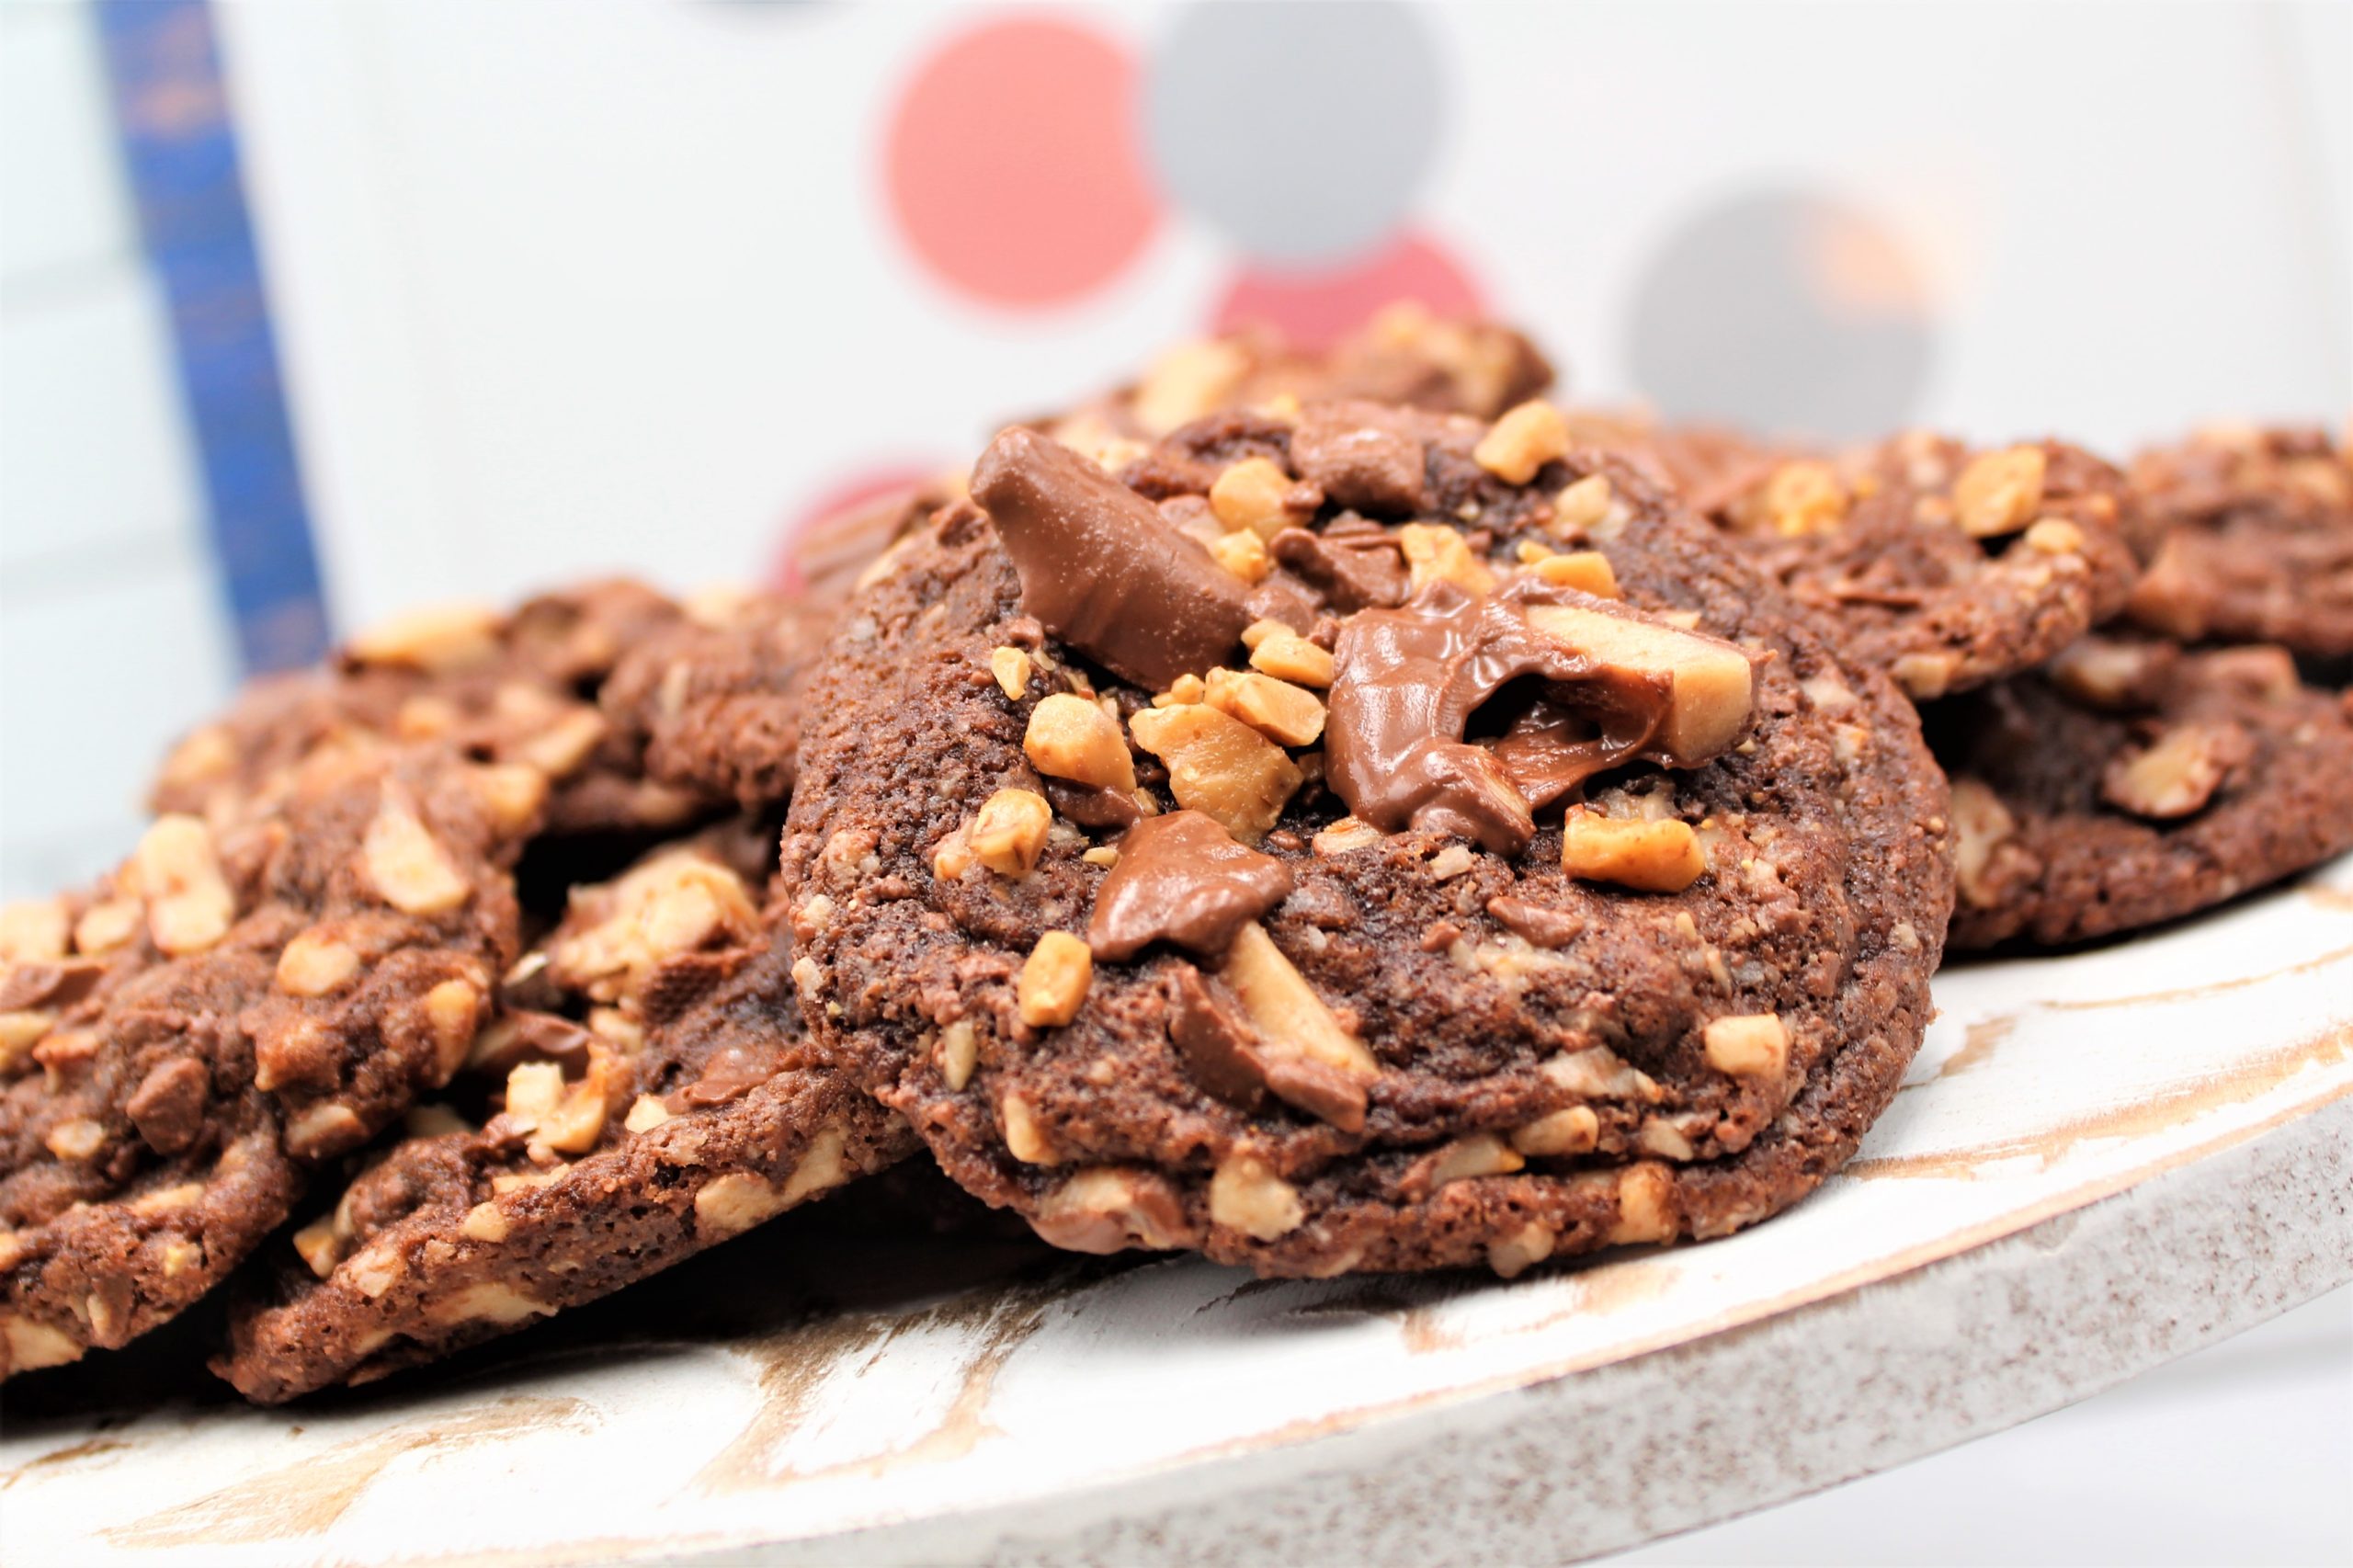
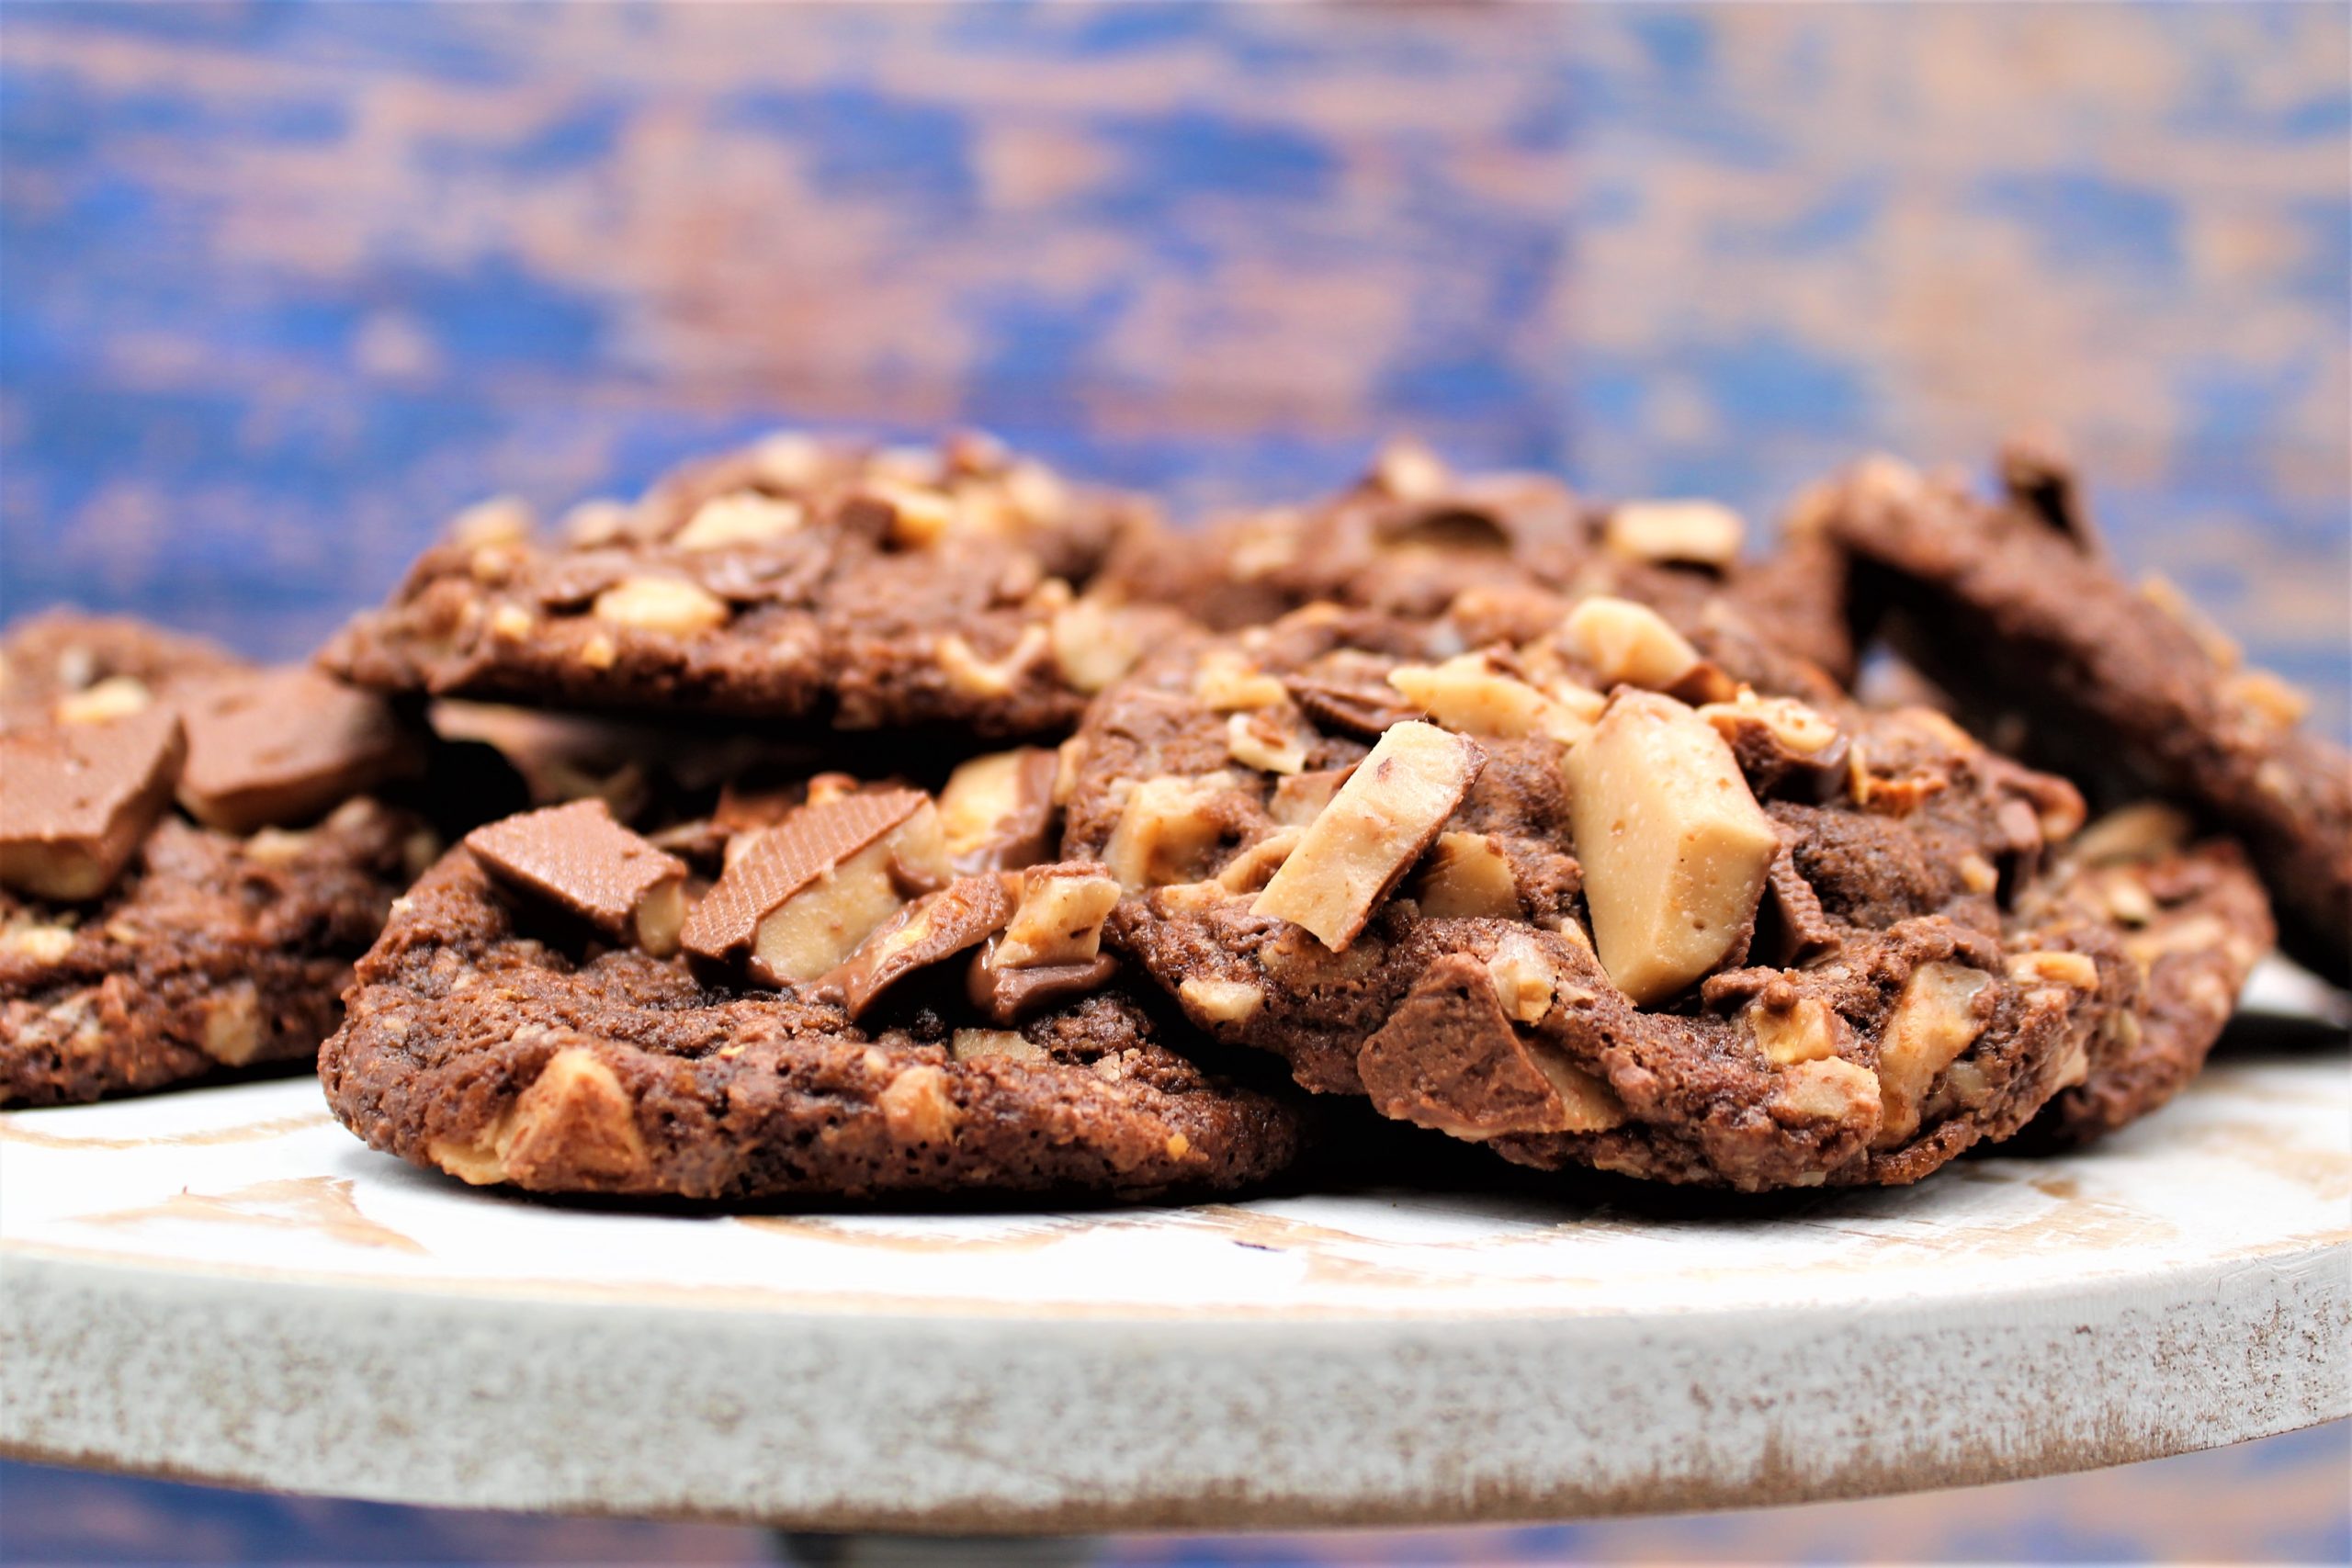
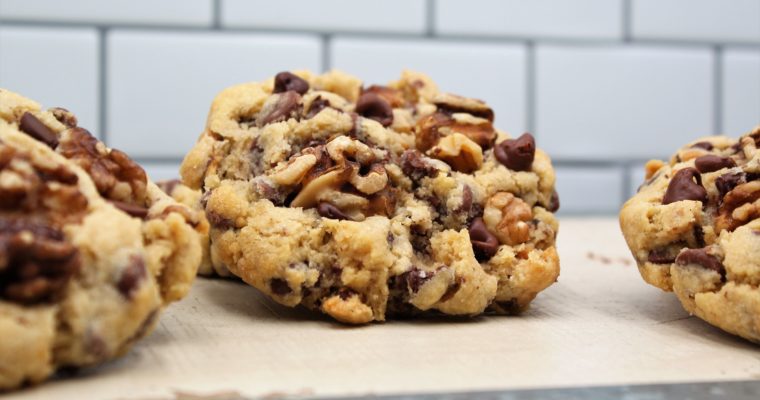
My Chocolate Toffee Cookies taste as if they came from the bakery, and I don’t mean mass-produced for a grocery store bakery either.
It is easy to see that these are scratch-made cookies. Only homemade cookies like these can have that Melty Center, crunchy edges, generous amounts of milk chocolate, and crunchy buttery toffee.
As a kid, I craved toffee. I specifically loved Heath Bars. When I was young and losing my baby teeth and had a loose tooth, the tooth finally came out while eating a Heath Bar. That experience probably should make me stay clear of that candy, But I guess you can say I was a glutton for punishment. So, my obsession with toffee continues.
These Chocolate Chip Toffee Cookies Are next level. They are the kind of cookie that makes you sneak from bed at night to the kitchen because you know they are a perfect companion to a tall cold glass of milk.
I hope you try my recipe for Chocolate Chip Toffee Cookies. They indeed are excellent; they are even worth losing a tooth over. Enjoy!
My Chocolate Chip Toffee Cookies have a soft middle and chewy edges. The toffee and the brown sugar give the cookies a rich toffee flavor, and it goes without saying, toffee goes excellent with chocolate.
Course
Cookies
Cuisine
American
Keyword
Chocolate Chip Toffee Cookies, dougbakes.com, heath bars, toffee cookies
Prep Time35minutes
Cook Time15minutes
Servings30cookies
AuthorDoug Bakes Staff
Ingredients
1cupbutter
1 1/2cupsdark brown sugar (packed)
1 + 1 yolklarge egg
1tablespoonvanilla extract
3cupsflour
1teaspoonbaking soda
3/4teaspoonsalt
1/2cuptoffee bits
1 1/2cupssemisweet chocolate chips
Instructions
Preheat oven to 350 F. Line baking sheets with parchment paper
Melt butter in a heavy pan.
Add brown sugar to a large bowl.
Pour melted butter over sugar.
Stir to combine butter and sugar. Let stand 5 minutes.
Add egg and egg yolk; stir to combine.
Stir in vanilla extract.
Add flour, baking soda, and salt. Stir until just combined.
Stir in toffee bits and chocolate chips.
Chill the dough for at least 30 minutes to give the ingredients a chance to meld.
Using a medium cookie scoop (1.5 tablespoons), drop scoops of dough 2 inches apart on the prepared cookie sheet.
Bake for about 8-12 minutes, or until the edges of the cookies are golden brown.
Let cool on cookie sheet for 5 minutes. Remove to a wire rack to finish cooling.
I love to bake in the very early morning hours. There is nothing better than starting a recipe while everyone in the house is asleep.
It doesn’t matter what I am about to bake; it is just the ritual that is a form of meditation for me.
I start with heating the oven and grab my trusty Plastic mixing bowls that receive so much use but never discolor and never lose shape.
I am fortunate enough to have my grandmother’s canisters that she used her entire adult life. They sit on my kitchen counter and never fail to make me smile when I use them.
I have a KitchenAid mixer that my husband gave me for my birthday, probably 20 years ago. At the time, I had never baked anything that did not come from a box, so a very expensive mixer seemed odd but has become invaluable to me as I started my baking journey.
Every part of the baking process is very therapeutic. I clean as I go, loading the dishwasher, cleaning the counters, and keeping my focus on my task at hand.
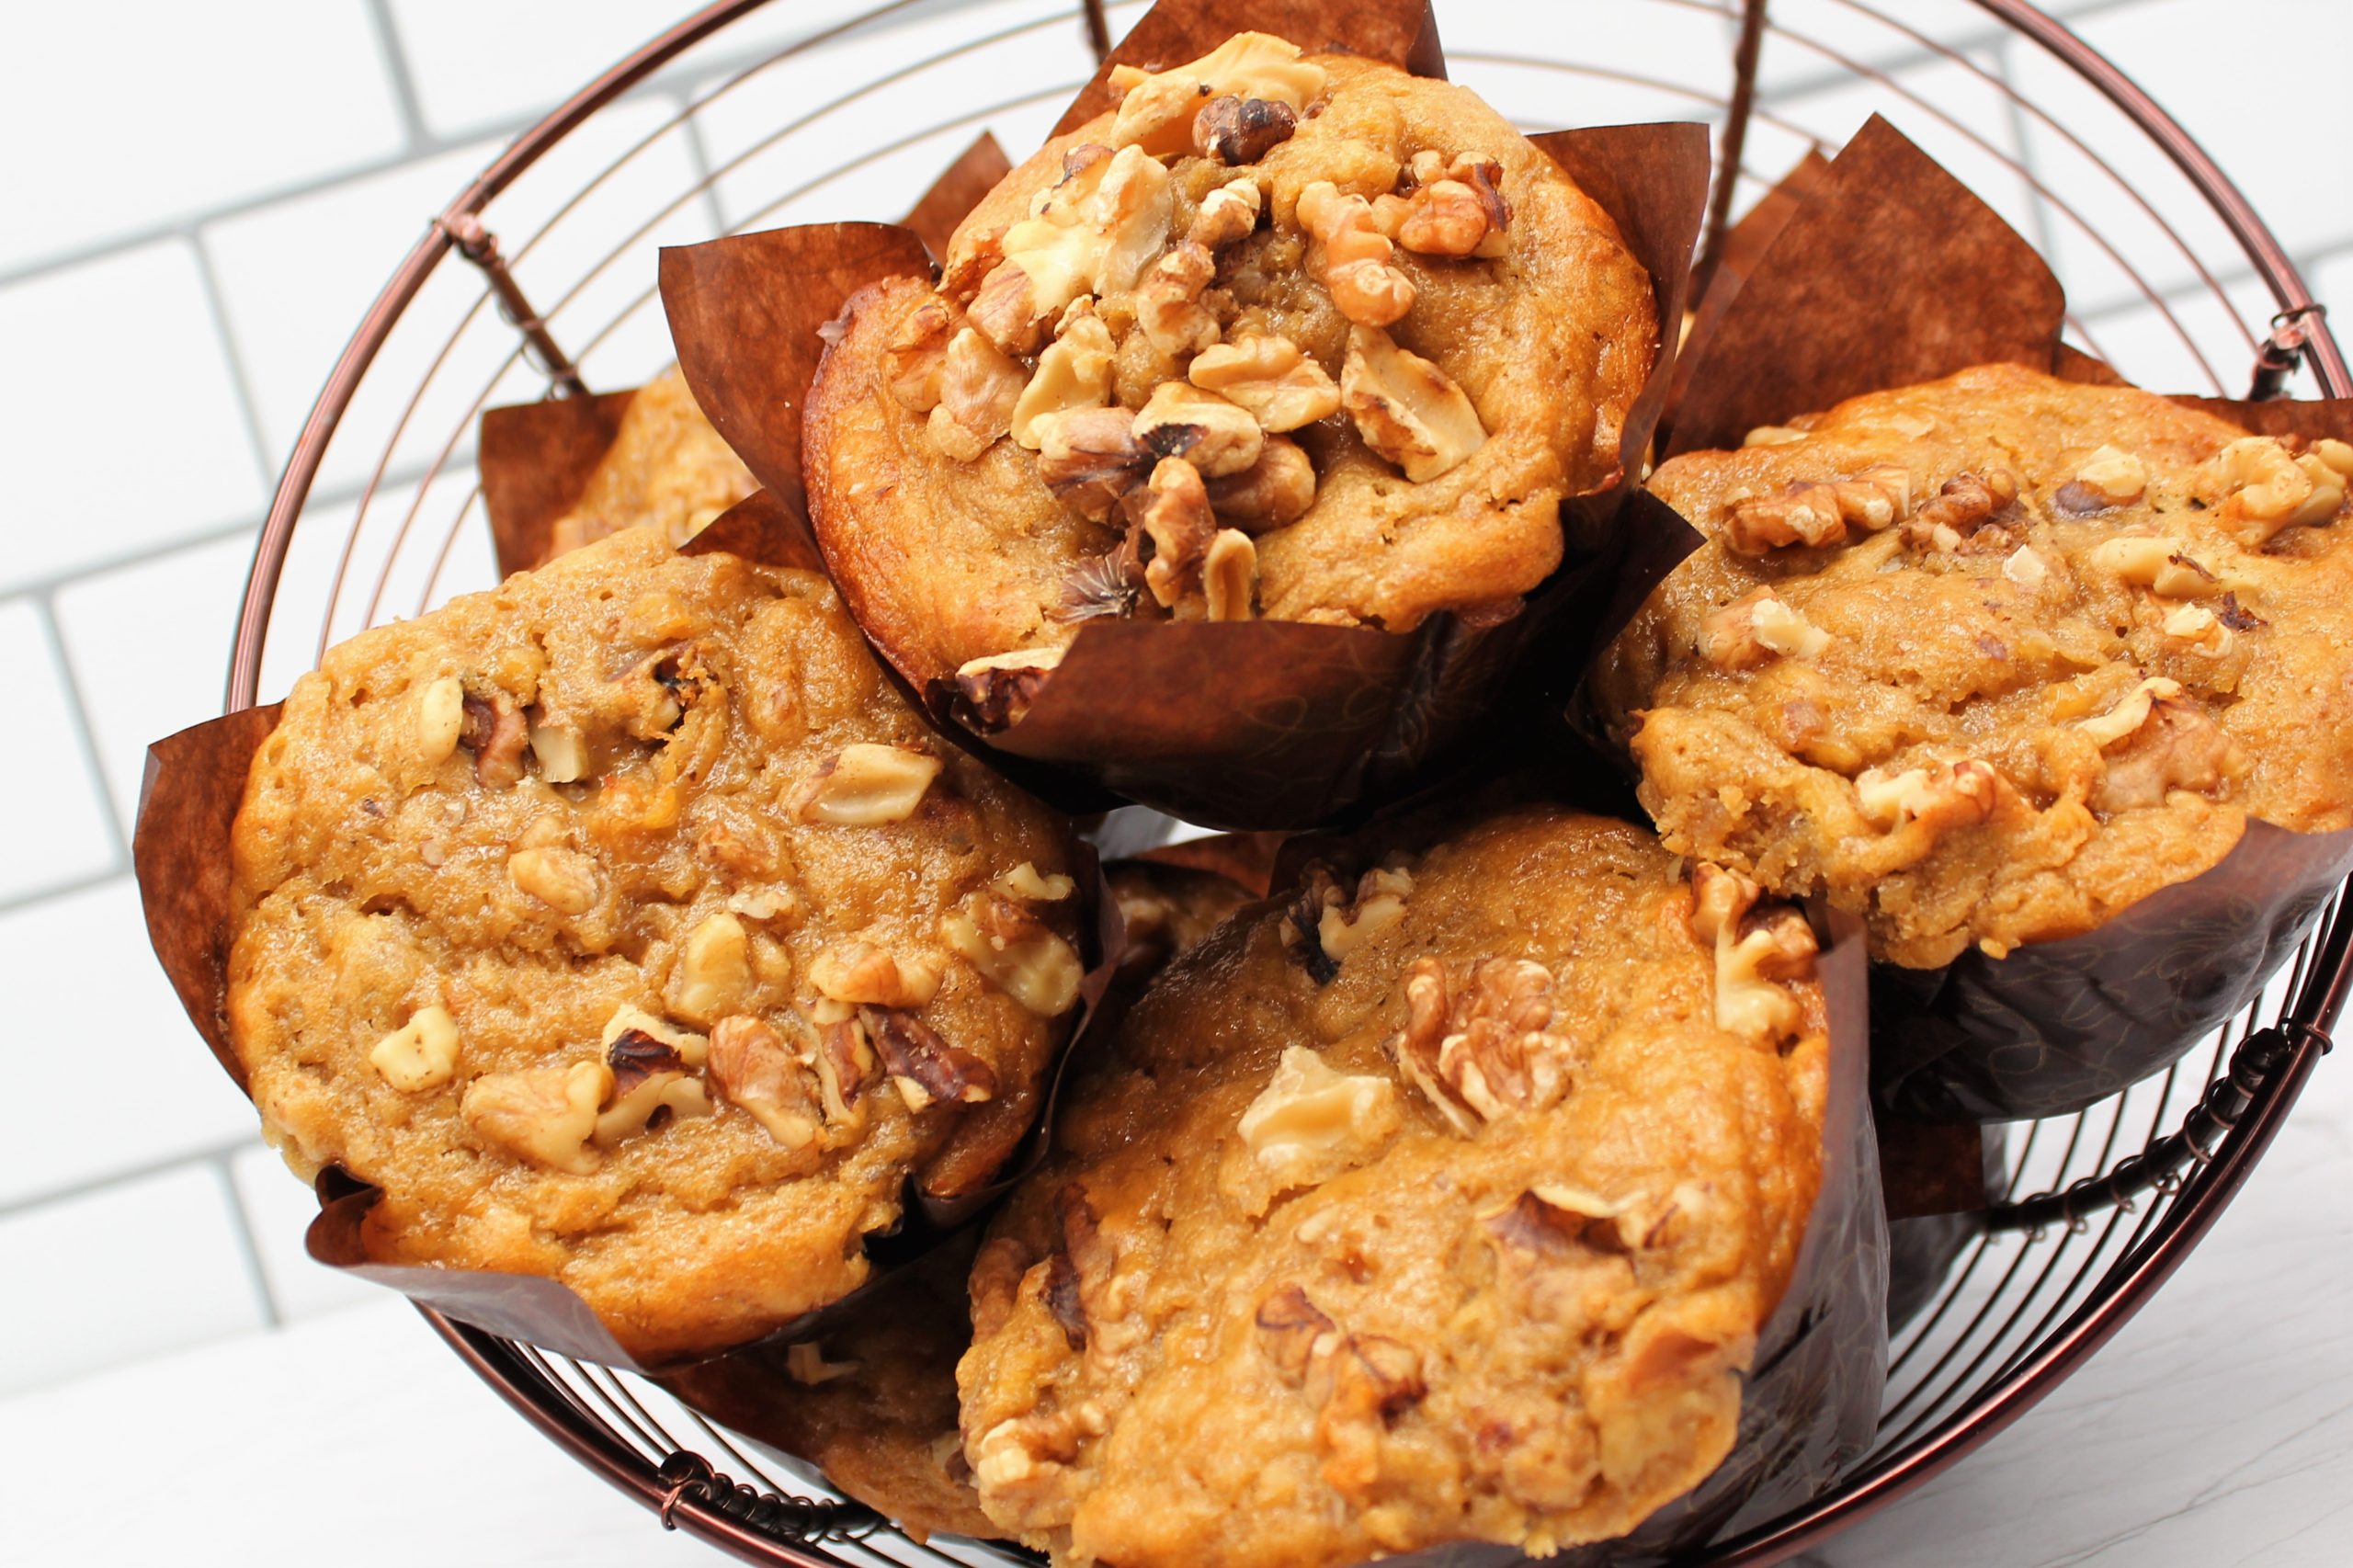
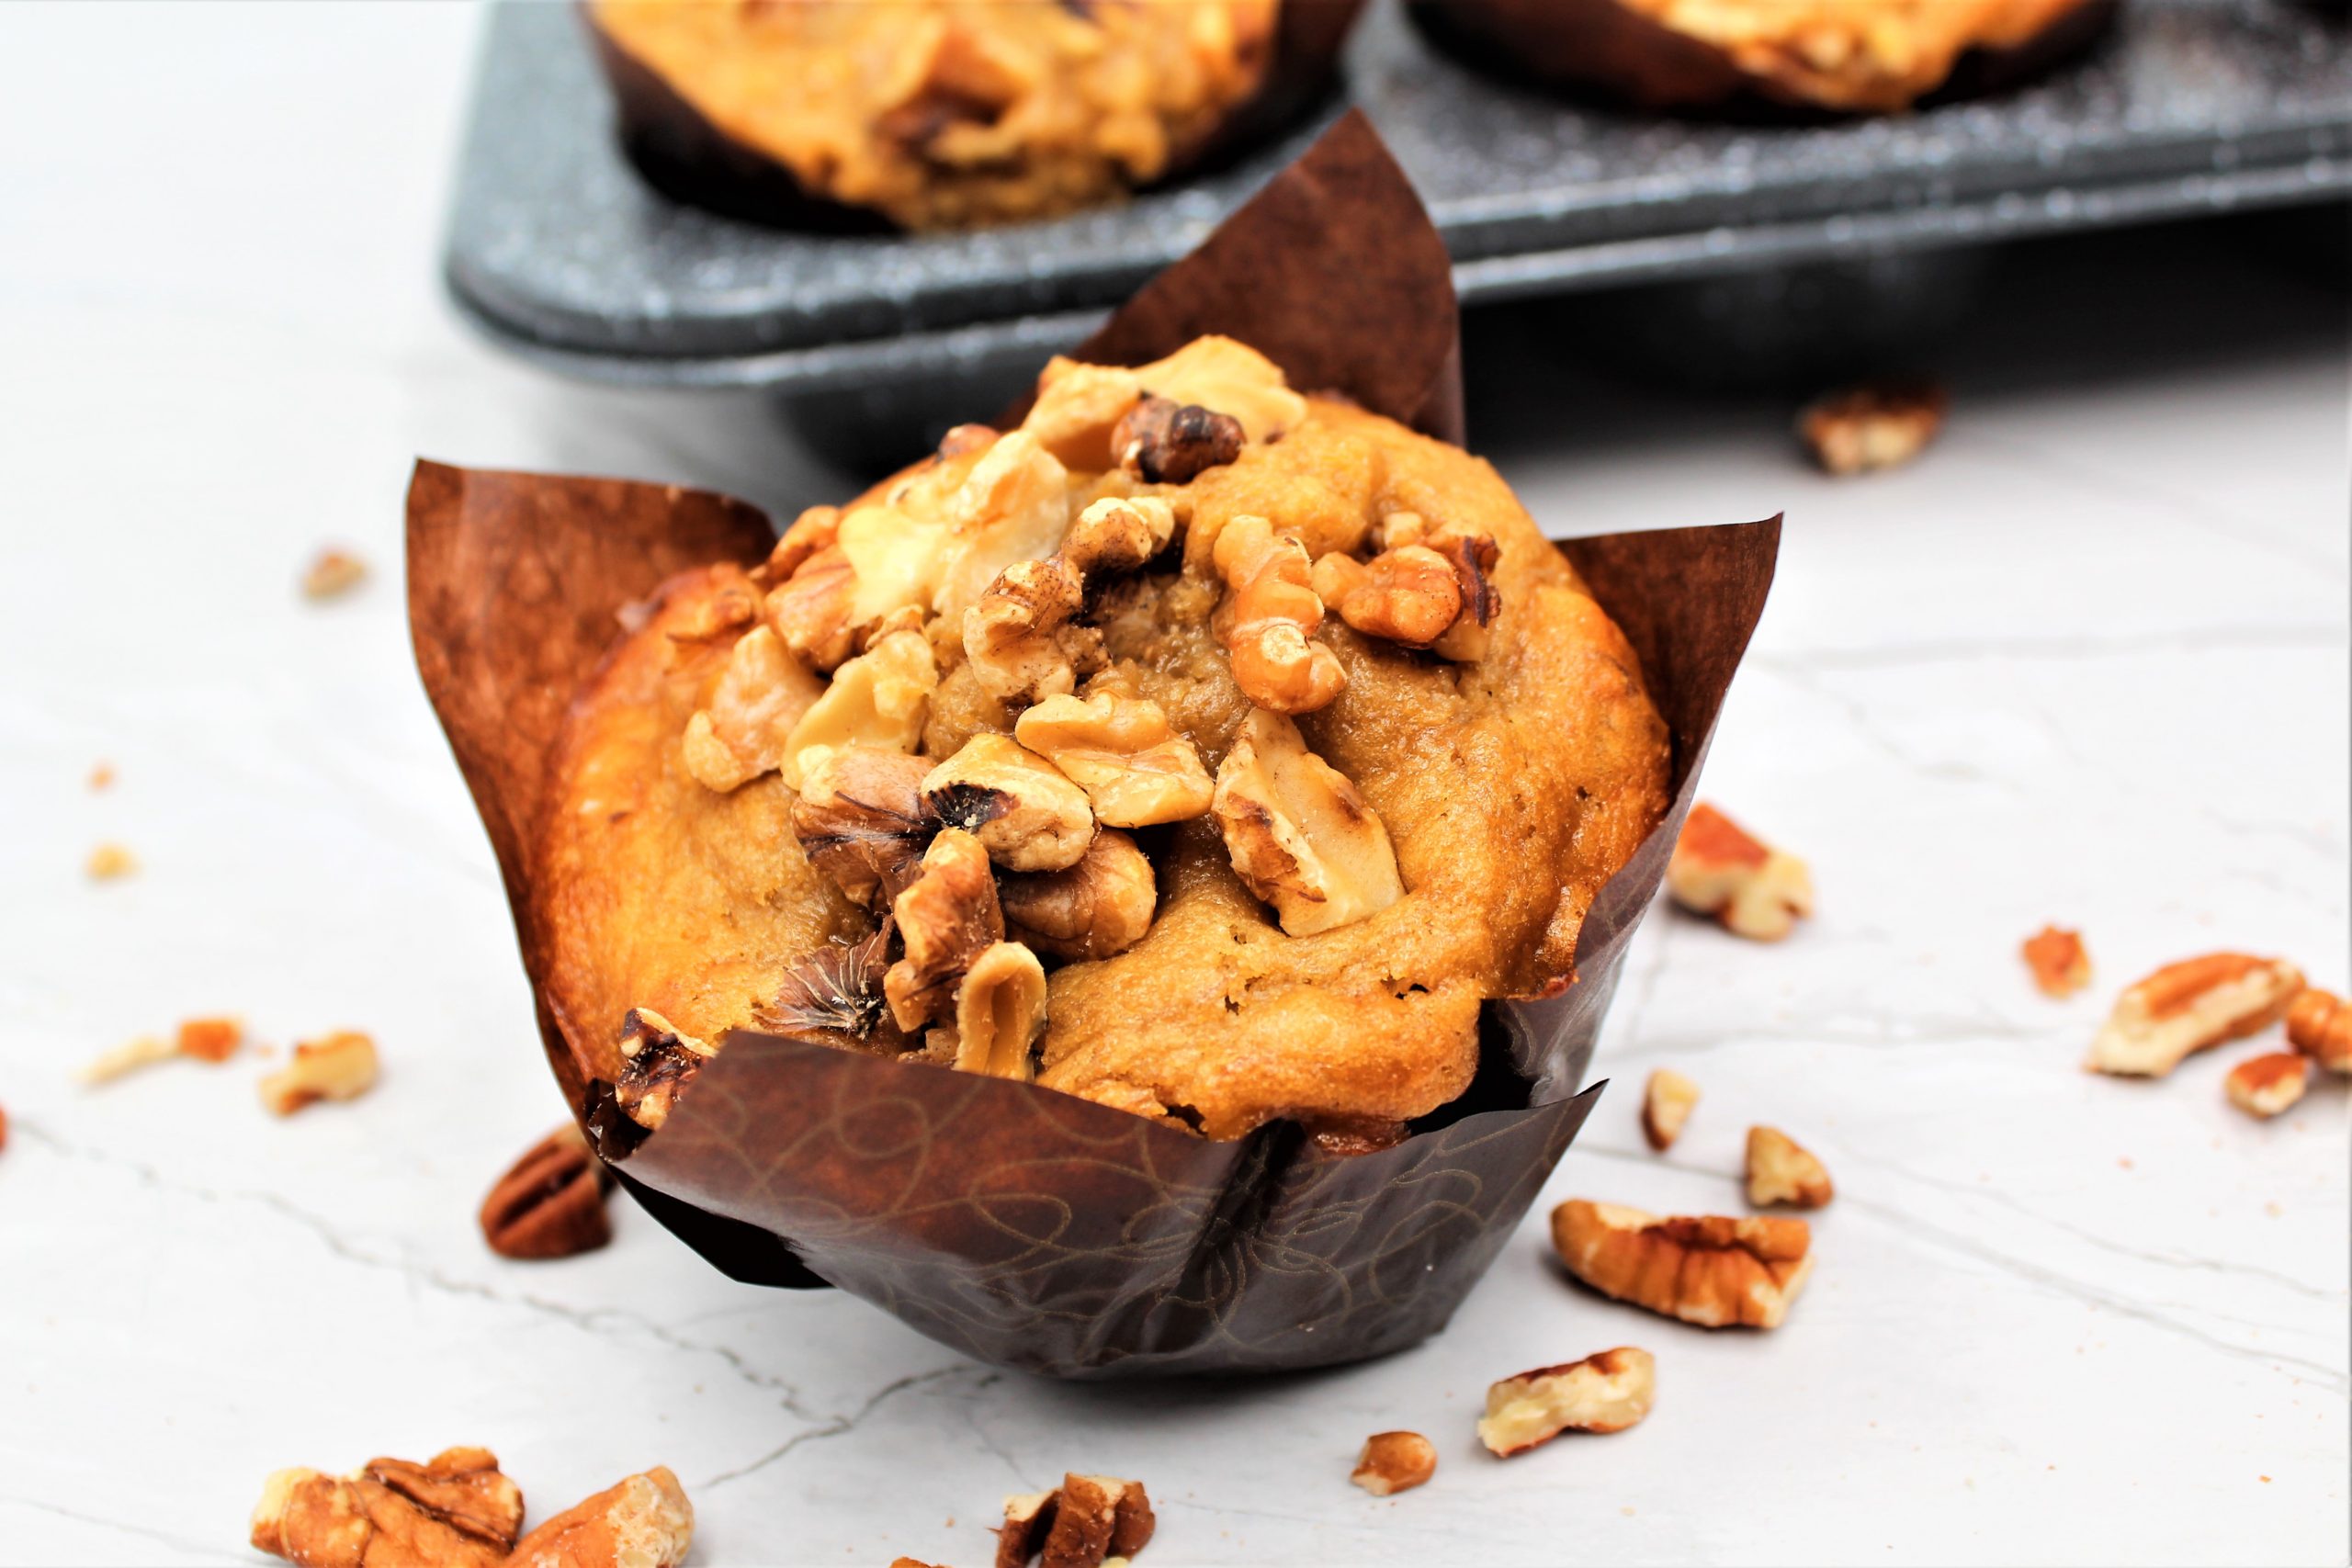
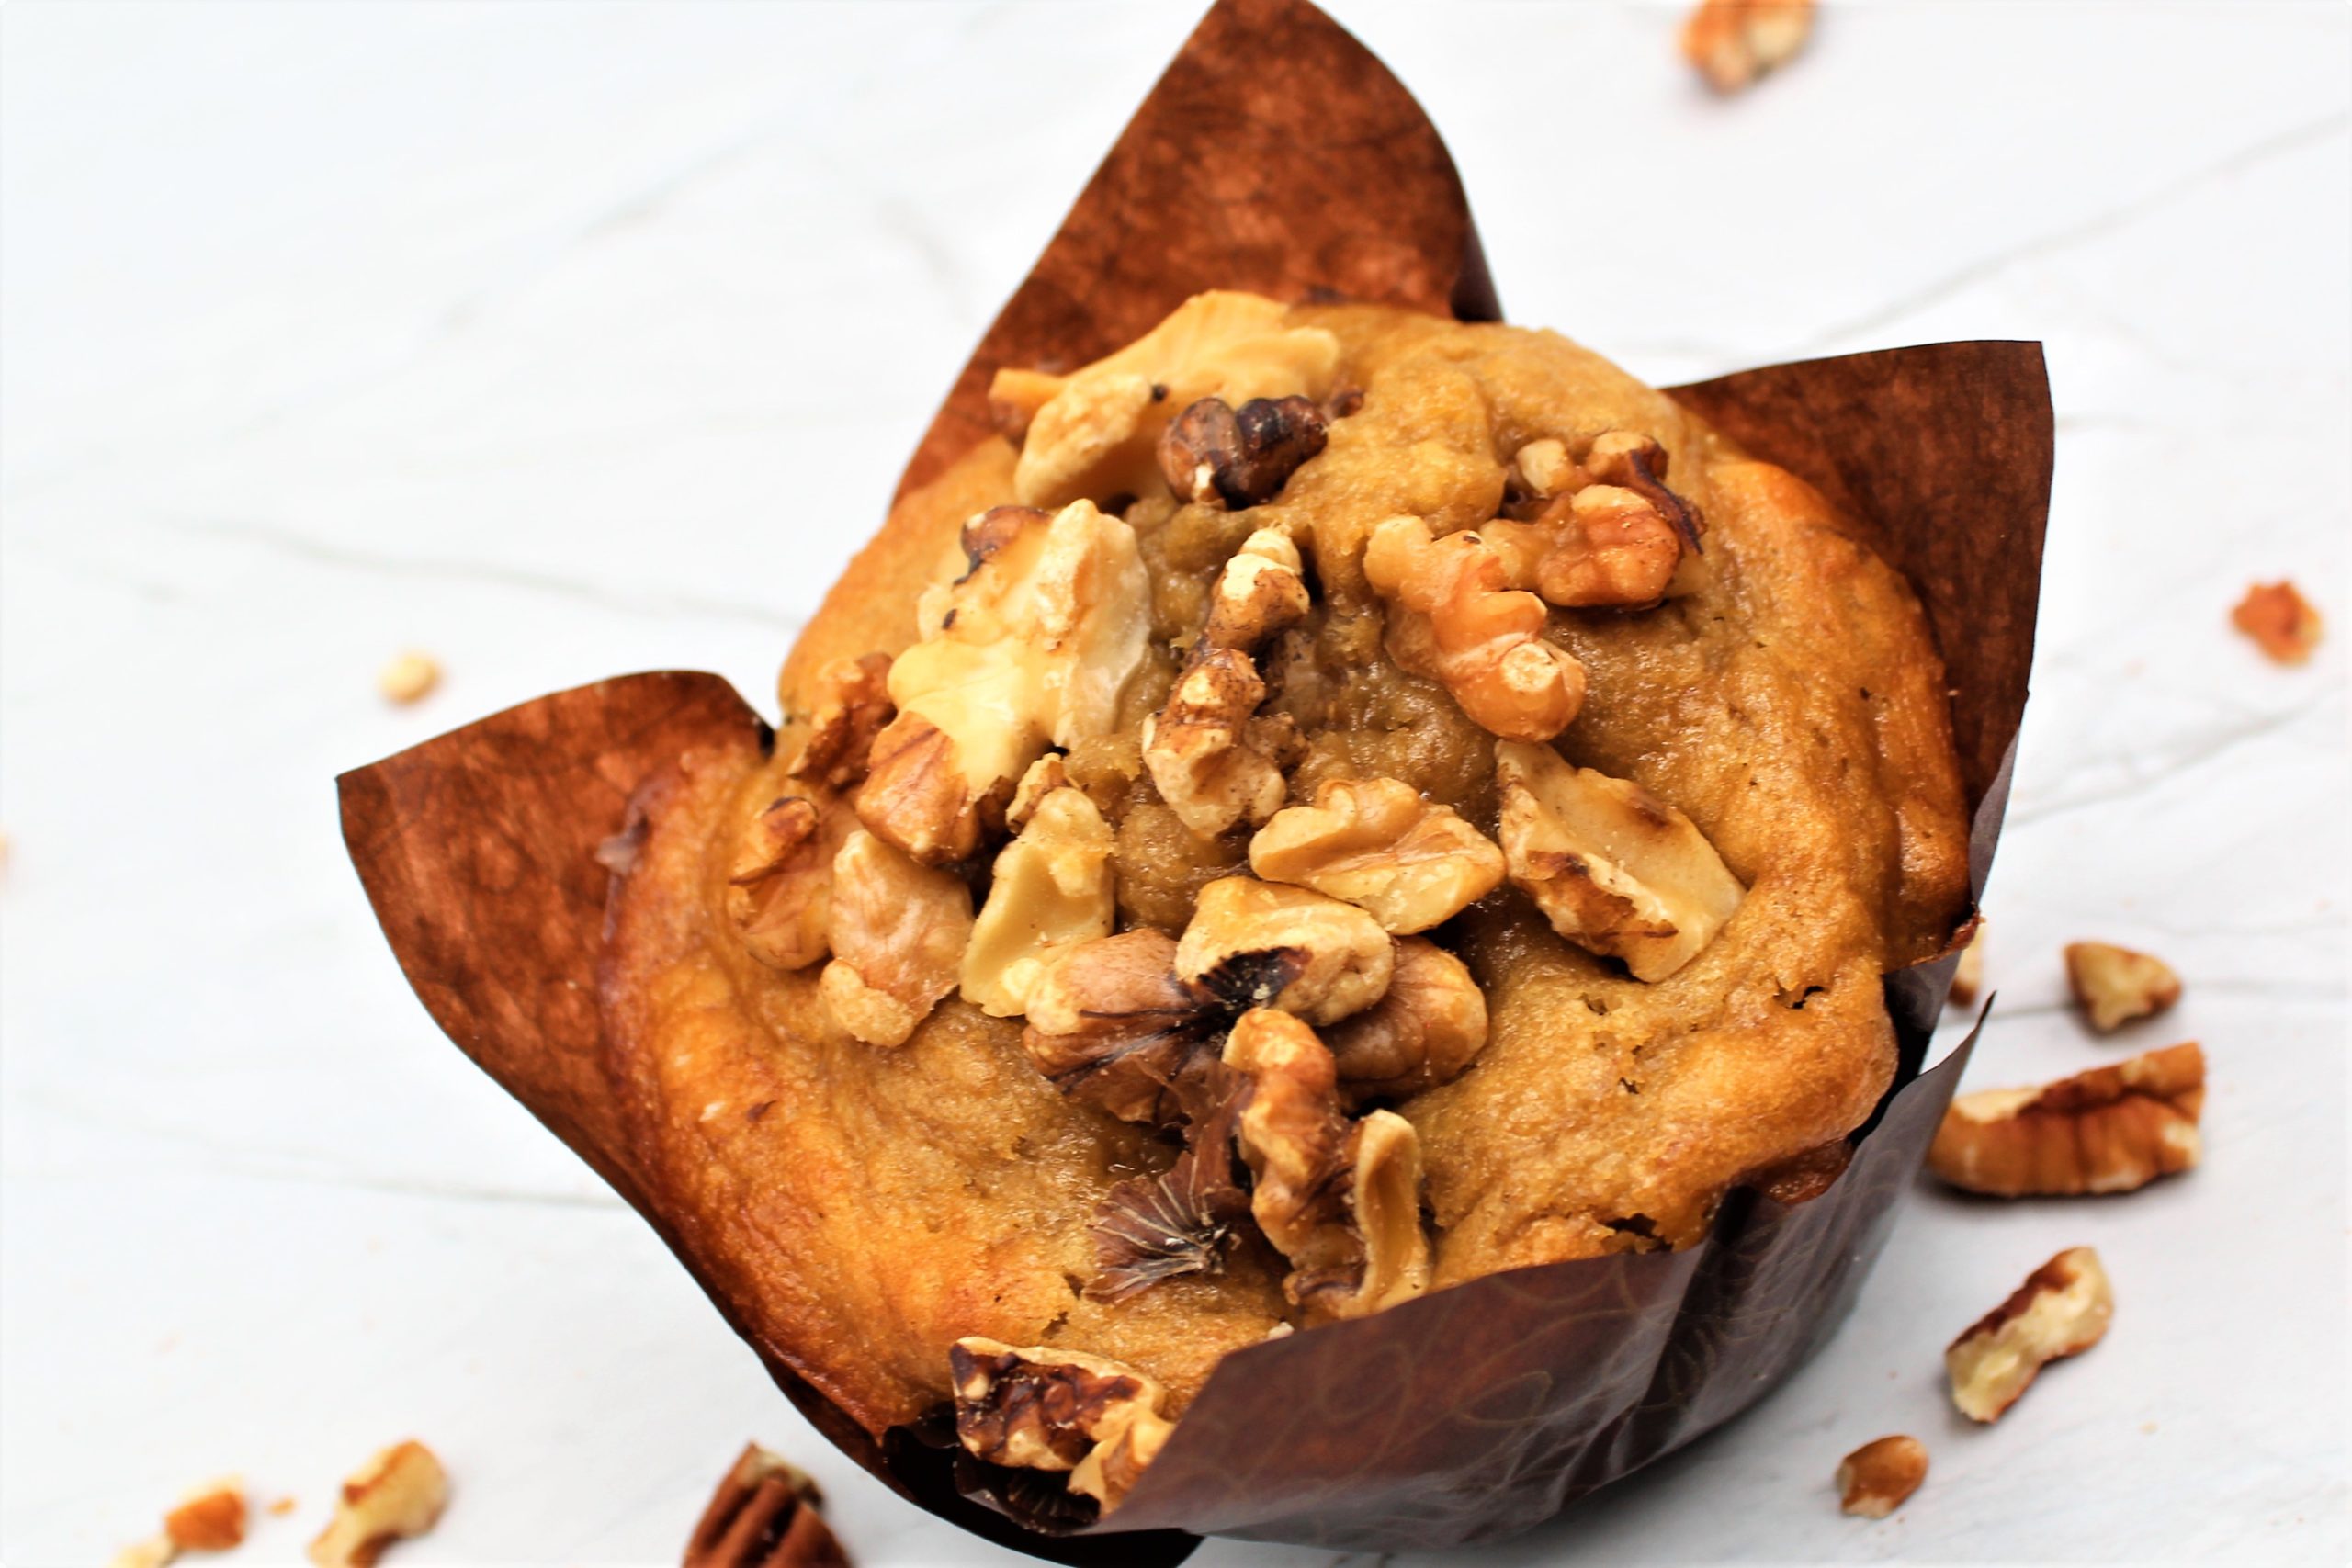
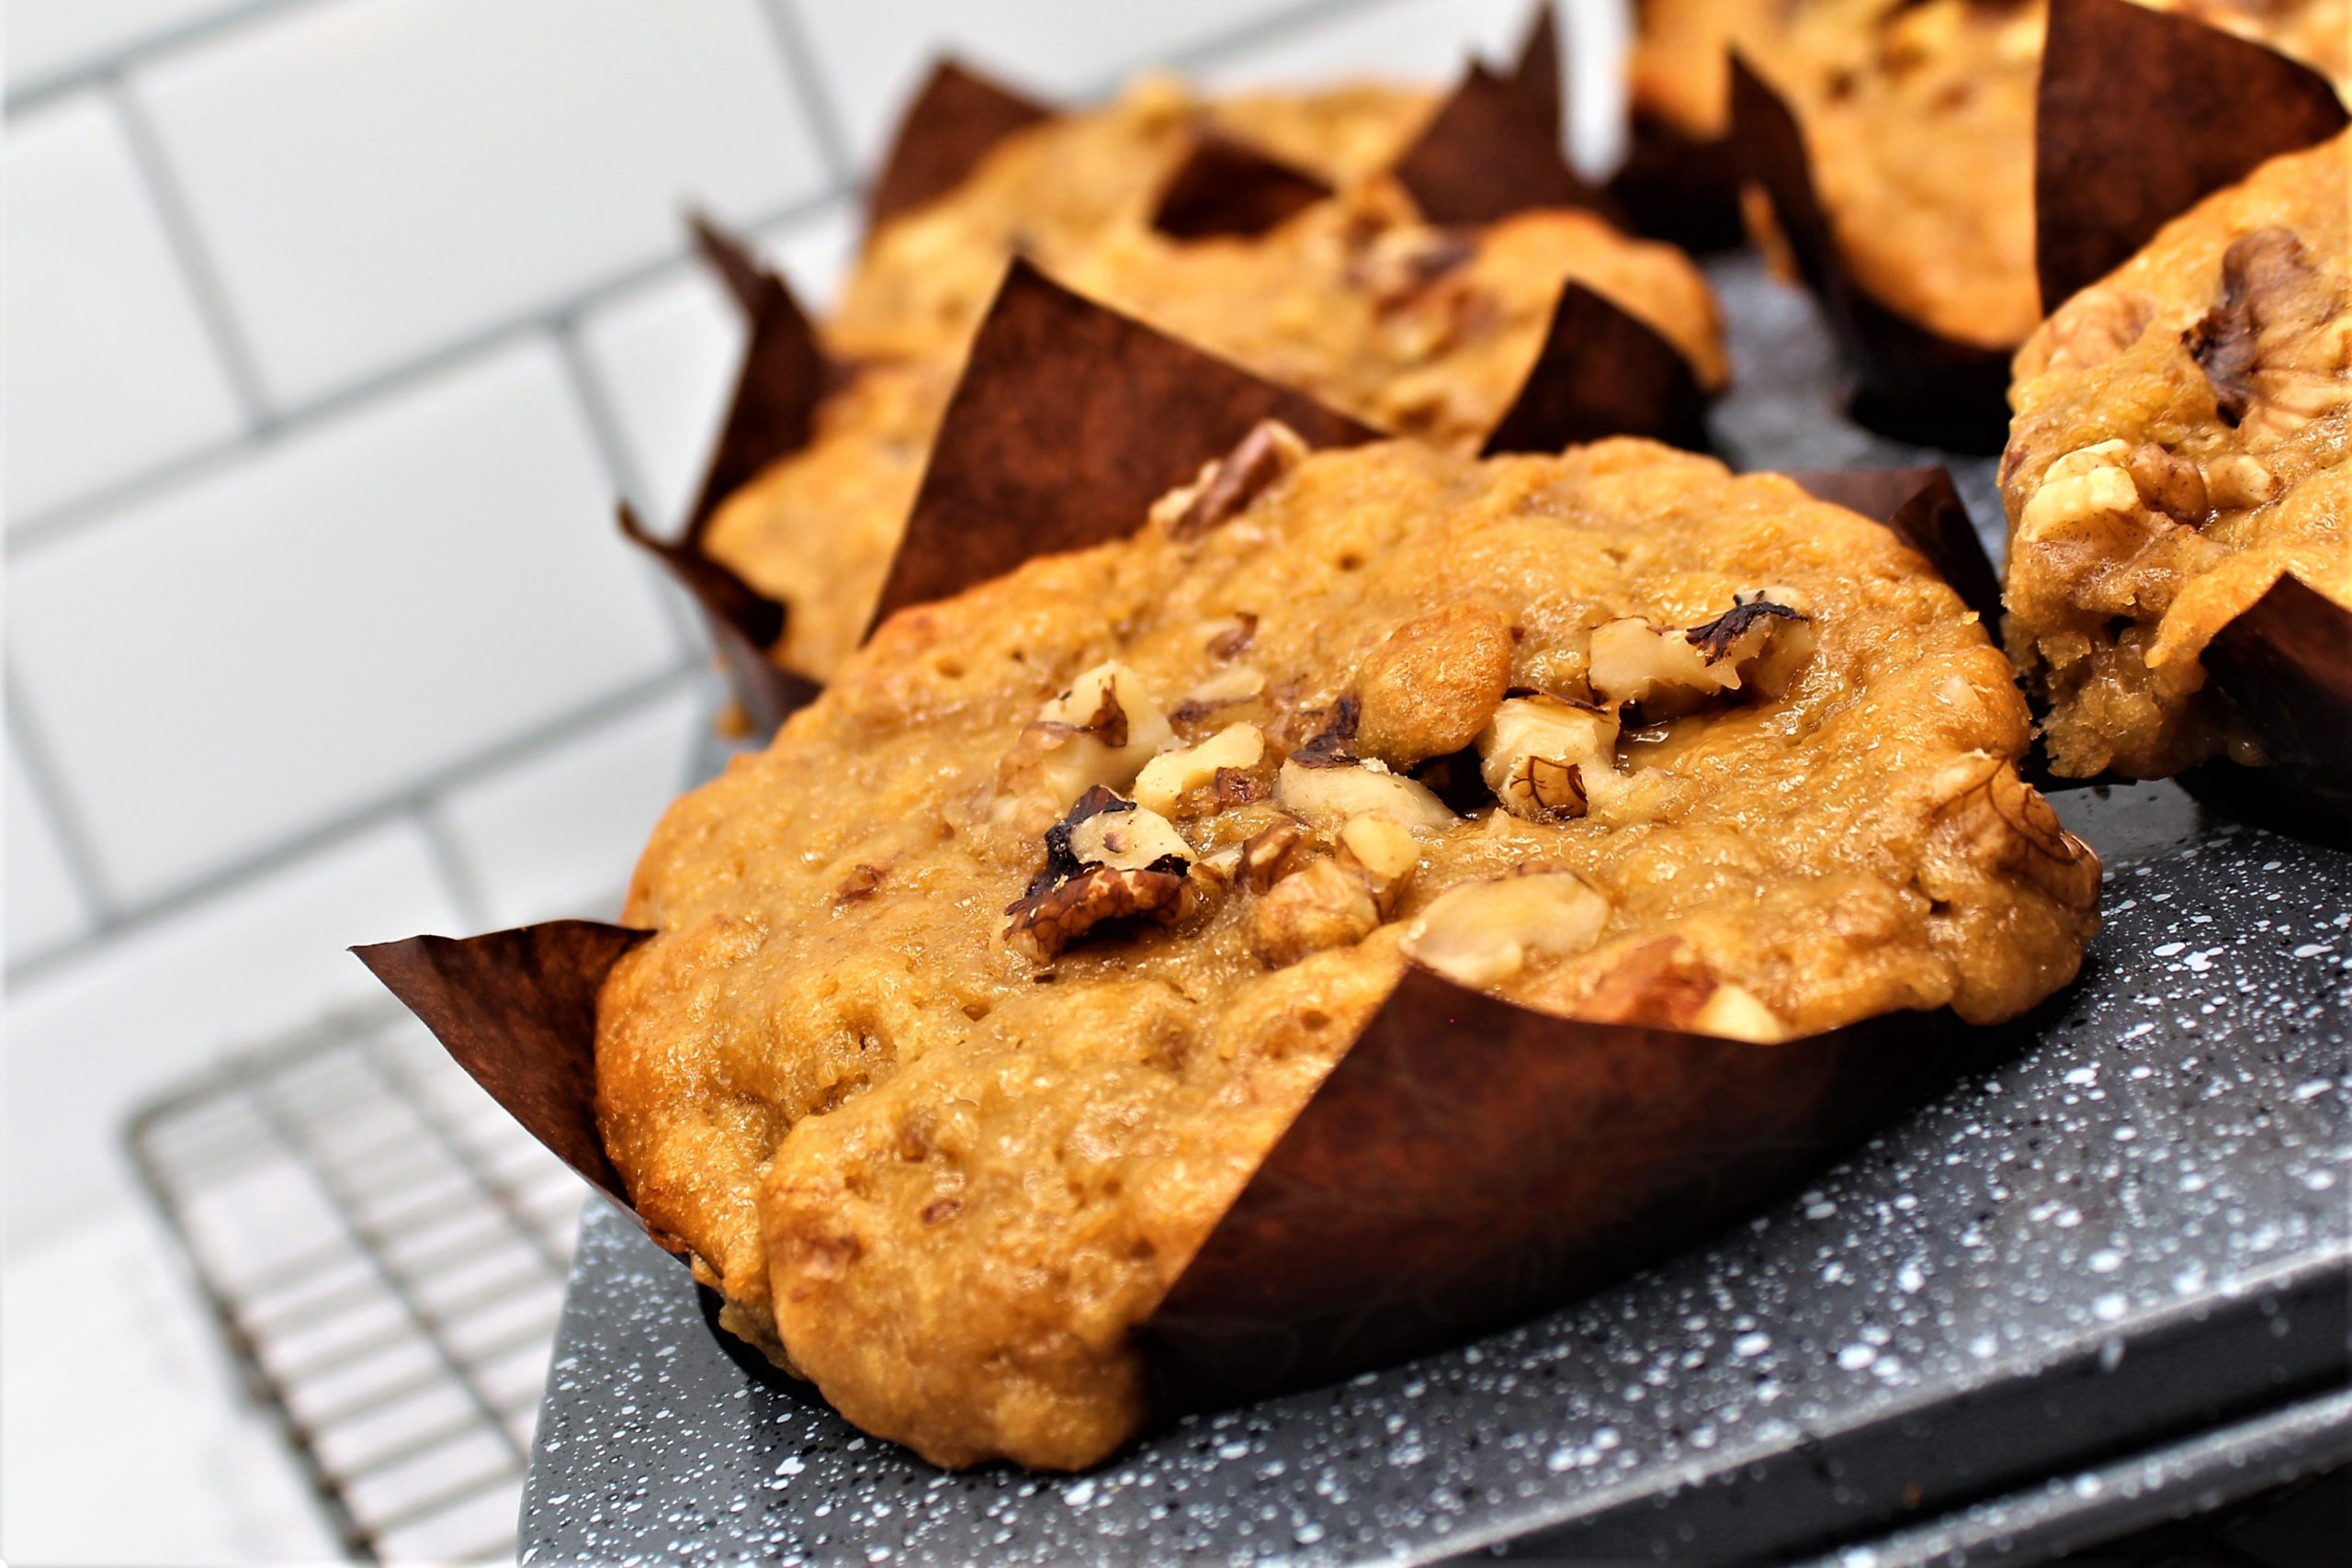
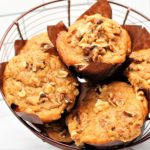
This morning, I baked these banana walnut muffins. This recipe is perfect for large muffin tins like I’ve used, or a standard muffin tin works just as well, and you’ll end up with 12 muffins.
If you use a large muffin tin, this recipe yields six jumbo muffins.
I bought my bananas a week in advance and allowed them to ripen on the counter. Then, when I think the bananas are ready, I wait a couple more days before using them. The Longer they sit, the better they are. Trust me here.
I always toast nuts when I am baking. Toasting brings out the oil and makes the nuts fresh again.
If you make this recipe, and I hope you do, please keep in mind not over mixing the batter. Forming gluten in a muffin is not a good thing.
When removing your Muffins from the oven, your result will be perfectly browned muffins that are slightly sweet and filled with banana flavor that pairs wonderfully with the toasted walnuts.
This recipe, I guarantee, will beat any bakery muffin you’ve had in the past.
I hope you try this recipe, and even though you may not have your grandmother’s canisters to keep you company in the kitchen, I hope you have memories that will. Enjoy!
Soft and flavorful, my Banana Walnut Muffins with large pieces of walnut mix through out are the ultimate muffin. They are an excellent way to use overripe bananas. They are also amazing with a hot cup of coffee.
Add sugar and eggs into a bowl and whisk to combine.
To that, add molasses, oil, buttermilk, sour cream, vanilla, and banana. Whisk to combine.
In a separate bowl, measure flour, salt, baking powder, baking soda, & walnuts. Whisk to combine.
Add wet ingredients to dry.
Add muffin liners, if desired, then grease or spray, and fill each muffin hole with 225g muffin batter if using a jumbo 6-muffin pan or about 110g if using a standard 12-muffin pan.
My Ham and Cheese Quiche is light, flavorful, and the crust? Well, forget about it! It is flakey and holds up to any filling you throw at it. All in all, the perfect quiche.
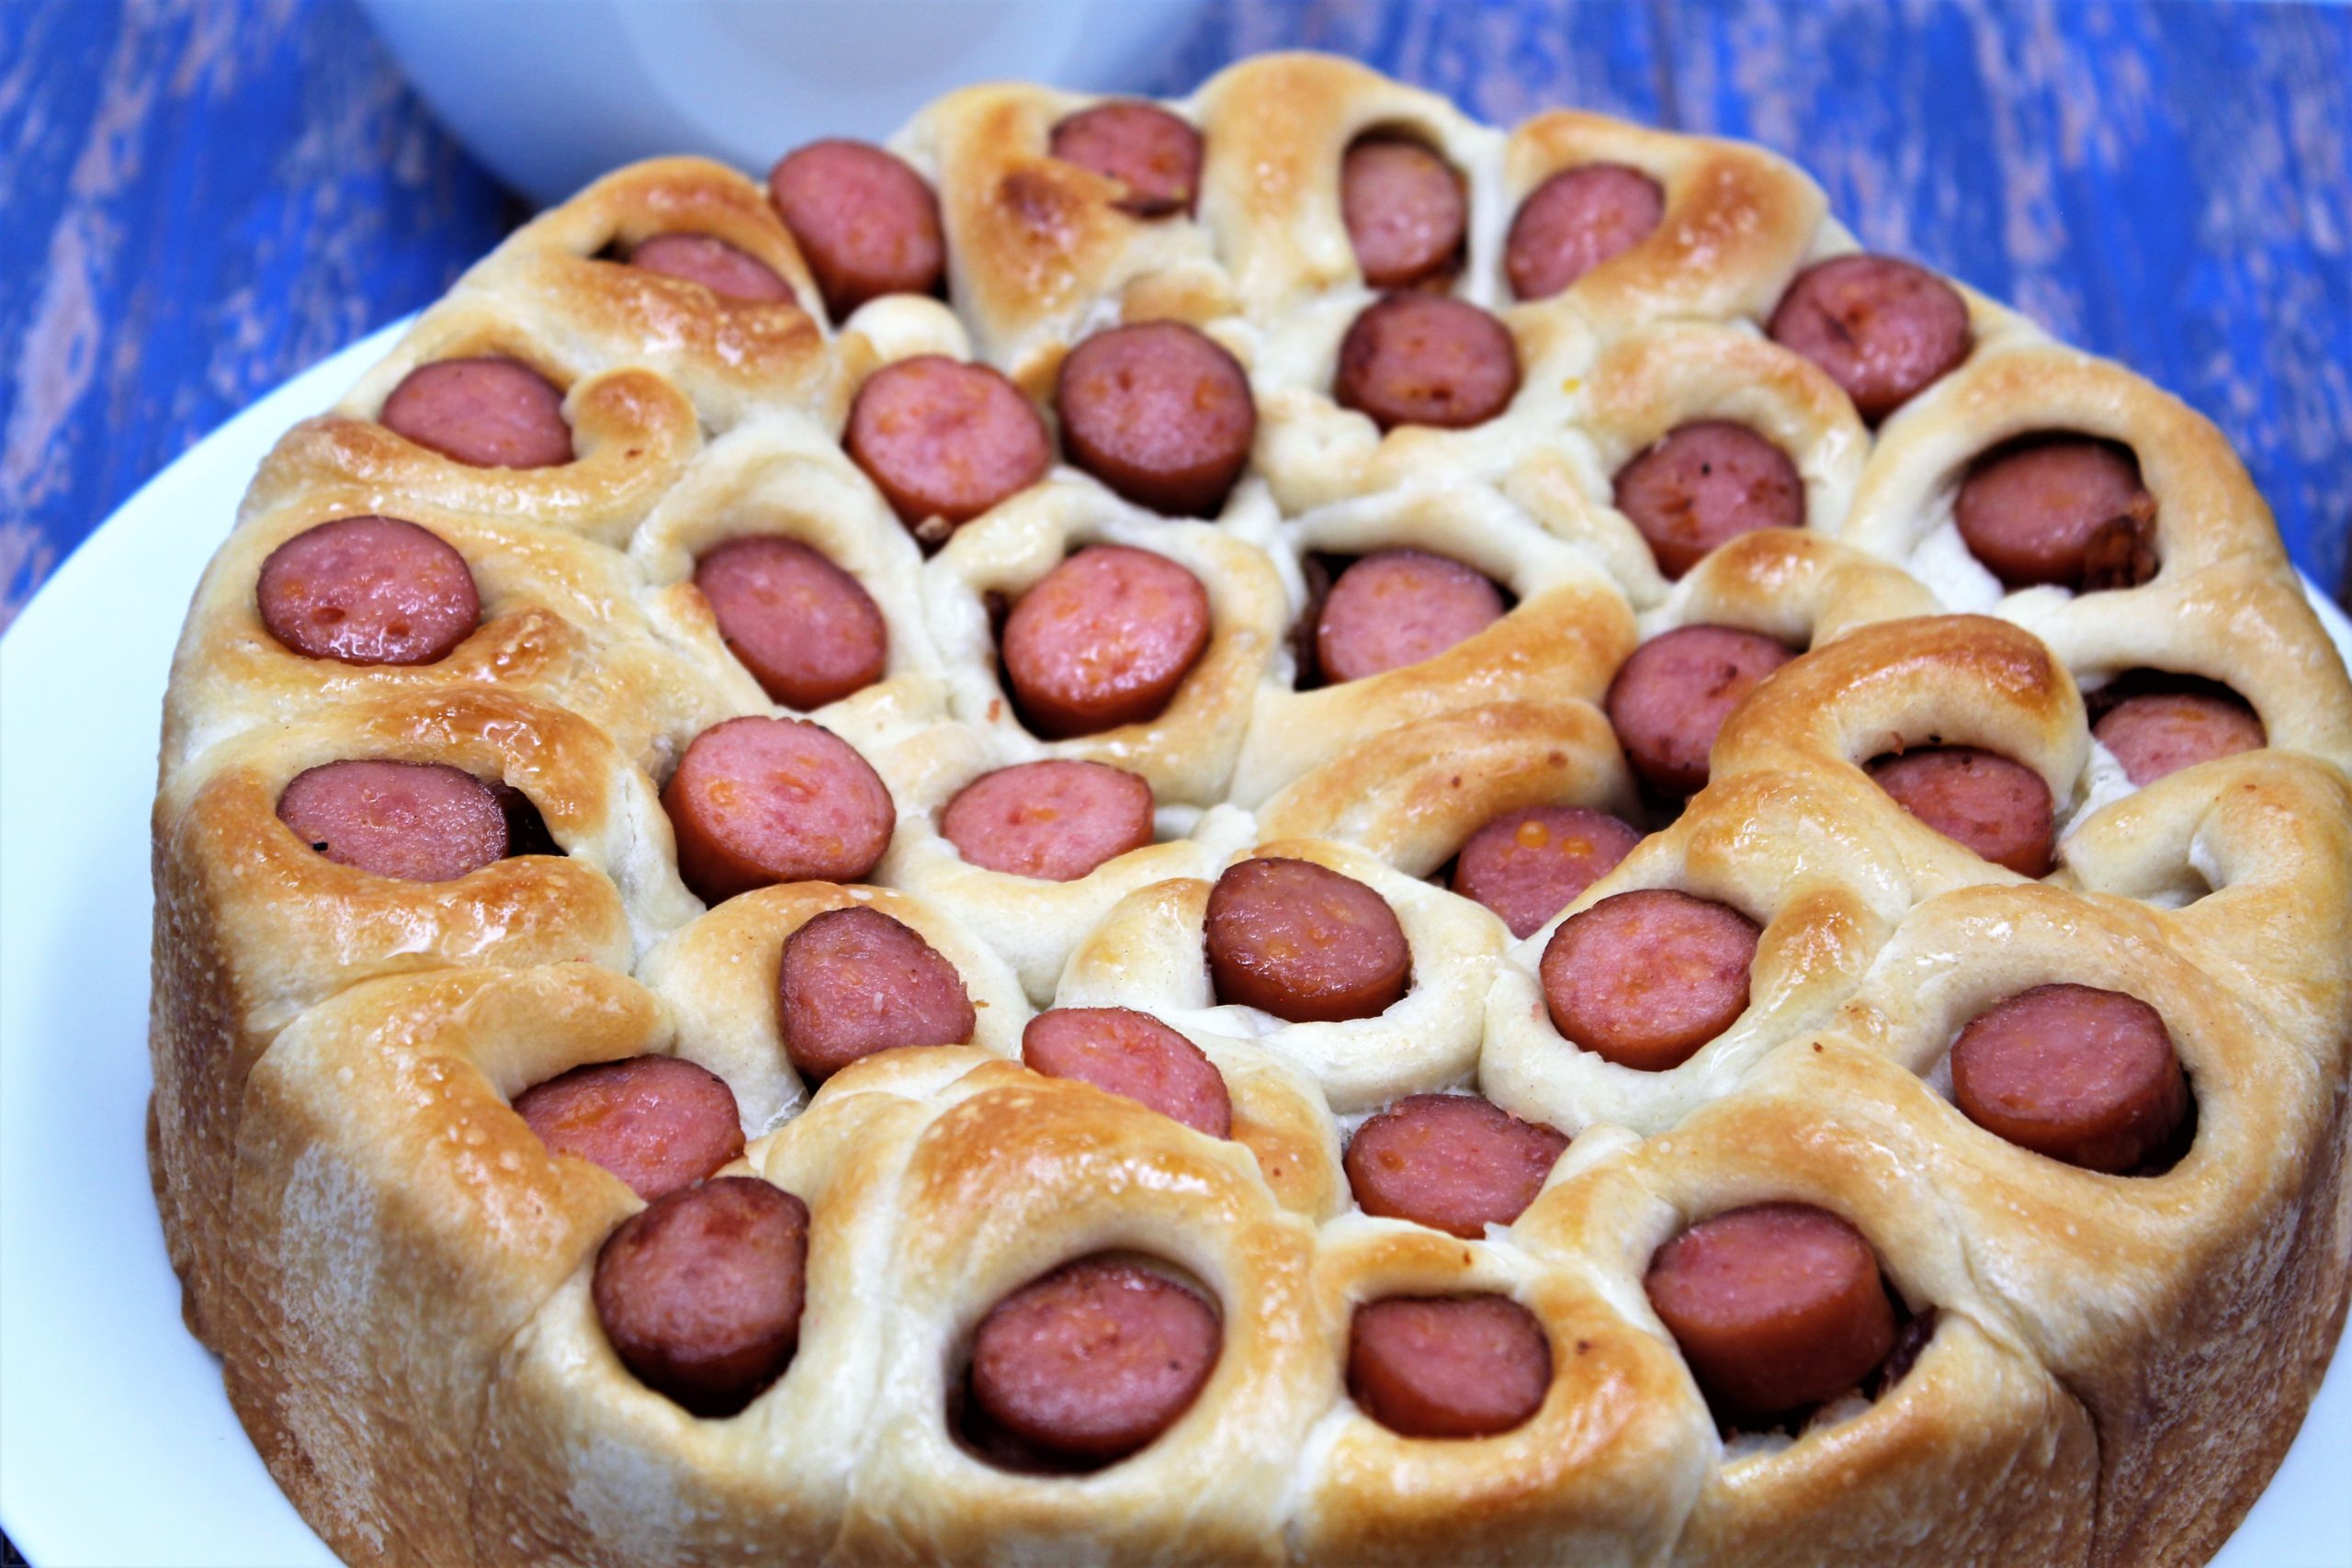
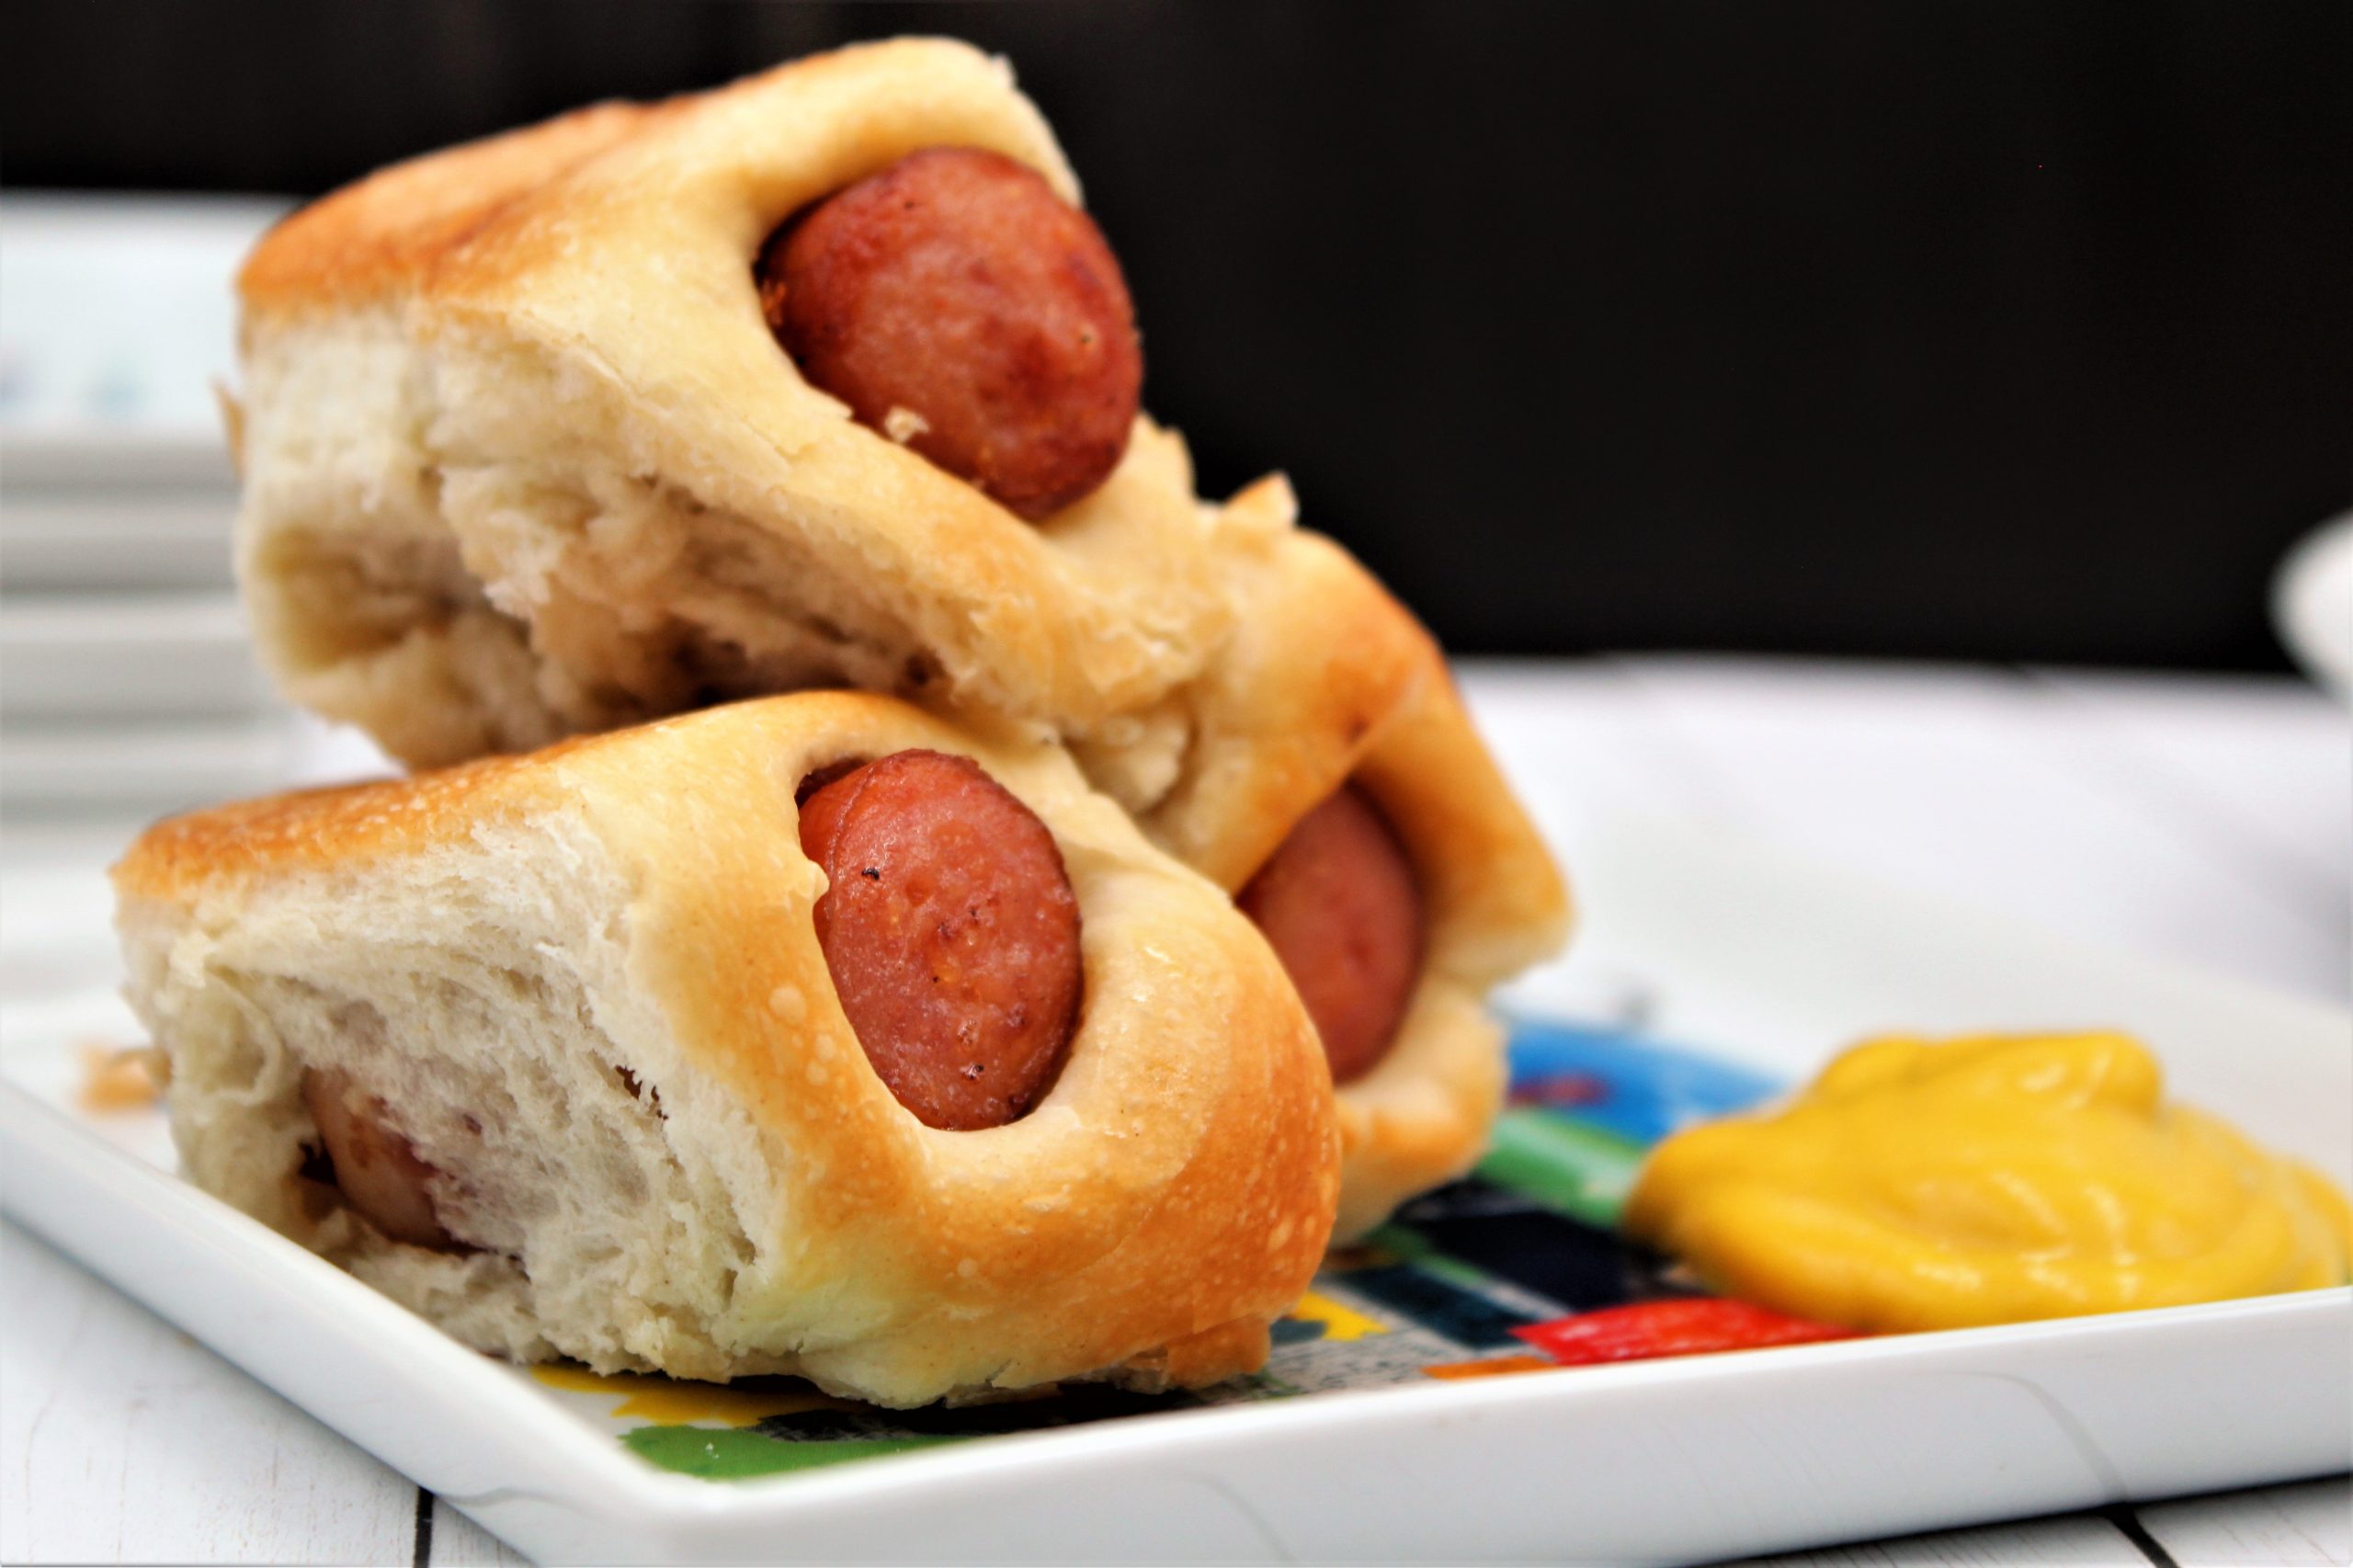
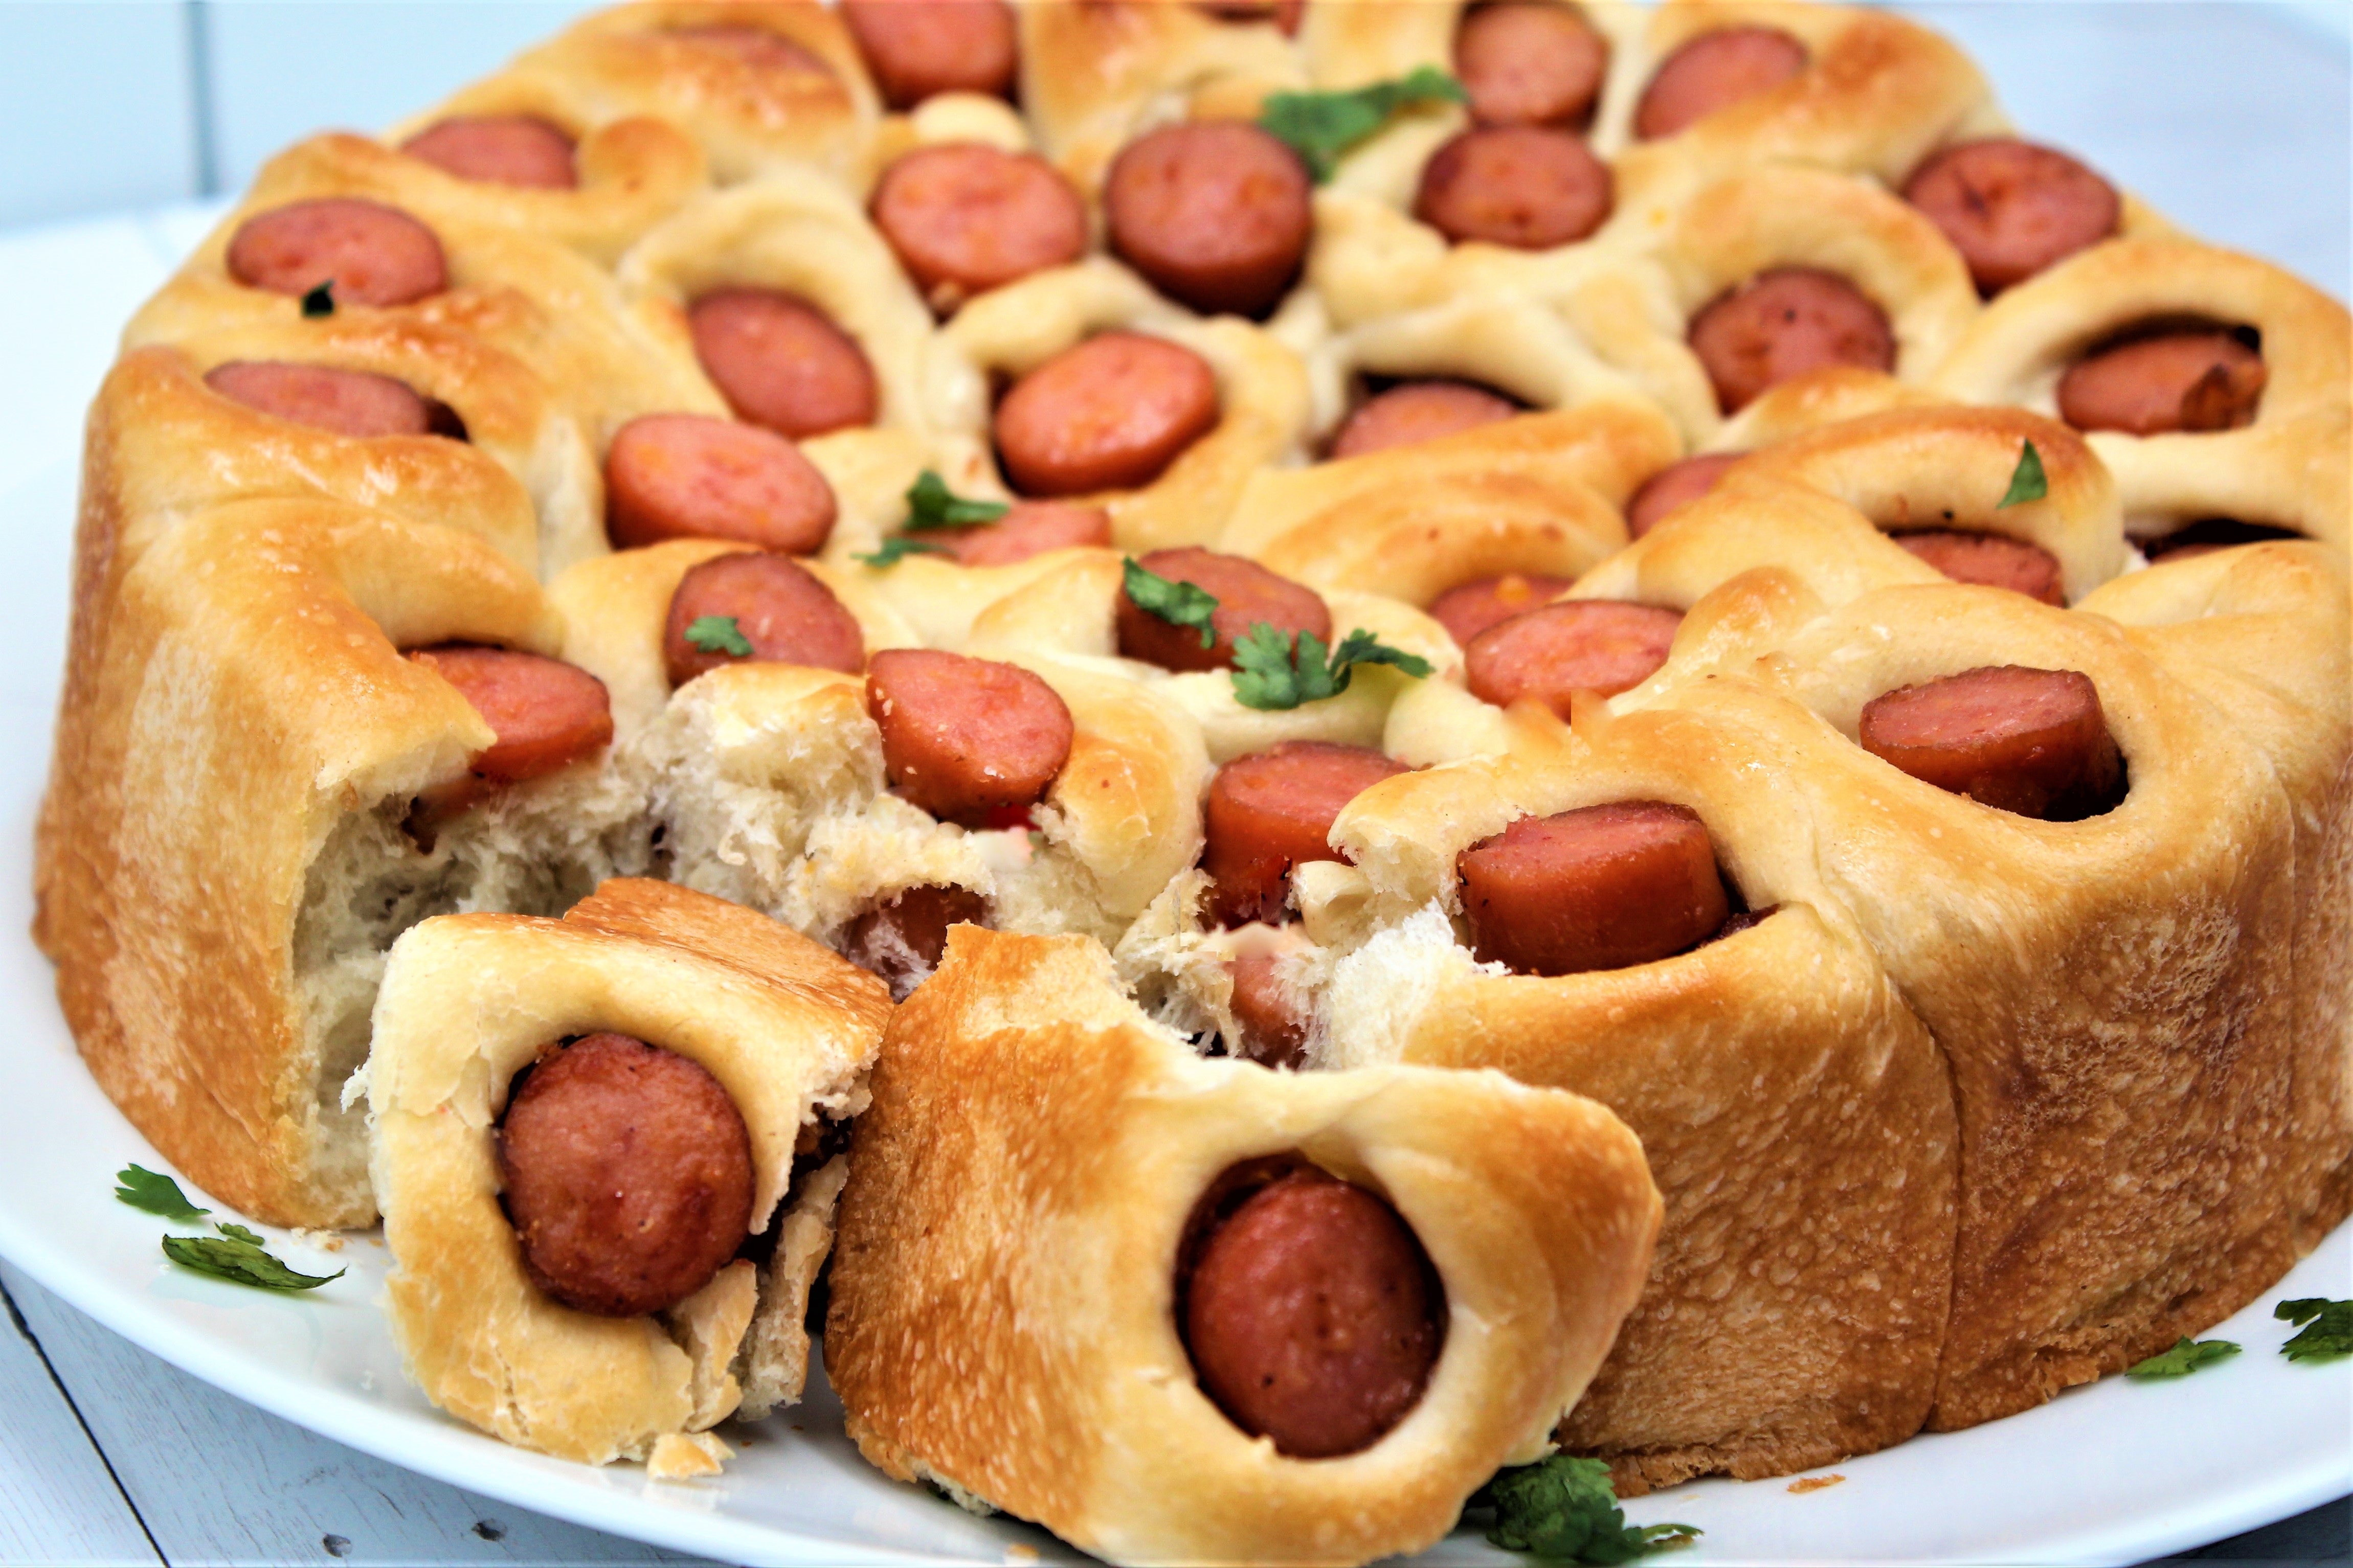
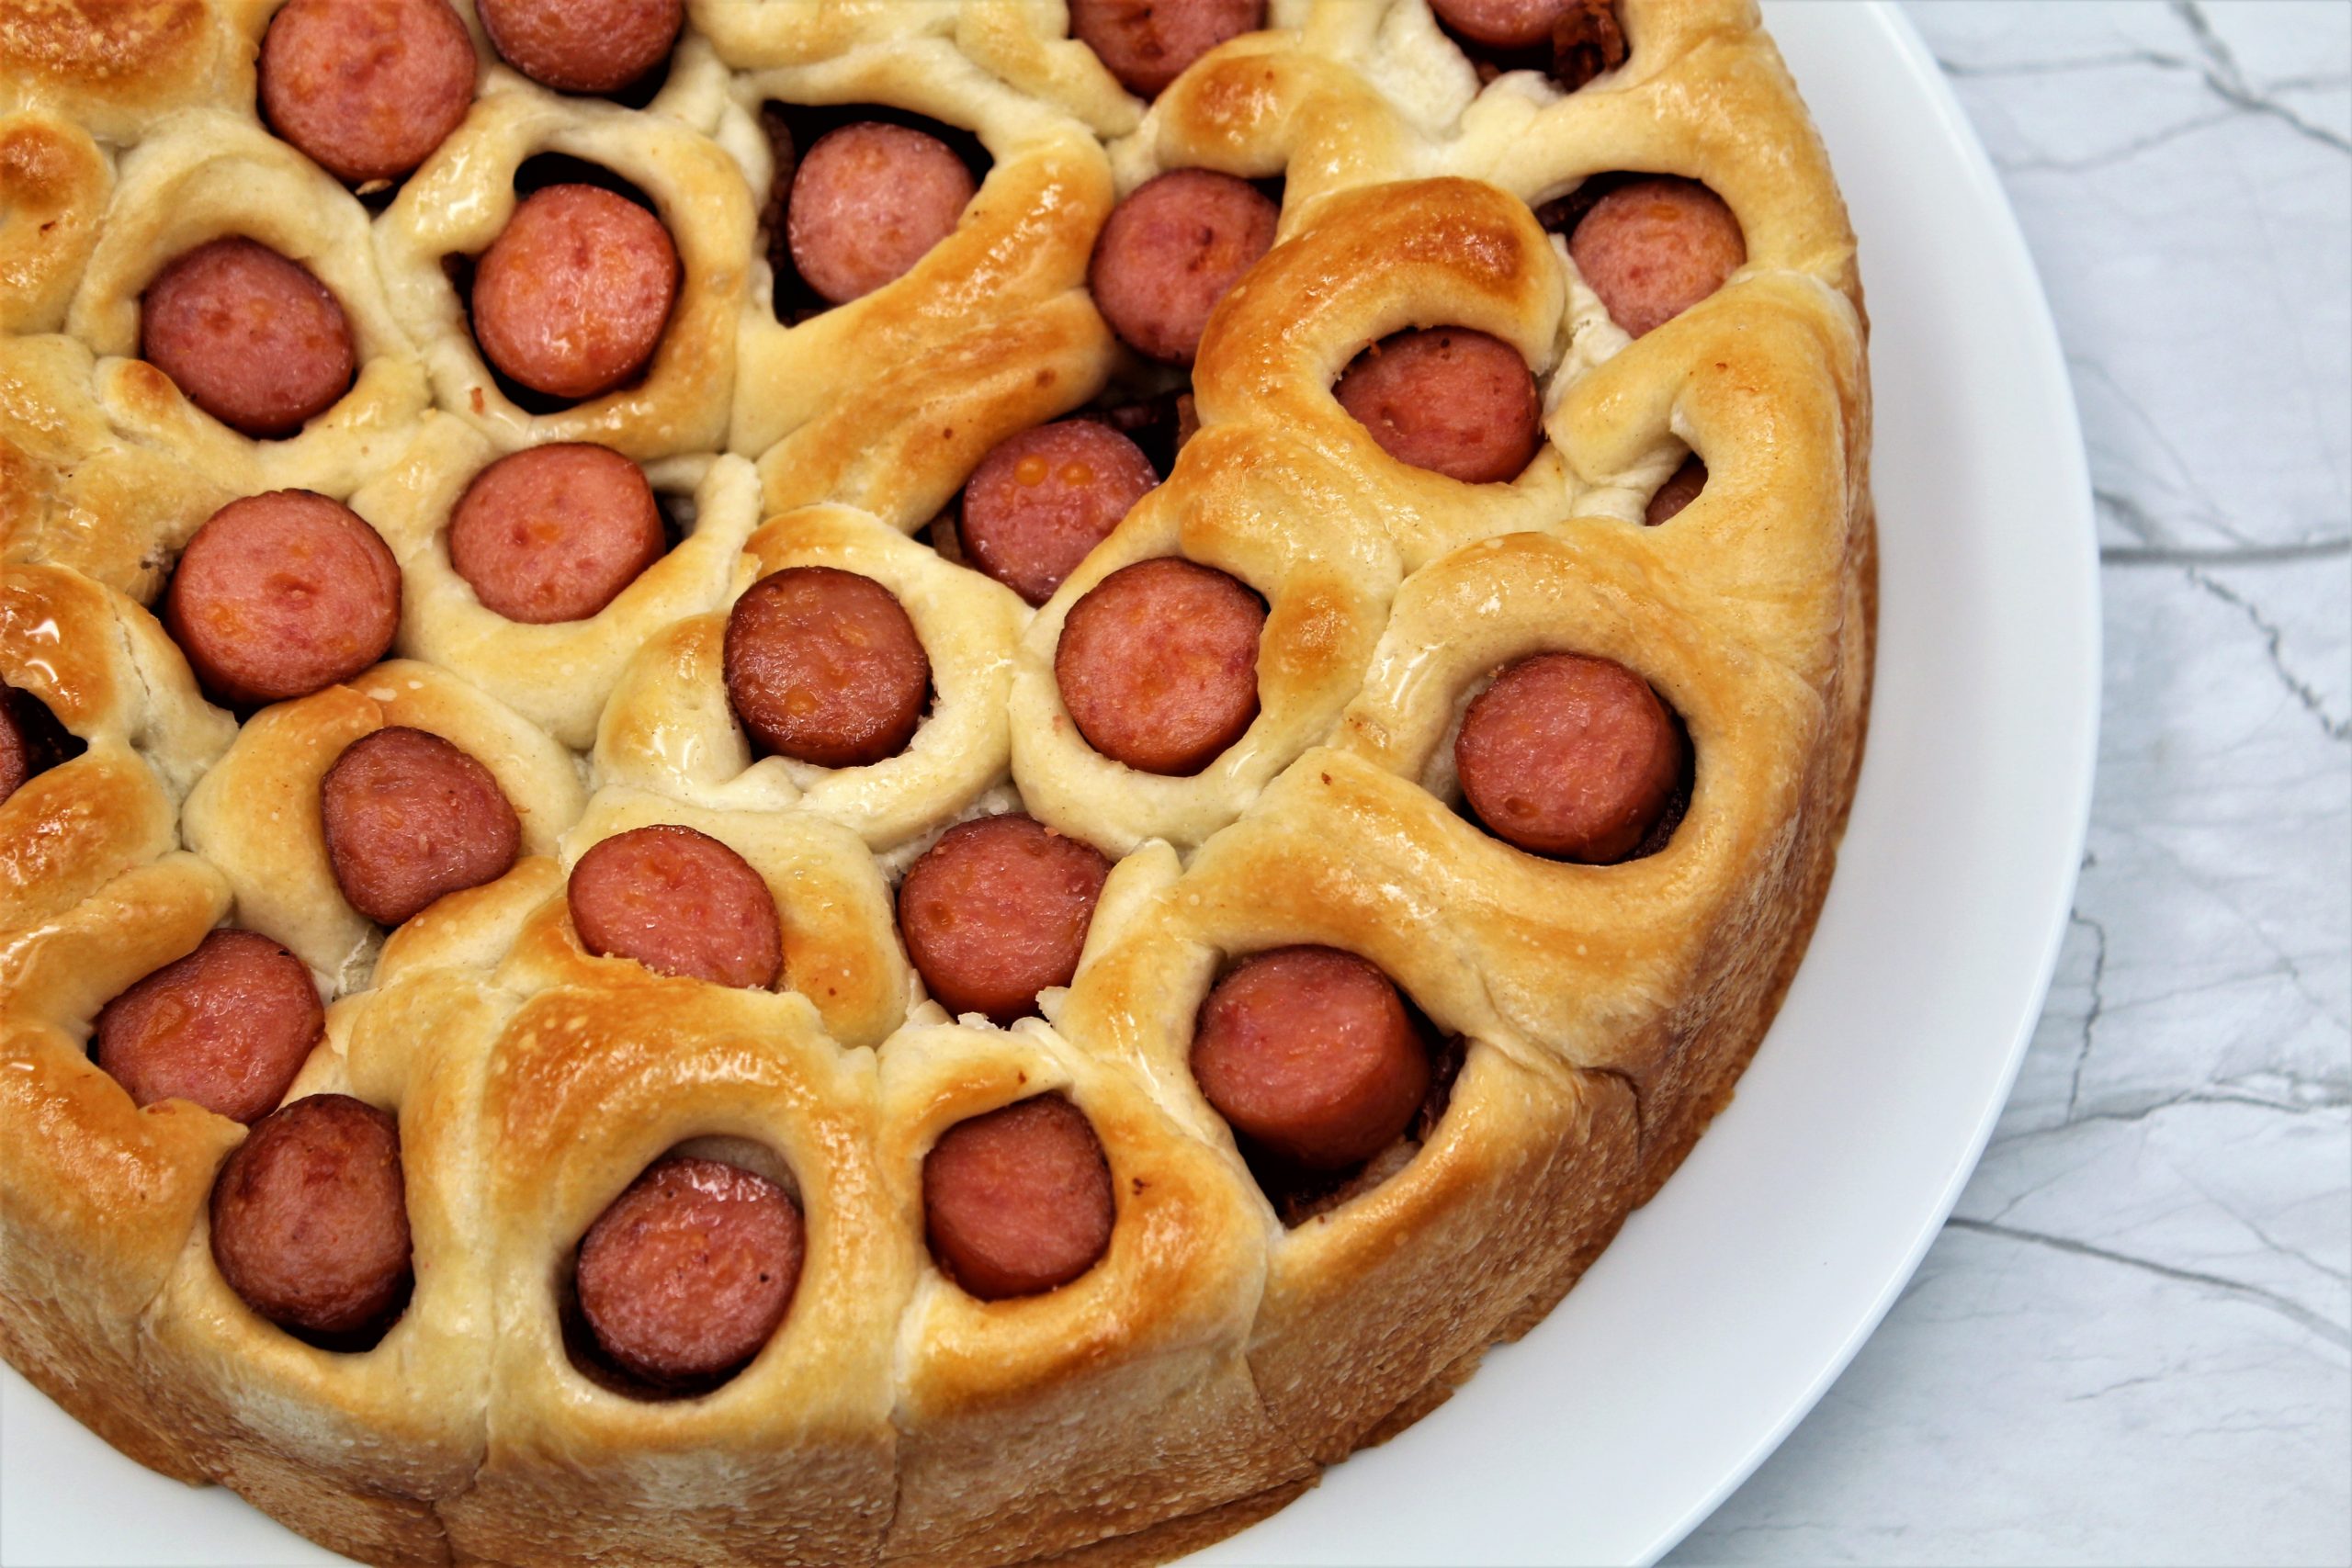
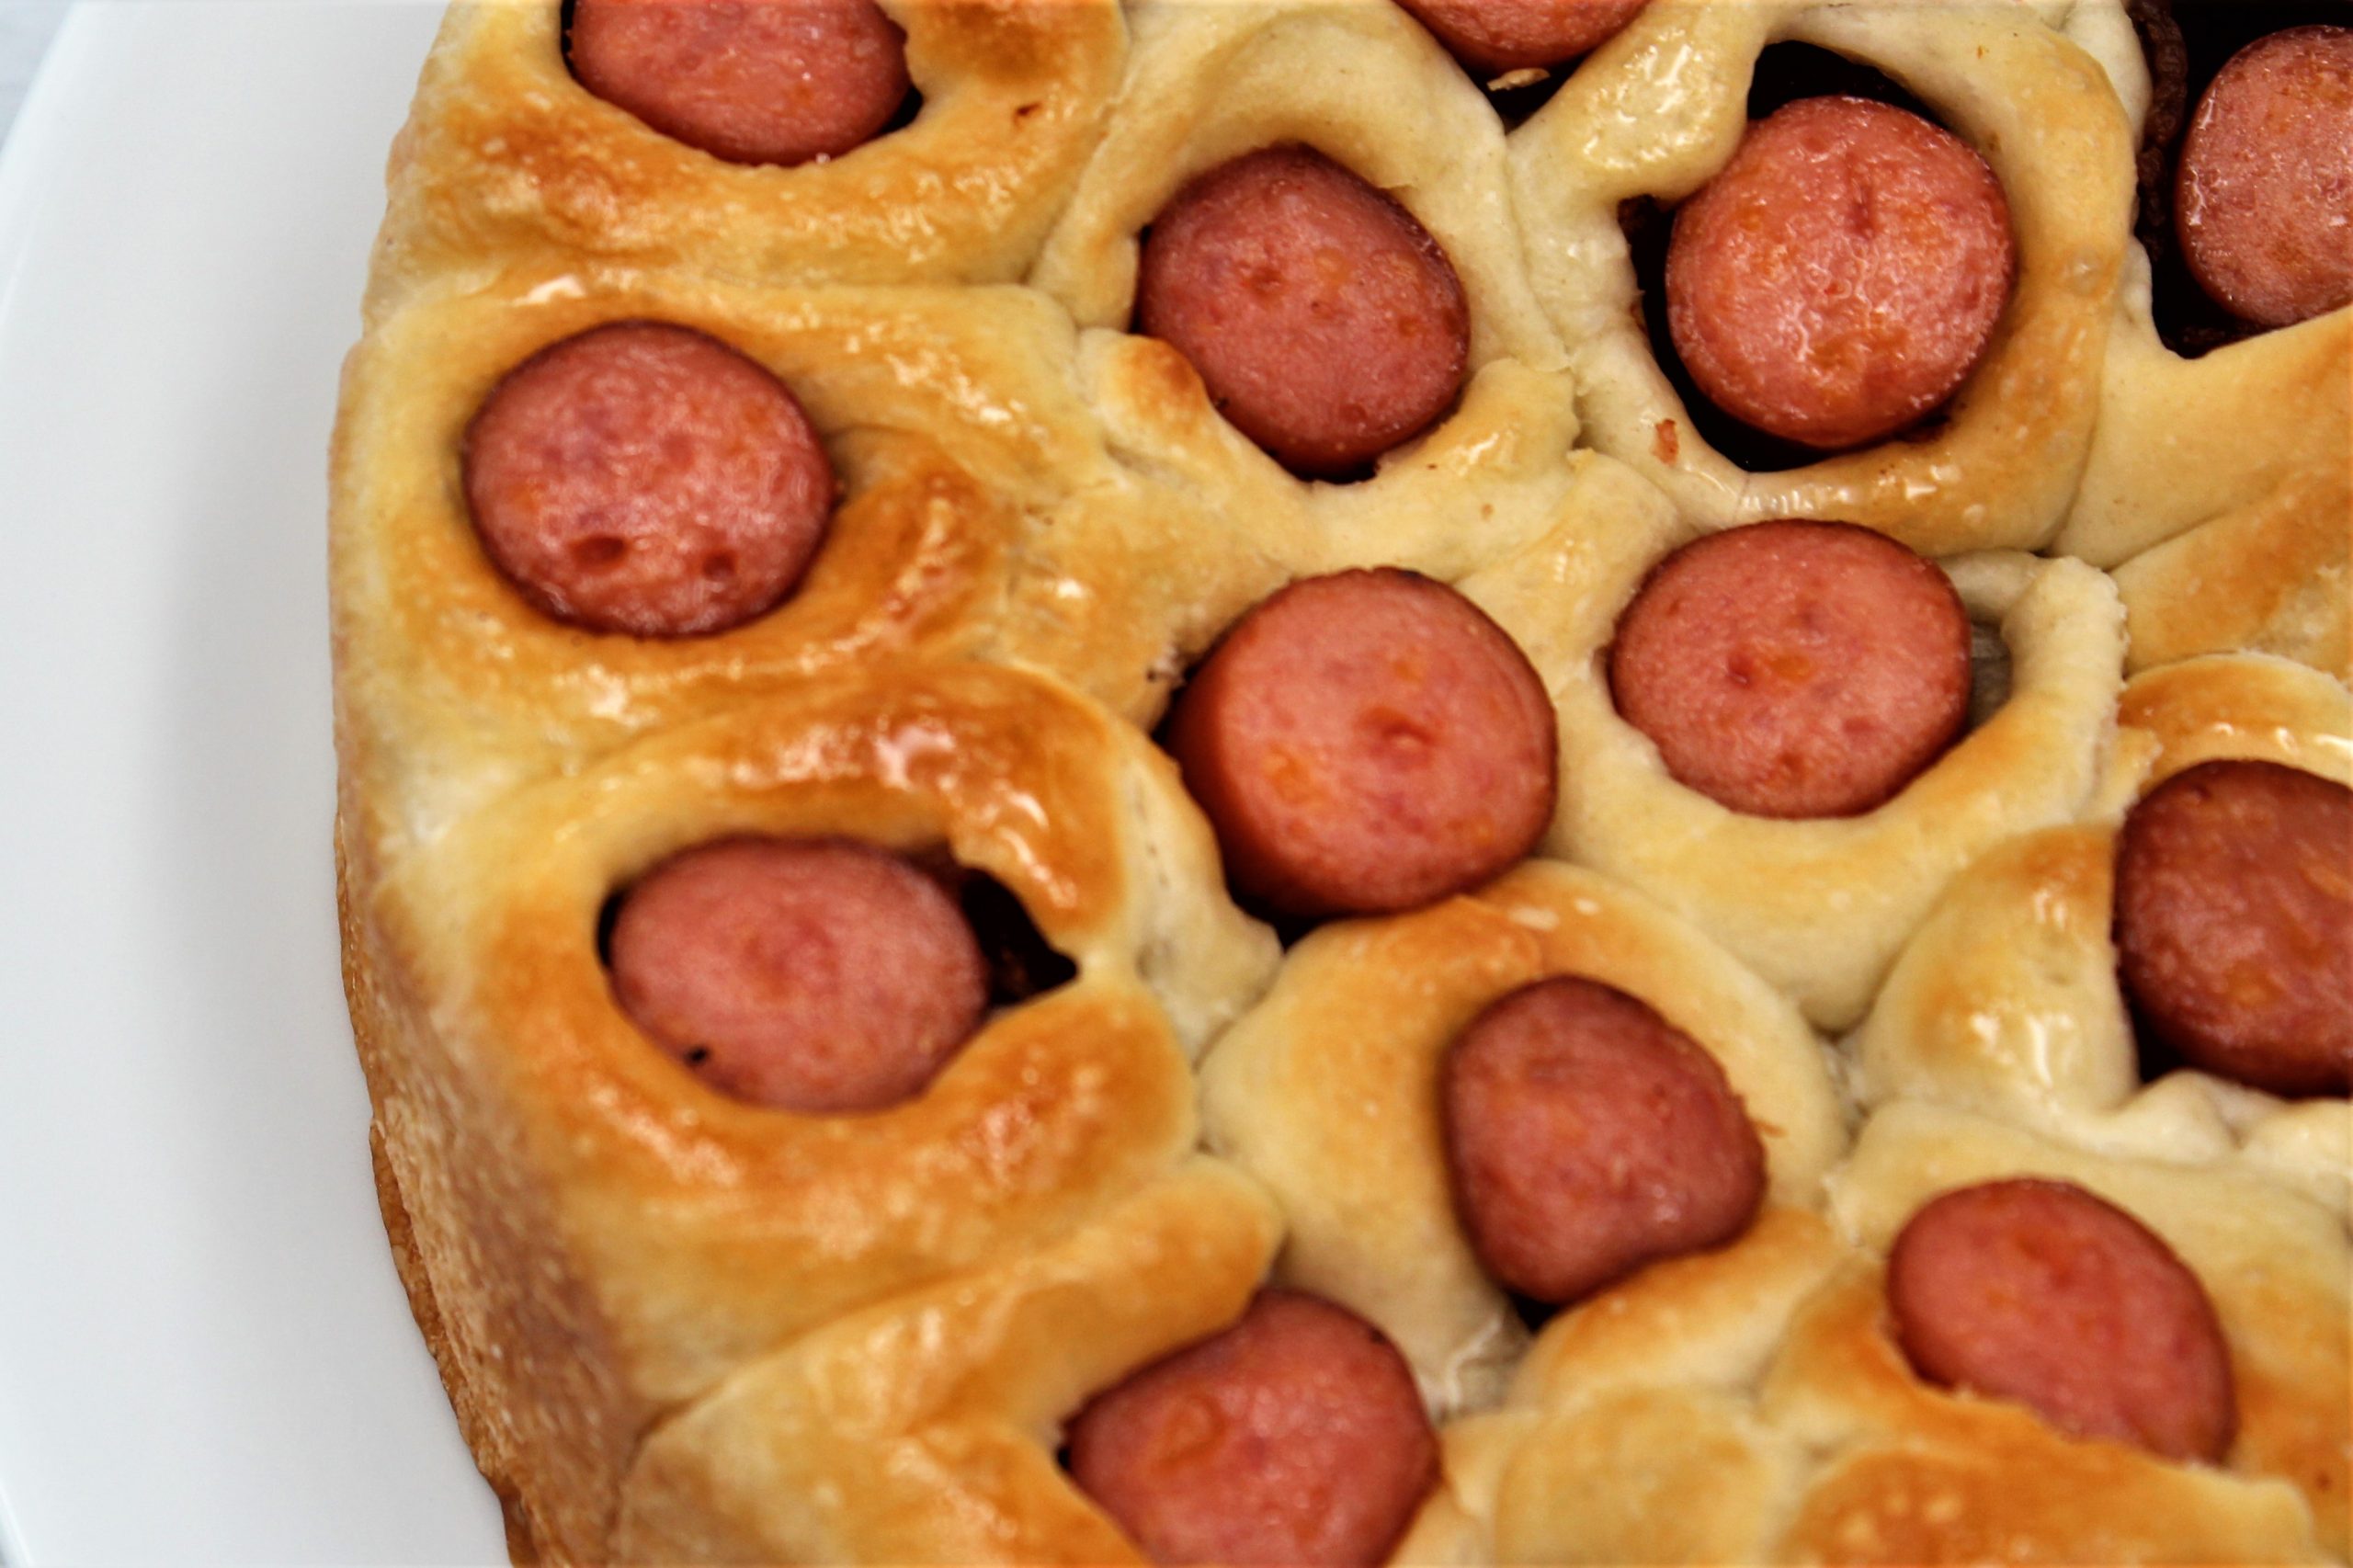
In honor of today being “National Hot Dog Day,” I wanted to honor my all-time favorite food. When someone asks me what my last meal would be, I do not hesitate in my response. I would choose hotdogs, more specifically Coney dogs. There is something unbeatable about a hotdog on a fluffy bun, preferably with poppy seeds.
When I was a kid, my first adventure in the kitchen was microwaving hotdogs. I know it’s not an exciting first, but it lead me to more experiences that made me love to cook.
There was something about hotdogs that I loved. It didn’t matter the brand (it matters to me now); I even loved concession stand hotdogs. Remember as a kid going to Little League baseball games, and the mothers operated the concession stand? There was always a crockpot full of hotdogs. I can see it now.
When I turned 21, I remember heading downtown Indianapolis to the bars with my friends. I was never one for the bar scene and would rather be in bed by 10 pm on a Saturday, but I would always go. Their motivation for staying up almost all night, going from place to place, was drinking. But, I went because I loved the end of the night. So, around 2 am, with my friends very drunk, we would leave the last bar. On the side walls outside the club, there were always hotdog carts. We would stand in line with all the other drunk people and order a water bloated dog that had been sitting in hot water for hours. I have heard that the holding water of an average hotdog cart has more bacteria than pond water. I know that sounds gross, but it never changed my willingness to hang out in loud, crowded, smoky bars for a late-night hotdog.
All these years later, I still love a good hotdog. Portillo’s is my choice for a great hotdog,
This recipe was created from my love for hotdogs. My Pig In A Blanket Pull A Part is a crowd-pleaser, the buttery crust wrapped around good quality hotdogs and dipped in whole grain mustard can not be beaten, and the good news is, you do not need to put up with a bunch of your drunk friends at 2 am to have it. Enjoy!
After several tries, I have settled on this recipe. It is the closest I have tasted that compares to Chef Boyardee. It is kind of sweet, tangy, and packed with parmesan cheese.
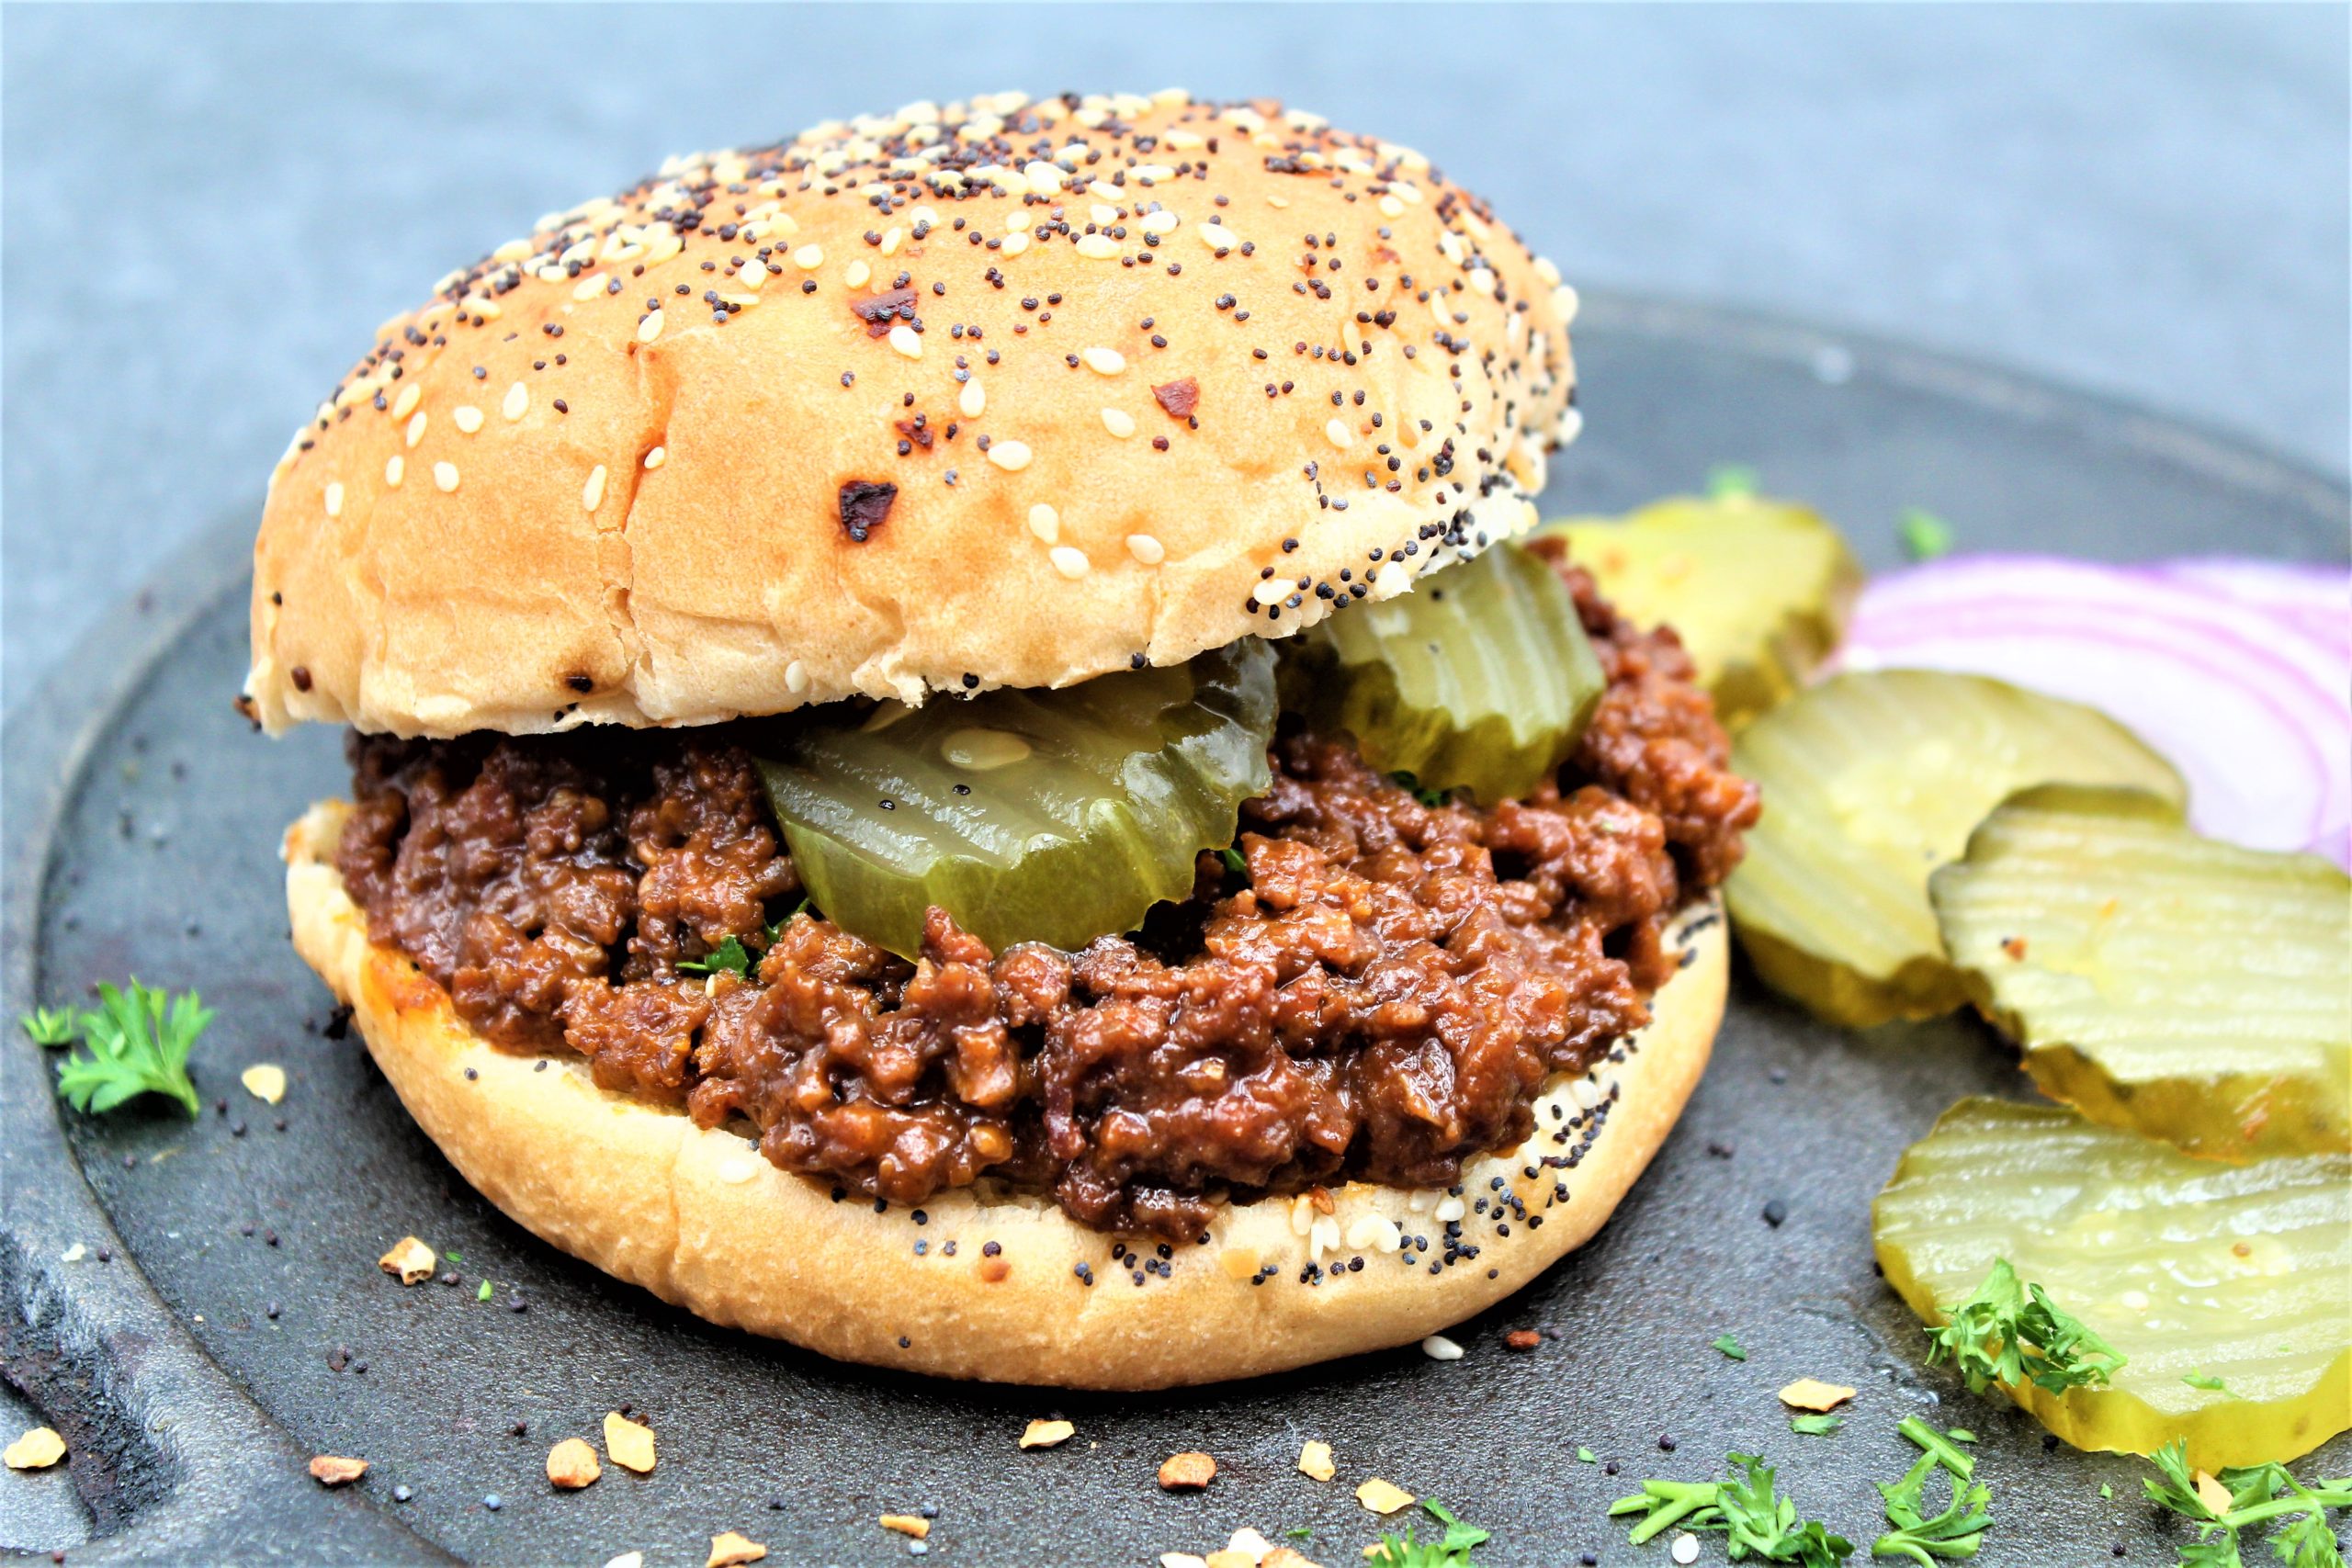
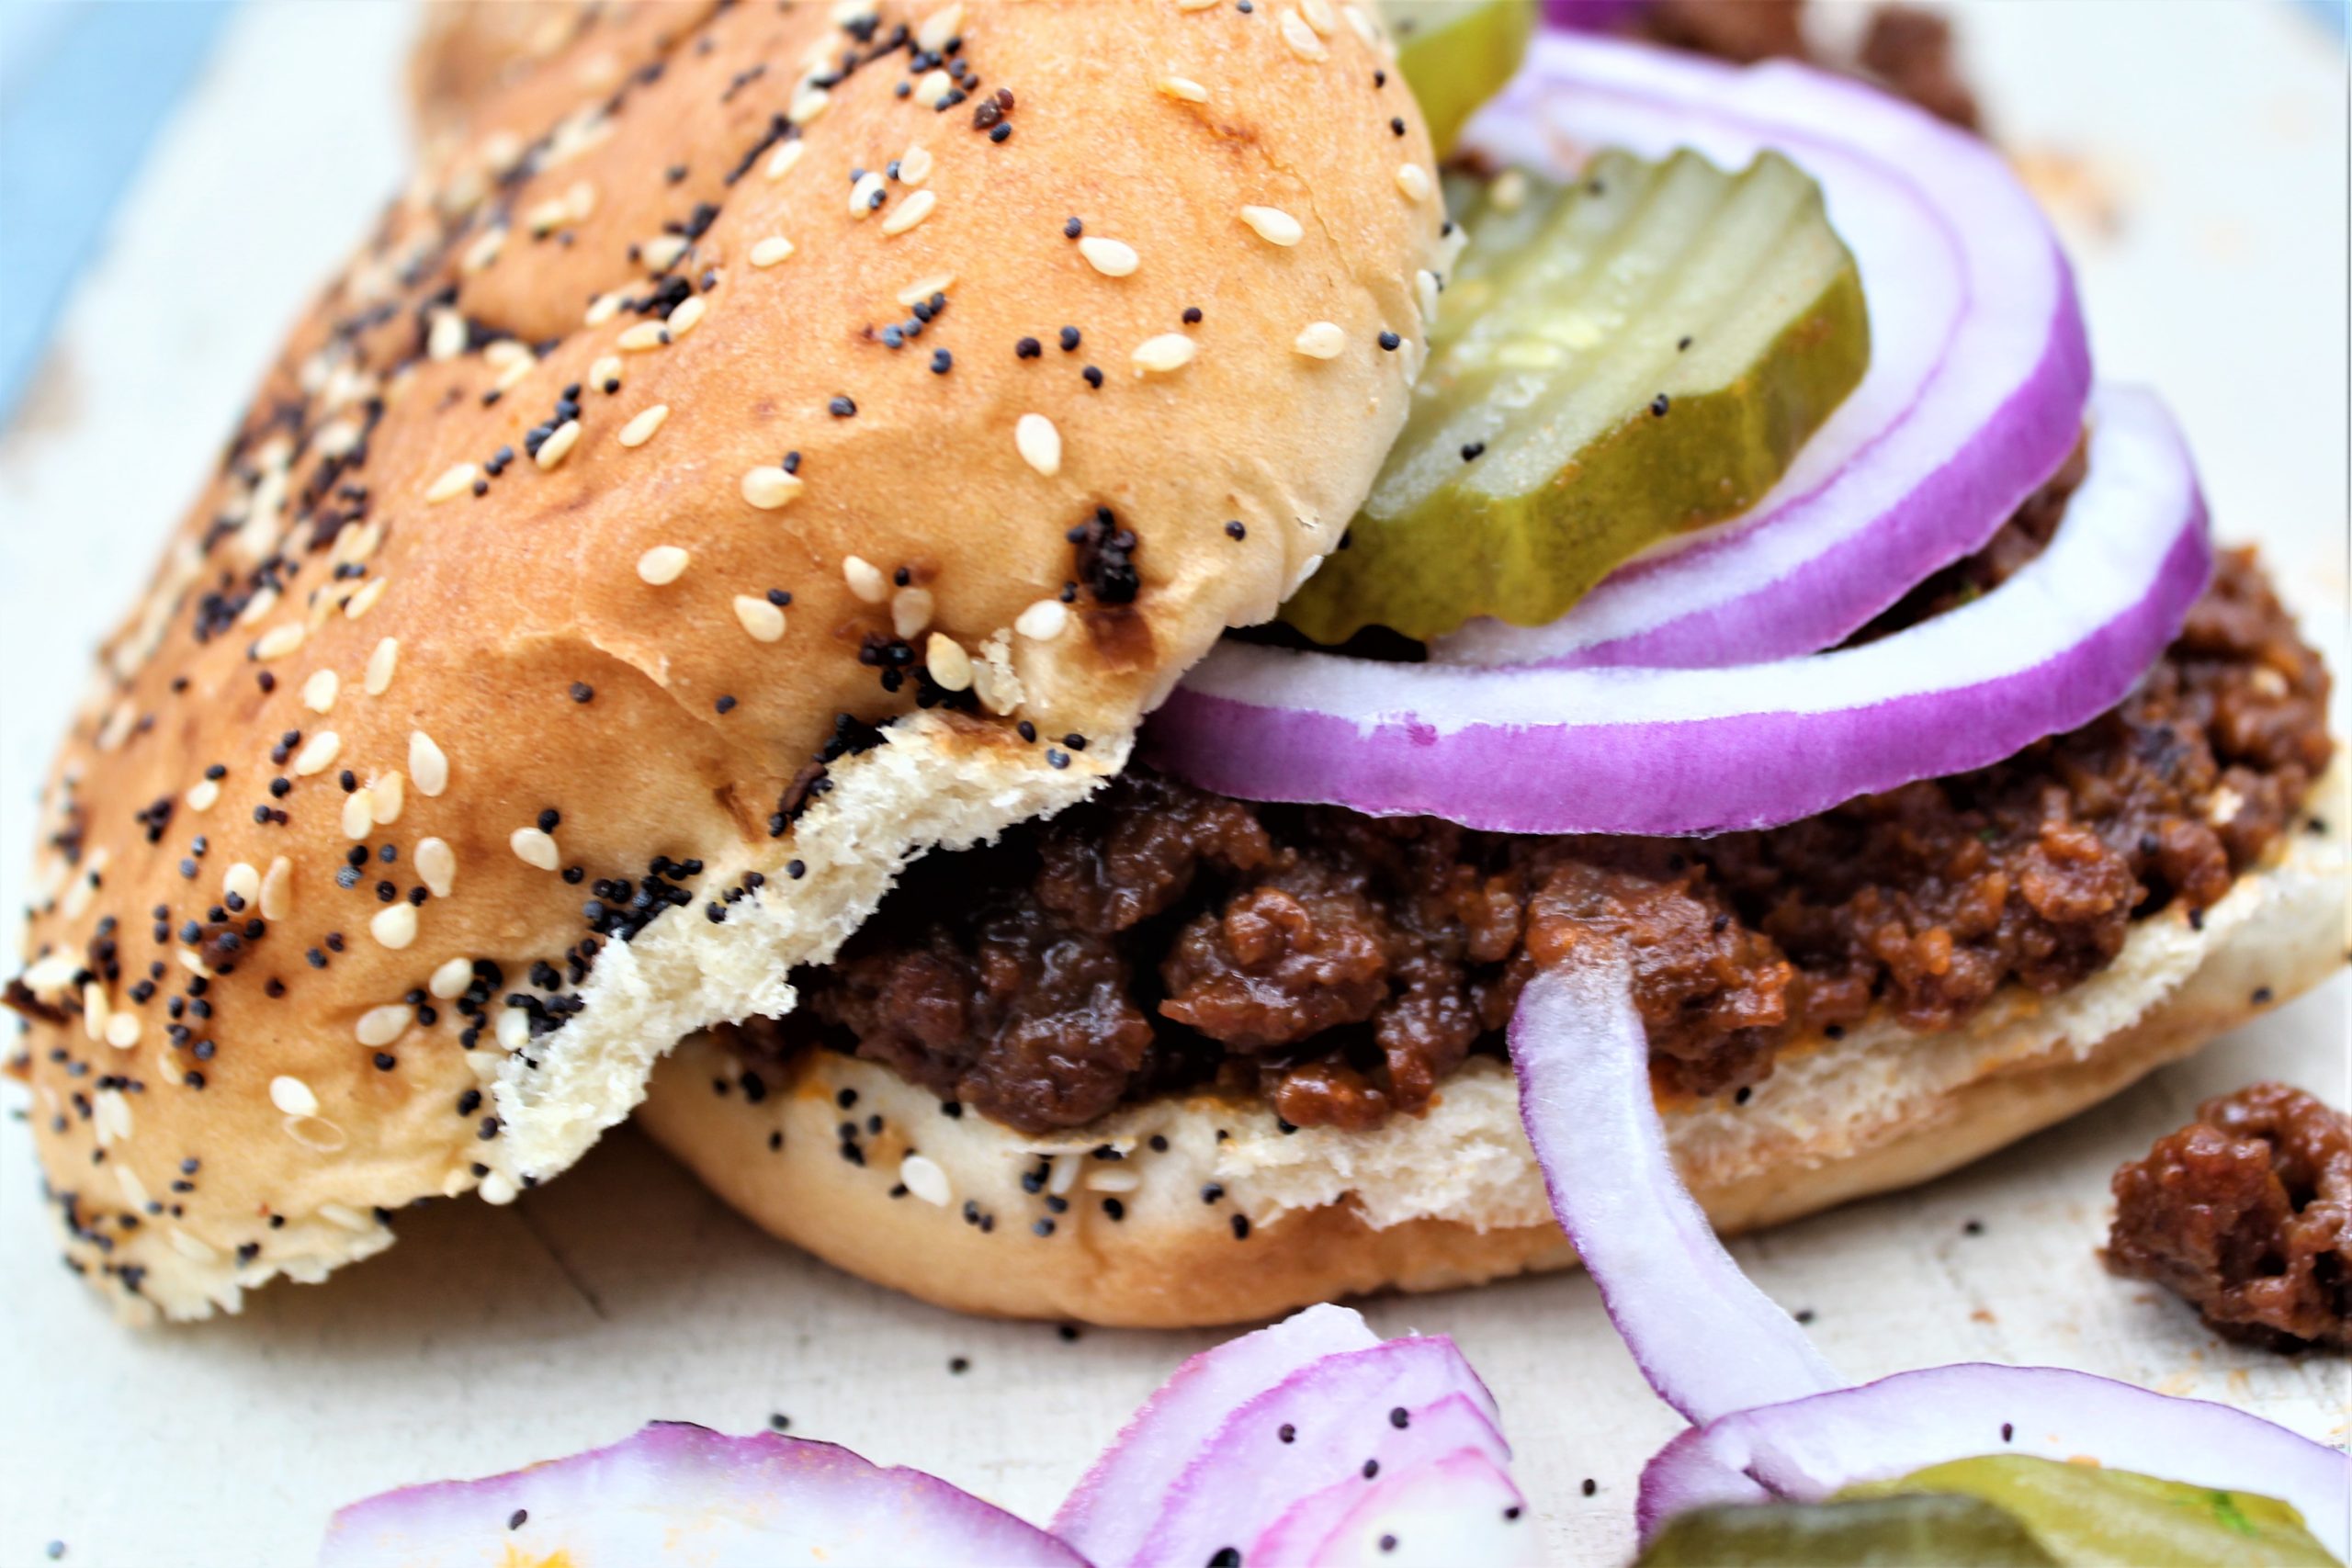
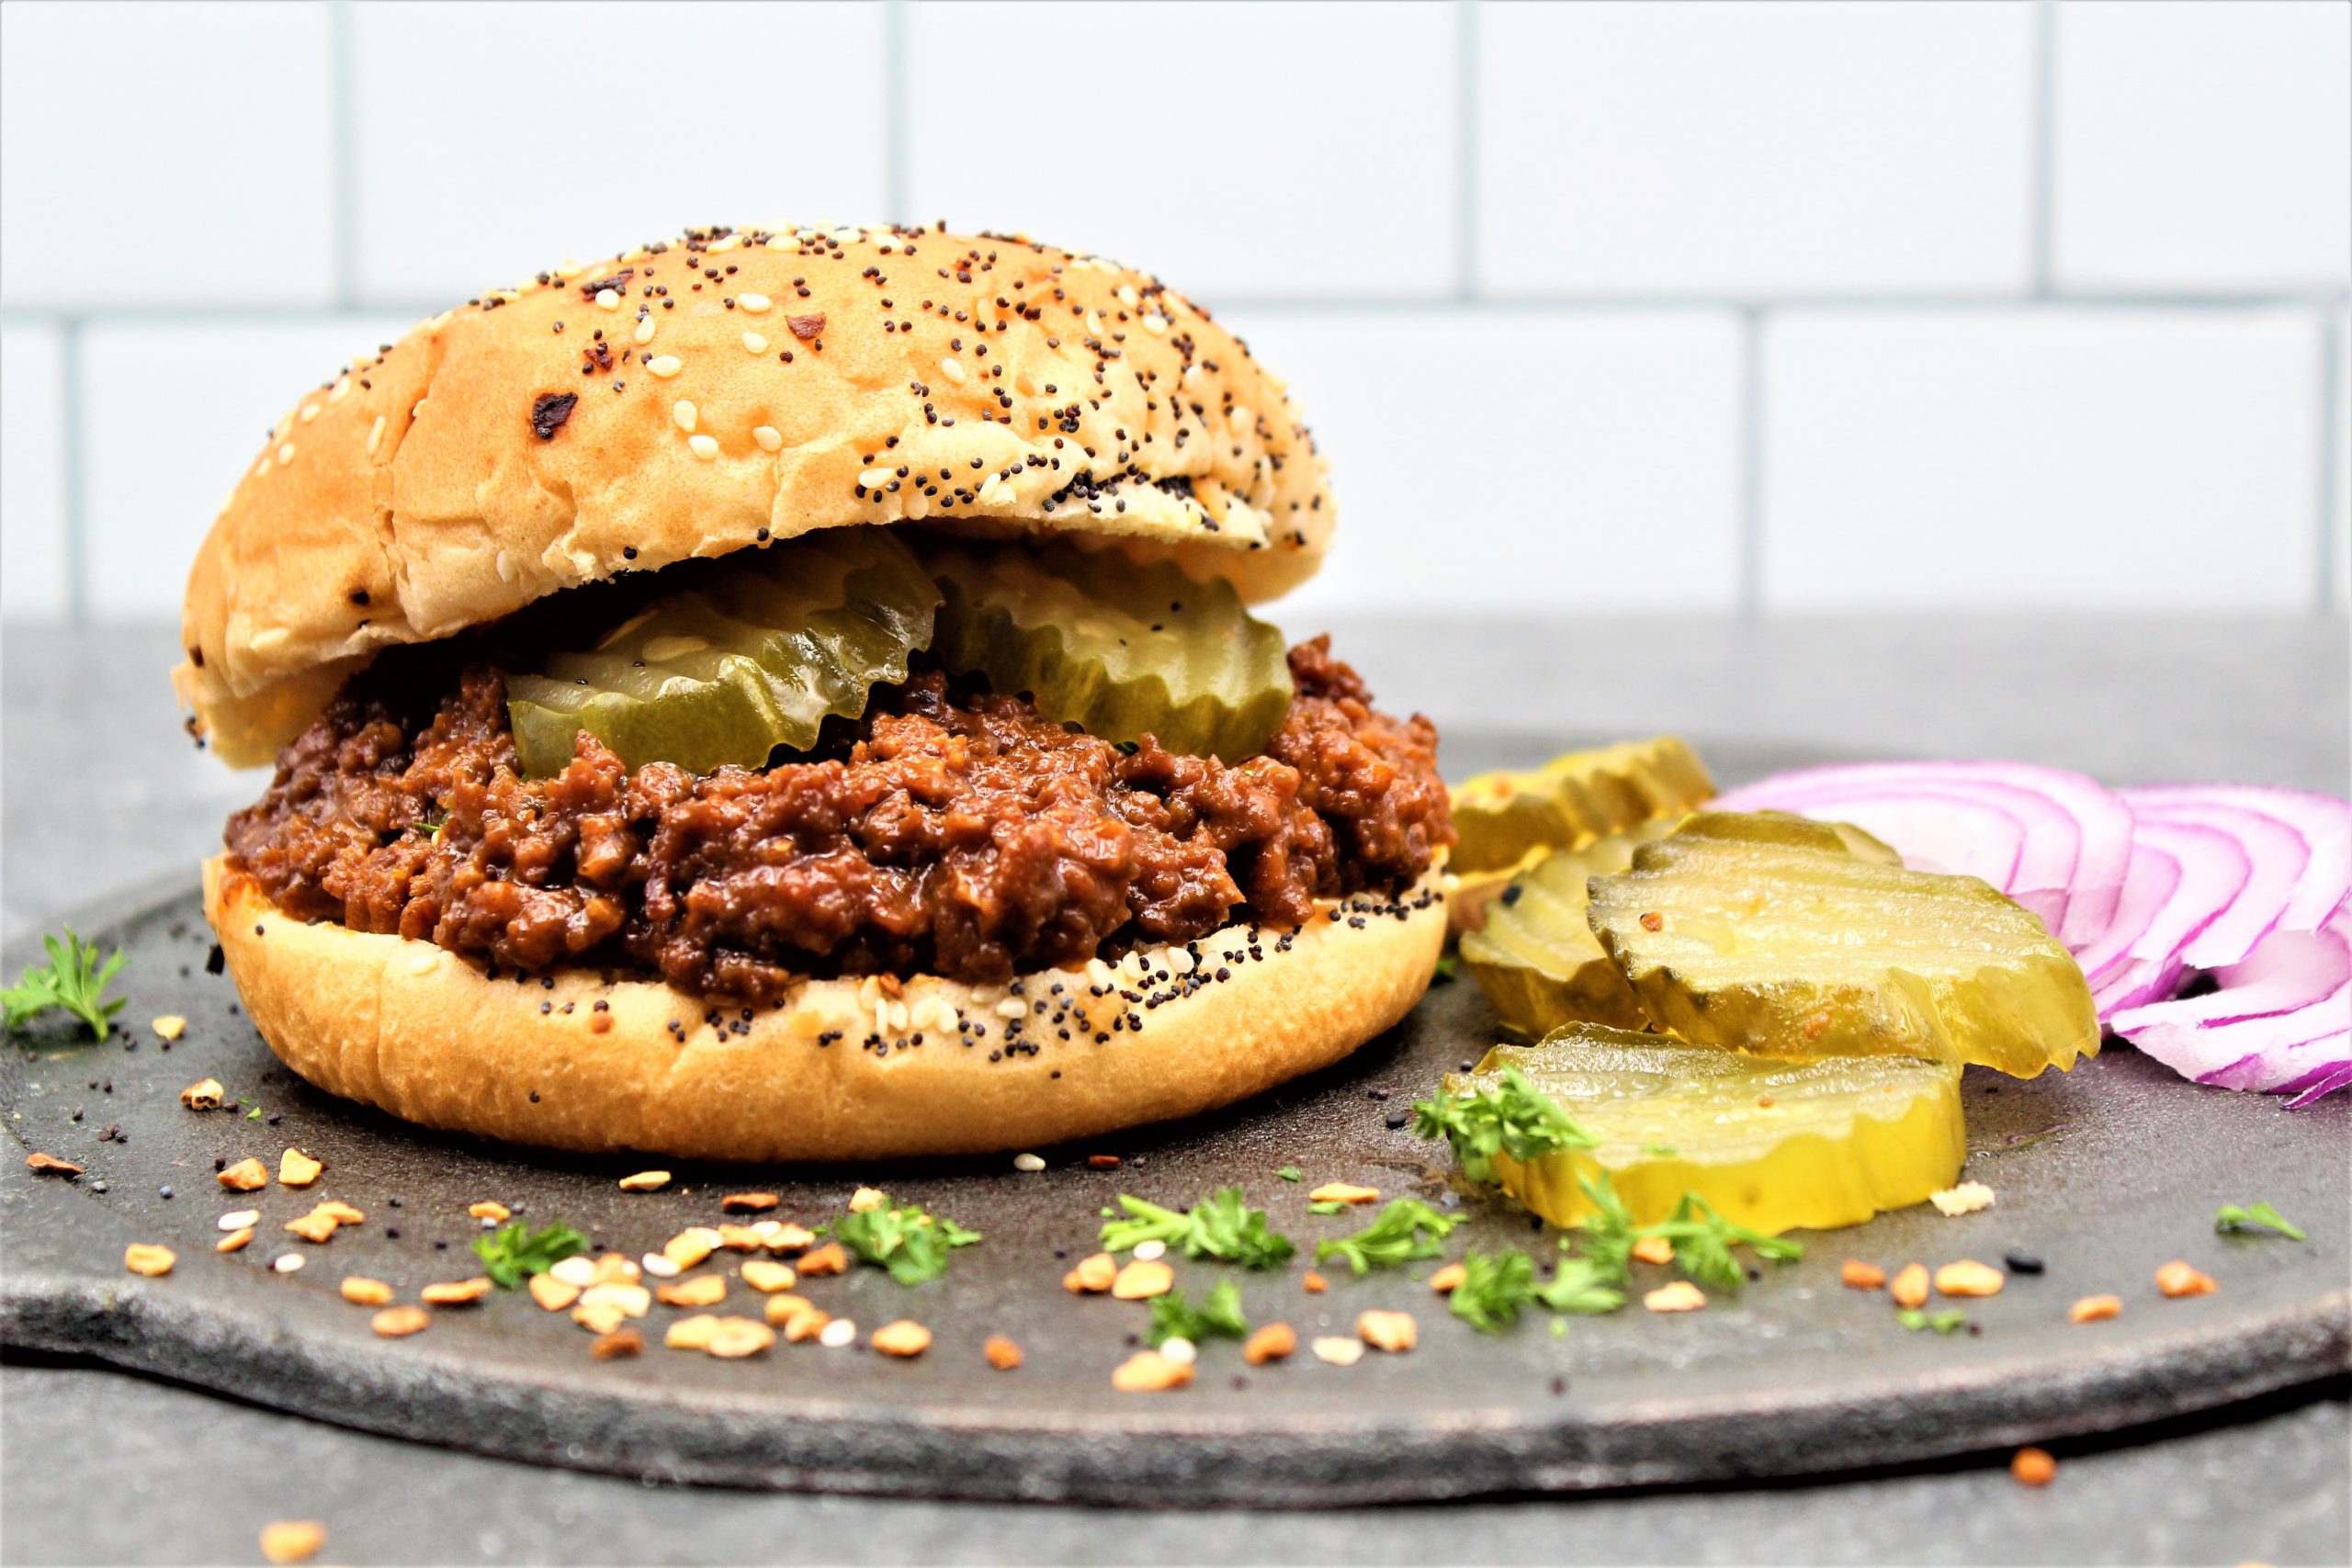
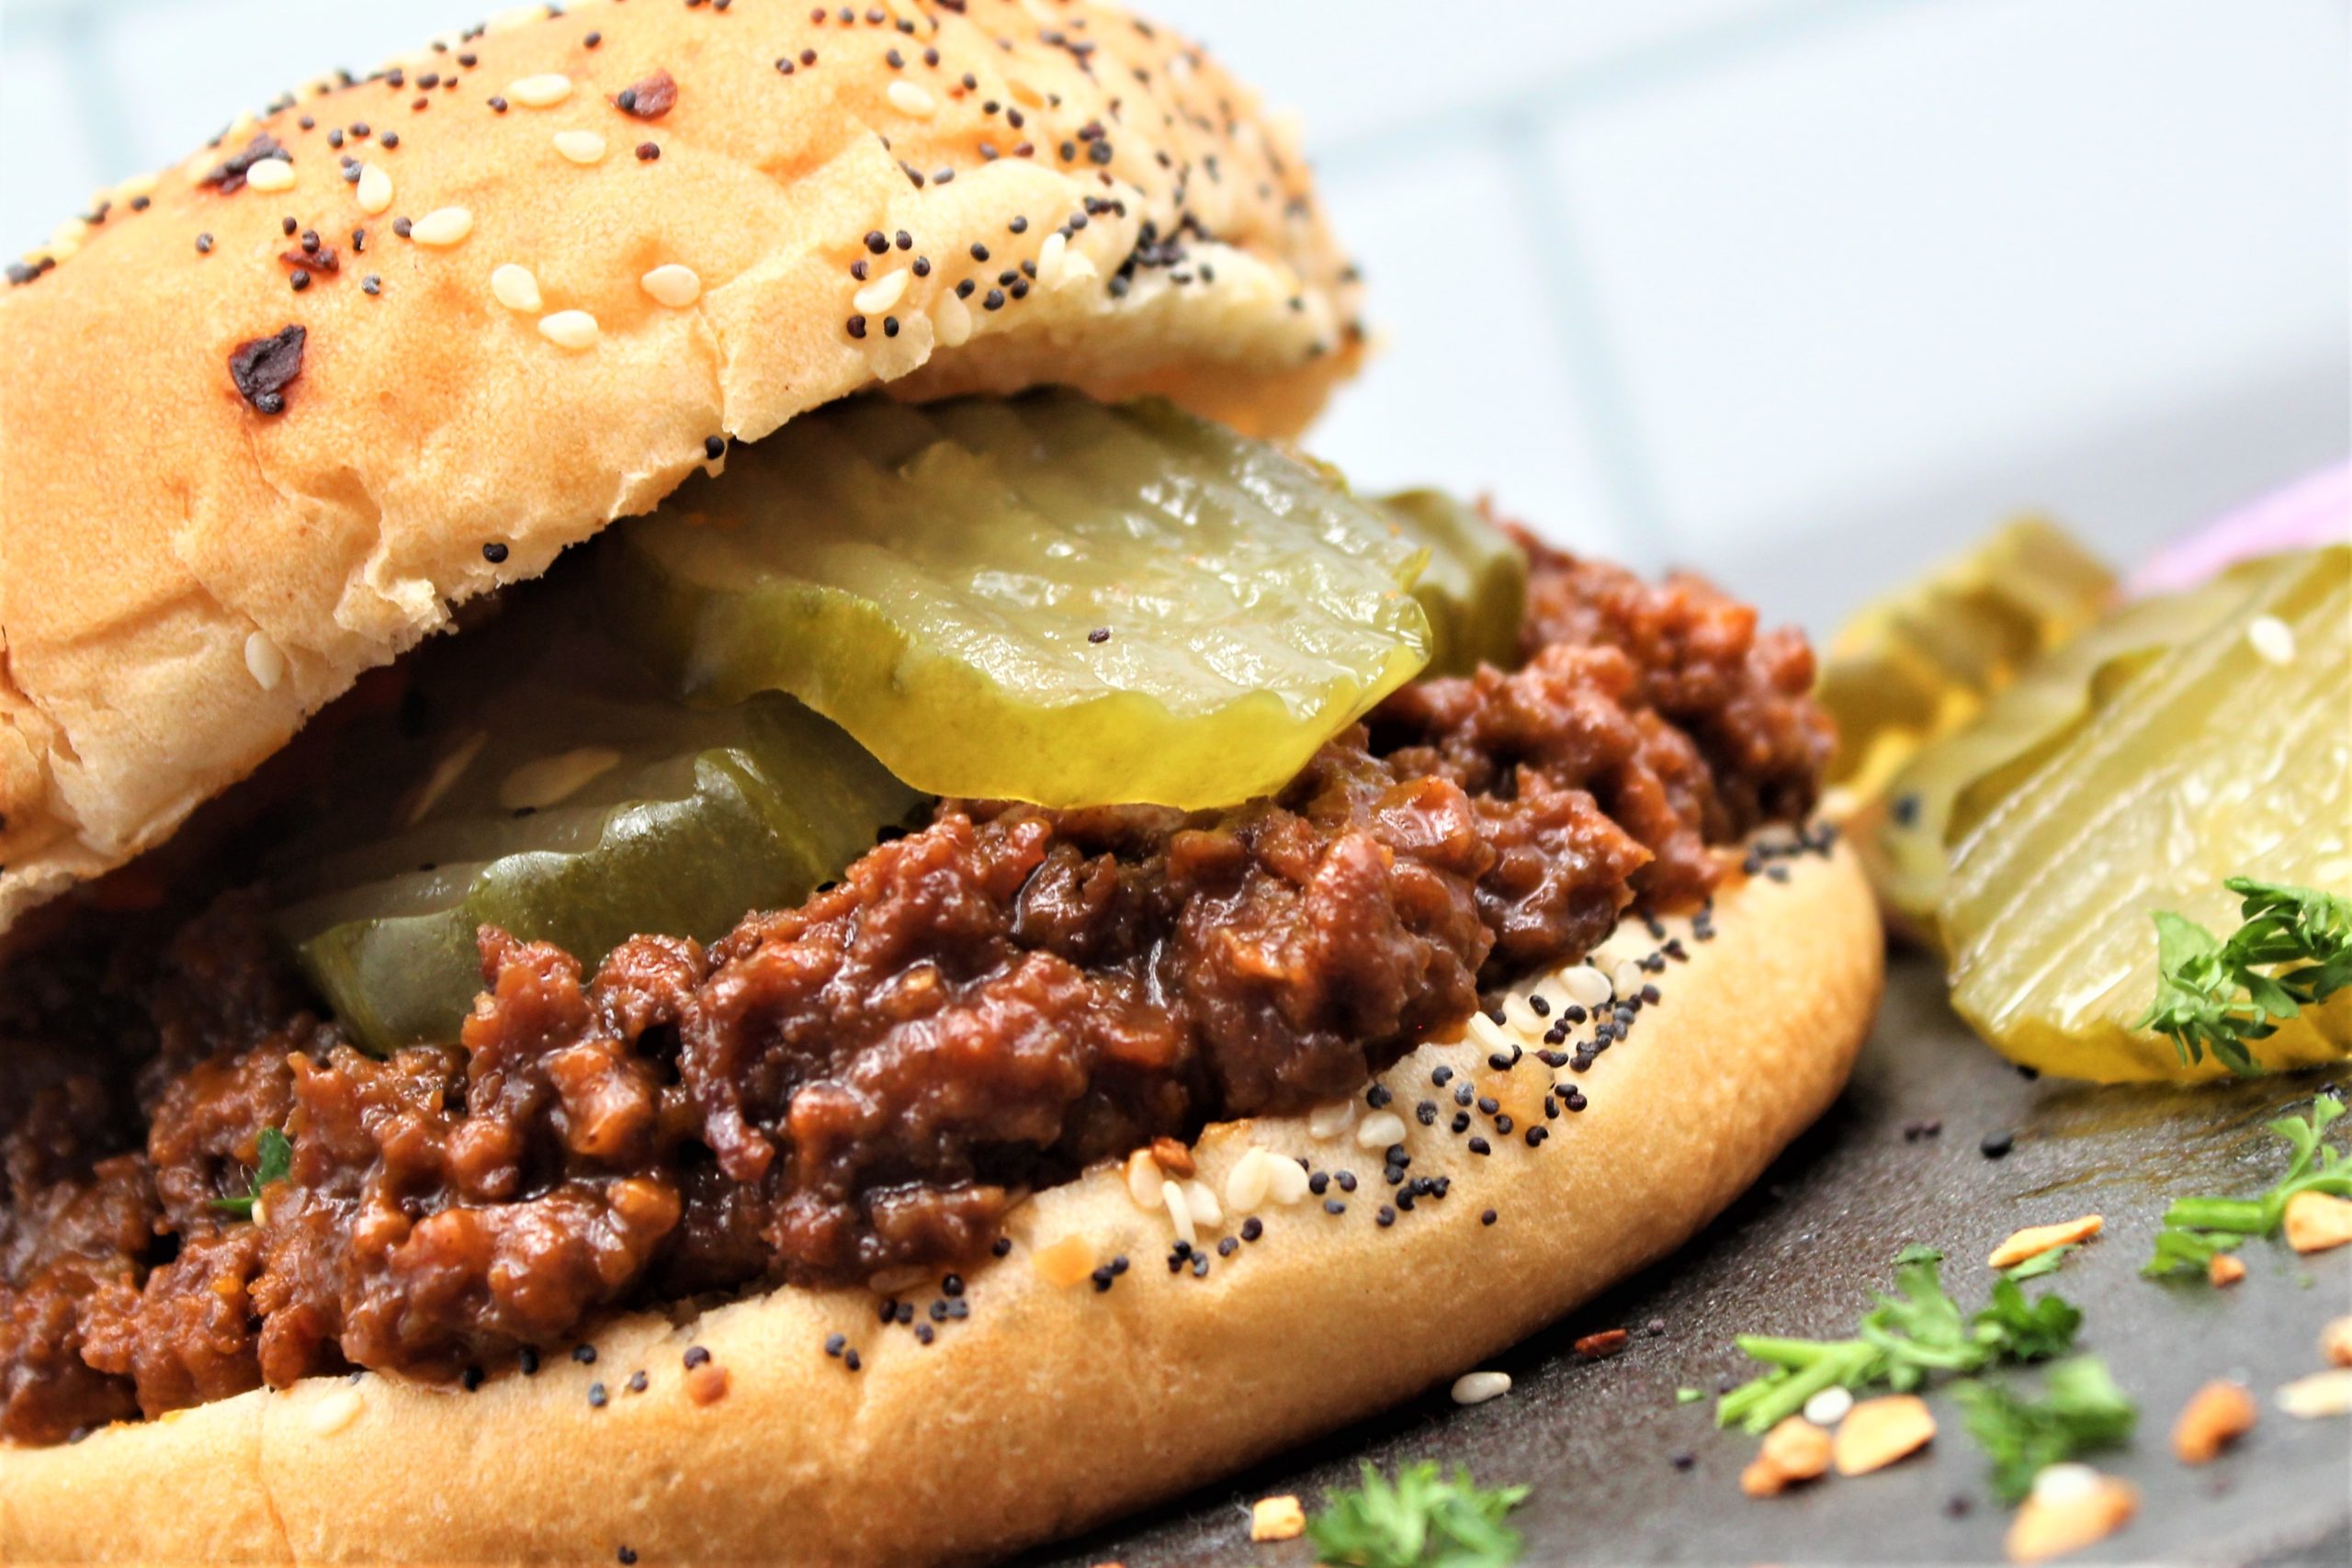
If you are an American, then you are no stranger to the “Joe.” Sloppy Joe’s are on every menu in every public school in the U.S. They are also a staple on the dinner tables of busy families.
I LOVE a good sloppy joe, and I guess you could say that I LOVE a not-so-good Sloppy Joe as well. I am not picky, but I know the difference between the two.
When I first lived by myself and money was tight, I would buy ground beef in bulk, a couple of cans of that sloppy joe sauce, and a loaf of Wonder Bread, and I had dinner for the week. Hard times called for fast solutions.
Once I was established in life and eating less Raman and more vegetables, I never forgot my friend, Sloppy Joe.
I have worked years to perfect the best Sloppy Joe Sandwich, and I believe I have accomplished this task.
My Sloppy Joe Sandwich is less sweet than the canned sauce. It is savory with the right amount of sweetness. It holds together, which kind of defeats the “sloppy” purpose but makes a hell of an adult meal.
So, the next time you are looking for a quick meal for the family, or just for yourself, look no further, I got you! My Sloppy Joe Sandwich is perfect anytime, not just in the lean times. Enjoy!
My Sloppy Joe Sandwich is less sweet than the canned sauce. It is savory with the right amount of sweetness. It holds together, which kind of defeats the "sloppy" purpose but makes a hell of an adult meal.
Course
Main Course
Cuisine
American
Keyword
dougbakes.com, Sloppy Joe
Prep Time5minutes
Cook Time15minutes
AuthorDoug Bakes Staff
Ingredients
2tablespoonsvegetable oil
1mediumonion, chopped fine
1/2teaspoonsalt
2clovesgarlic, minced
1/2teaspoonchili powder
1poundground beef
1/4teaspoonblack pepper
1teaspoonbrown sugar
1cuptomato puree
1/2cup ketchup
1/4cupice water
1/4teaspoonhot pepper sauce
4 hamburger buns
Instructions
Heat oil in a large skillet over medium-high heat until shimmering.
Add onion and salt and stir until coated with oil. Reduce heat to medium, cover, and cook, stirring occasionally, until onion is soft, about 10 minutes (if onion begins to burn after 5 minutes, reduce heat to low).
Add garlic and chili powder and cook, uncovered, stirring constantly, until fragrant, about 30 seconds.
Add beef and cook, breaking up meat with wooden spoon, until just pink, about 3 minutes.
Add 1/4 teaspoon pepper, brown sugar, tomato puree, ketchup, water, and hot sauce. Simmer until Sloppy Joe sauce is slightly thicker than ketchup, 8 to 10 minutes. Adjust seasonings. Spoon meat mixture onto hamburger buns and serve. Enjoy!
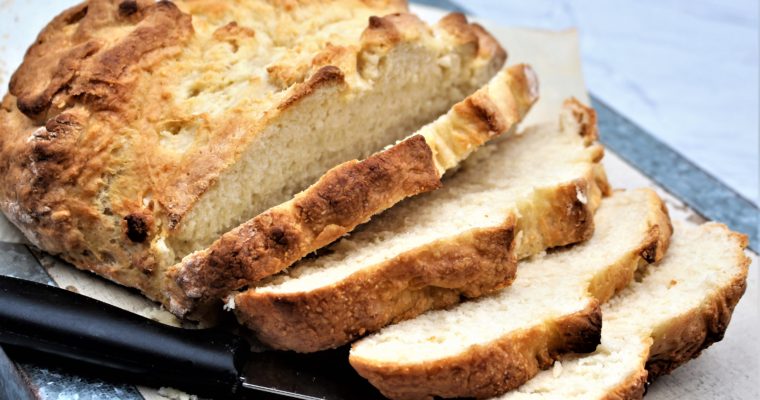
Boston Brown Bread is unlike any bread I have tasted. It is soft, spongy, and it has an earthy sweetness that most other loaves of bread do not possess.
I promise that this will be the best bread pudding you have ever eaten. The warm spices and the soft challah bread mixed with warm caramel and pecans will make southerners stand and take notice.
When I was a teenager, I worked in a small family-owned grocery store. The building was ancient, and some of the grocery aisles had divots, really they were holes in the floor that caused several customers to see their full grocery carts flip over, spilling the contents of their cart all over the floor.
The veteran shoppers knew to swerve around the holes. But, the new shoppers were not as lucky. It wasn’t unusual to hear a crashing sound from aisle three every once in a while. I would grab a mop and clean it up.
The heart of the store was the bakery/deli. It was the real reason people shopped at our tiny store. The deli served sliced to order lunch meats and cheeses. Their donuts were legendary and sold out daily.
I loved the deli for their fried chicken. It was well seasoned, crispy, and juicy. We sold so much chicken that the pressure fryer was constantly running.
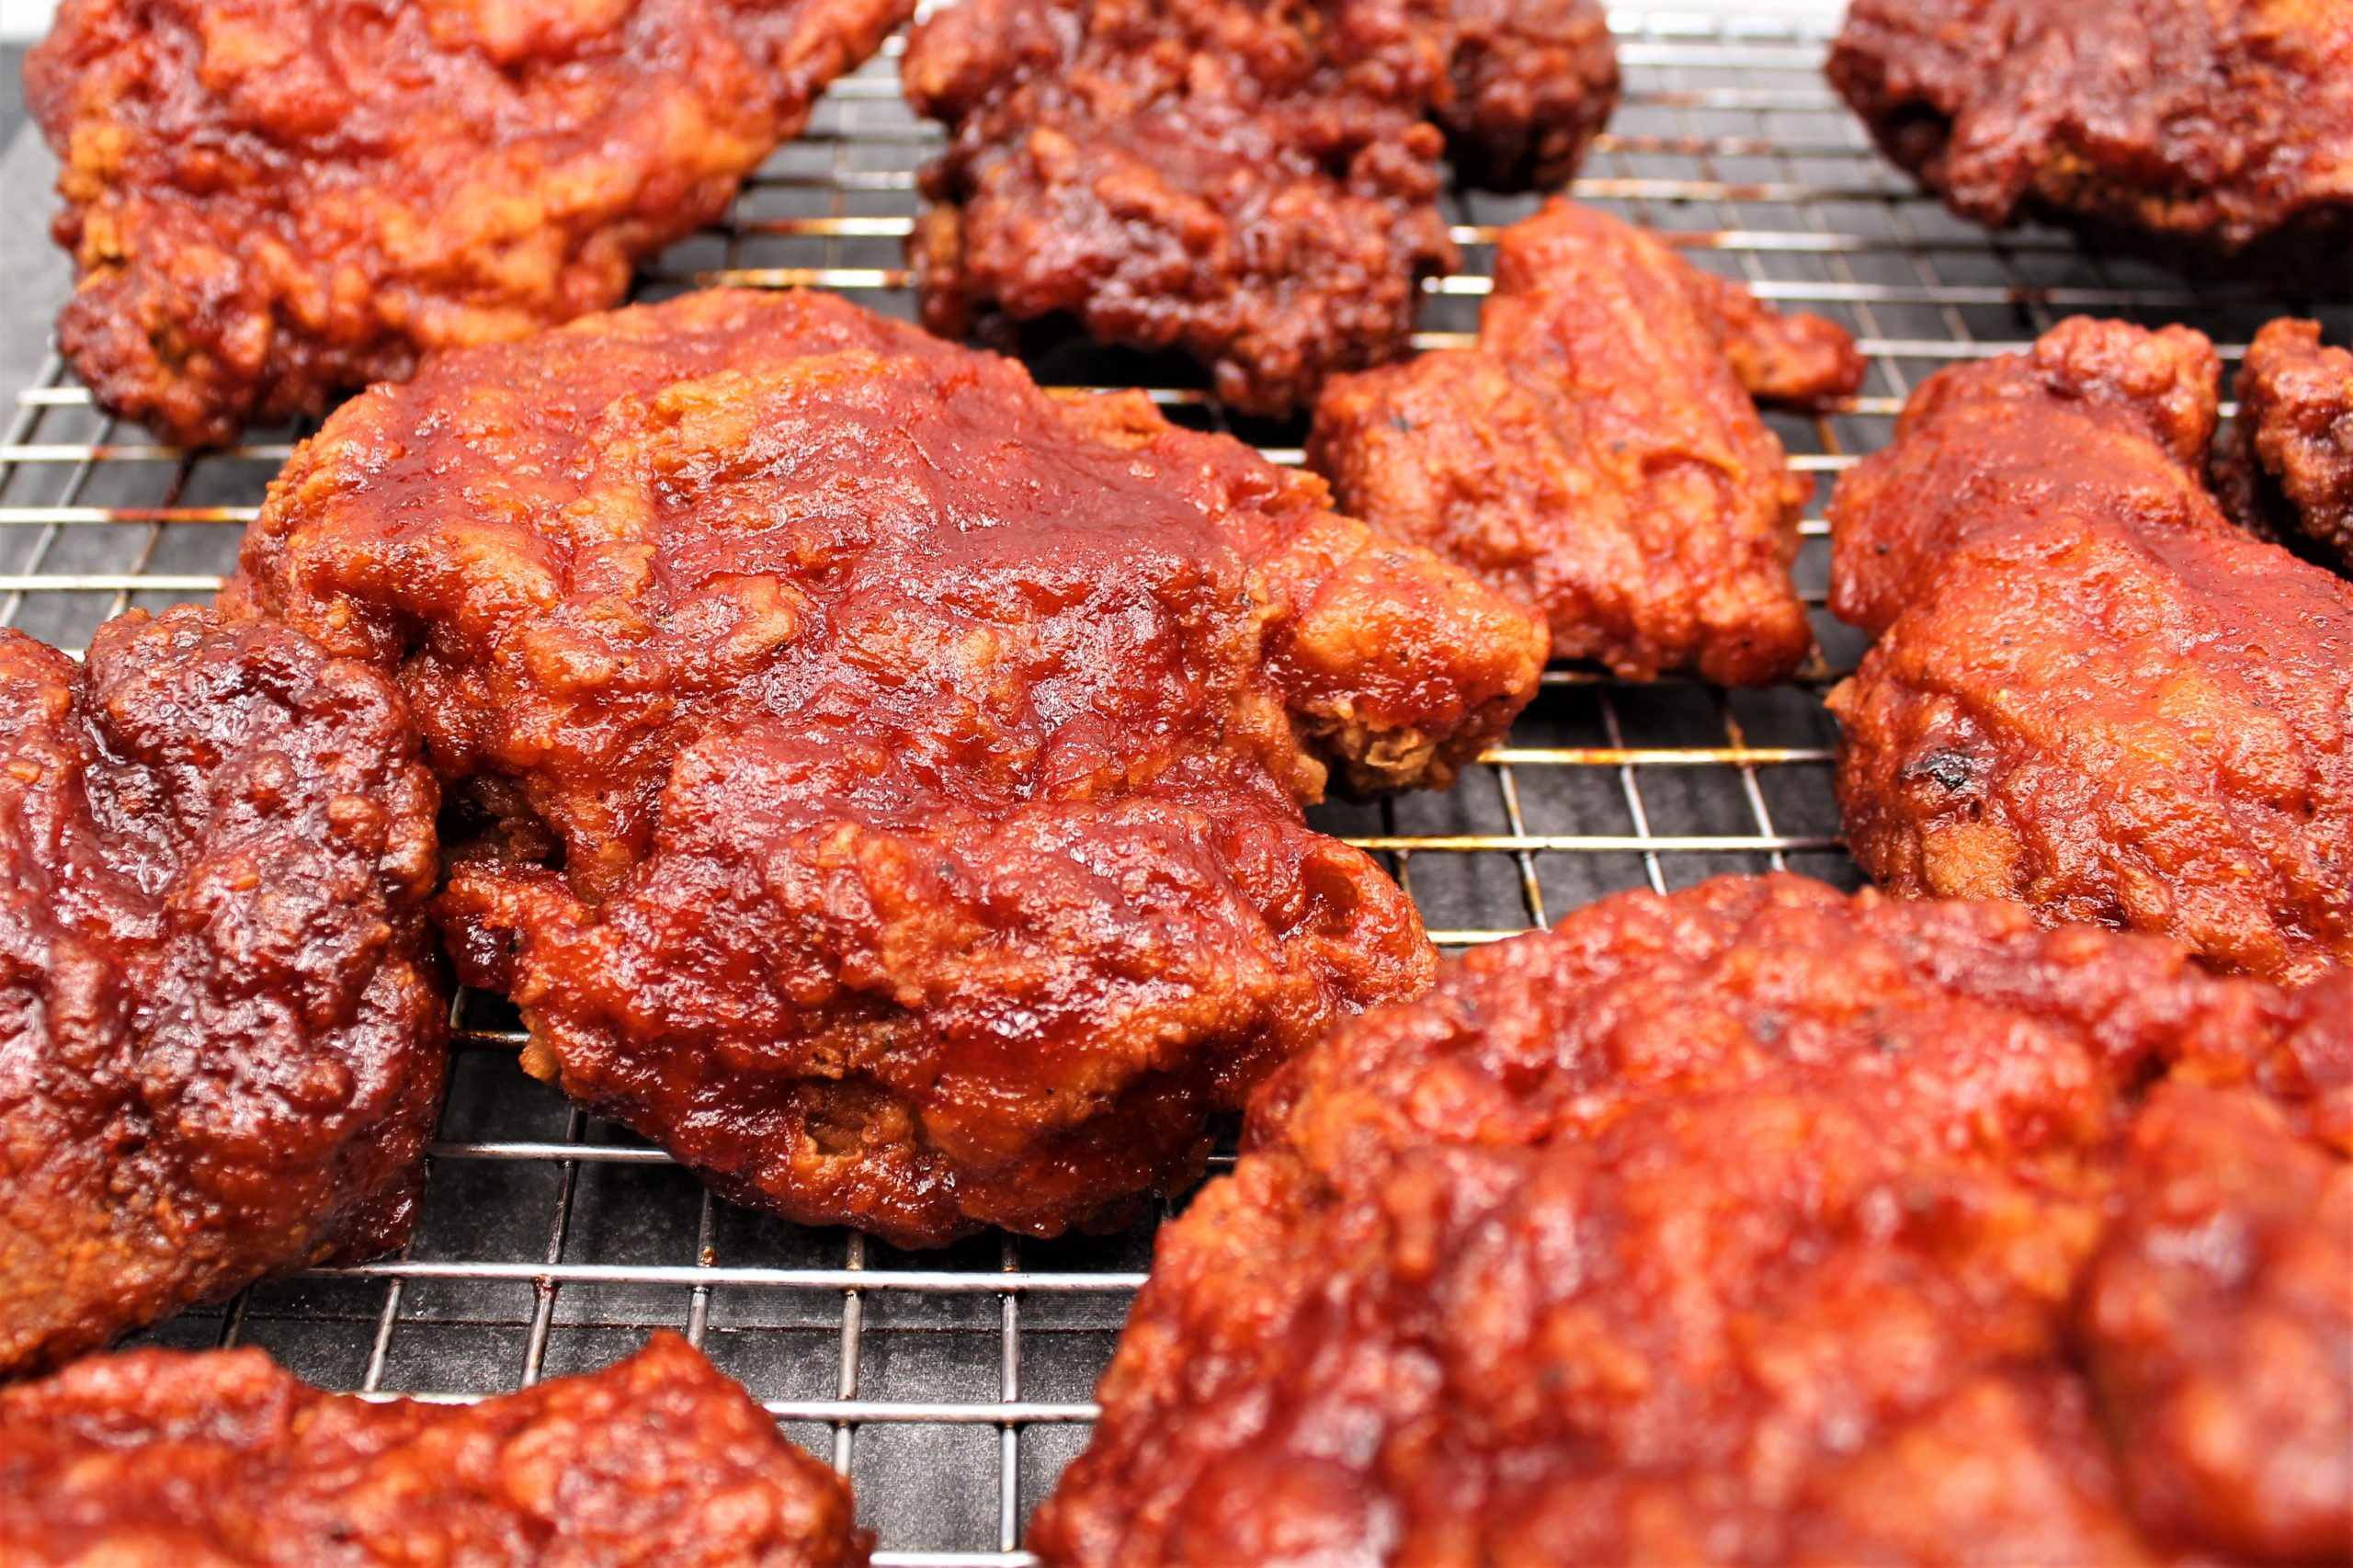
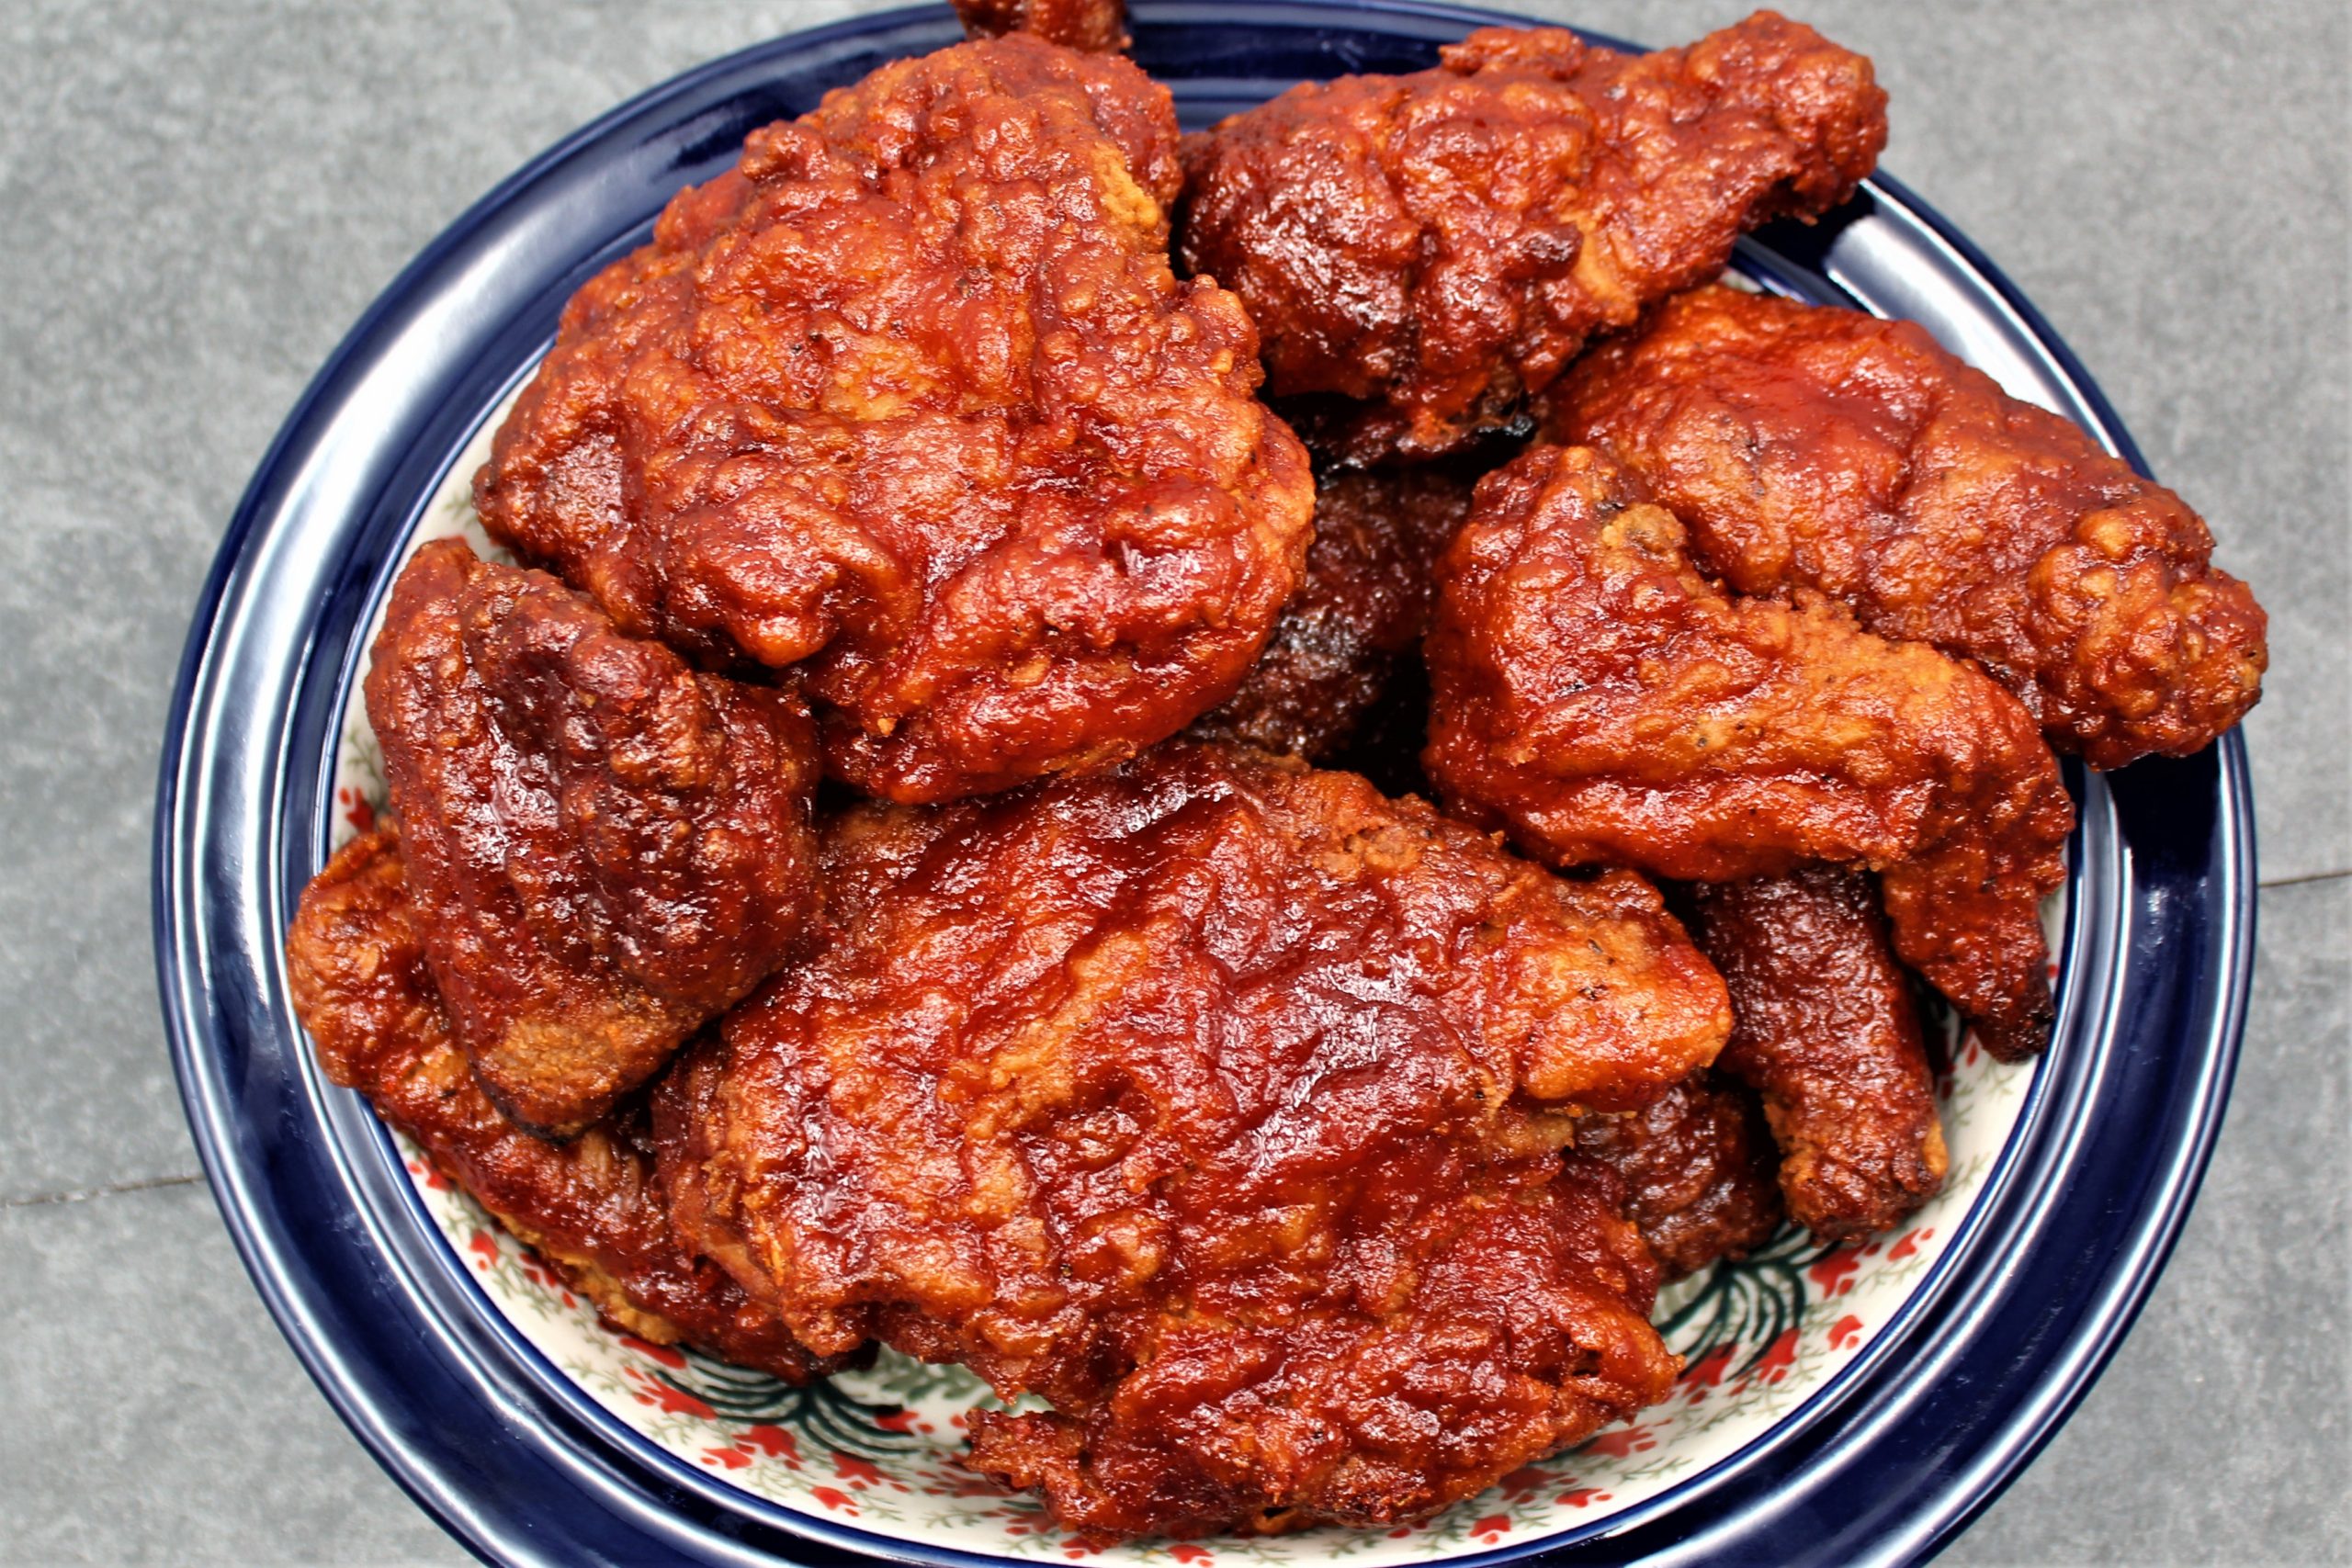
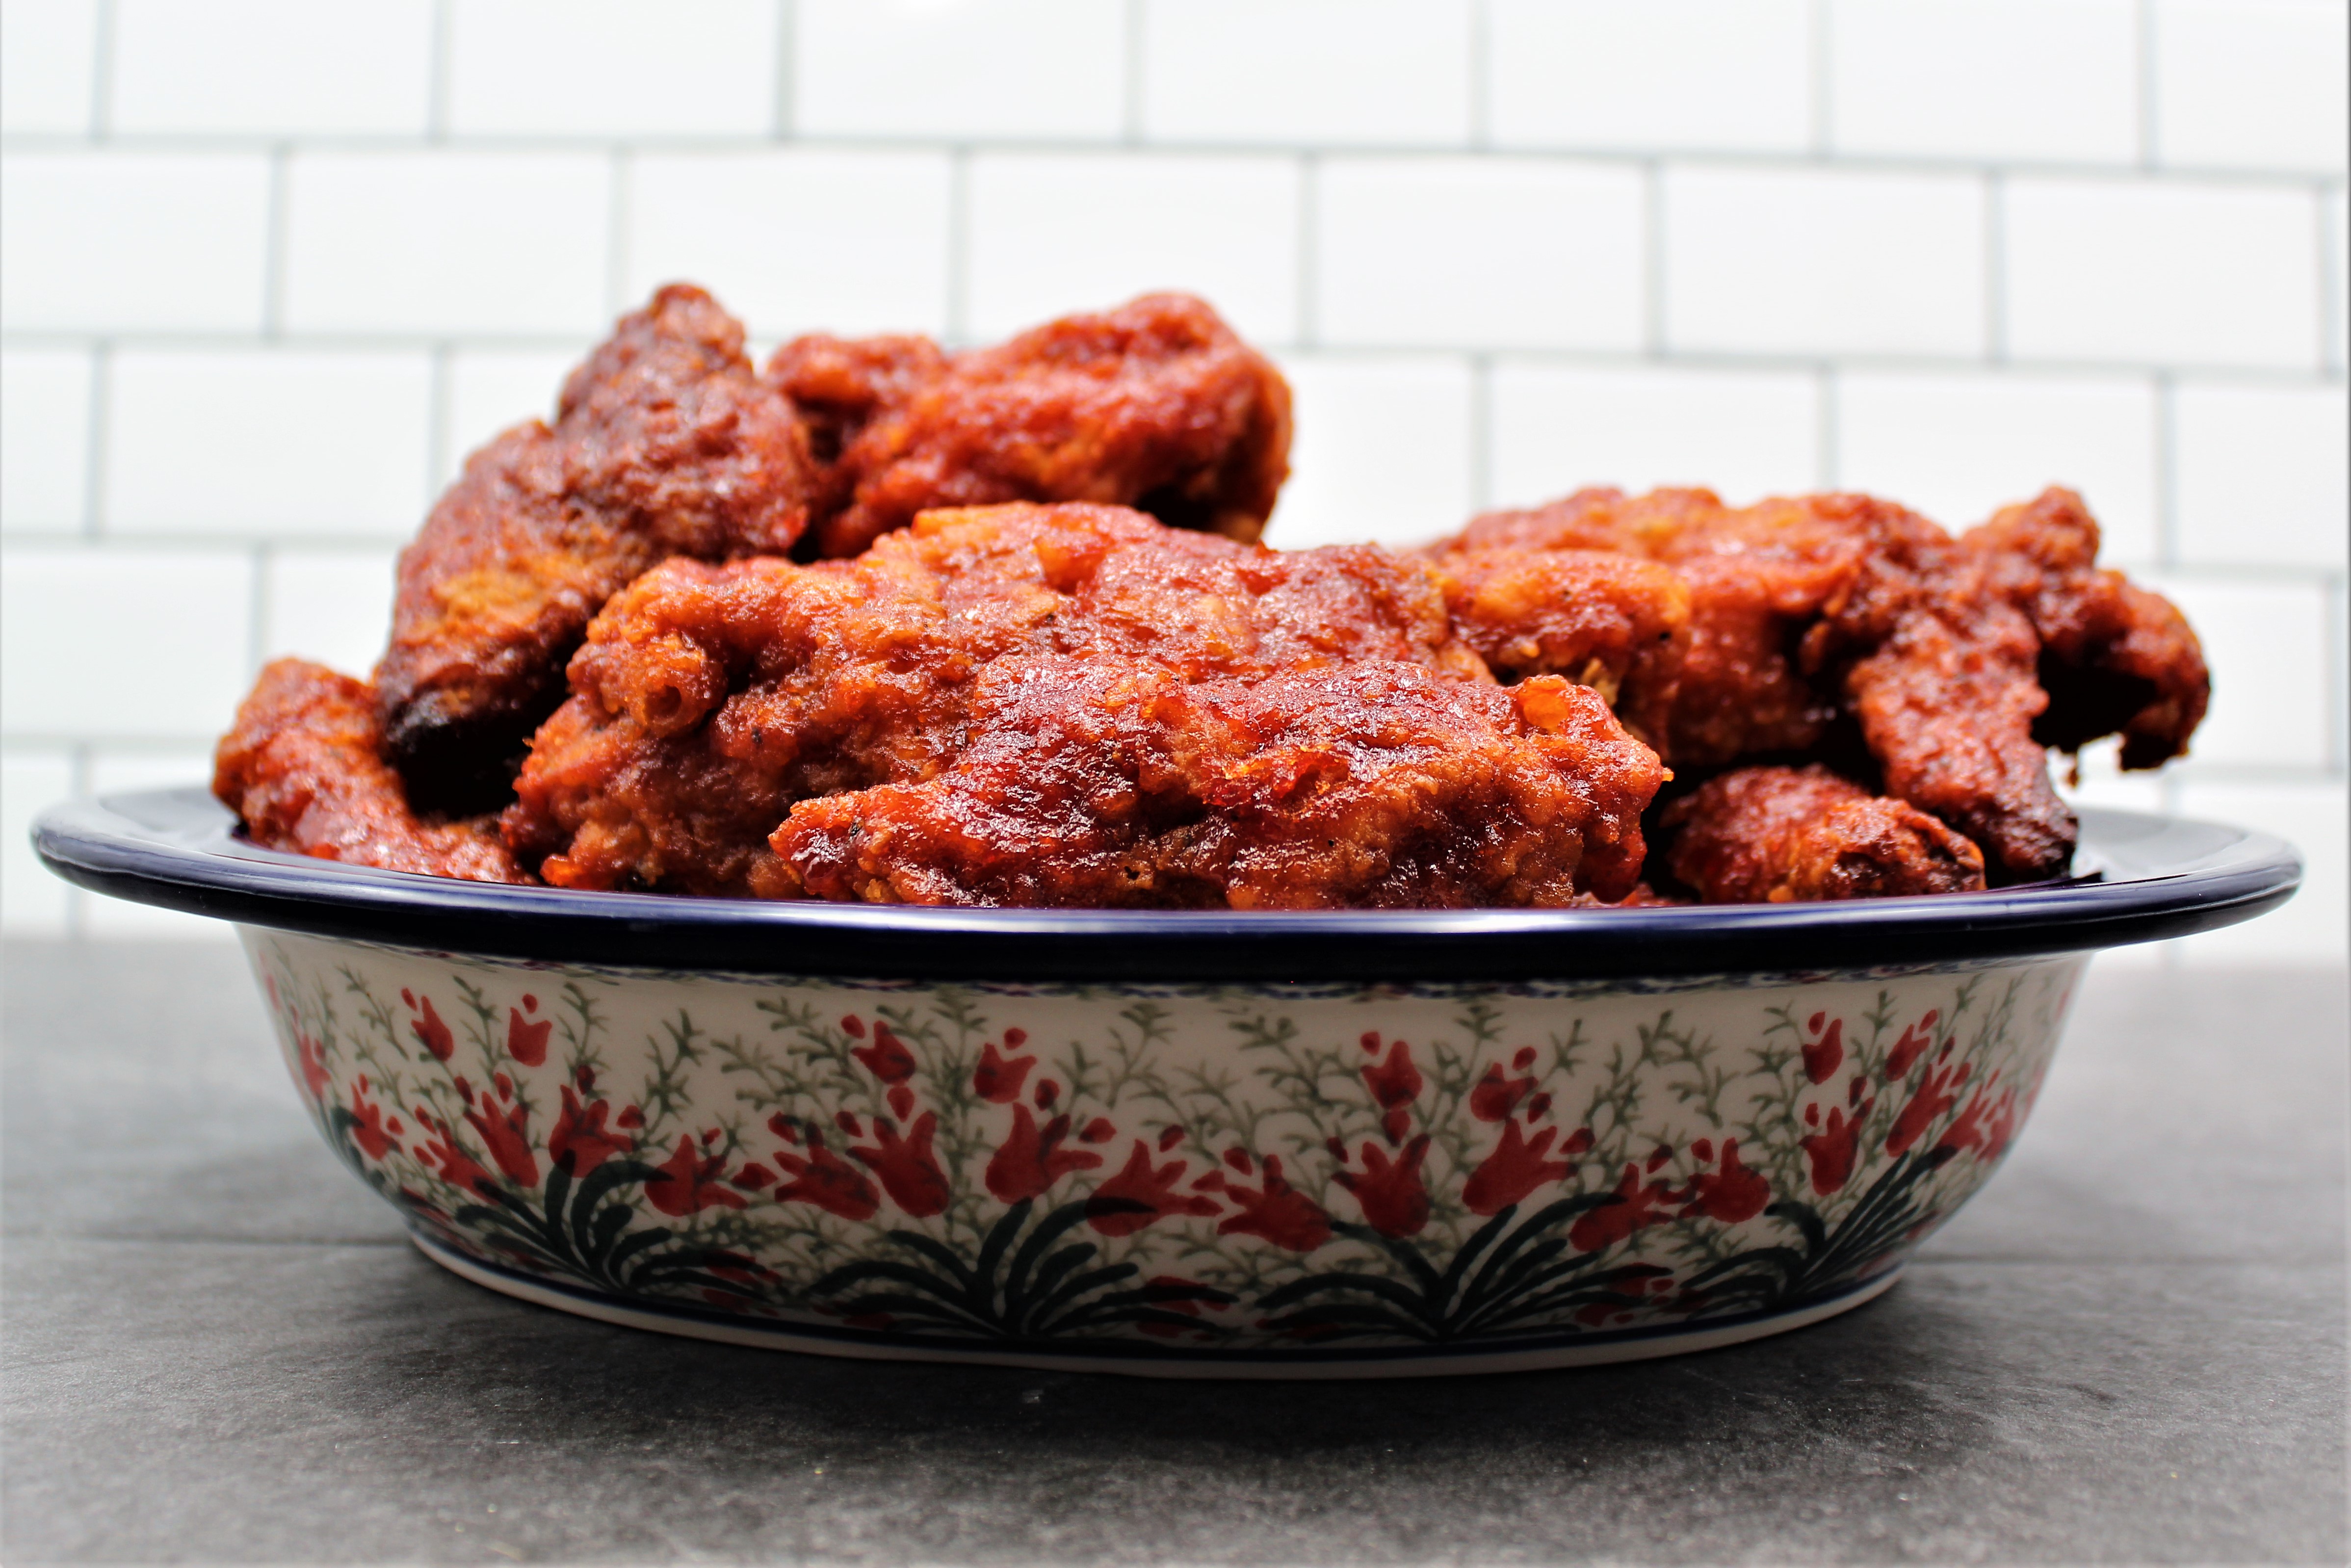
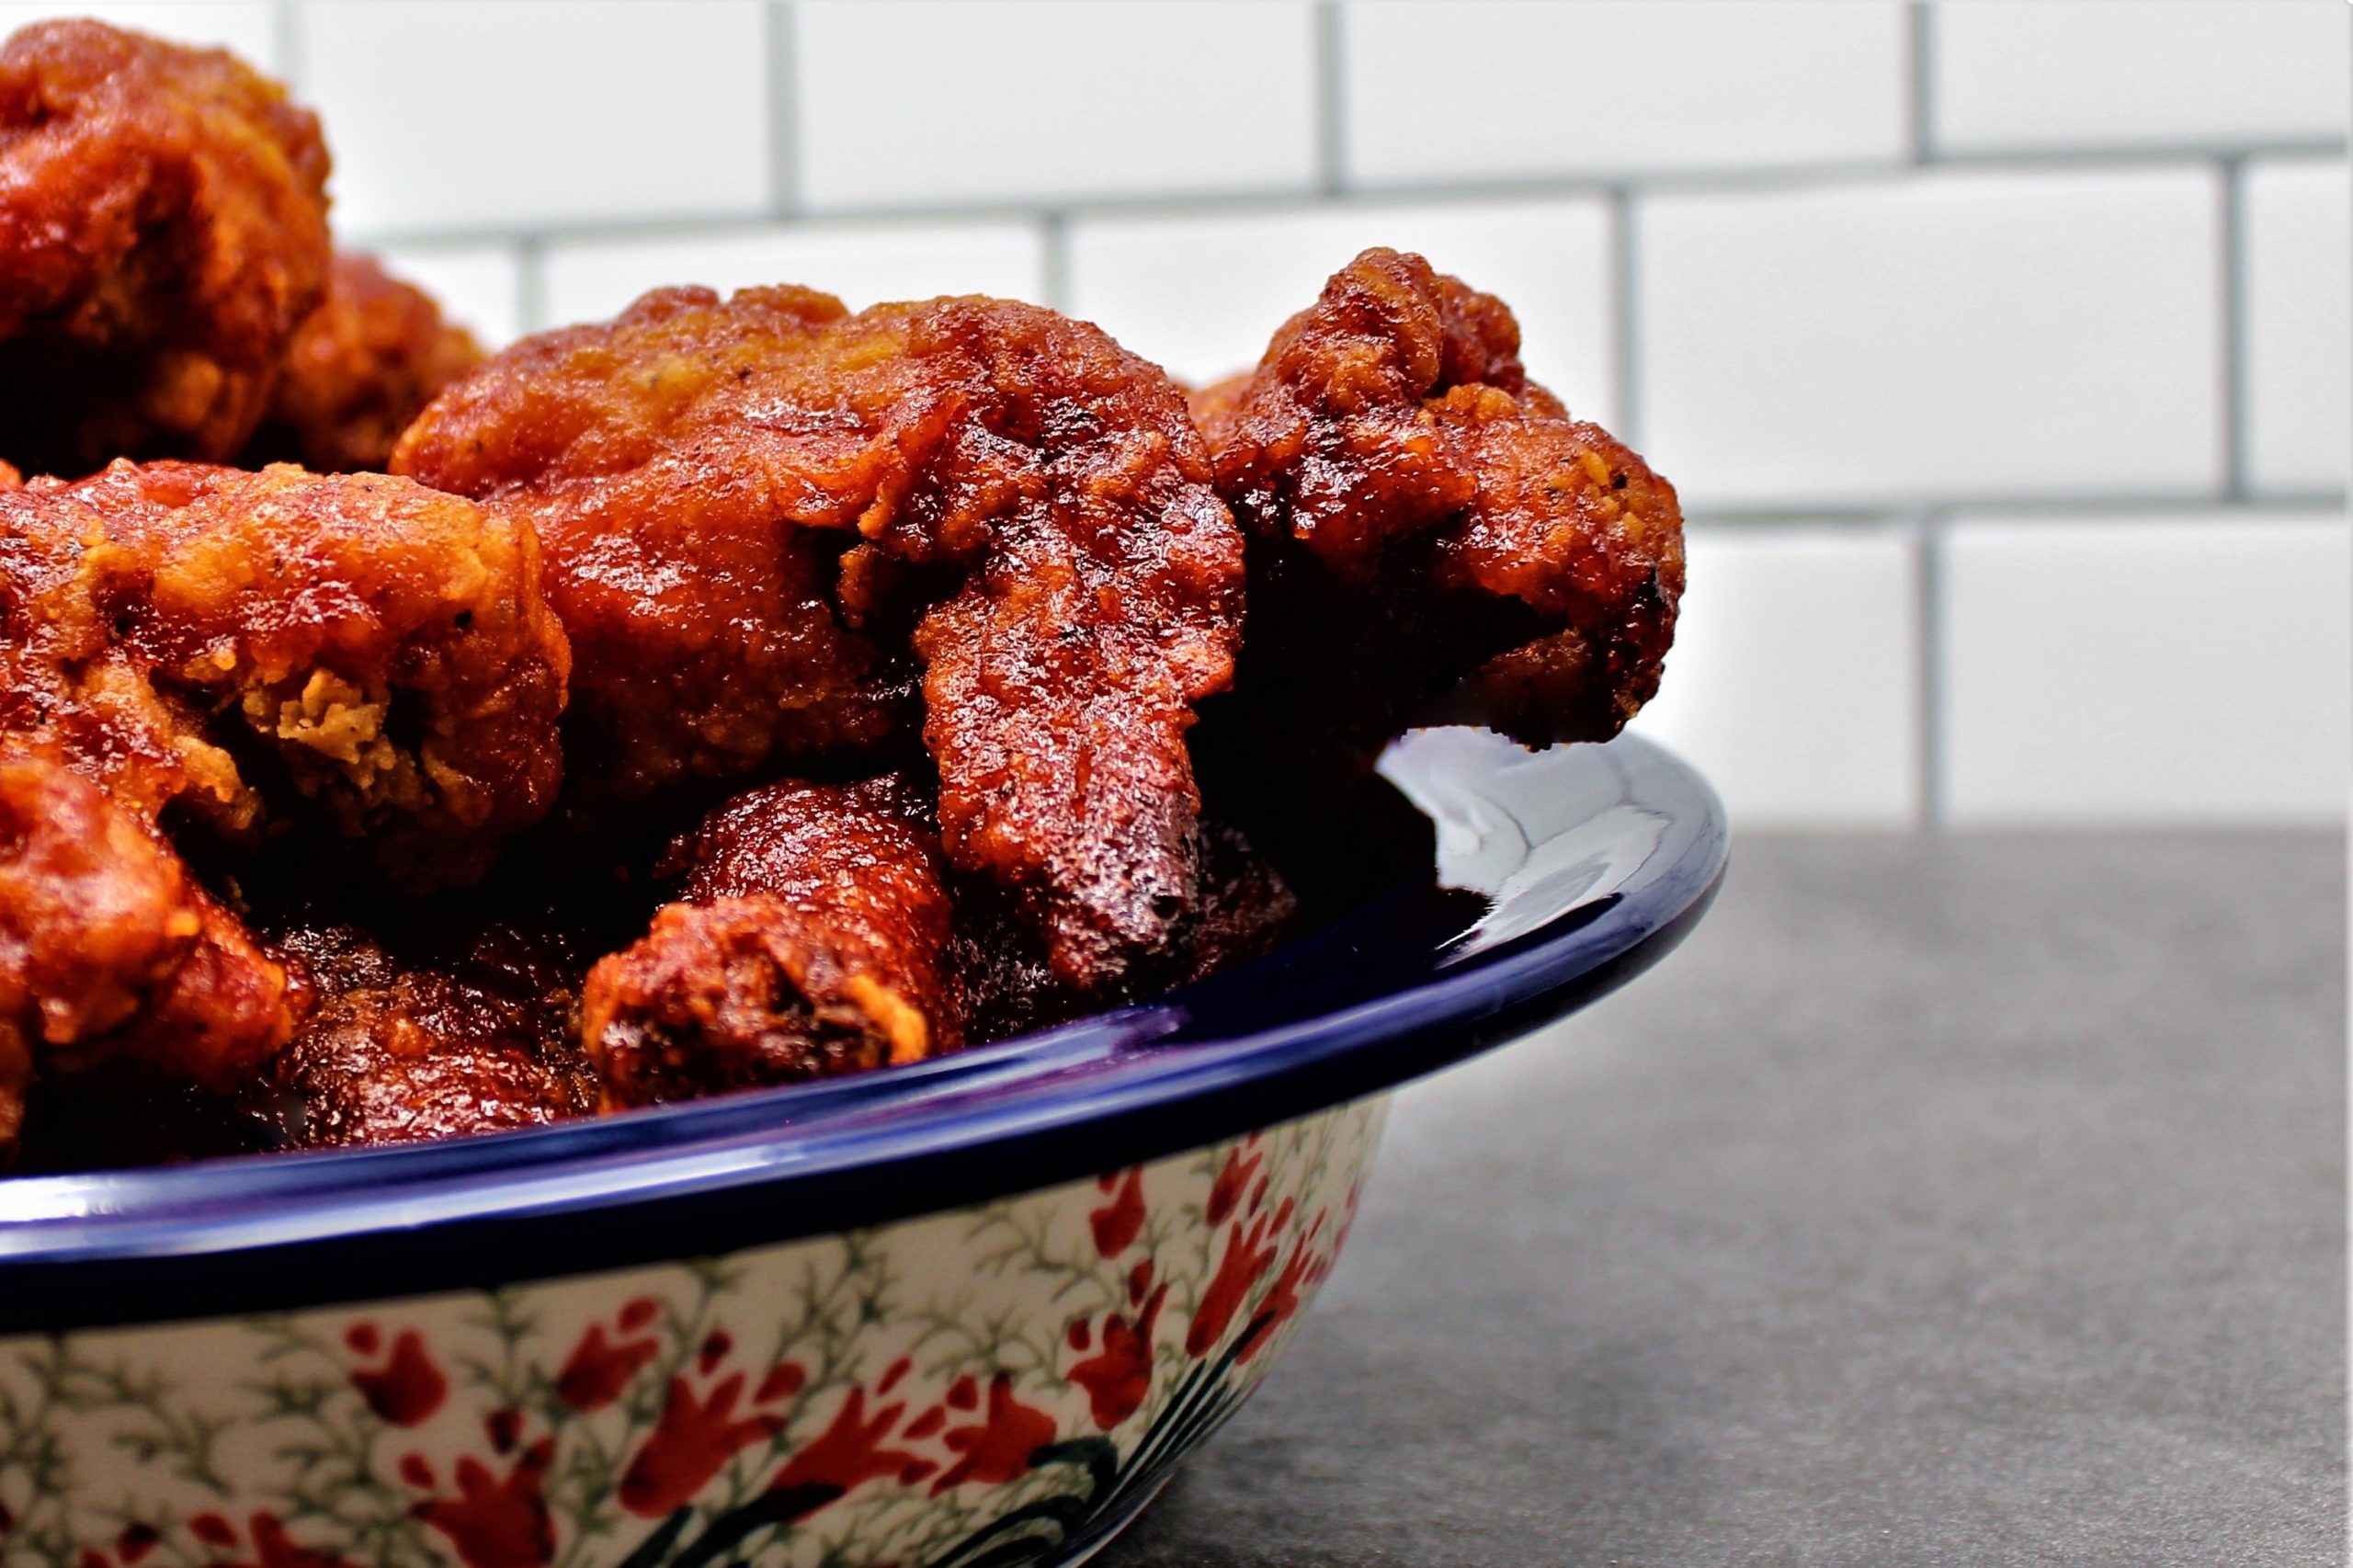
Every night before closing, the fried chicken that didn’t sell was wrapped and put in the walk-in cooler. The next day the leftover chicken was dipped in BBQ sauce and baked. The BBQ sauce made the breading sweet, savory, and sticky. I was in love!
It’s been thirty-five years since I have had that delicious BBQ Dipped Fried Chicken, so I decided to create my version. I have to say; it’s pretty close to the original.
I use store-bought fried chicken, just like we did back then. Why recreate the wheel?
My BBQ Dipped Fried Chicken is everything you want in a summer meal. It tastes great straight from the refrigerator and straight from the oven.
I hope you give this recipe a try and watch out for those divots; they’re a killer. Enjoy!
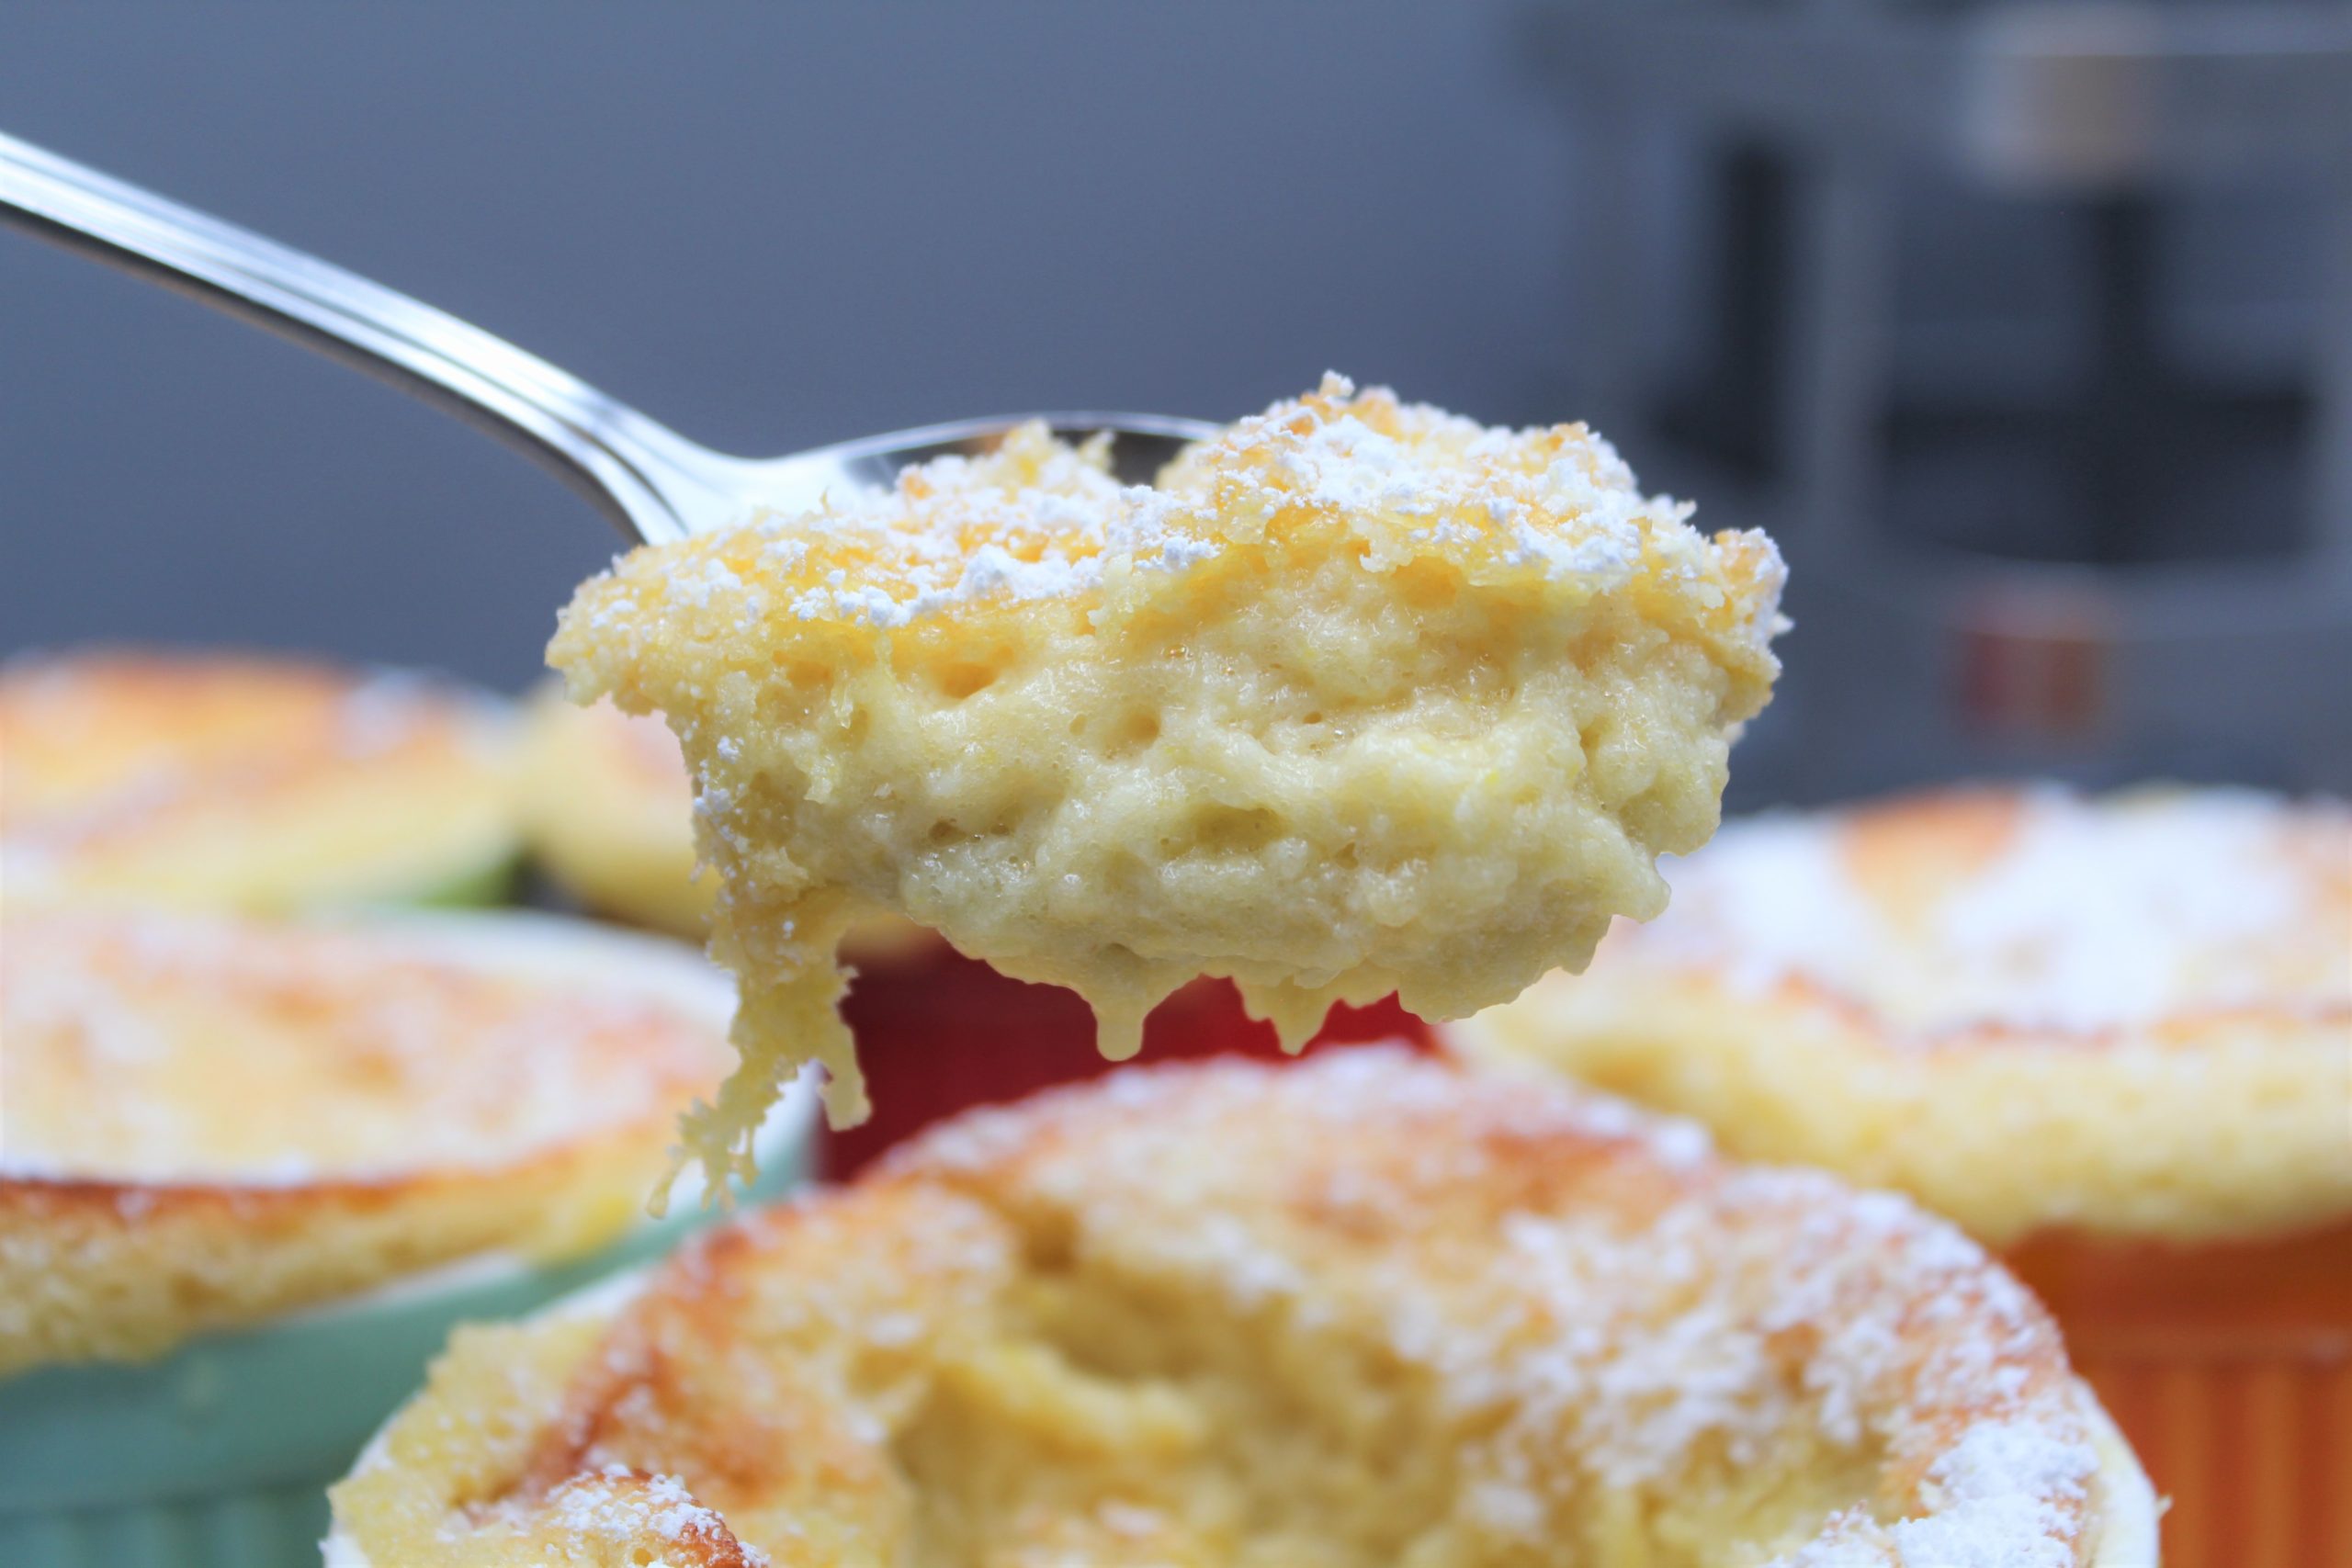
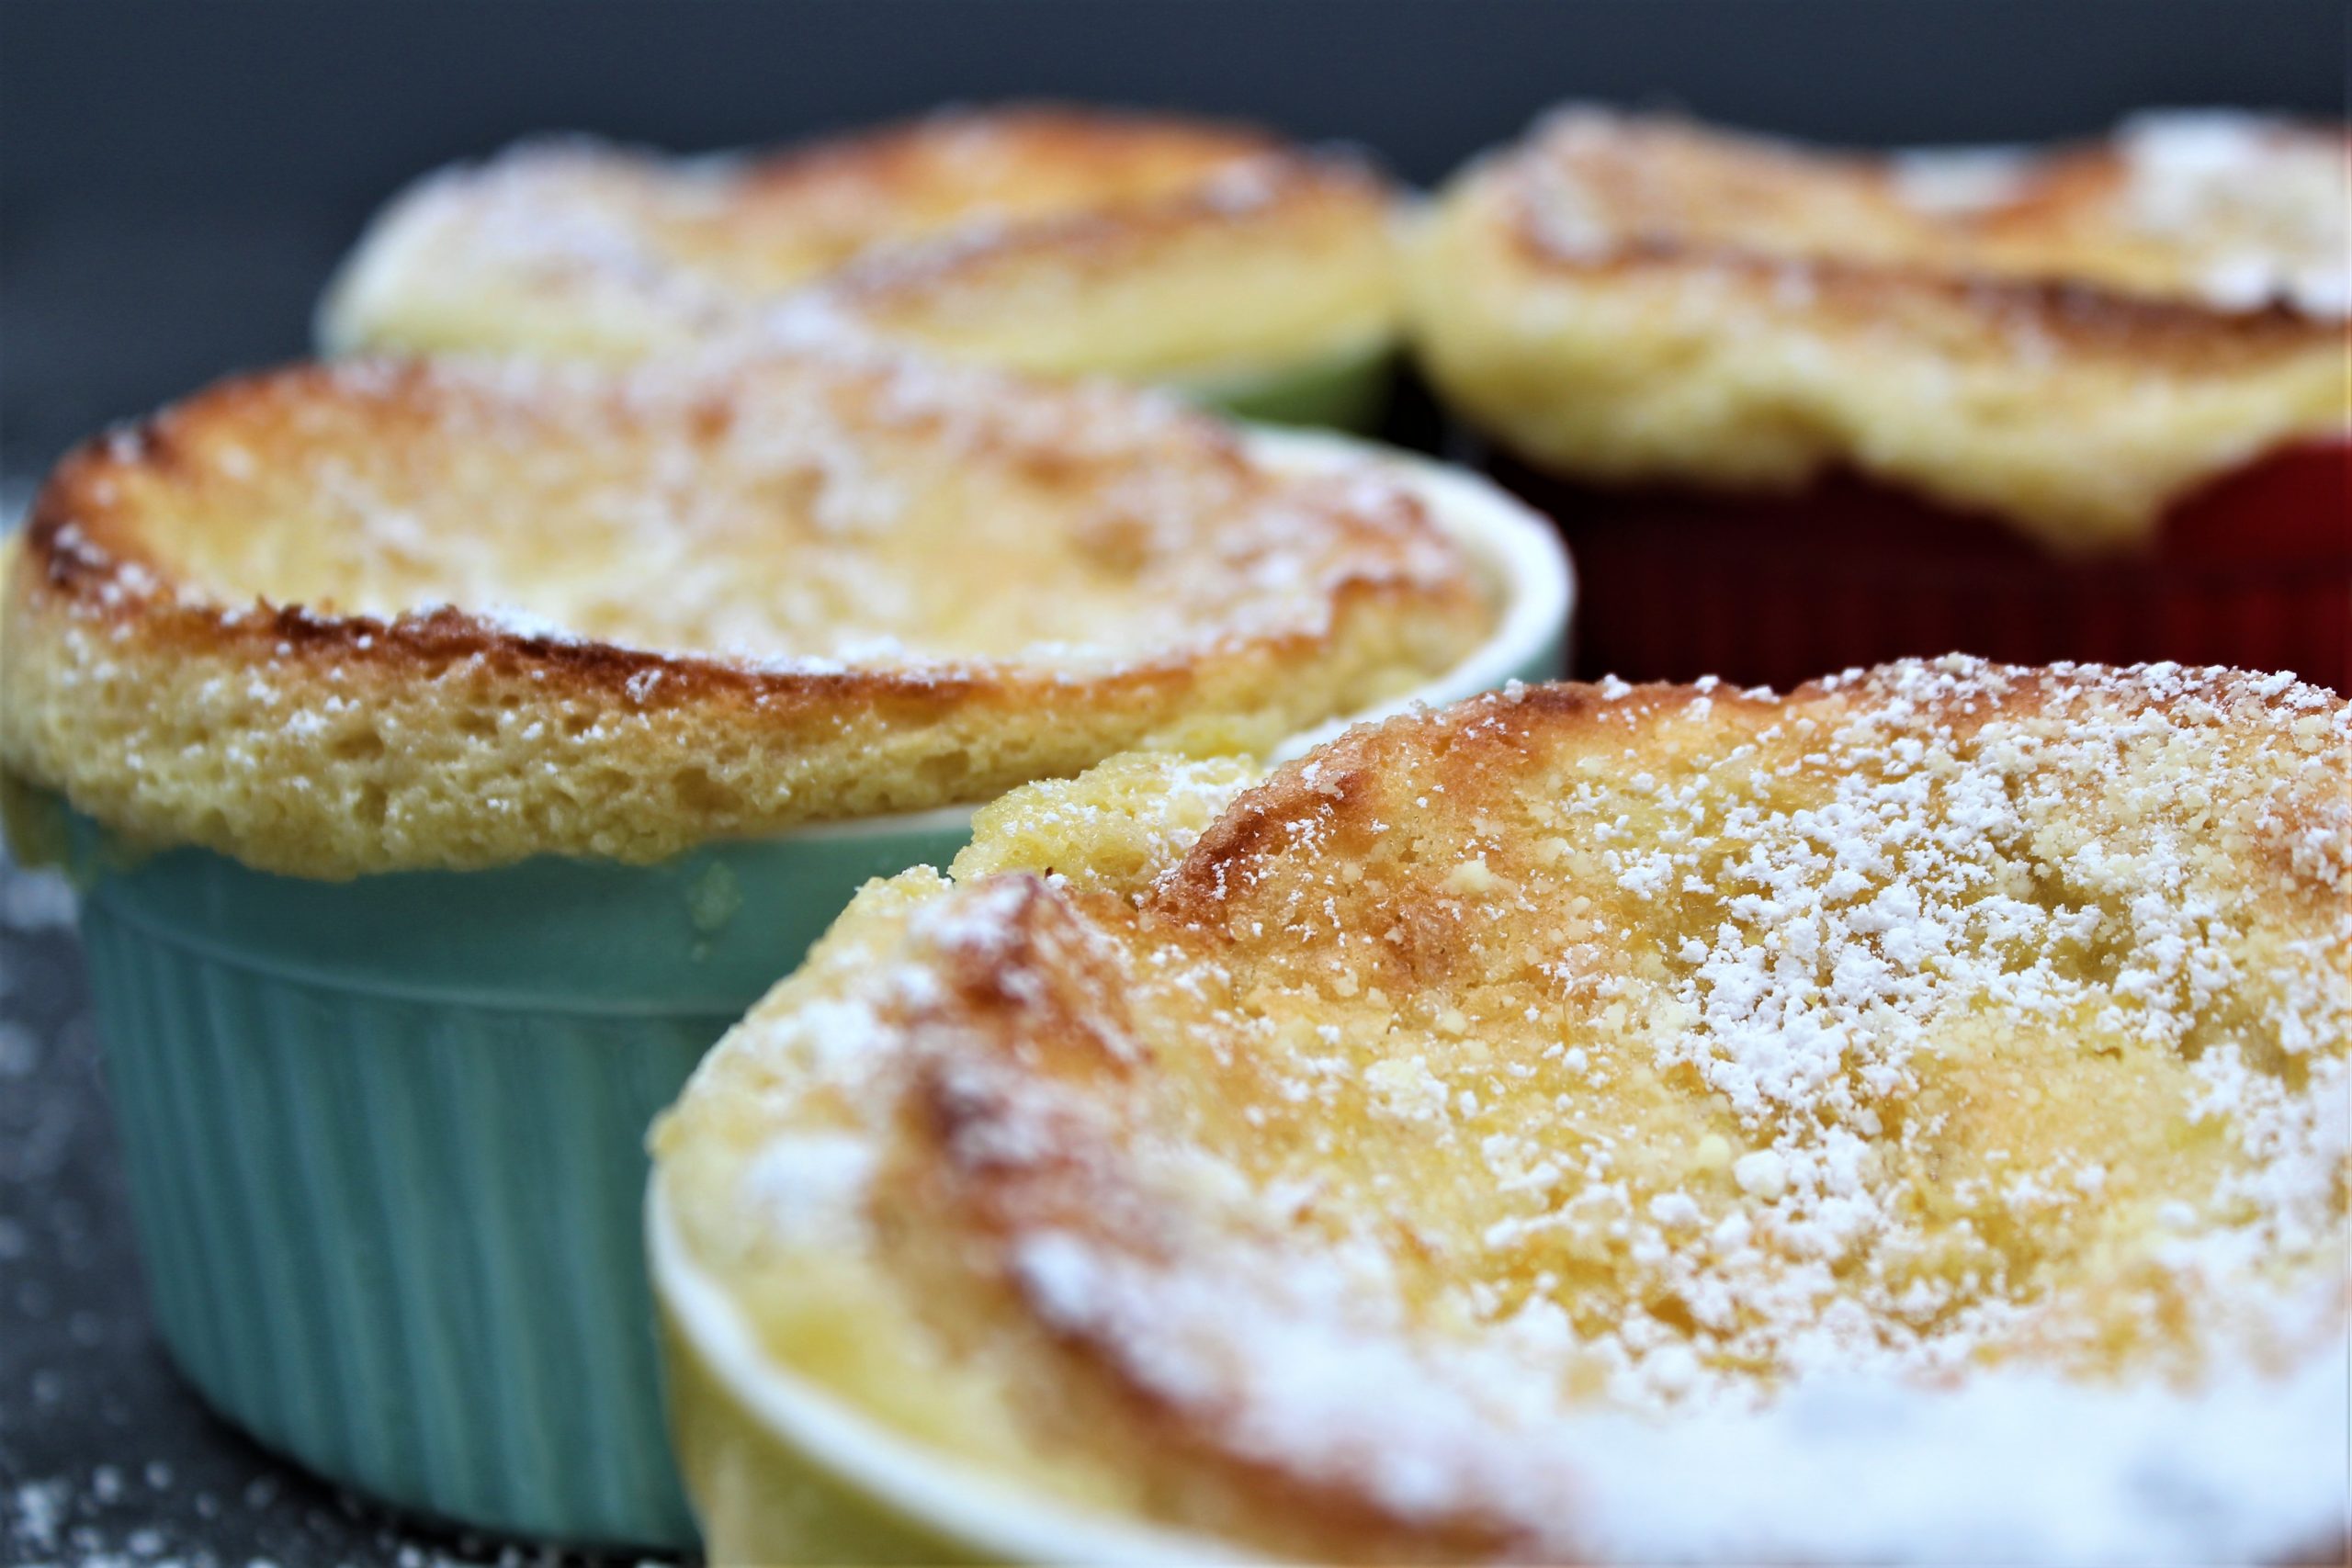
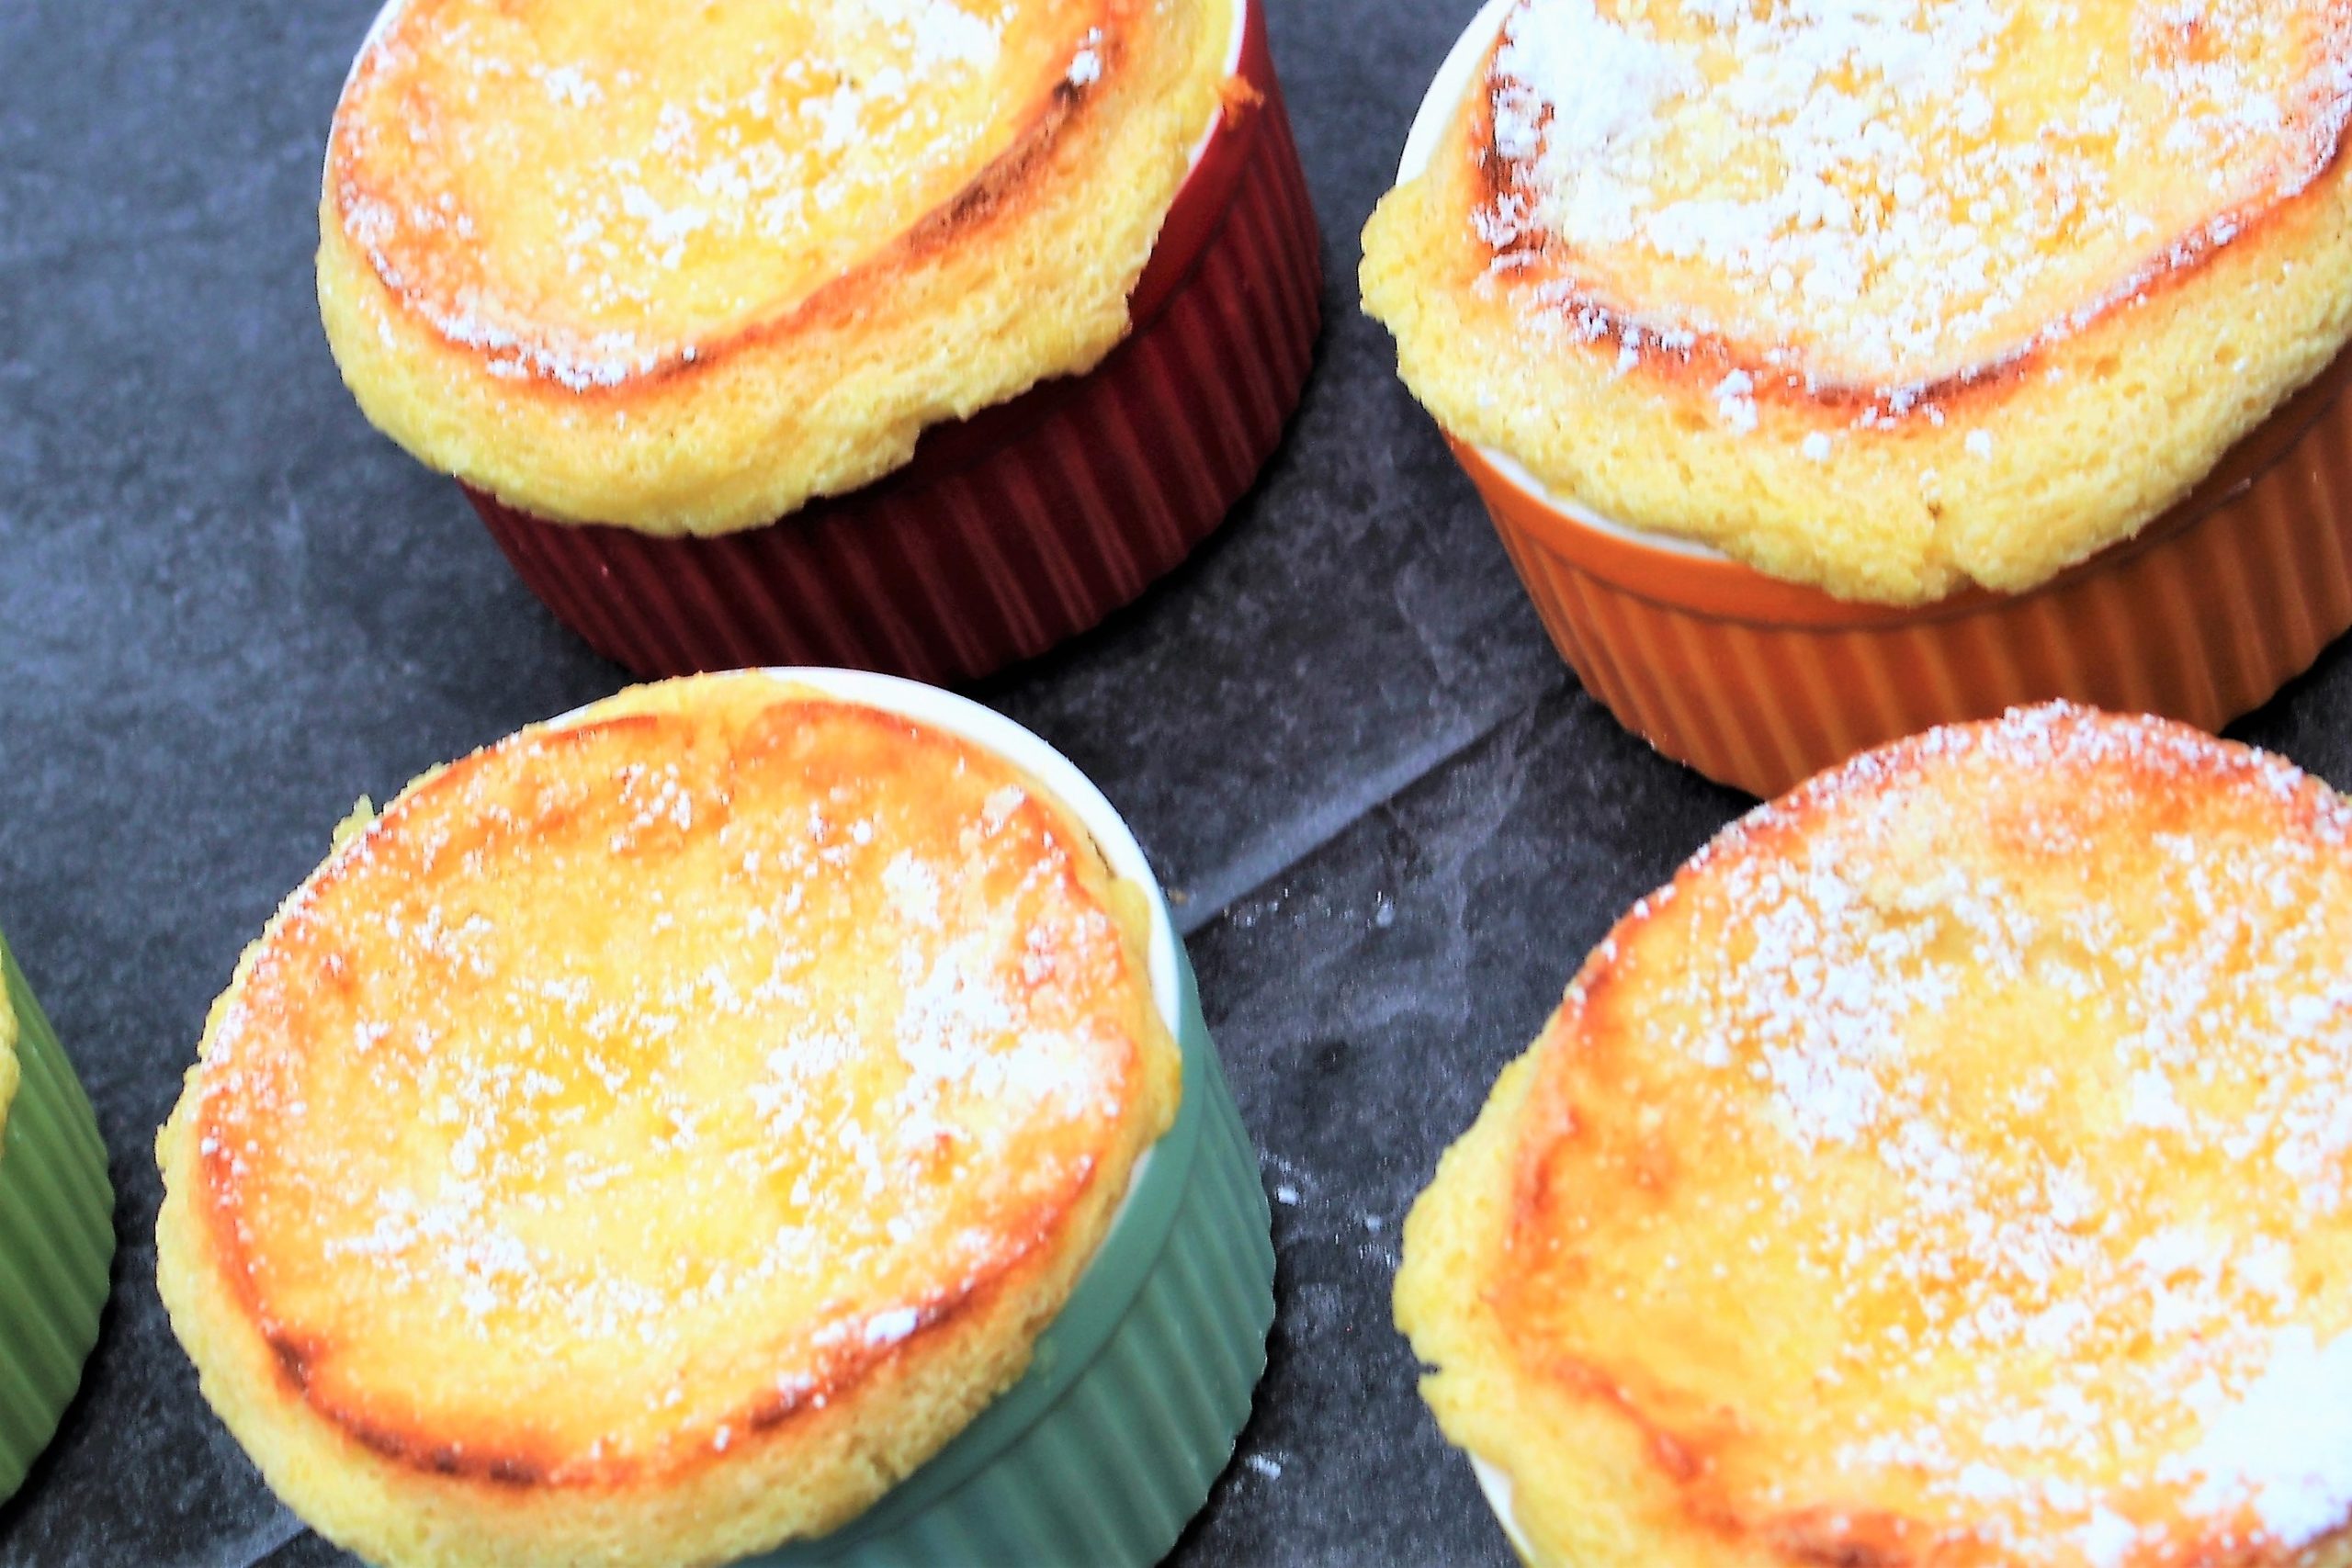
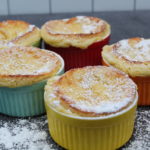
Crispy edges and silky and fluffy on the inside, this Soufflé is filled with fresh sweet corn. Preparing soufflés is actually an easy process, contrary to its reputation for being difficult to make. The reward for making this French classic is immense.
The word on the culinary street is that soufflé’s are temperamental. The truth is a soufflé is not nearly as sensitive as people say.
Yes, you can open your oven door; no, you won’t need to walk on eggshells while it is baking. The way a soufflé works is by having the beaten egg whites expand as gases and steam work to inflate tiny air bubbles and make them larger. It’s science, and it works…mostly.
Once baked and removed from the oven, soufflé’s start to deflate almost immediately. Taking photos for this blog was quite comical. I had to take the 350-degree soufflé’s from the oven and carry them quickly down the hall to the lightbox I use for my photos. Once in the lightbox, I had to hurry and set up the cups and take pictures before they deflated.
Honestly, it took a couple of tries before I was satisfied. I think I lost the feeling in my fingerprints that day., but I took some good pictures, I think.
I hope you join me as together we demystify the misunderstood soufflé. You will impress your dinner guest with my Sweet Corn Soufflé that is super simple to make, and walking on eggshells is not required. Enjoy!
Crispy edges and silky and fluffy on the inside, this Soufflé is filled with fresh sweet corn. Preparing soufflés is actually an easy process, contrary to its reputation for being difficult to make. The reward for making this French classic is immense.
Course
Dessert
Cuisine
French
Keyword
sweet corn souffle'
Prep Time20minutes
Cook Time25minutes
Servings6soufflé's
AuthorDoug Bakes Staff
Ingredients
2cupsCorn, kernels
4tspLemon, zest
2Eggs, large
65gramsAll-purpose flour
2tspbaking powder
1/8tsptable salt
2tspvanilla extract
135gramswhite sugar
8tbspbutter, salted
1cupheavy cream."
Instructions
Preheat the oven to 350 degrees and spray 6 6" soufflé dishes with nonstick cooking spray.
In a 2 quart saucepan, combine 1 cup of corn, 1/2 cup of cream, sugar, and salt.
Using a knife, split the vanilla bean down the center, scrape the seeds into the saucepan with the pod, and Bring it all to a simmer and cook for 5 minutes.
Remove from heat and let it steep for 10 minutes more. Pluck out the vanilla pod and toss.
Transfer all the contents to the blender and process until smooth, and set aside.
Stir together flour and baking powder and set aside.
In the same saucepan, heat the remaining cream over medium heat until bubbles form around the edge.
Whisk in the flour mixture and continue cooking until thickened.
It will be very pasty. Remove it from the heat and stir in the butter, 2 tablespoons at a time..
Once the flour mixture is at room temperature, add the pureed corn mix, egg yolks, lemon zest, and reserved corn. Stir together and set aside.
In a mixer fitted with a whisk attachment, beat the egg whites until they reach stiff peaks.
Fold them gently into the corn. Fill baking cups with the soufflé. Sprinkle with nutmeg and bake uncovered for about 35 minutes.
The soufflé should rise to the edge of the dish. Top with blackberries and serve right away
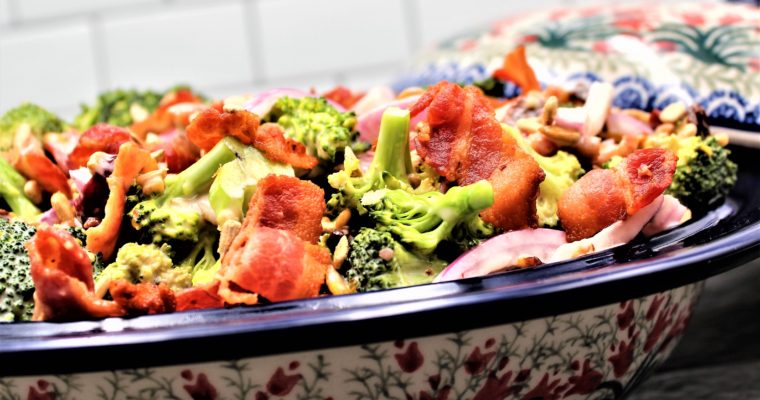
My cold, savory, lightly sweet broccoli salad—filled with crispy bacon, ribbons of red onion, and chewy golden raisins, then tossed in a creamy easy to make dressing, this is what your summer party dreams are made of.
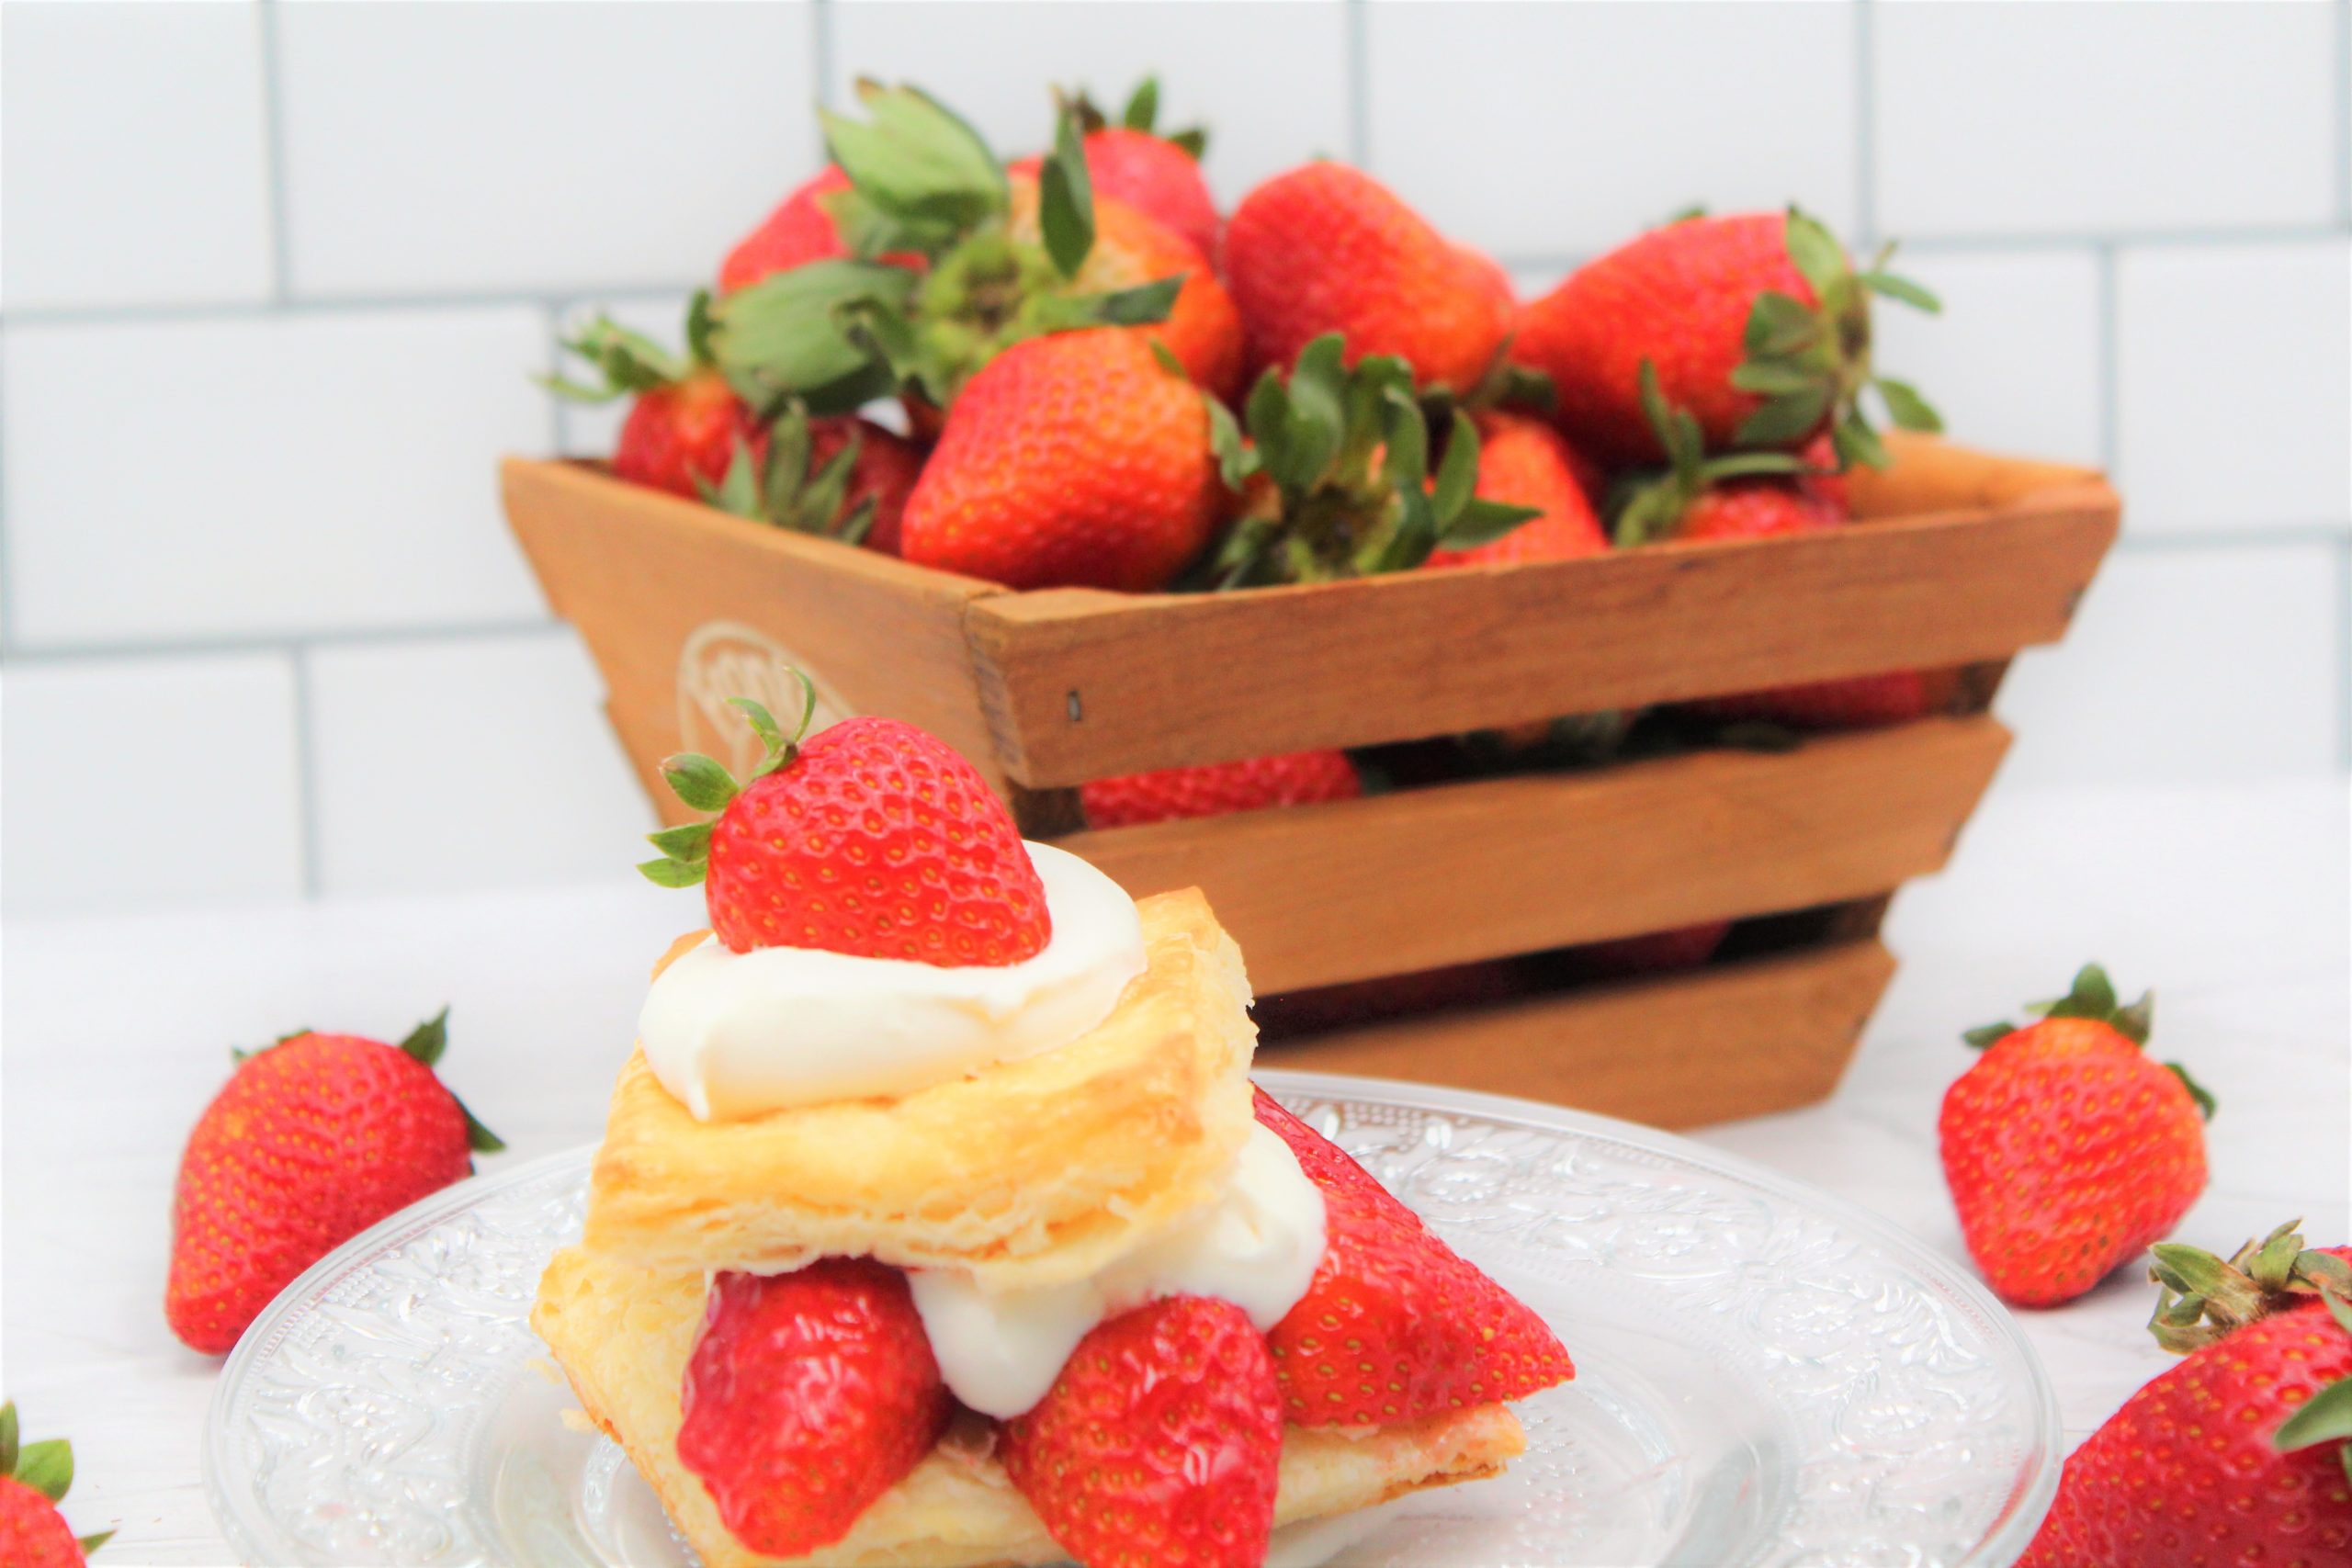
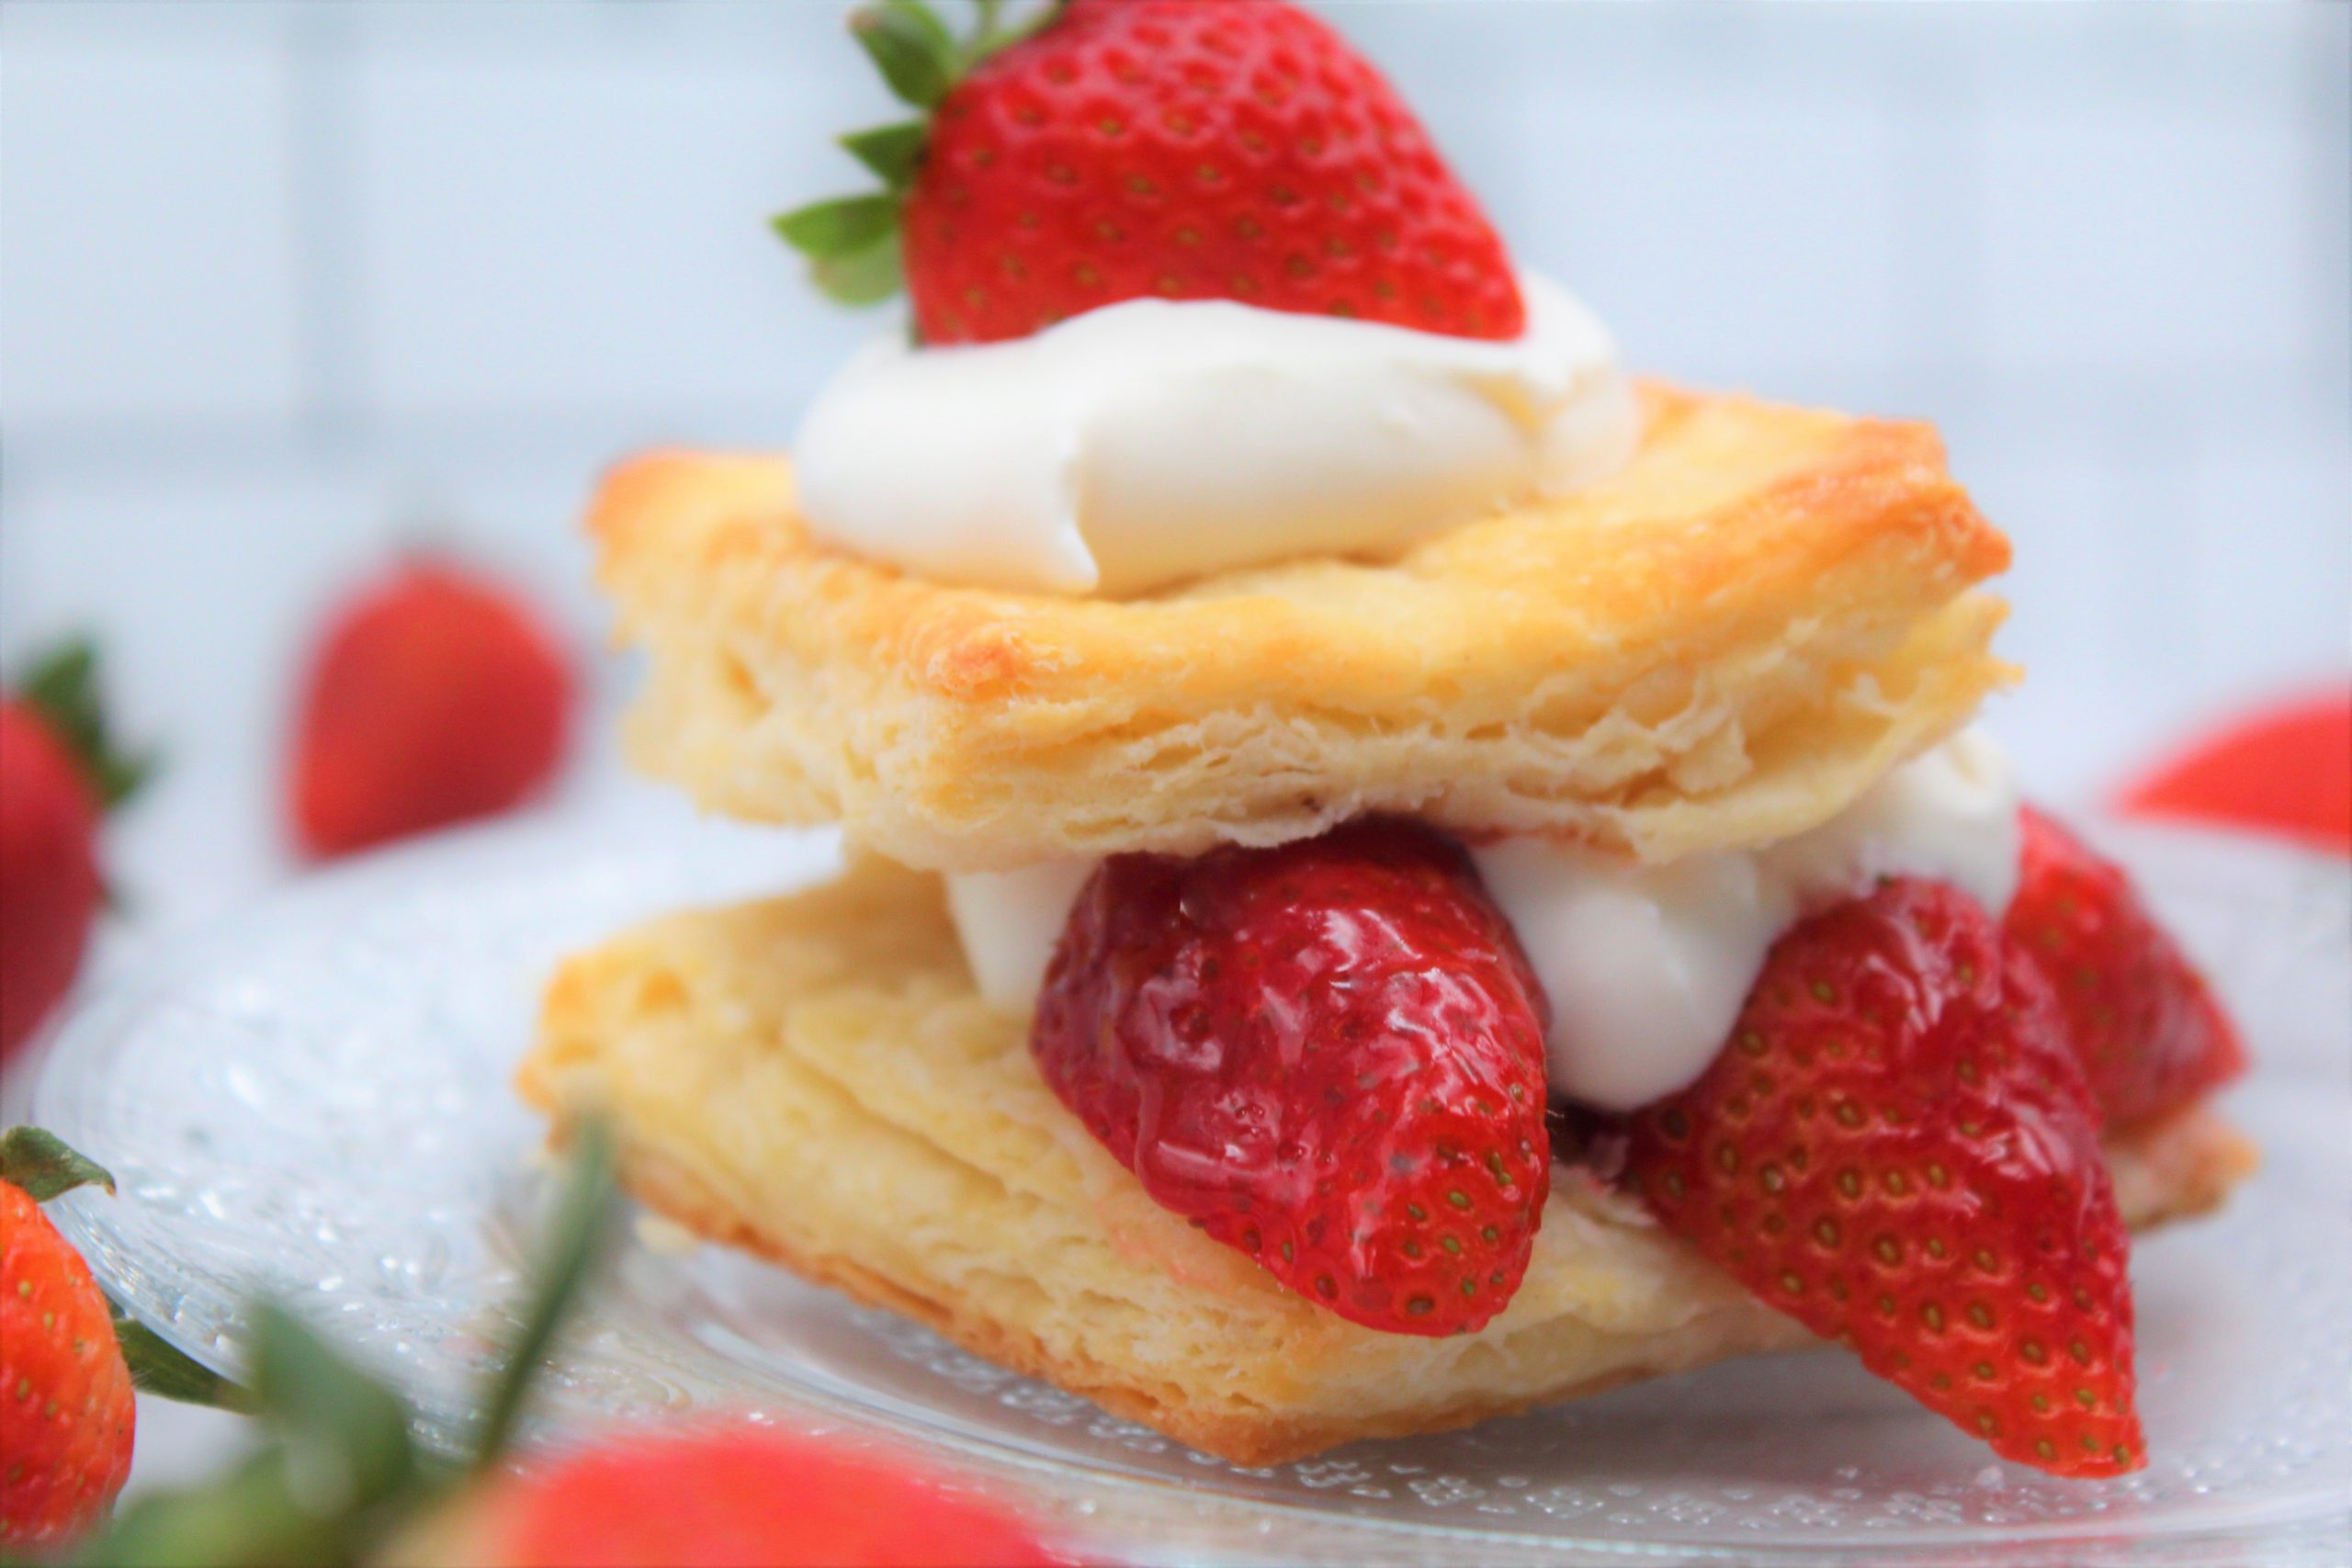
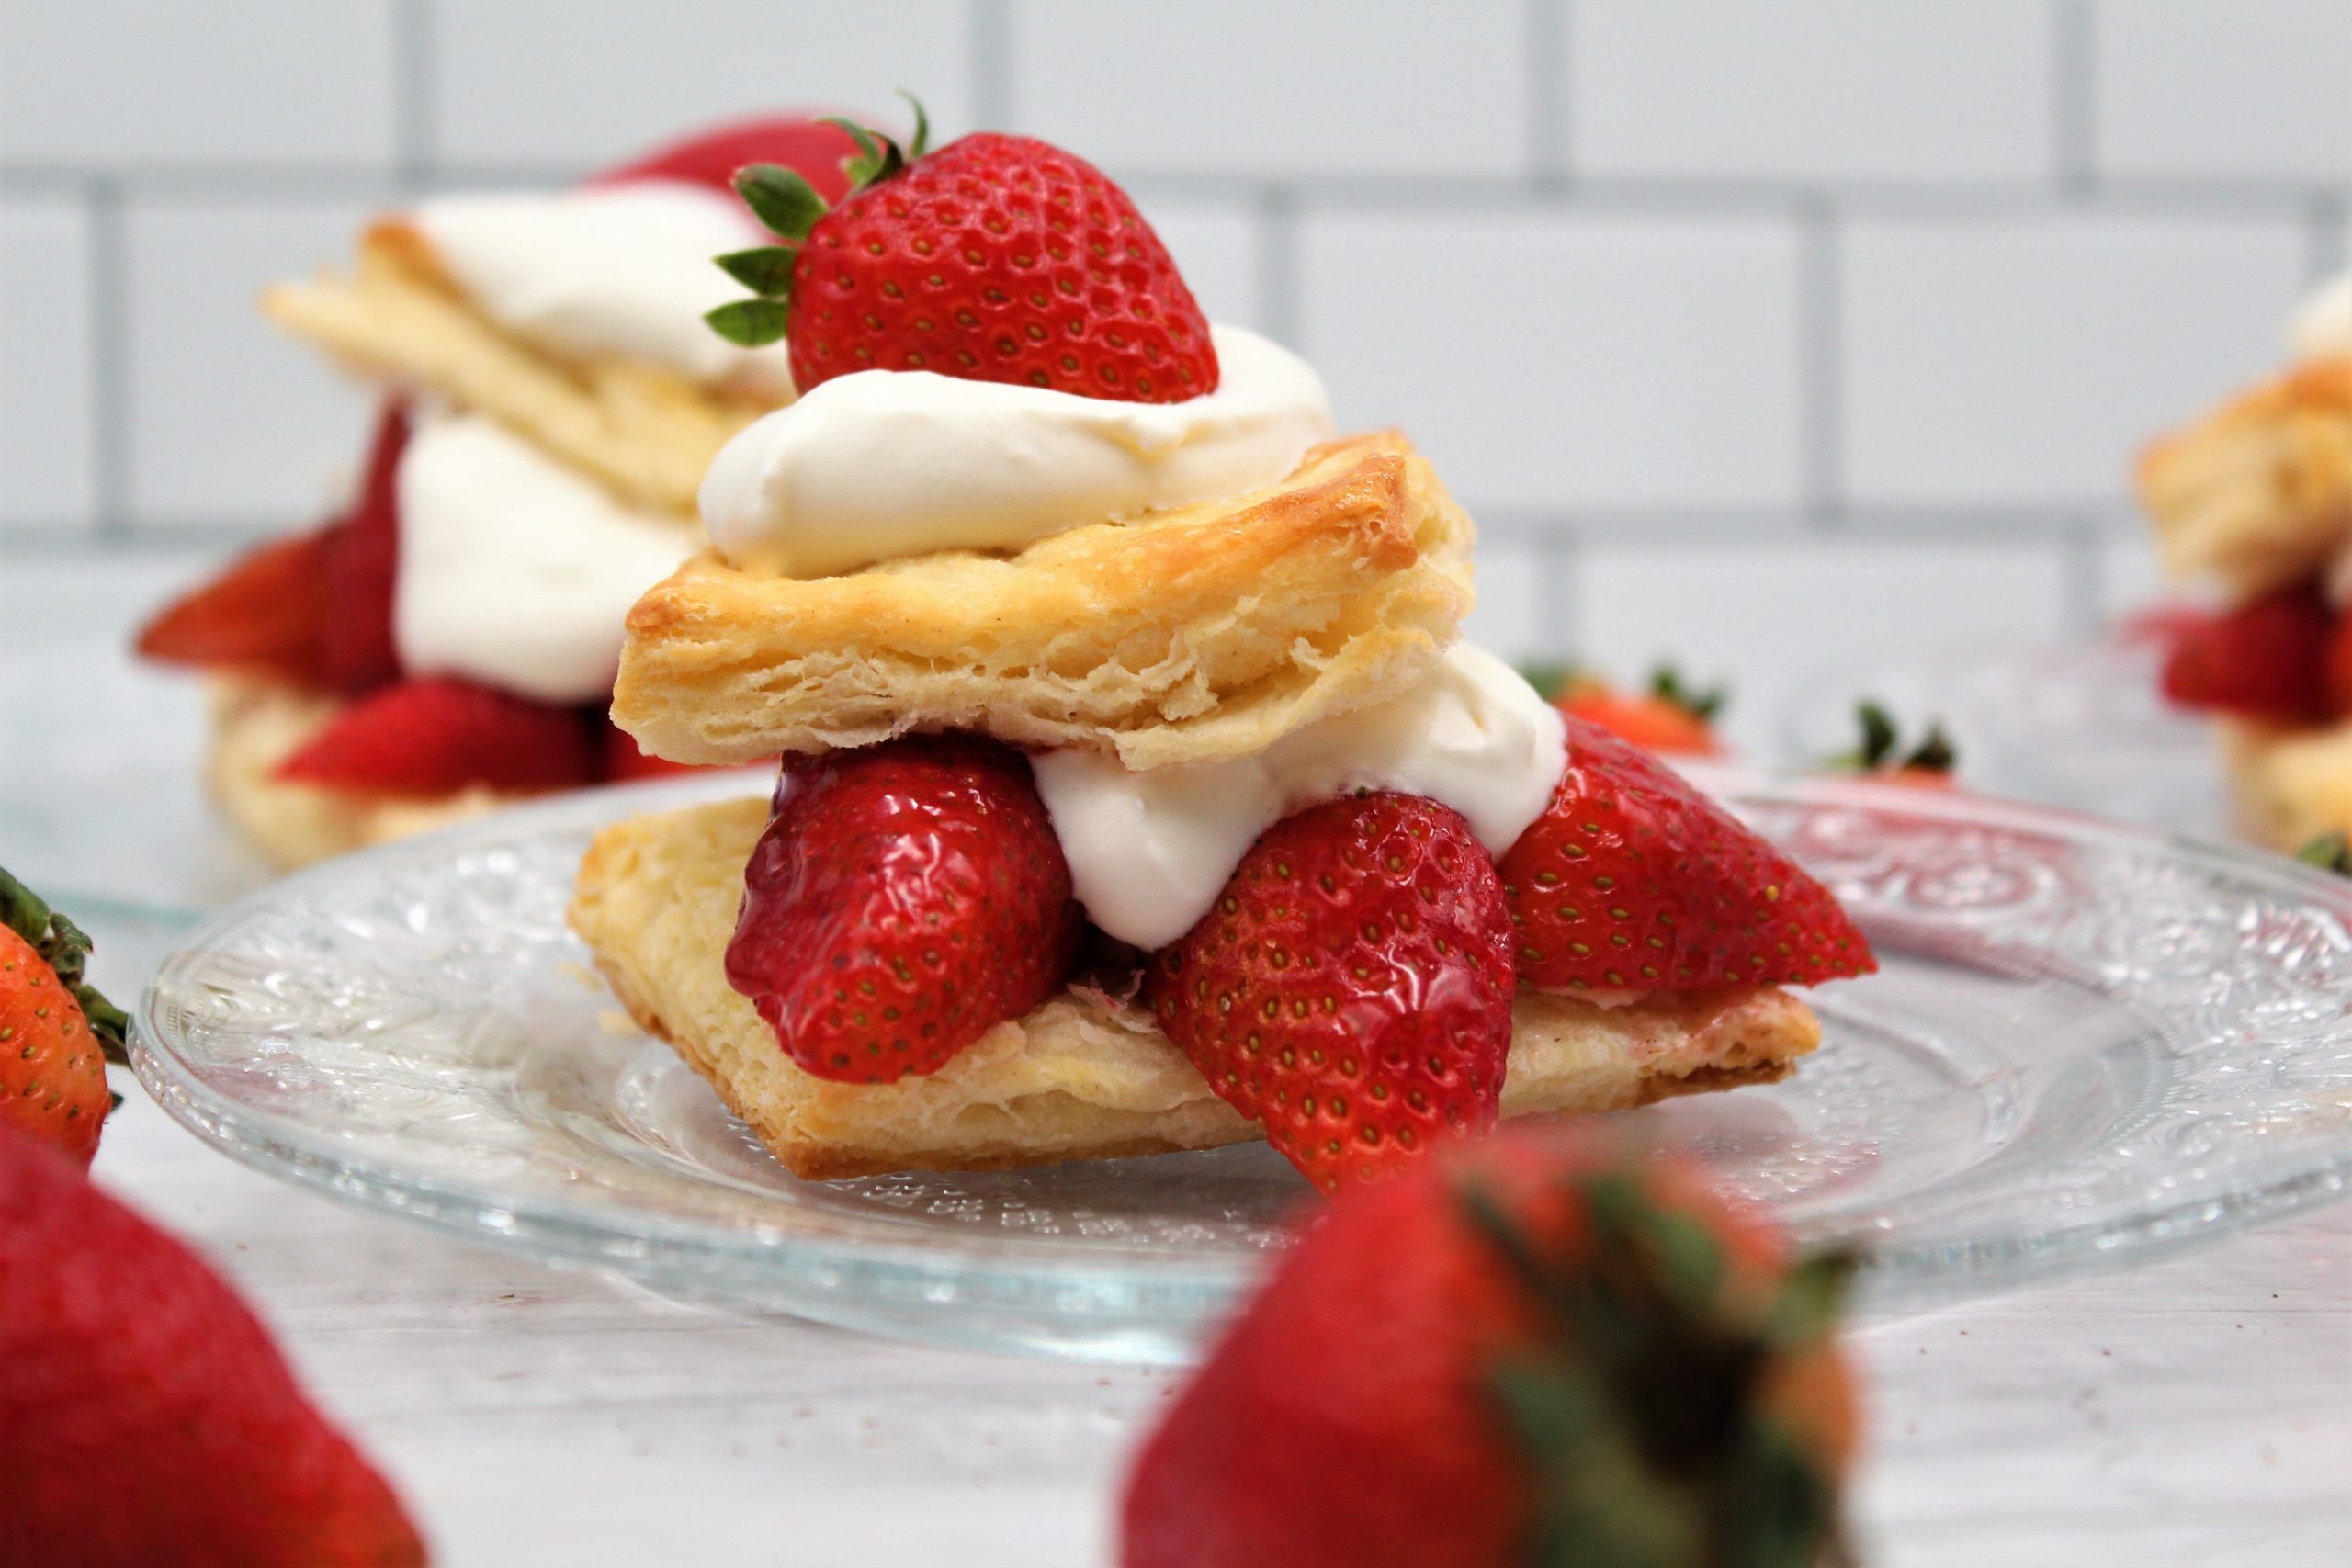
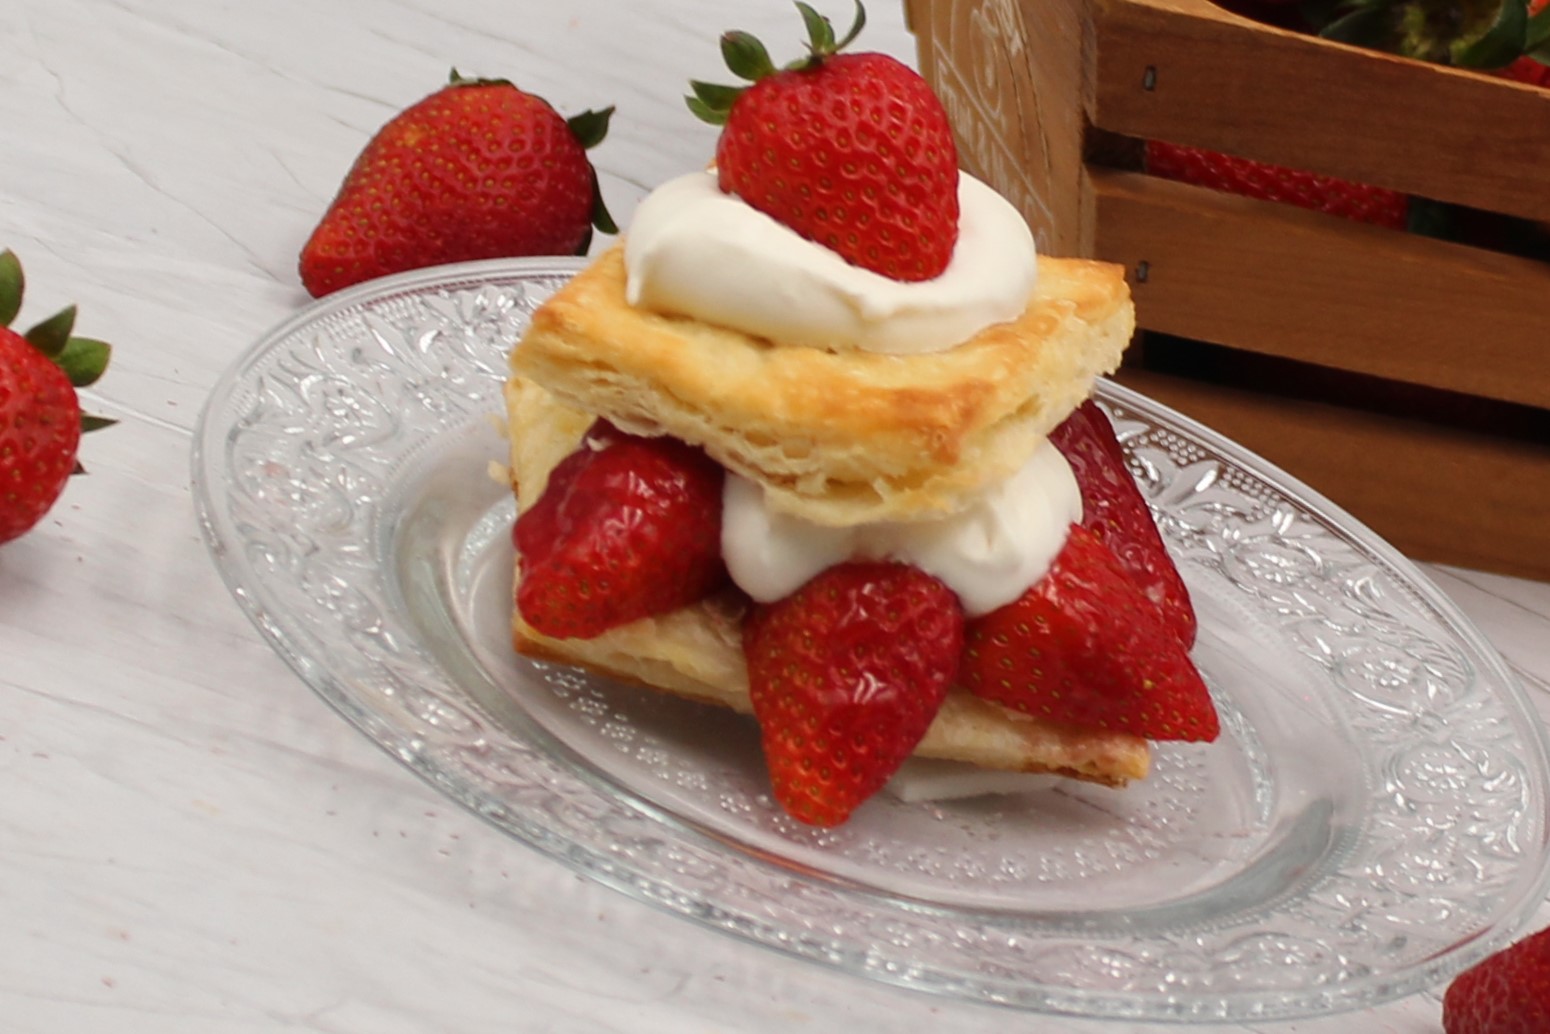
When I was a kid, strawberry shortcake consisted of store-bought yellow sponge cakes topped with overly sugared strawberries and topped with store brand cool whip.
It wasn’t until 30 years later when I was managing a hotel in Lafayette, Indiana, that I learned what a real strawberry shortcake was. At the hotel, I worked with one of the craziest, most hilarious people I have ever met, Devry Butcher, Butch for short. Butch and I had a blast together; although he was my boss, he was my friend and still is all these years later.
The hotel’s restaurant had a good following from people in the community. We had a chef that did a good job, but from time to time, Butch would decide he could do better.
When those moments came, Butch would leave his office at the opposite end of the hotel and walk with determination to the kitchen. Butch is a big guy, around six foot five. If Butch was coming, people moved out of his way.
When Butch was in his mood to cook for our guests, fear was palpable in the air from the kitchen staff; they knew that every pot and every pan would be used by the end of the night, and the kitchen declared a disaster zone. When he would decide that he was done cooking for the moment, Butch would stop in the middle of what he was doing and head back to his office without washing a single pan. Needless to say, I washed a lot of pots and pans during those days.
Butch is one of the best cooks I know. He has loved to cook his entire life, and he knows his way around a kitchen. He is creative and passionate, and as with everything in his life, Butch does it his way.
One night at the restaurant, we were scrambling for something to serve for dessert. He Butch heard about the dilemma and jumped to action. Immediately, he headed to the kitchen in his deliberate way. I had chills. What Butch came up with was his version of Strawberry Shortcake. His strawberry shortcake became the inspiration for mine.
I had not heard of buttermilk biscuits as a dessert, but once I tasted it, I was a believer, and so were our guests. Butch’s Strawberry Shortcake became a regular item in the restaurant, and this made Butch Very happy.
I hope Butch reads this blog and gives this recipe a try. If he does, he will change it up, you know, he has to do it his way. But, regardless, I won’t have to wash the pans! Thank you for everything Devry!
16tablespoonsunsalted butter, frozen for 30 minutes
1 1/4cupsbuttermilk, chilled
Strawberry Sauce ingredients
2poundsstrawberries, sliced
1/2cupsugar
12ouncejar of good quality strawberry preserves
1tablespoonfresh lemon juice
Whipped Cream ingredients
1cupcold heavy whipping cream
2tablespoonssugar
1/2teaspoonvanilla
Instructions
Biscuit instructions
Line rimmed baking sheet with parchment paper and set aside. Whisk flour, sugar, baking powder, baking soda, and salt together in a large bowl. Coat sticks of butter in flour mixture, then grate 7 tablespoons from each stick on large holes of a box grater directly into the flour mixture. Toss gently to combine. Set aside the remaining 2 tablespoons of butter.
Add buttermilk to flour mixture and fold with a spatula until just combined (dough will look dry). Transfer dough to liberally floured counter. Dust surface of dough with flour; use your floured hands and press dough into a rough 7-inch square.
Roll dough into 12 by 9-inch rectangle with the short side parallel to the edge of the counter. Starting at the bottom of the dough, fold into thirds like a business letter, using a bench scraper or metal spatula to release the dough from the counter. Press top of dough firmly to seal folds. Turn dough 90 degrees clockwise. Repeat rolling into 12 by 9-inch rectangle, folding into thirds, and turning clockwise 4 more times, for a total of 5 sets of folds. After the last set of folds, roll dough into 8 1/2-inch square about 1 inch thick. Transfer dough to prepared sheet, cover with plastic wrap and refrigerate for 30 minutes. Adjust oven rack to upper-middle position and heat oven to 400 degrees.
Transfer dough to a lightly floured cutting board. Using a sharp, floured chef’s knife, trim 1/4 inch of dough from each side of the square and discard. Cut remaining dough into 9 squares, flouring knife after each cut. Arrange biscuits at least 1 inch apart on sheet. Melt reserved butter; brush tops of biscuits with melted butter.
Bake until tops are golden brown, 22 to 25 minutes, rotating sheet halfway through baking—transfer biscuits to wire rack and let cool for 15 minutes before serving.
Strawberry Sauce Instructions
cut strawberries and add sugar. Let it sit for 1 to two hours to pull the juices from the berries.
drain strawberries and reserve the liquid.
puree the strawberry preserves in a food processer until smooth. note: preserves will become cloudy.
In a medium pan, cook preserves over medium high heat until the mixture becomes clear.
add reserved strawberry/sugar liquid and lemon juice.
allow to cool on the counter.
add strawberries and serve.
Whipped Cream
Place mixer bowl and whisk in freezer for at least 20 minutes to chill.
Pour heavy whipping cream, sugar and vanilla into the cold bowl and whisk on high speed until medium to stiff peaks form, about 1 minute.
Do not over beat.
Plating instructions
Pull biscuit apart, rather then slicing to maintain layers.
Pour strawberries on top of the bottom biscuit, and top with whipped cream.
add top biscuit followed by strawberry sauce and top with whipped cream.
I was talking to my friend Victor about upcoming ideas I had for this website. I usually have a list of recipes I am working on and dates I will post them live to my blog. When it comes to special occasions and holidays, I like to post a recipe to celebrate that event. Victor asked about my plan for Cinco de Mayo. At that moment, I did not have any plans for a Cinco de Mayo post.
Victor was born in Mexico, and there was no better person to help me decide on the perfect dessert. He said that, hands down, I should make a Tres Letches Cake.
Never having a Tres Letches Cake, I had a lot of questions. Victor said that a traditional cake has three kinds of milk soaked in a fluffy yellow cake. Victor also said that it must have fruit on top. So I started researching Tres Letches Cake recipes and found a whole new world! There are hundreds of recipes, and most are traditional, the way Victor likes his cake. However, I opted for something new and different, and that is how the Cereal Milk Tres Letches Cake was born.
Who doesn’t love the milk leftover from a bowl of cereal? Now you can have that taste in a cake. This recipe makes a fantastic tres latches cake. It is sweet, moist, and so satisfying.
I missed my deadline to post this cake for Cinco de Mayo, but who needs a holiday to enjoy a cake this delicious? As far as the strawberries, Victor can add them to this cake and make it his own. Thank you for the idea, Victor. Eres la Mejor!
You’ll love this special tres leches cake recipe! Cereal milk tres leches is sweet, creamy, and a perfect make-ahead cake for your next celebration.
Course
Dessert
Cuisine
Mexican
Keyword
Cereal Milk Tres Leches Cake
Prep Time30minutes
Cook Time20minutes
Servings12servings
AuthorDoug Bakes Staff
Ingredients
Ingredients for cereal
3 1/2ouncescornflakes
2ouncessugar
2 1/2ouncesmelted butter
pinch of salt
6ouncesevaporated milk
9ouncescondensed milk
6tablespoonswhole milk
Cake Ingredients
3eggs, separated
3 1/2ouncessugar
3ouncesflour
1teaspoonbaking powder
1/4teaspoon salt
2tablespoonswhole milk
1teaspoonvanilla
1 1/20uncessugar (for egg whites)
Whipped Cream Ingredients
1 cup heavy cream
1/4 cuppowdered sugar
1/2teaspoonvanilla
Instructions
Cereal Milk Instructions
Preheat oven to 275 degrees
In a large bowl, mix cereal, sugar ,salt, and melted butter together.
Spread cereal mixture in a single layer on a baking sheet.
Bake for ten mins, stirring after five mins.
Allow to cool for five mins.
While the cornflakes cool, in a medium bowl, mix together the evaporated mile, condensed milk, and the whole milk and set aside.
pour still warm pour half of the cornflakes into a medium bowl.
pour milk mixture over the cornflakes, ensuring that all of the cereal is coated.
cover and refrigerate for two hours up to over night.
Cake instructions
preheat oven to 350 degrees
grease only the bottom of a 9 x 12 baking dish and set aside.
separate egg yolks and whites into two bowls.
add sugar to the egg yolks and mix with a hand mixer until light yellow and fluffy.
add flour, baking powder, and salt. stir together to make a paste.
add one teaspoon of milk and vanilla to the mixture, and stir to combine, and set aside.
in a medium bowl, whip egg whites to soft peaks.
continue beating while slowly adding sugar.
beat until stiff peaks
fold whipped egg whites slowly into cake batter.
pour mixture into prepared dish and make sure the top is smooth.
bake for 25 mins until a toothpick comes out clean.
do not remove the cake from the oven, turn off the oven and crack the oven door and allow the cake to cool slowly. remove after 10 mins
using a fork, pierce cake repeatedly to allow the the milk to settle once poured on the cake, and set aside.
remove the cereal/milk mixture from the refrigerator, and drain through a fine mesh sieve. squeeze cornflakes to get as much milk from them as you can. discard cornflakes once drained.
pour cereal milk evenly over the cake.
wrap cake in plastic wrap and refrigerate 2 hours unto over night.
whipped Cream Instructions
In a cold bowl from a stand mixer, add cream, powdered sugar, and vanilla and beat on high until stiff peaks.
Add whipped cream to the center of the cake and spread to sides, ending in a smooth top.
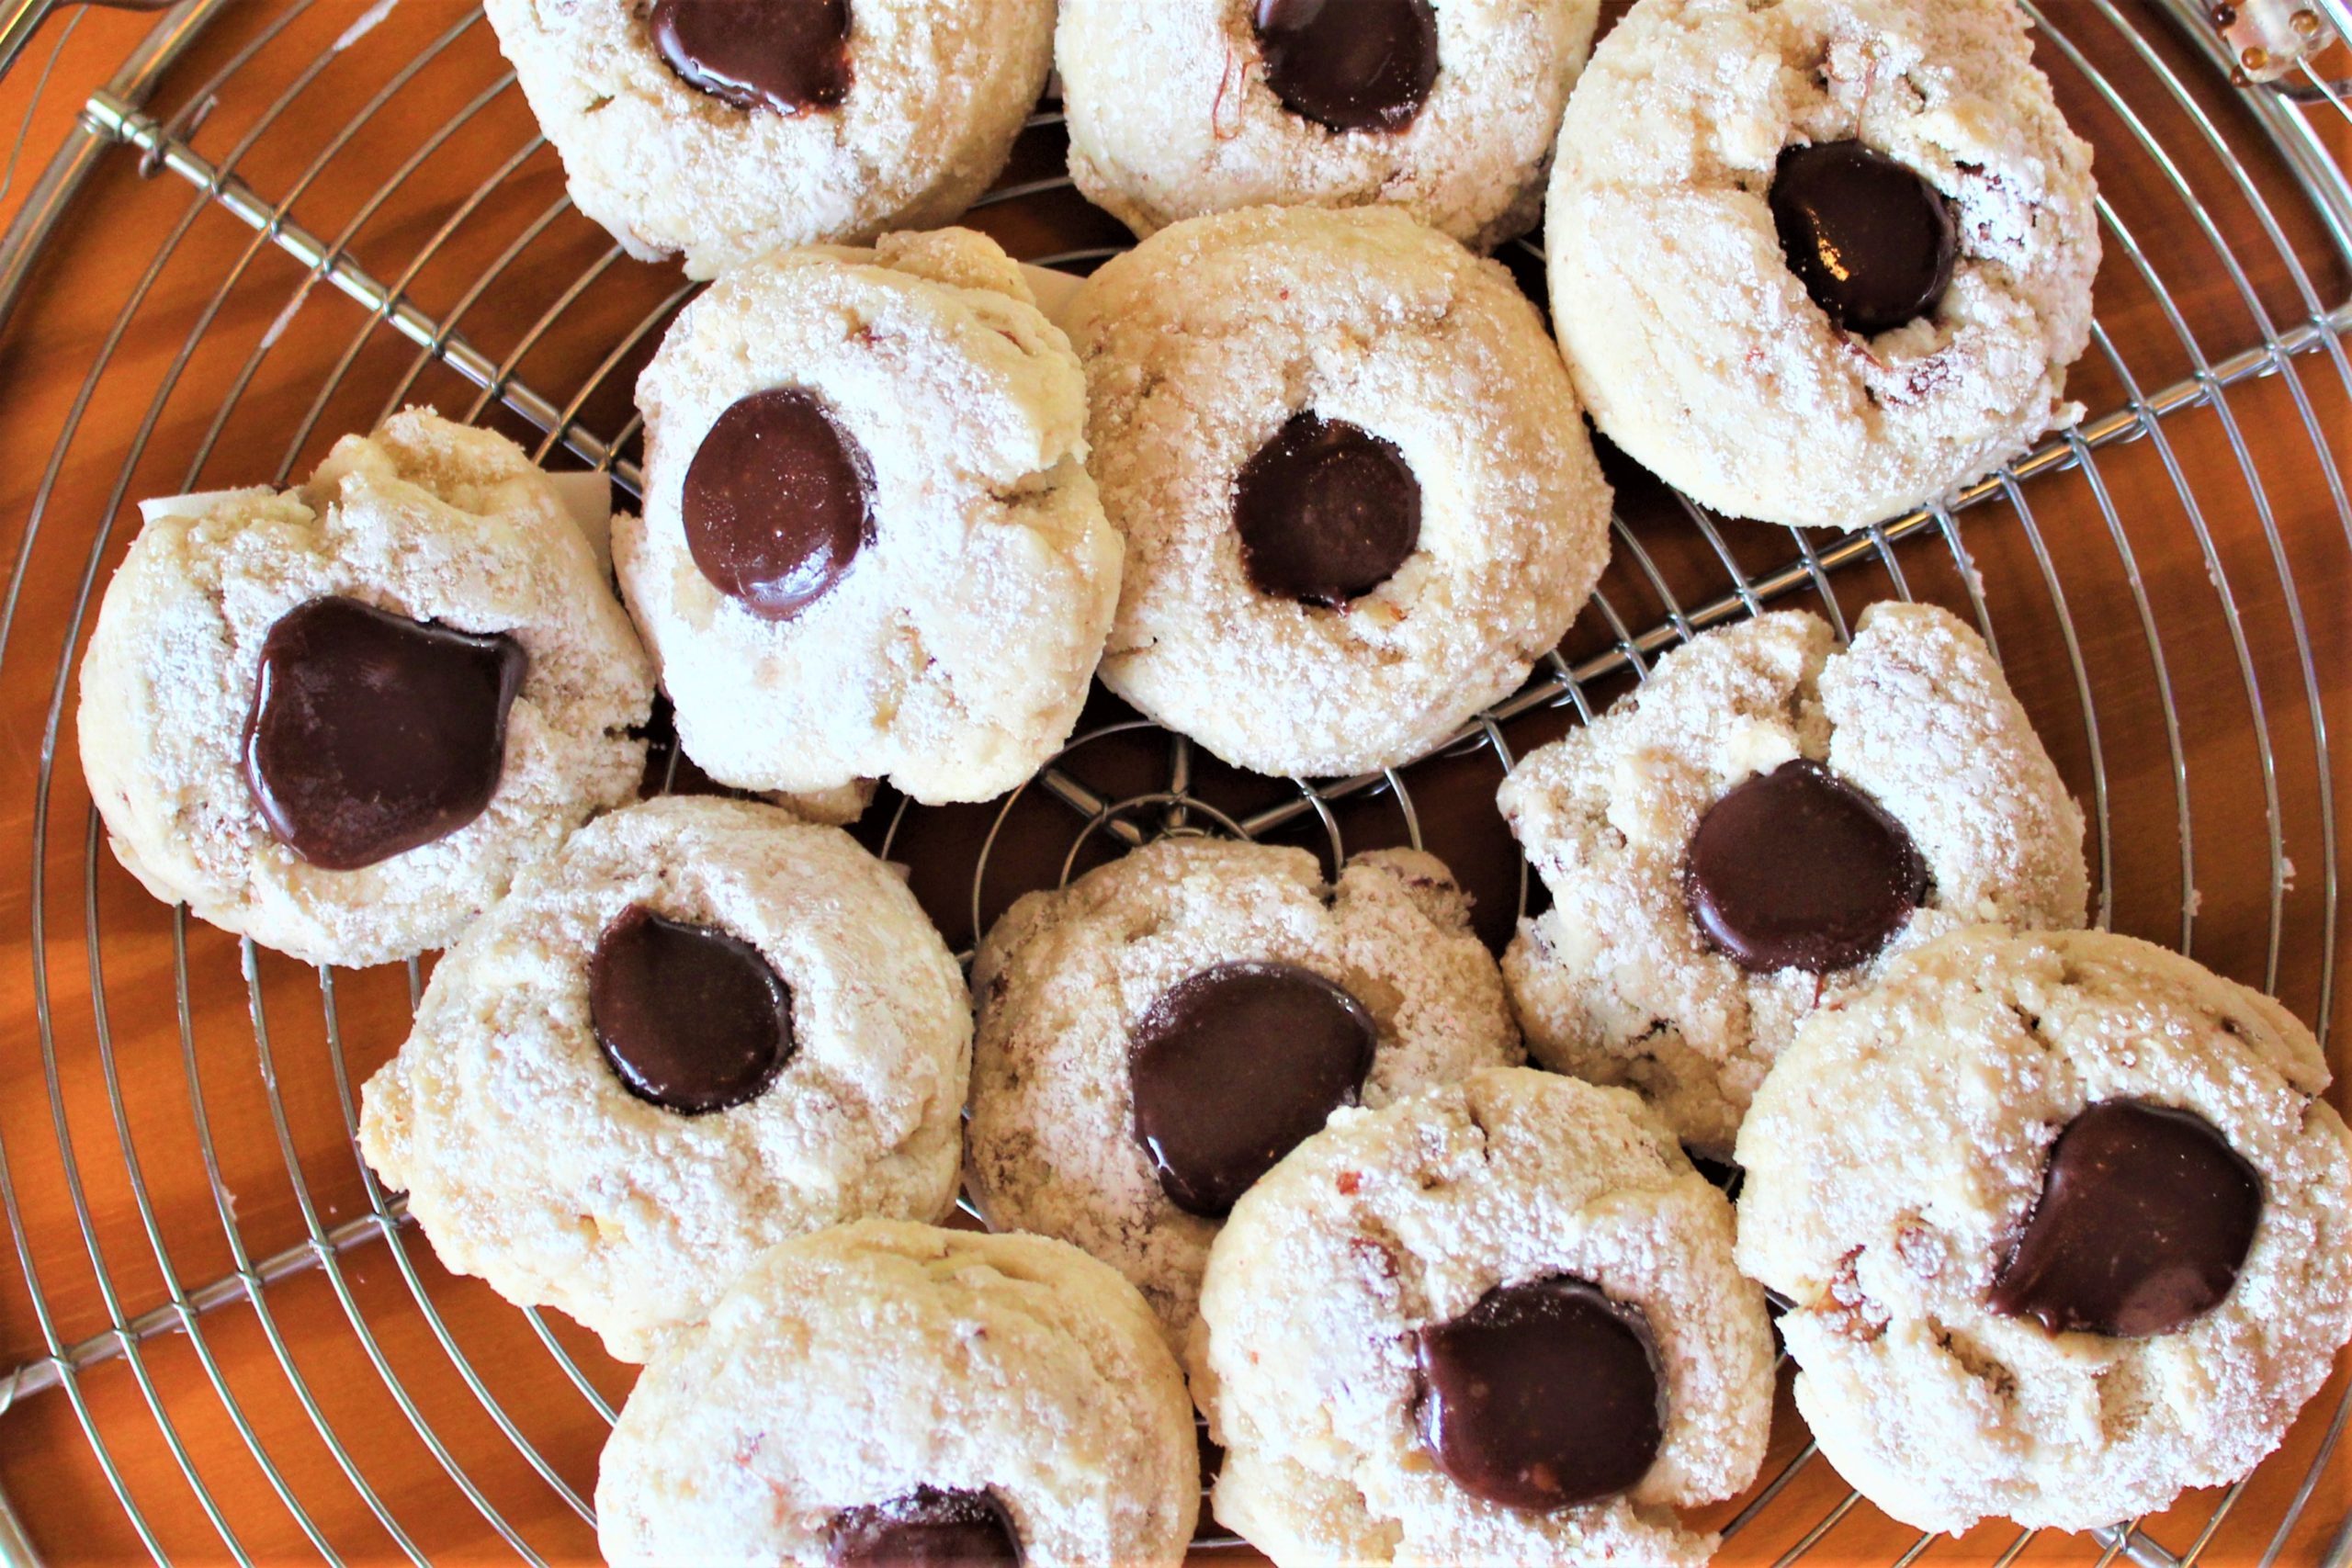
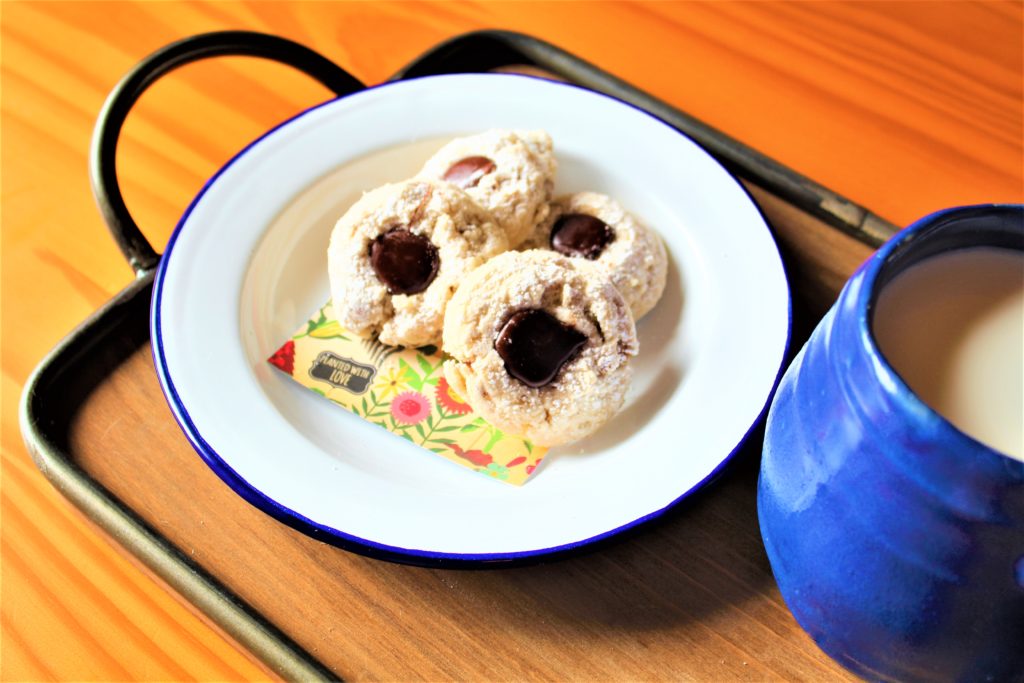
My White Chocolate, Cherry, and Pistachio Cookies are unlike any cookie you have had. The cookie is soft, moist, and packed with flavor. The white chocolate is smooth and creamy. The cherries add a sweet note that comes through nicely, and the pistachios provide a unique texture and saltiness that ties this cookie together.
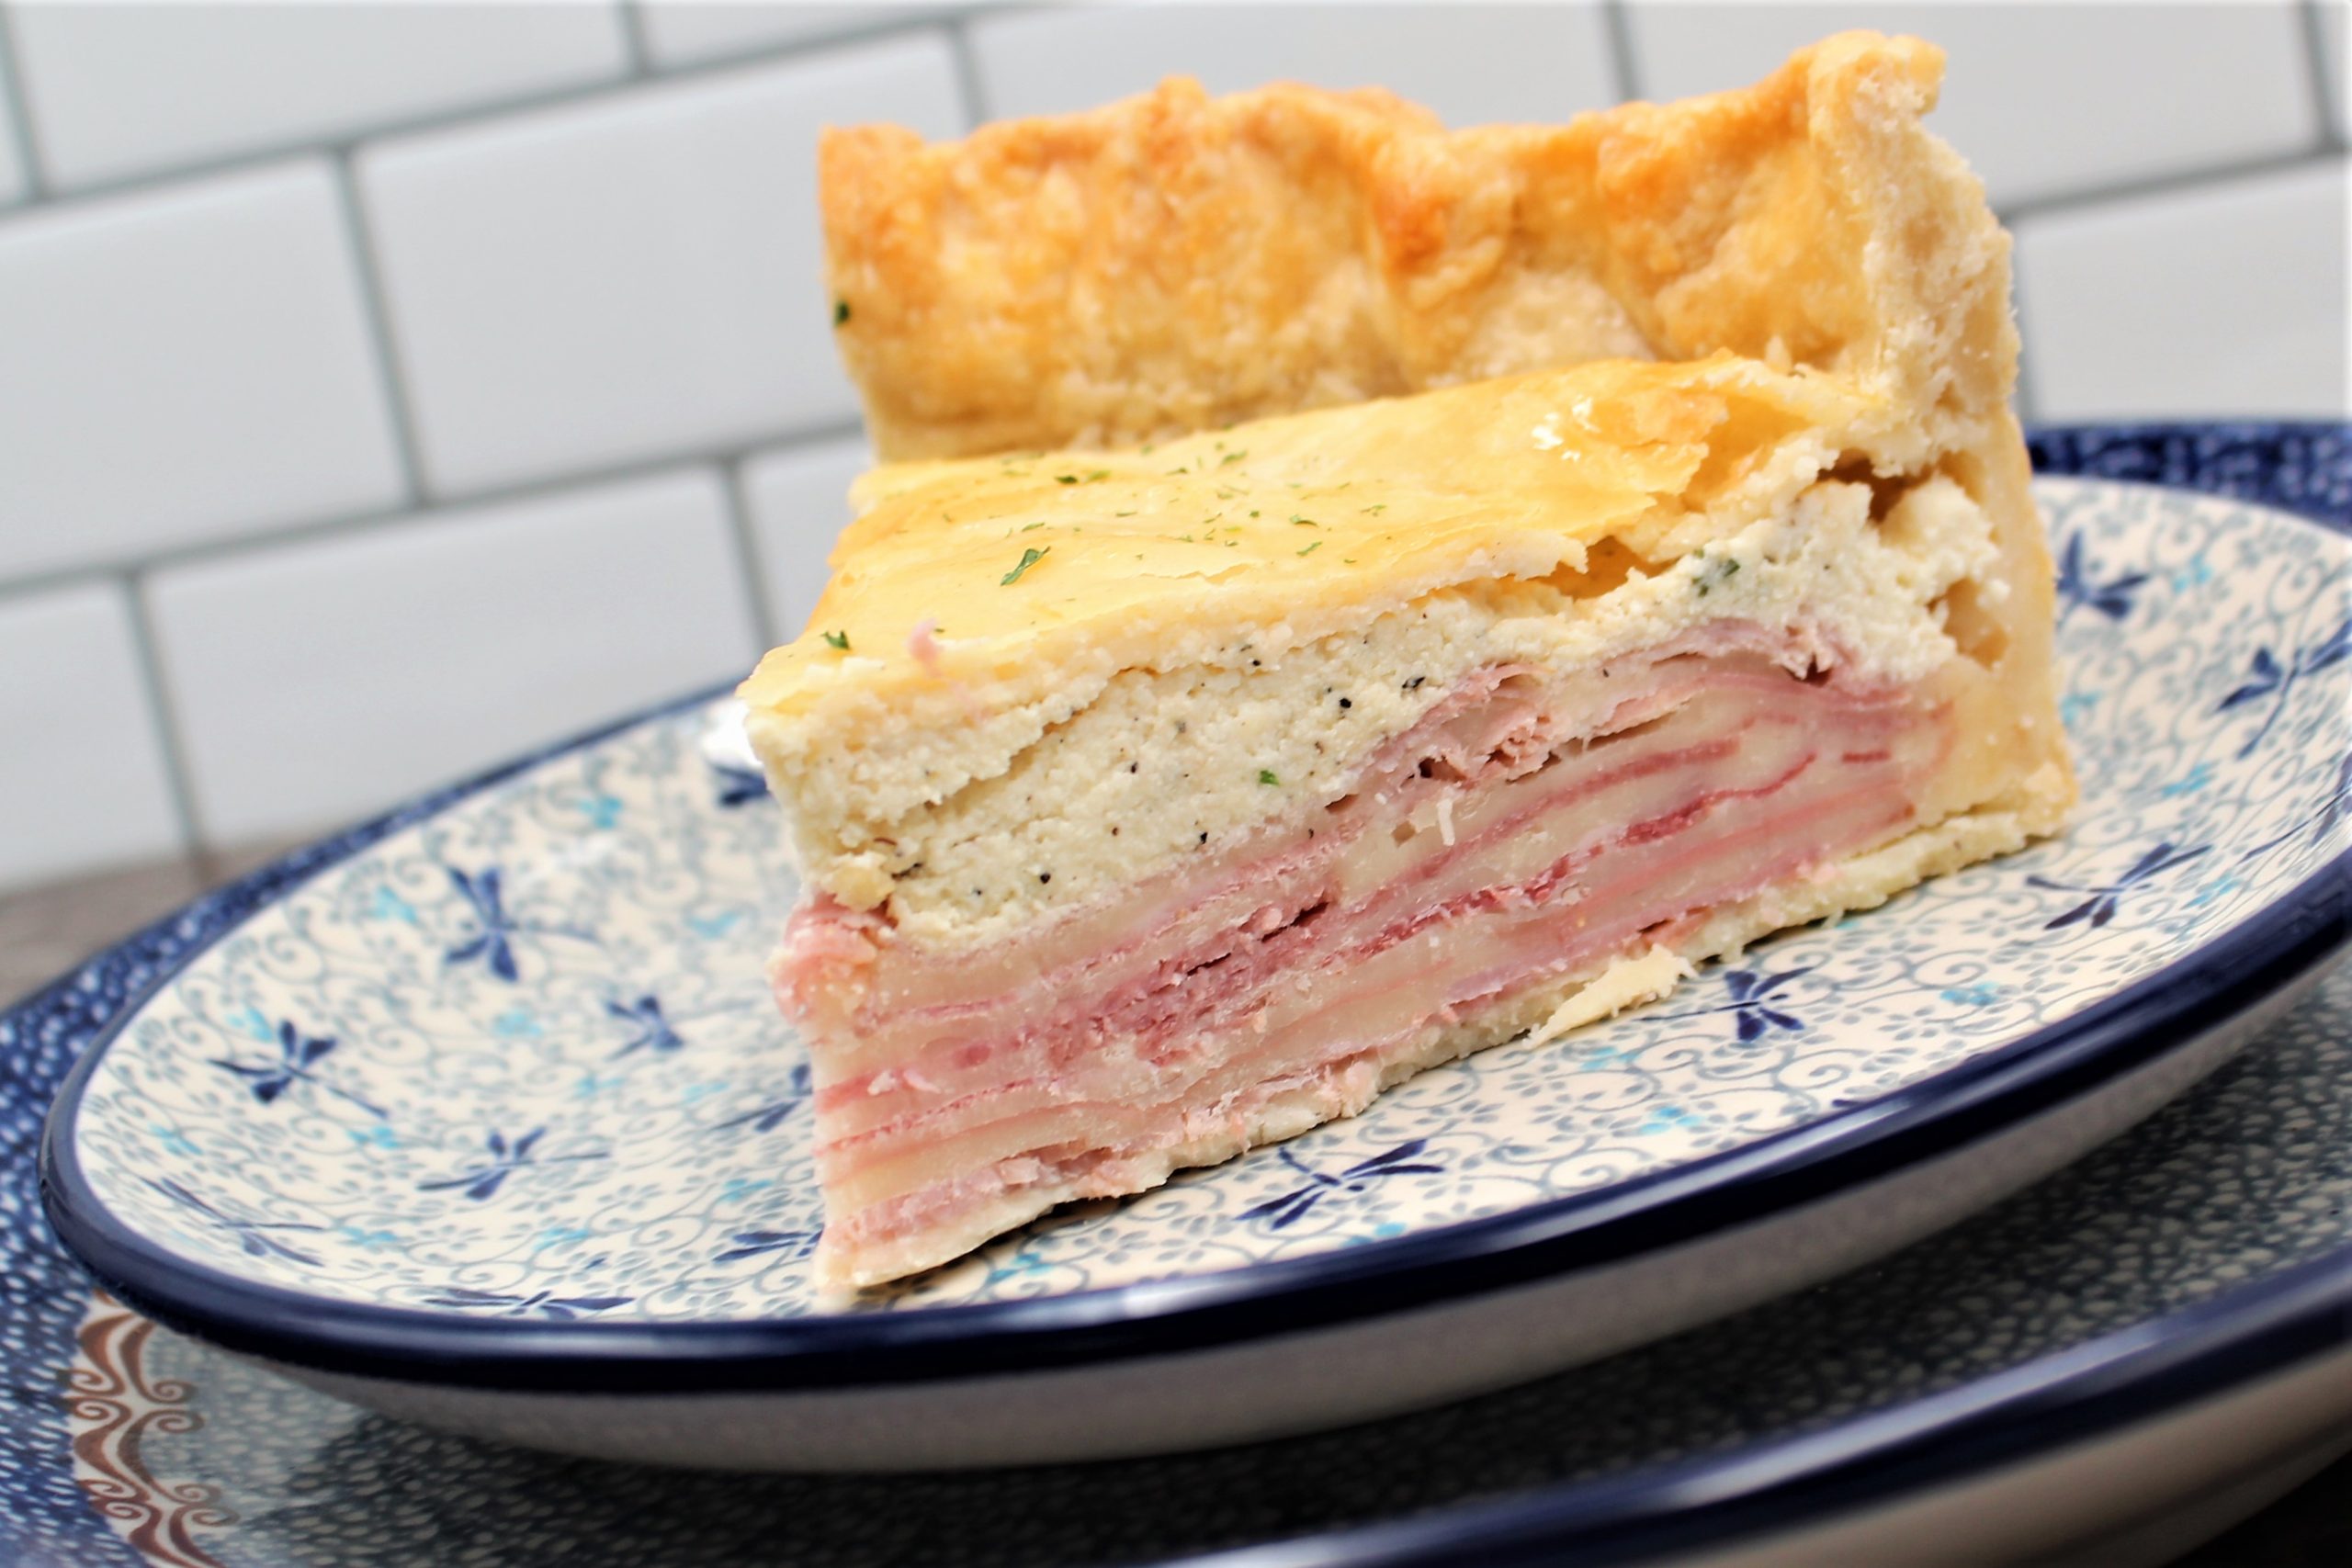
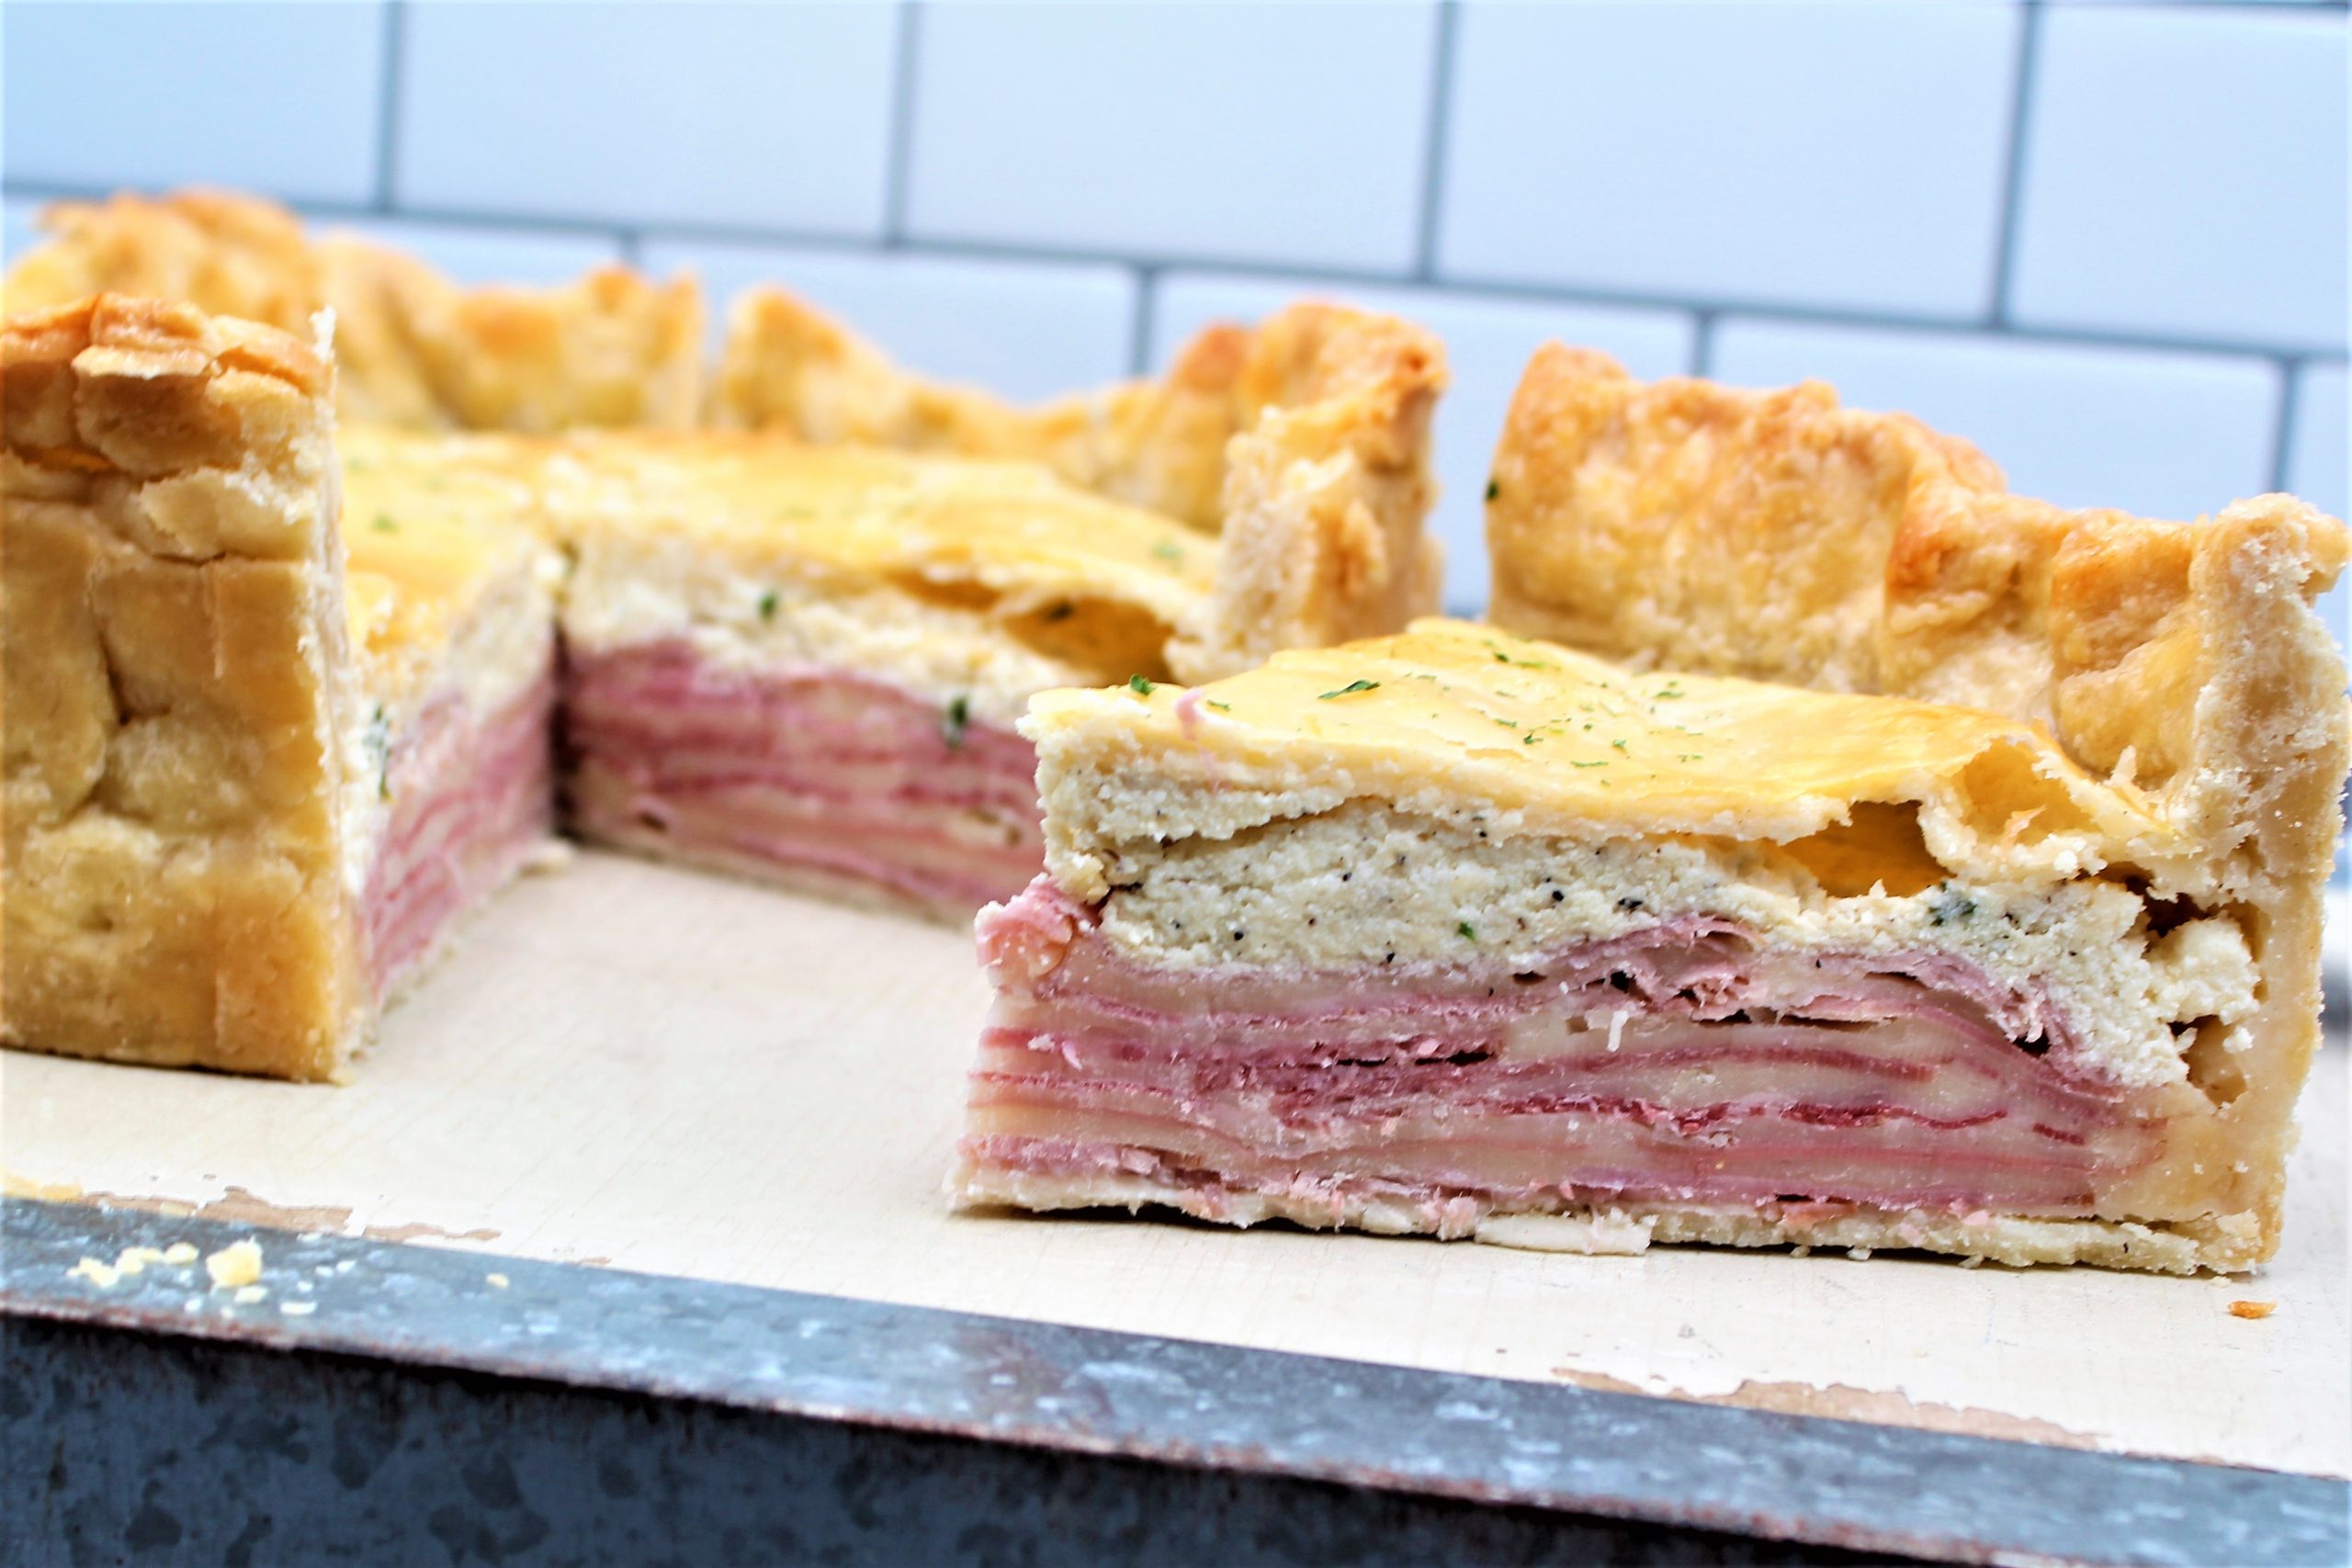
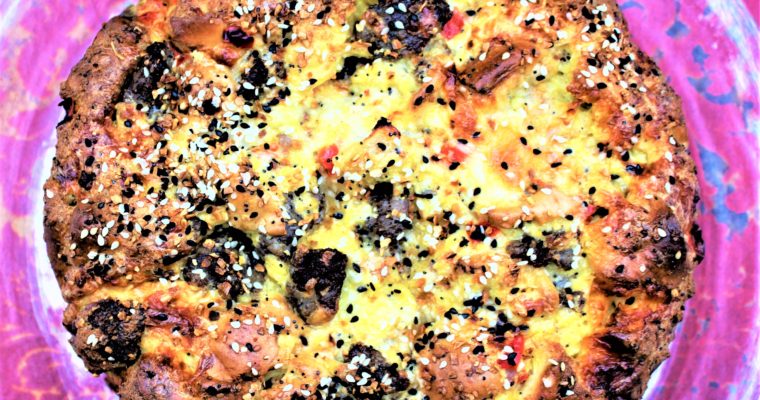
Pizza Rustica, Pizzagaina, or Pizza Chiena) is an Italian pie, unlike any pizza you have ever tried. Don’t look for tomato sauce; this filled pizza is a cheese and Italian meat pie with a pizza crust. With distinctive layers, this pie is perfect for lunch or dinner.
Pizza in Italian means pie. That’s why this pizza doesn’t look like any pizza you’ve had before. Pizza Rustica is also known as an Italian Easter Pie. There are many variations, and I am sure they are all delicious, this recipe is my favorite.
Pizza Rustica is a show stopper. It is a large, tall pie that once cut open to reveal the many layers of salami, ham, ricotta, provolone, all the other meats, and cheese, baked in a flaky crust. Everyone will be impressed, for sure.
Pizza Rustica is so easy to make that you will find yourself making it for not only Easter but for a weeknight dinner.
Pizza Rustica, Pizzagaina, or Pizza Chiena) is an Italian pie, unlike any pizza you have ever tried. Don't look for tomato sauce; this filled pizza is a cheese and Italian meat pie with a pizza crust. With distinctive layers, this pie is perfect for lunch or dinner.
In a large bowl, sprinkle yeast over 1 cup of warm water, stir well, and let proof for 5 to 10 minutes, or until foamy. Add the remaining 1 1/2 cups water and mix well.
In another bowl, mix 5 cups of the flour with the salt. Add to the yeast mixture along with 1 teaspoon of olive oil. Mix with hands, adding additional flour if necessary, until a soft, and no longer sticky dough is formed
Turn the dough out onto a floured surface and knead it until smooth and elastic. Lightly grease a large bowl with 1 teaspoon of olive oil, add the dough, and turn to coat. Cover tightly with plastic wrap and let rise in a warm place until doubled in bulk.
Preheat the oven to 375ºF
Brush the bottom and sides of a 10X3 inch springform pan with the remaining 1 1/2 teaspoons olive oil.
Punch down the dough and knead it on a floured surface for 3 or 4 minutes.
Divide the dough in half. On a floured surface, roll one piece of the dough round at least 2 inches larger than the pan. Fit the dough in the pan, stretching it up the sides so that it overhangs the rim.
Fill the pan with alternating layers of the sliced cheeses and meats (you should have 9 or 10 layers).
In a bowl, whisk together the eggs, Parmigiano-Reggiano cheese, parsley, and salt and pepper. Pour the mixture evenly over the cheese and meat.
Place the dough over the filling and seal the edges by pinching them closed and rolling the seam underneath itself.
Brush the top of the pie evenly with the egg wash. Bake for 35 to 40 minutes or until the crust is nicely browned. Remove from the oven and let cool completely.
My Stuffed Pork Loin is a perfect recipe for a weeknight dinner.
Don’t be intimidated by the presentation. It takes a little prep, but you can be serving this fantastic Pork Loin in no-time.
My potsticker recipe consists of fresh ground pork with cabbage and seasonings wrapped in a light dough and cooked until golden brown. My recipe is an easy way to make this classic at home.
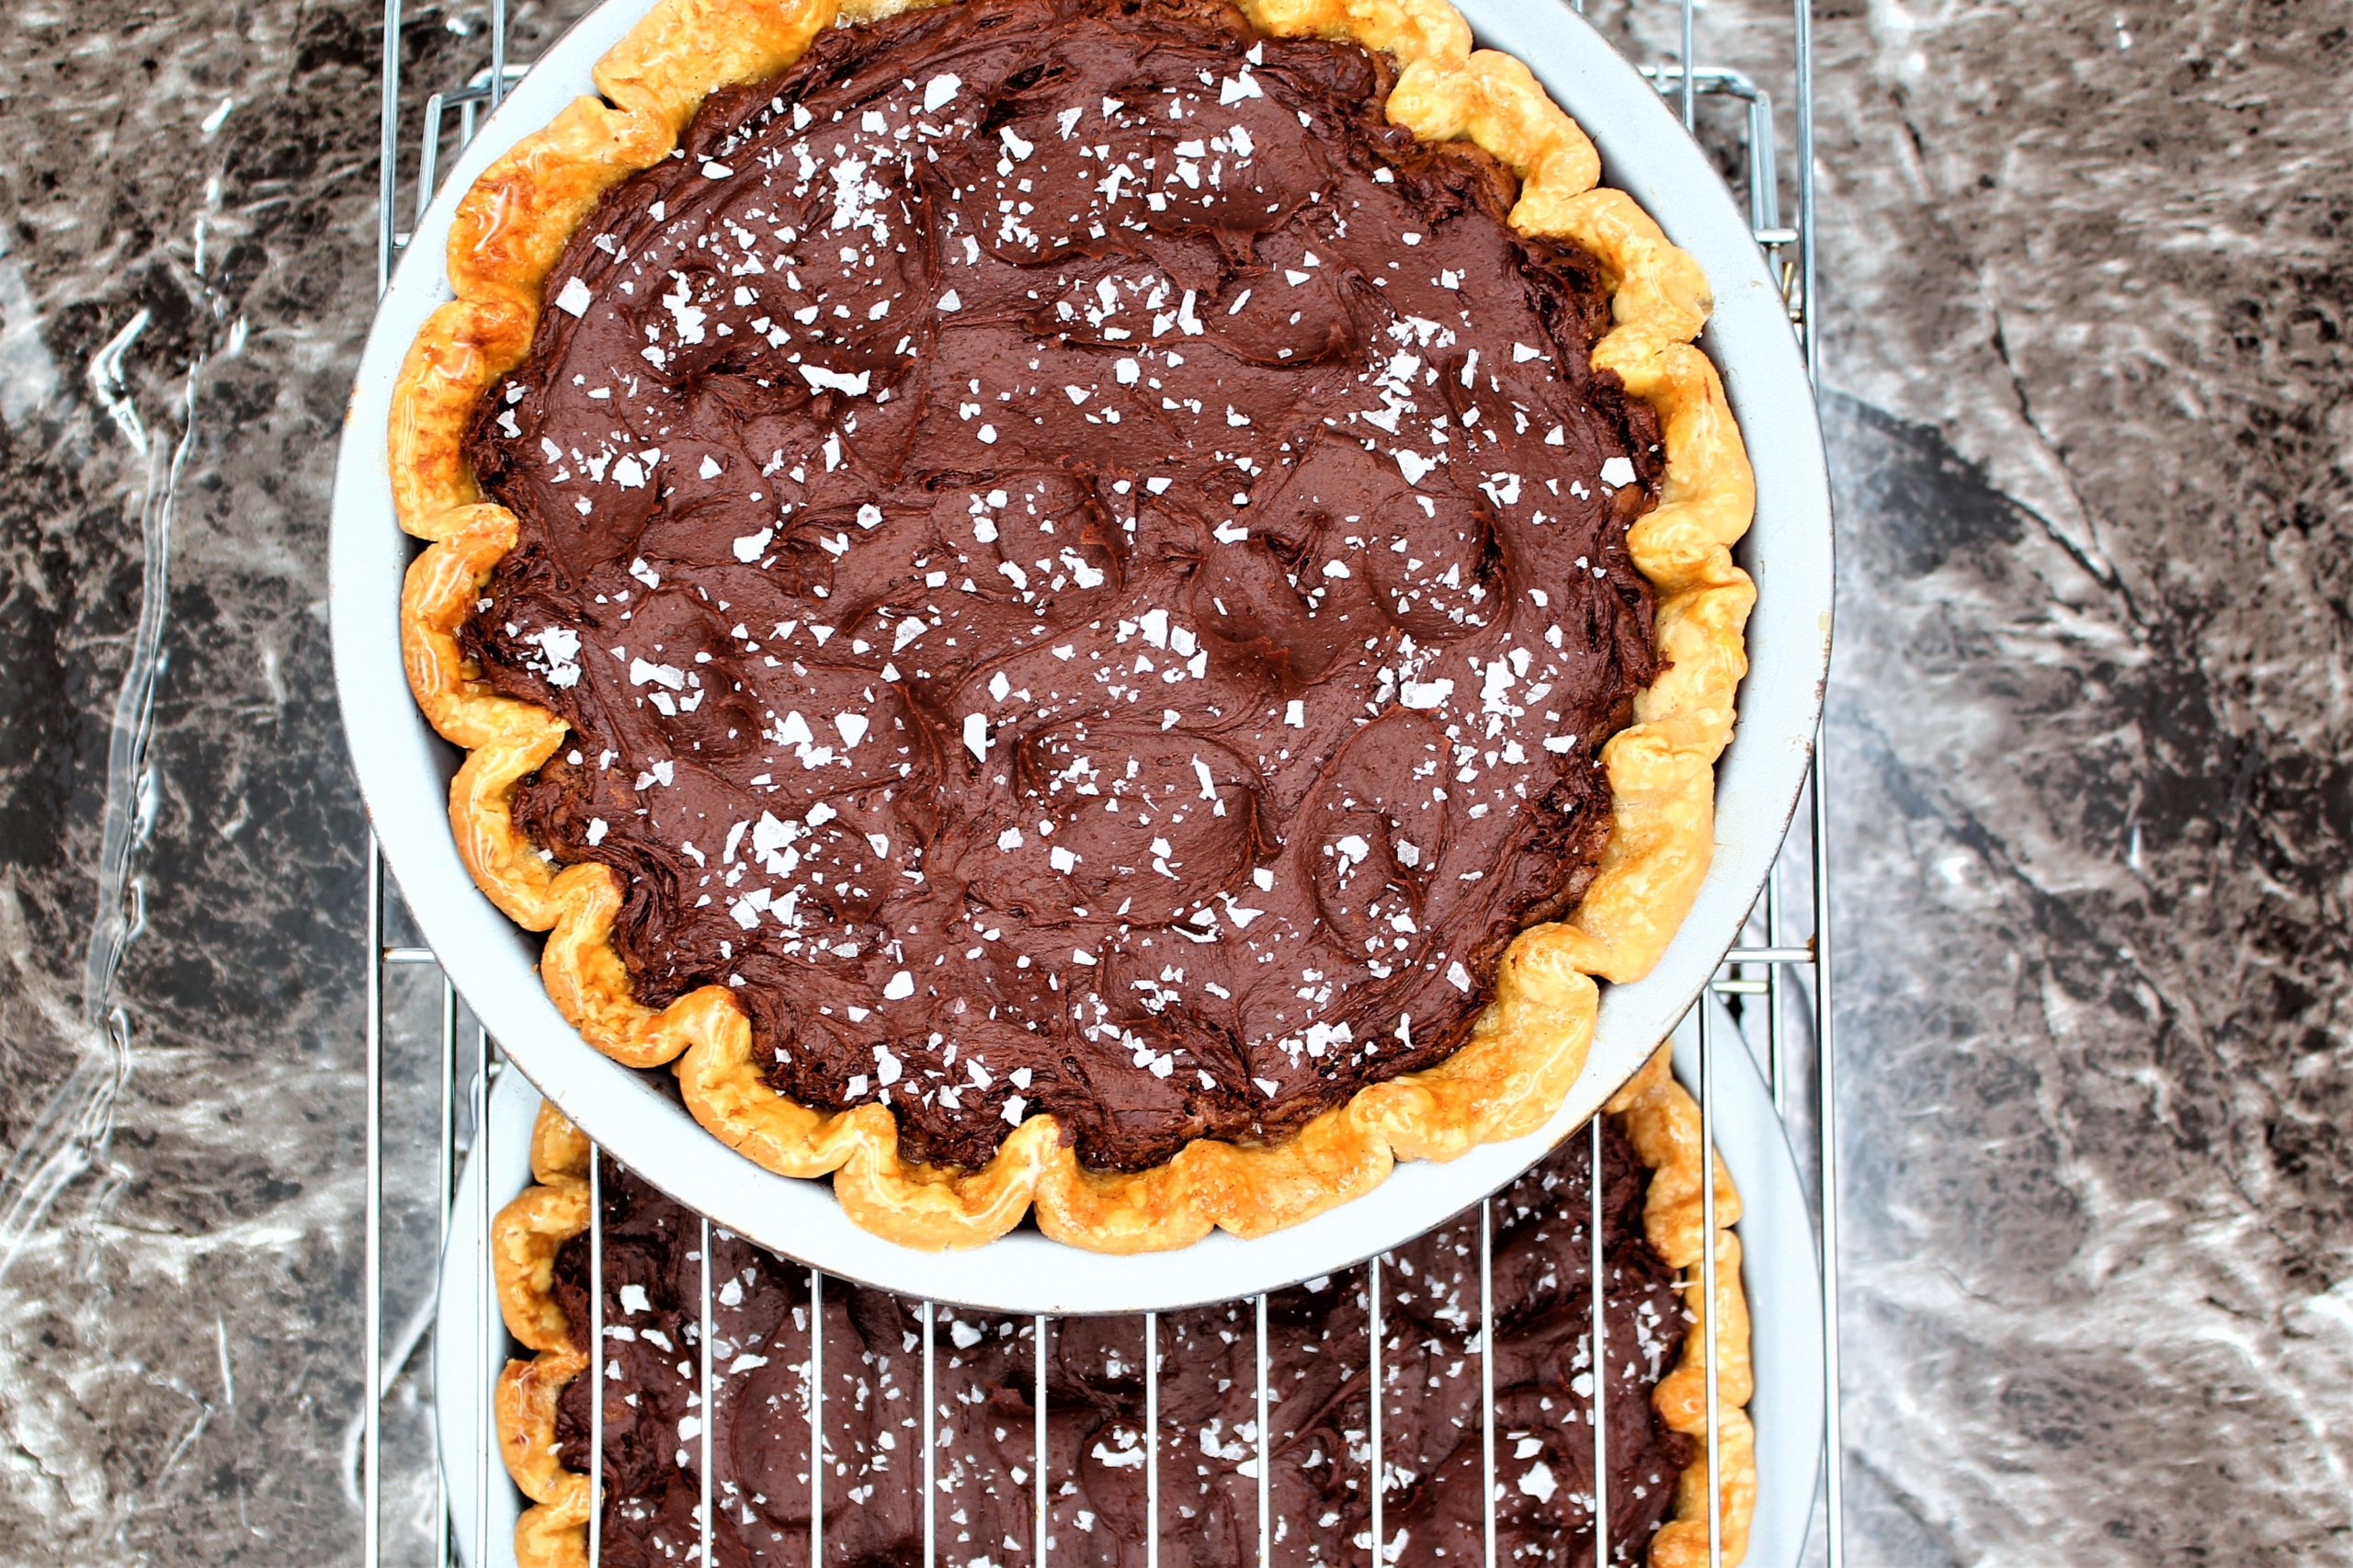
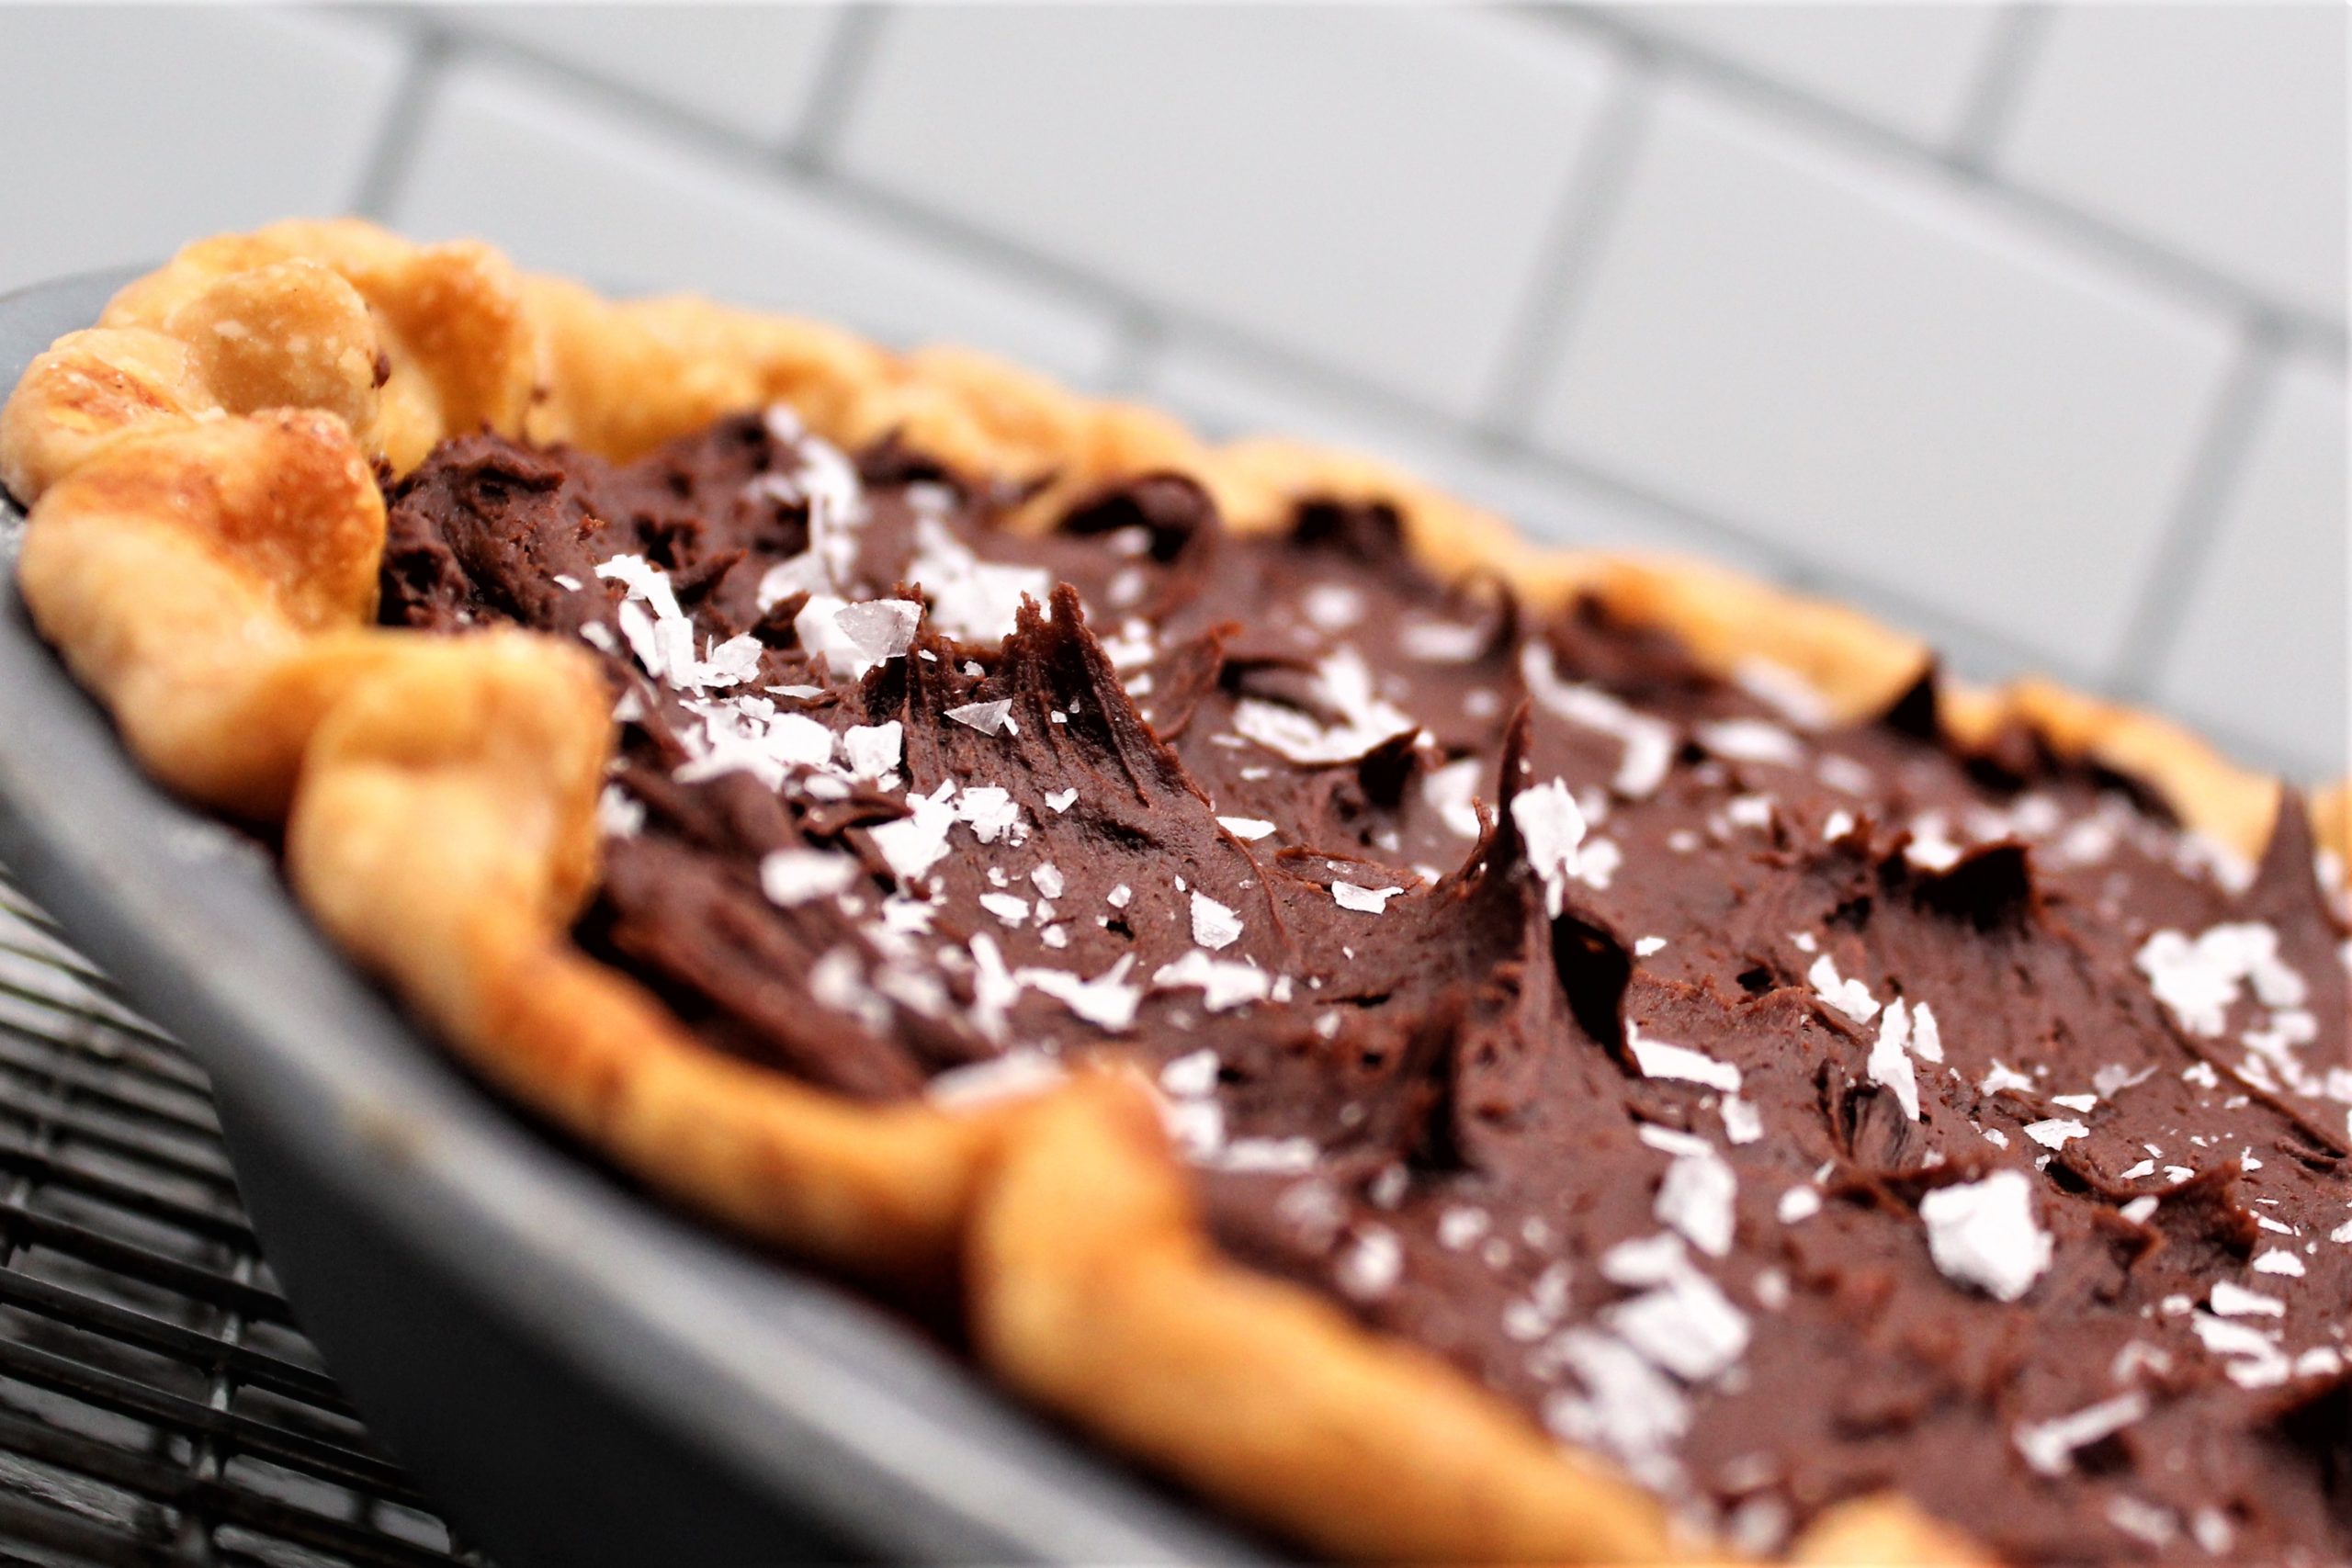
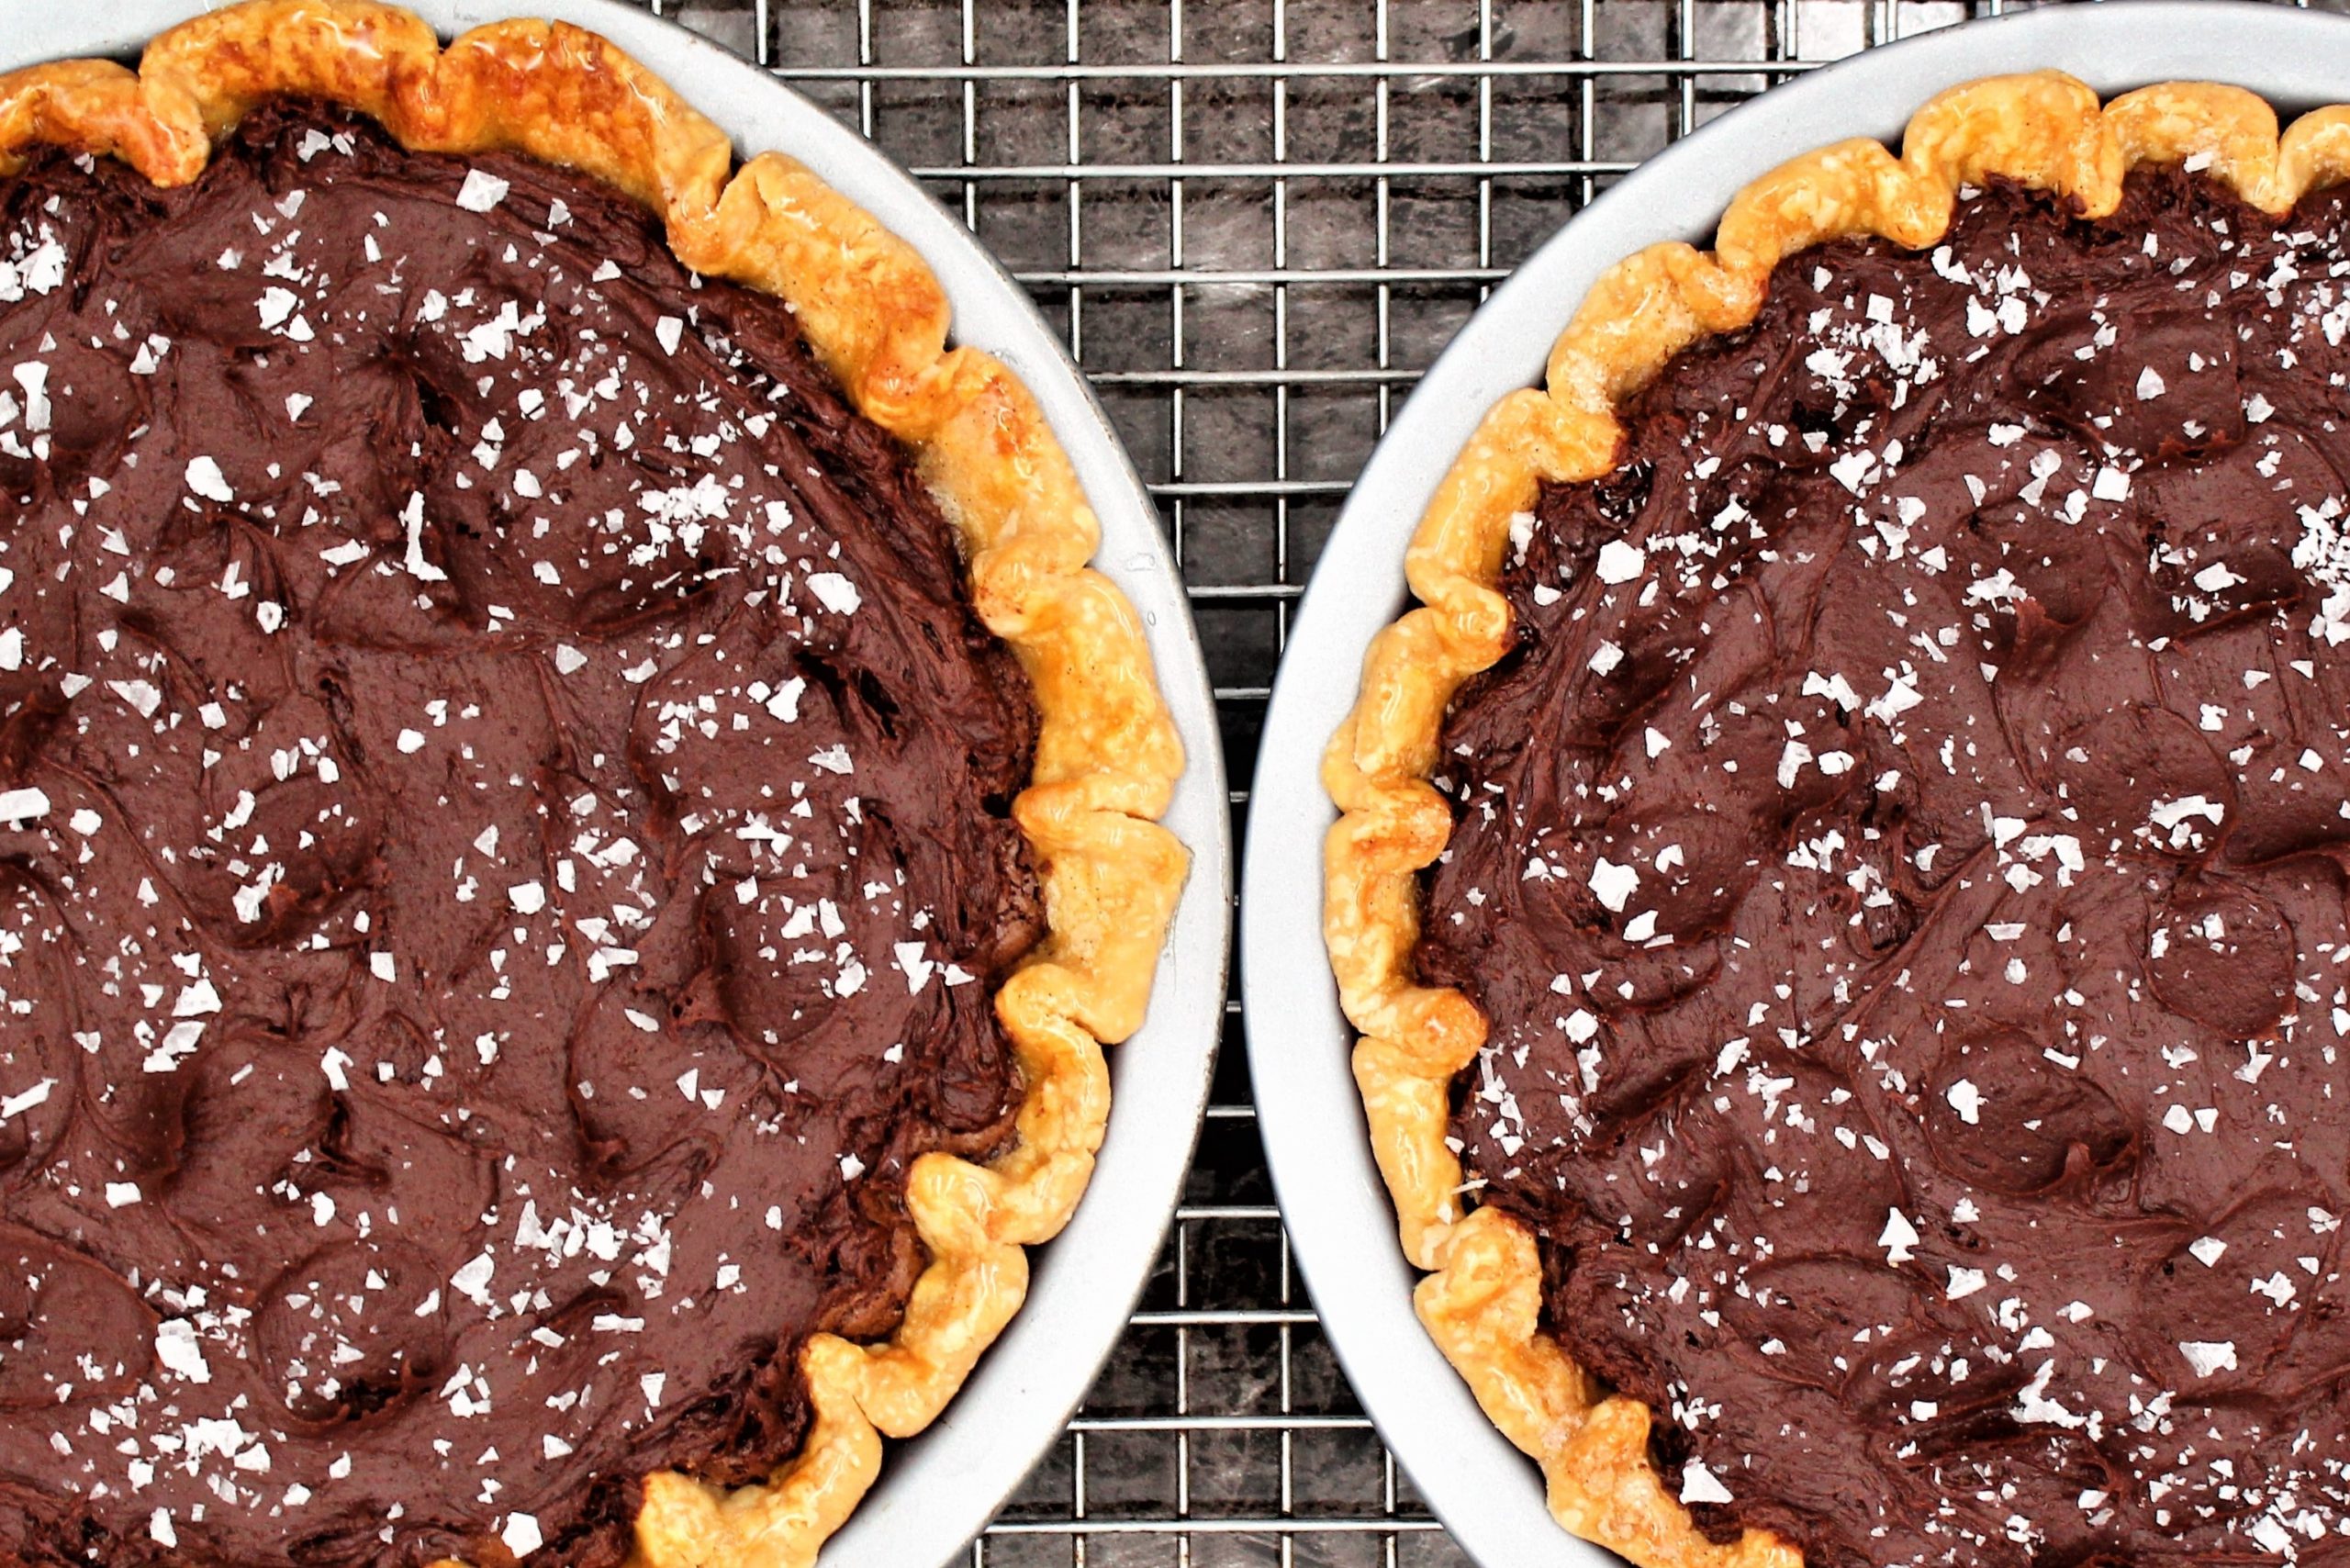
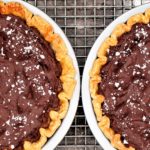
I promise that you will love this Chocolate Brownie Pie. That’s a big statement, but it’s true: it’s a from-scratch brownie pie with an all-butter pie crust and a fudgy brownie filling. What is there not to love?
You need to stop right now and make this pie. Ok, read the rest of this blog, then make it!
This Chocolate Brownie Pie is over-the-top chocolatey. You will not use a boxed brownie mix for this masterpiece; this is scratch baking at it’s best. Looking at the pictures, you might think, It looks rich, and you couldn’t finish a slice”, but you could, and will; that is another promise.
It is rich enough without being crazy over the top. So, have I convinced you to make it? I have? Well, get to it! Enjoy!
This Cream of Celery Soup recipe is creamy and velvety. This soup is mild yet very flavorful. I love to take simple ingredients and elevate them into something special.
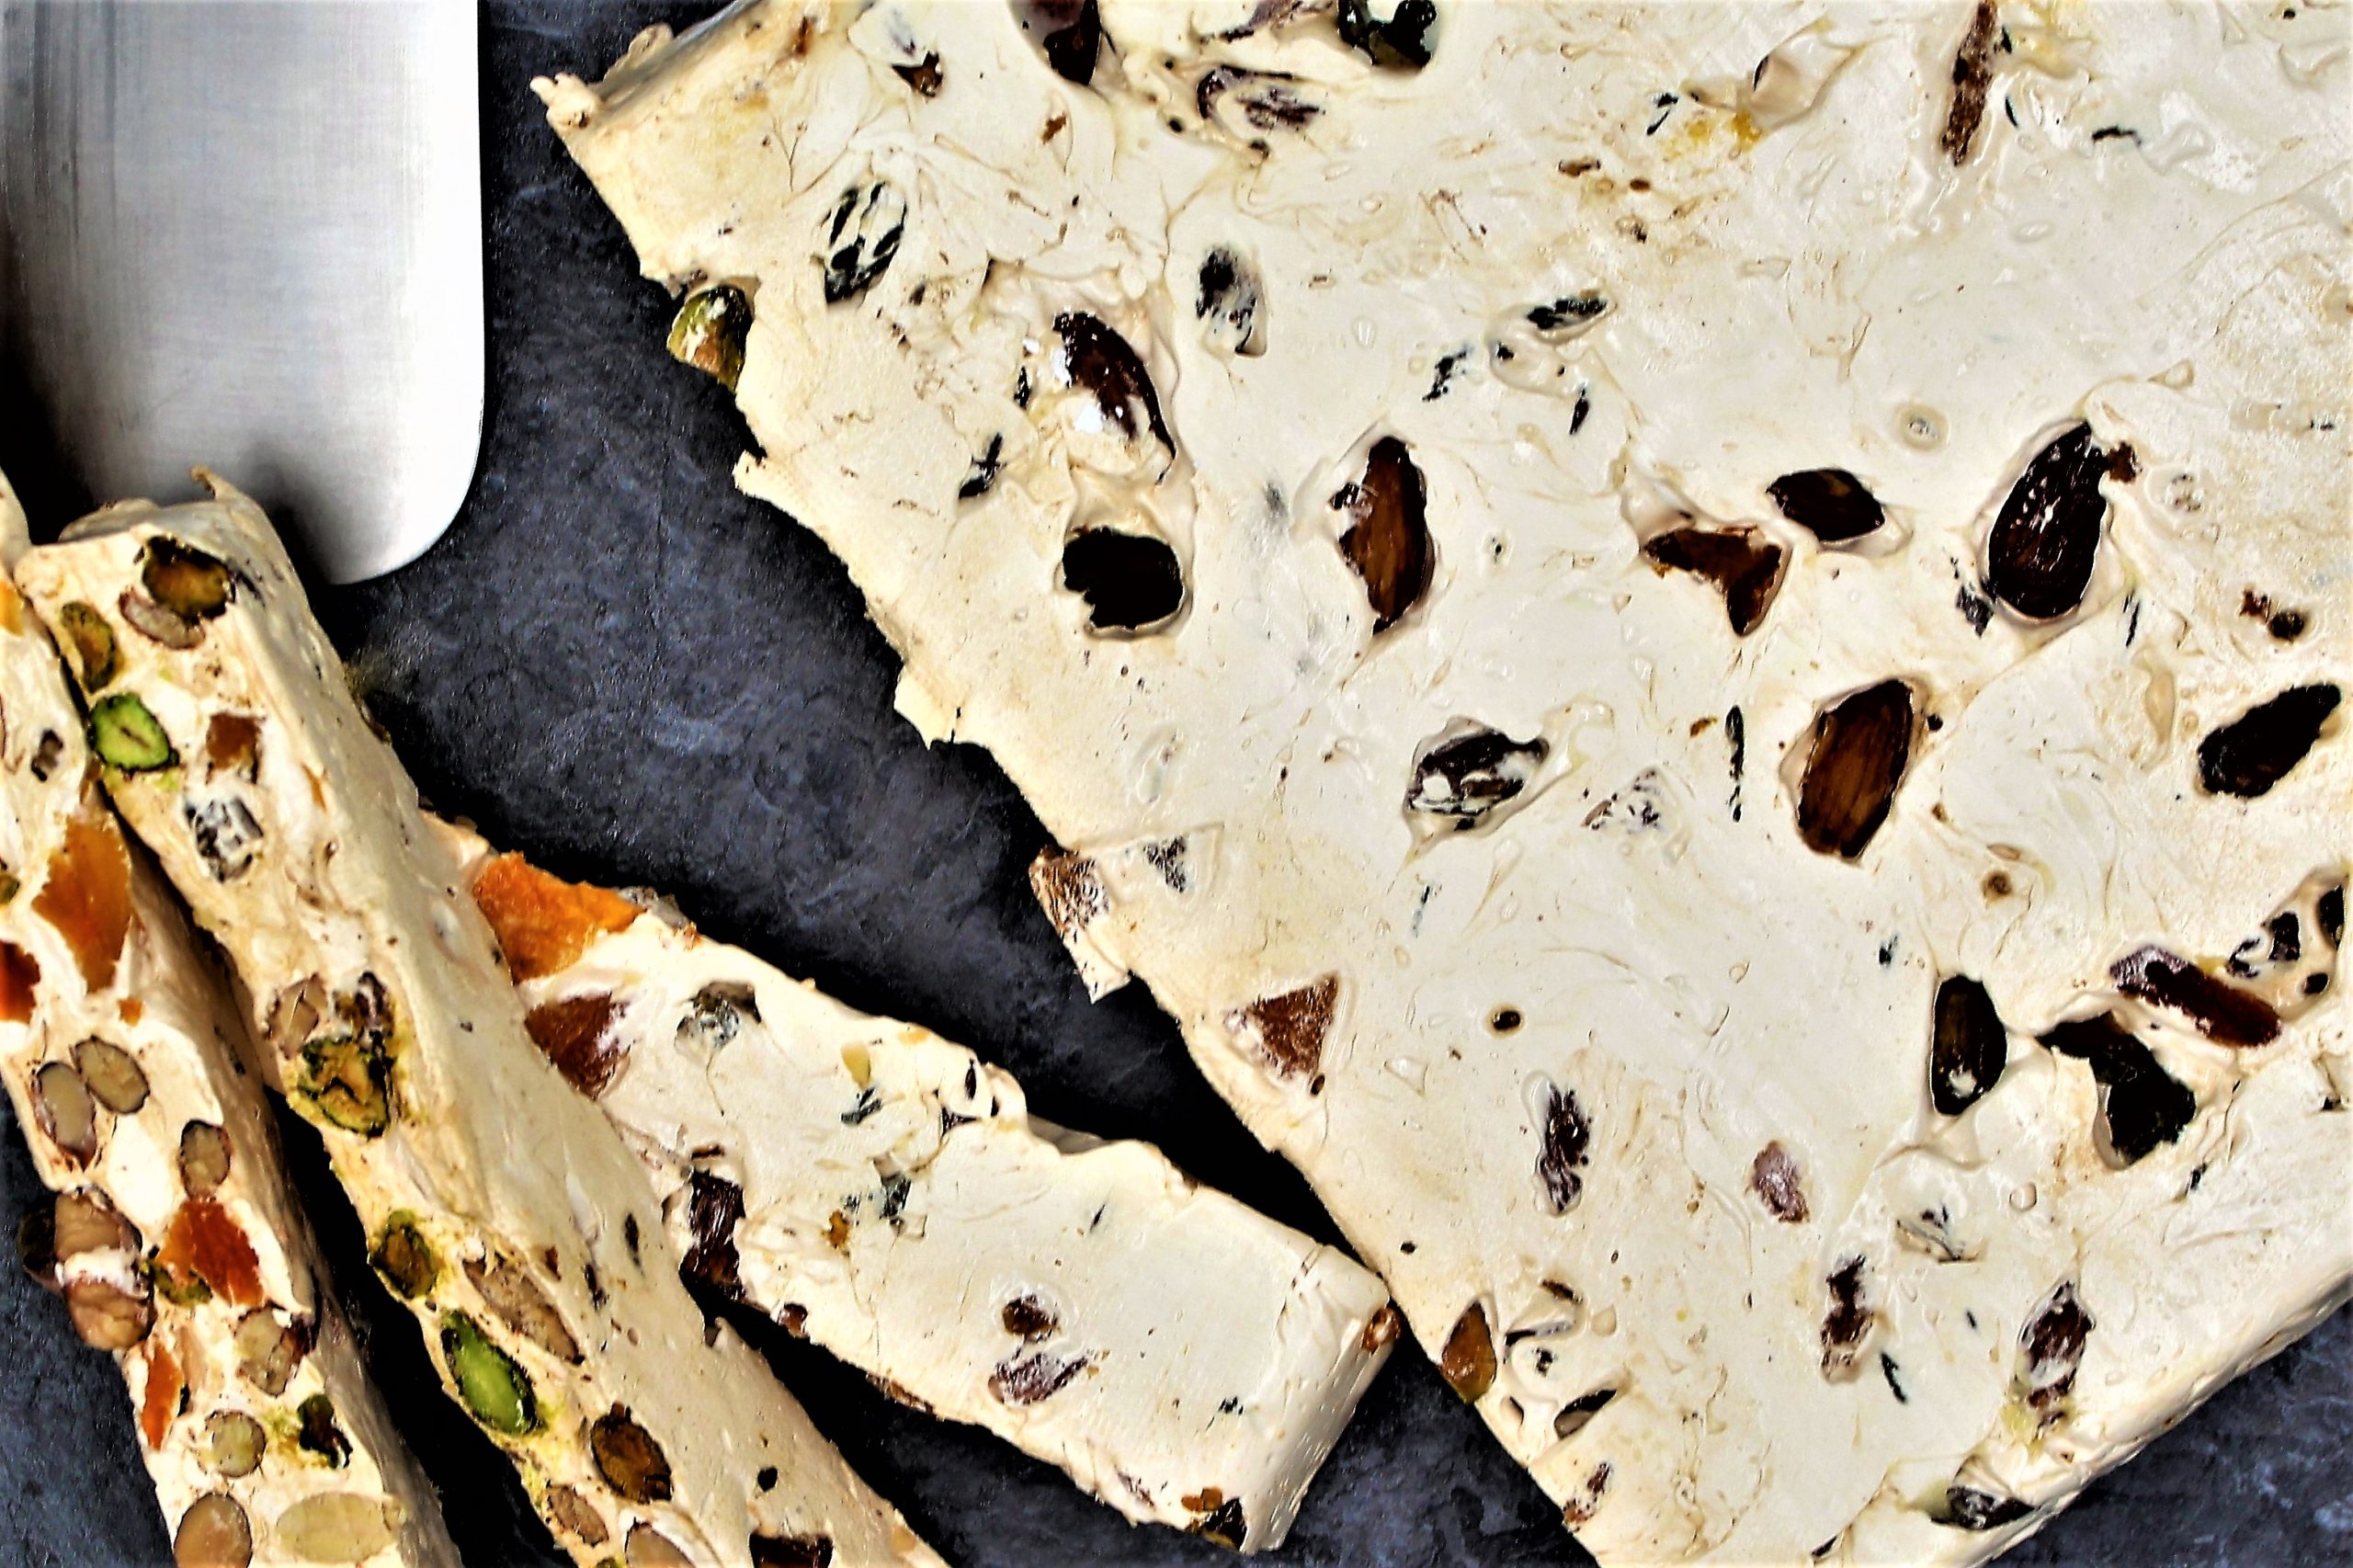
I love torrone, the marshmallow nougat candy filled with almonds, pistachios, and dried apricots. A traditional torrone is from Italy, but as Americans tend to do, we make it our own, and in the process, change everything about it.
In my childhood, I remember a version of a torrone that was from Brachs Candy Company. Their Torrone was part of their mix n match candy that was in most grocery stores.
The shopper would fill a provided bag with candy and have it weighed in the deli. The sweets were individually wrapped and included other confections such as butterscotch, peppermints, root beer barrels, and their nougat.
The nougat was the last to be eaten from the candy dish. If I were looking for something sweet, and the only candy left was the nougat, I would pick ut the nuts and fruit and eat the marshmallow part. Now that I am older, I love the addition of salty almonds and pistachios. The apricots add a beautiful color and a mild citrus sweetness.
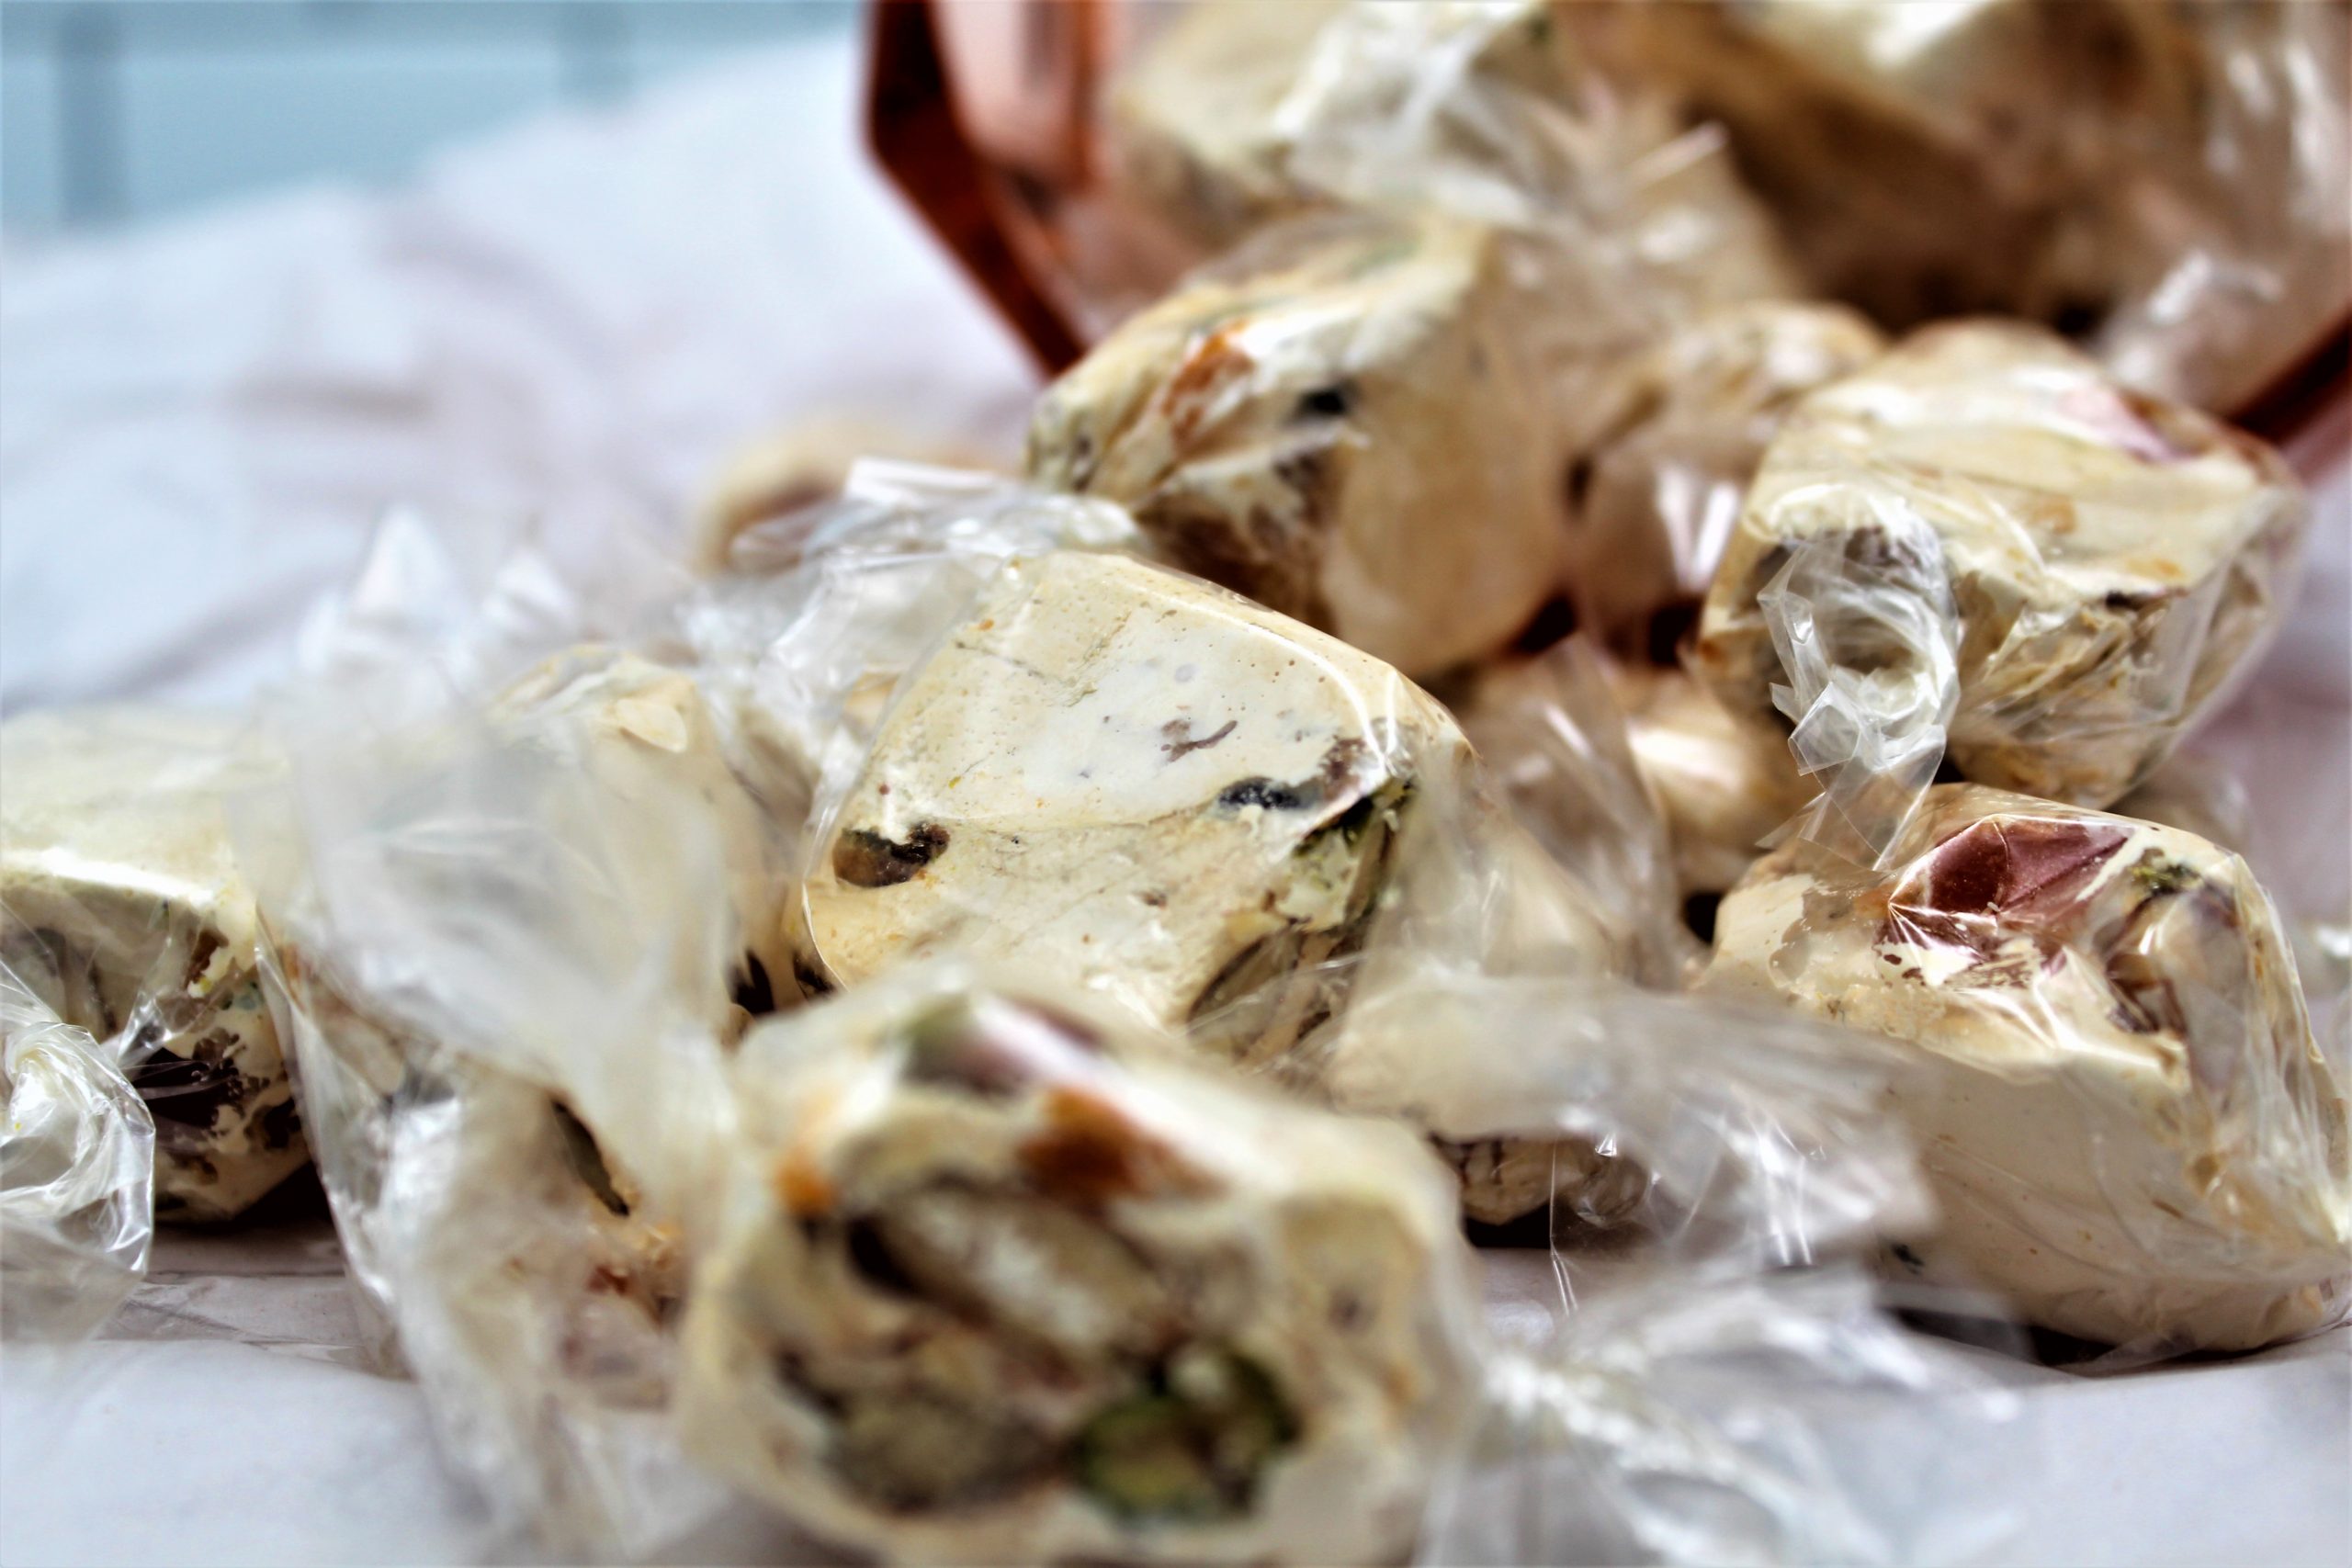
I love making Torrone; it is satisfying to cut into it and reveal all the fruit and nuts’ colors.
Give this recipe a go. You will love it, and try not to pick out the nuts and fruit; that’s the best part.
Torrone, a classic Italian nougat, it is easy to make. This traditional recipe is sweetened with honey, orange, and almond flavors, and packed with toasted almonds, and pistachios.
1 1/2cupsnuts, a mixture of almonds, and pistachios
1/2cup apricots, dried, chopped
1/8teaspoonsalt
1teaspoonpure vanilla extract
Instructions
Cover a loaf pan or small square baking dish (8 inches by 8 inches) with parchment paper. Have another sheet of parchment paper ready to cover the top of the Torrone once it's done cooking.
Toast nuts in a 350 F for about 8 minutes or until shiny and fragrant. Set aside.
Place honey in a double boiler or large bowl over a saucepan of water (bain-marie) on the lowest heat. Make sure the bowl is not touching the water. Heat honey until it melts, occasionally stirring with a wooden spoon
In the meantime, whisk egg whites to stiff peaks in a separate bowl. Add the whites to the bowl of honey, stirring with the wooden spoon to incorporate. It should turn into a caramel-colored cream.
Keep cooking, stirring slowly but continuously over a gentle heat for 45 minutes. The mixture should thicken and become pale. A small test should determine that your Torrone is at the right stage – a drop of the mixture in a glass of water should solidify into a softball, not dissolve immediately
Add the nuts, apricots, salt, and vanilla to the mixture and continue cooking and stirring for 30 minutes.
Pour into prepared baking dish. Top with additional parchment and smooth it down, pressing the torrone gently with your hands.
Place in a cool place to set for a couple of hours.
When set, cut the torrone into thick slices with a sharp, heavy knife.
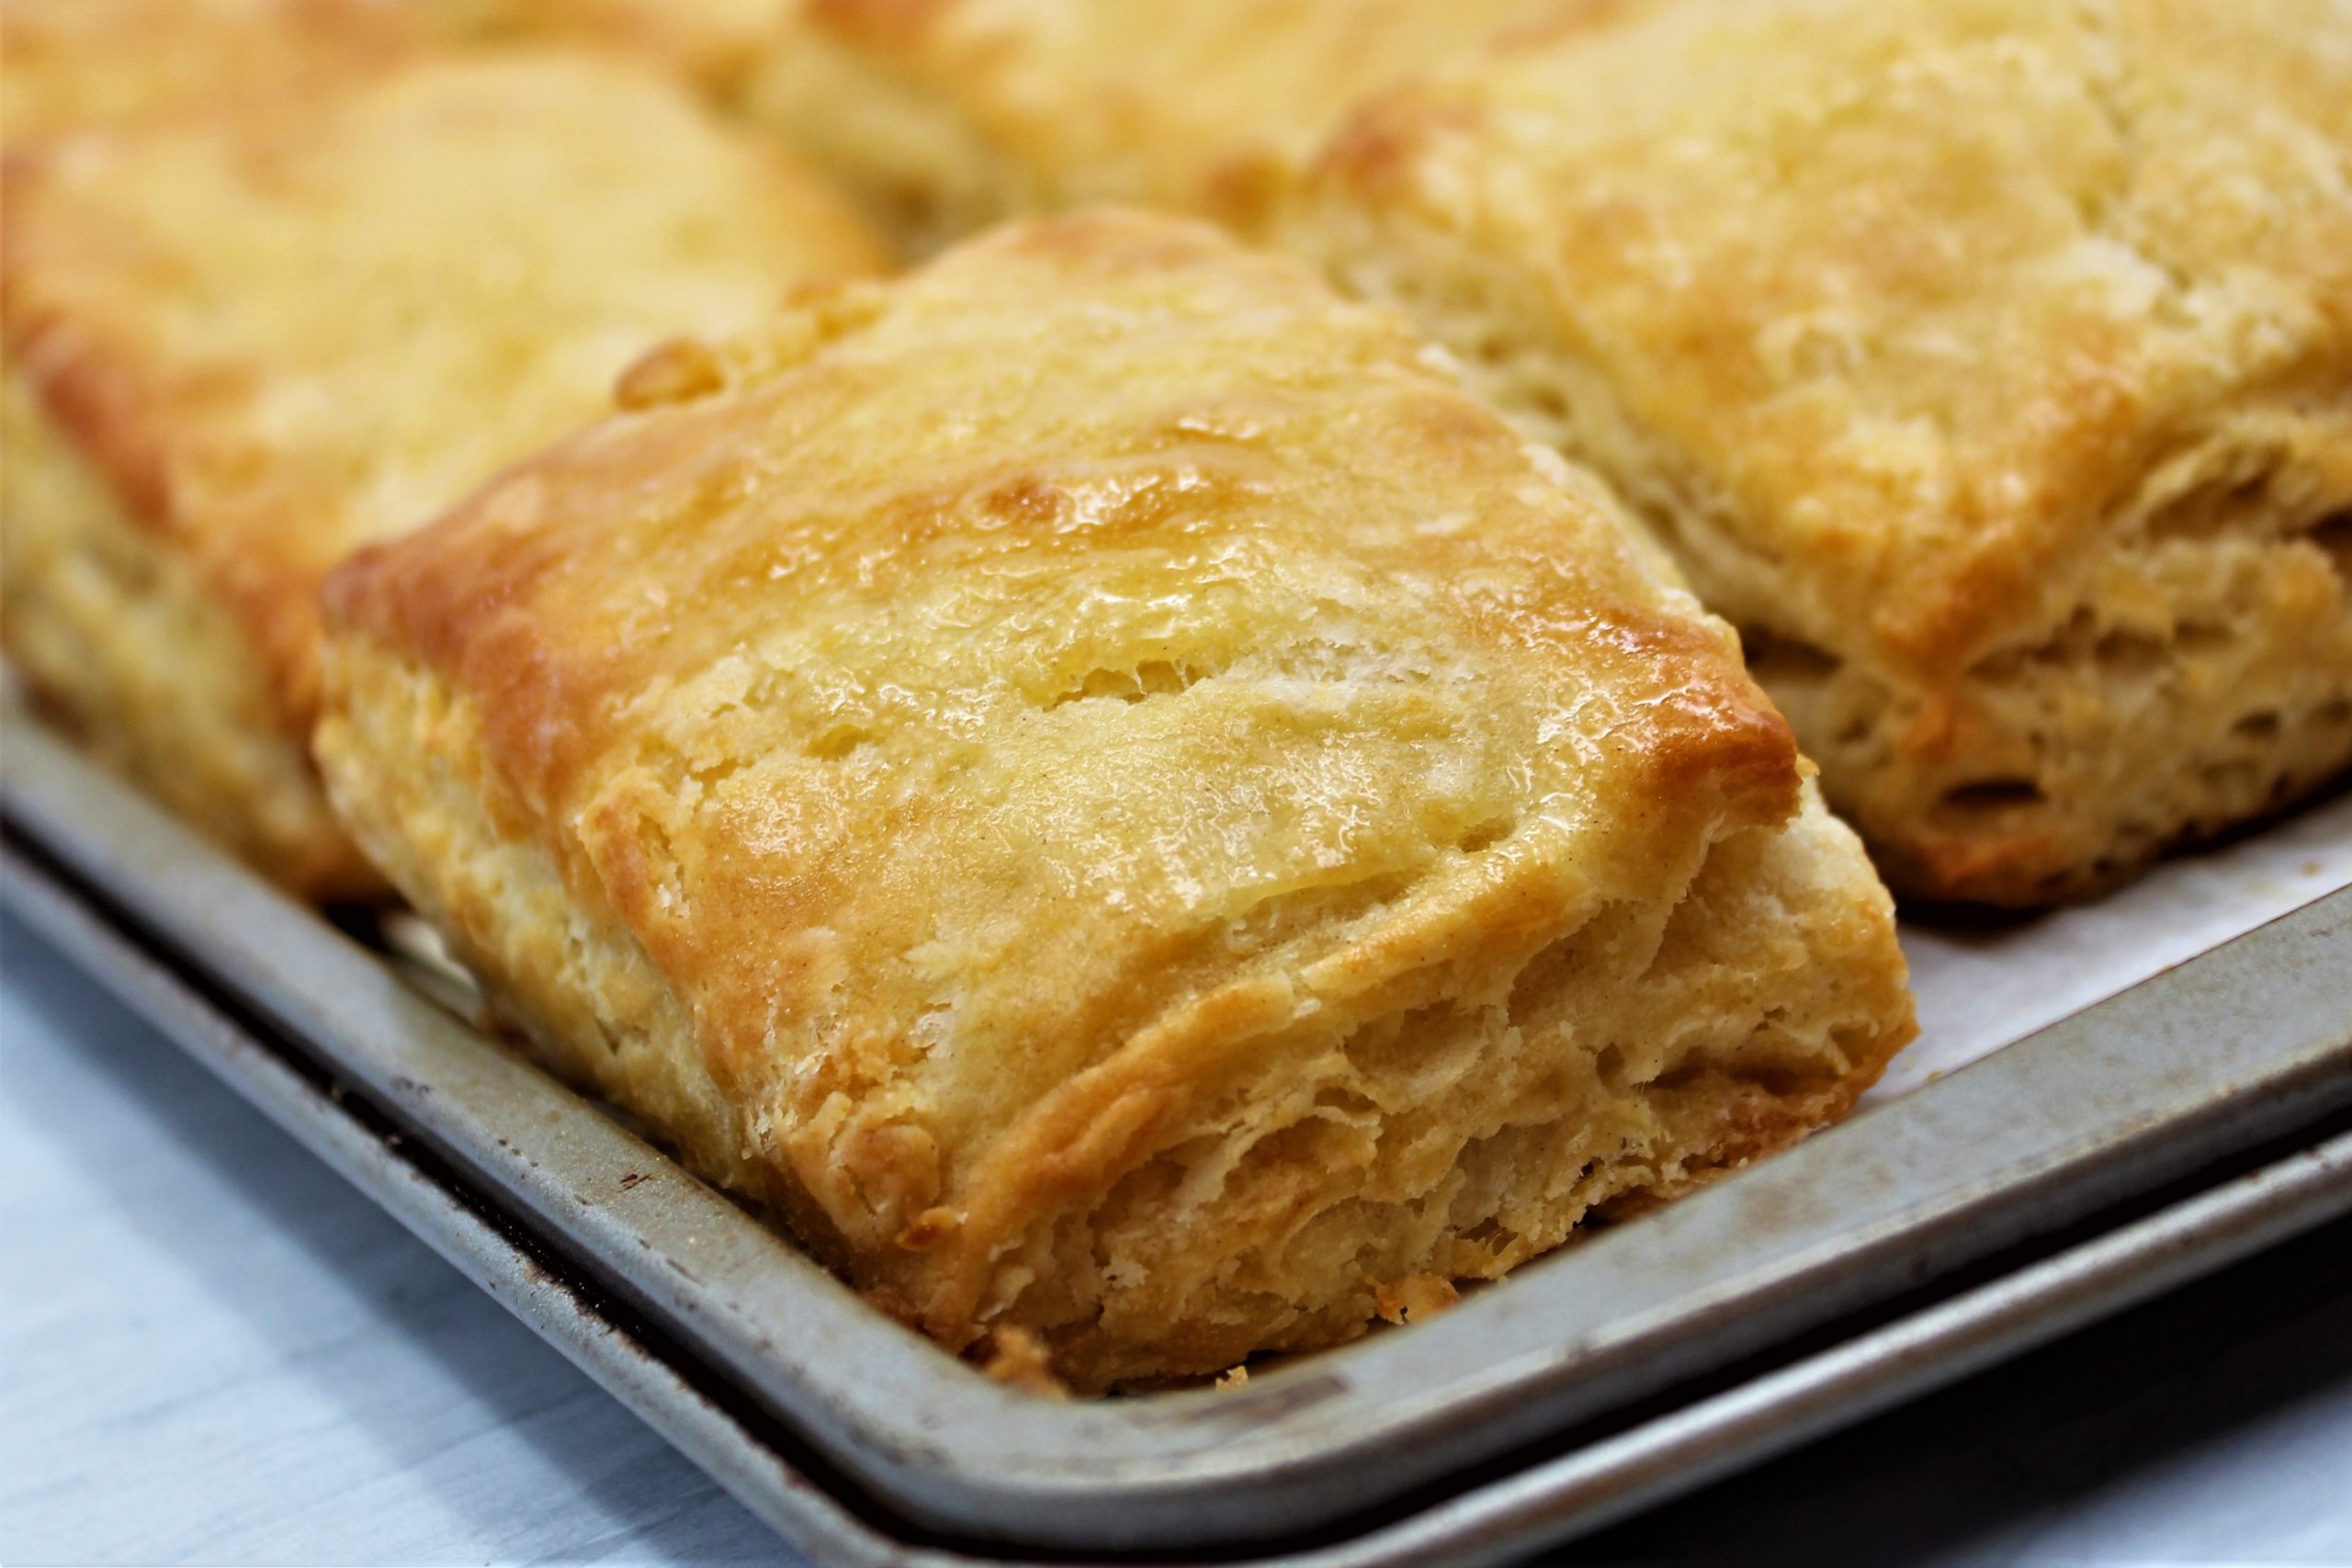
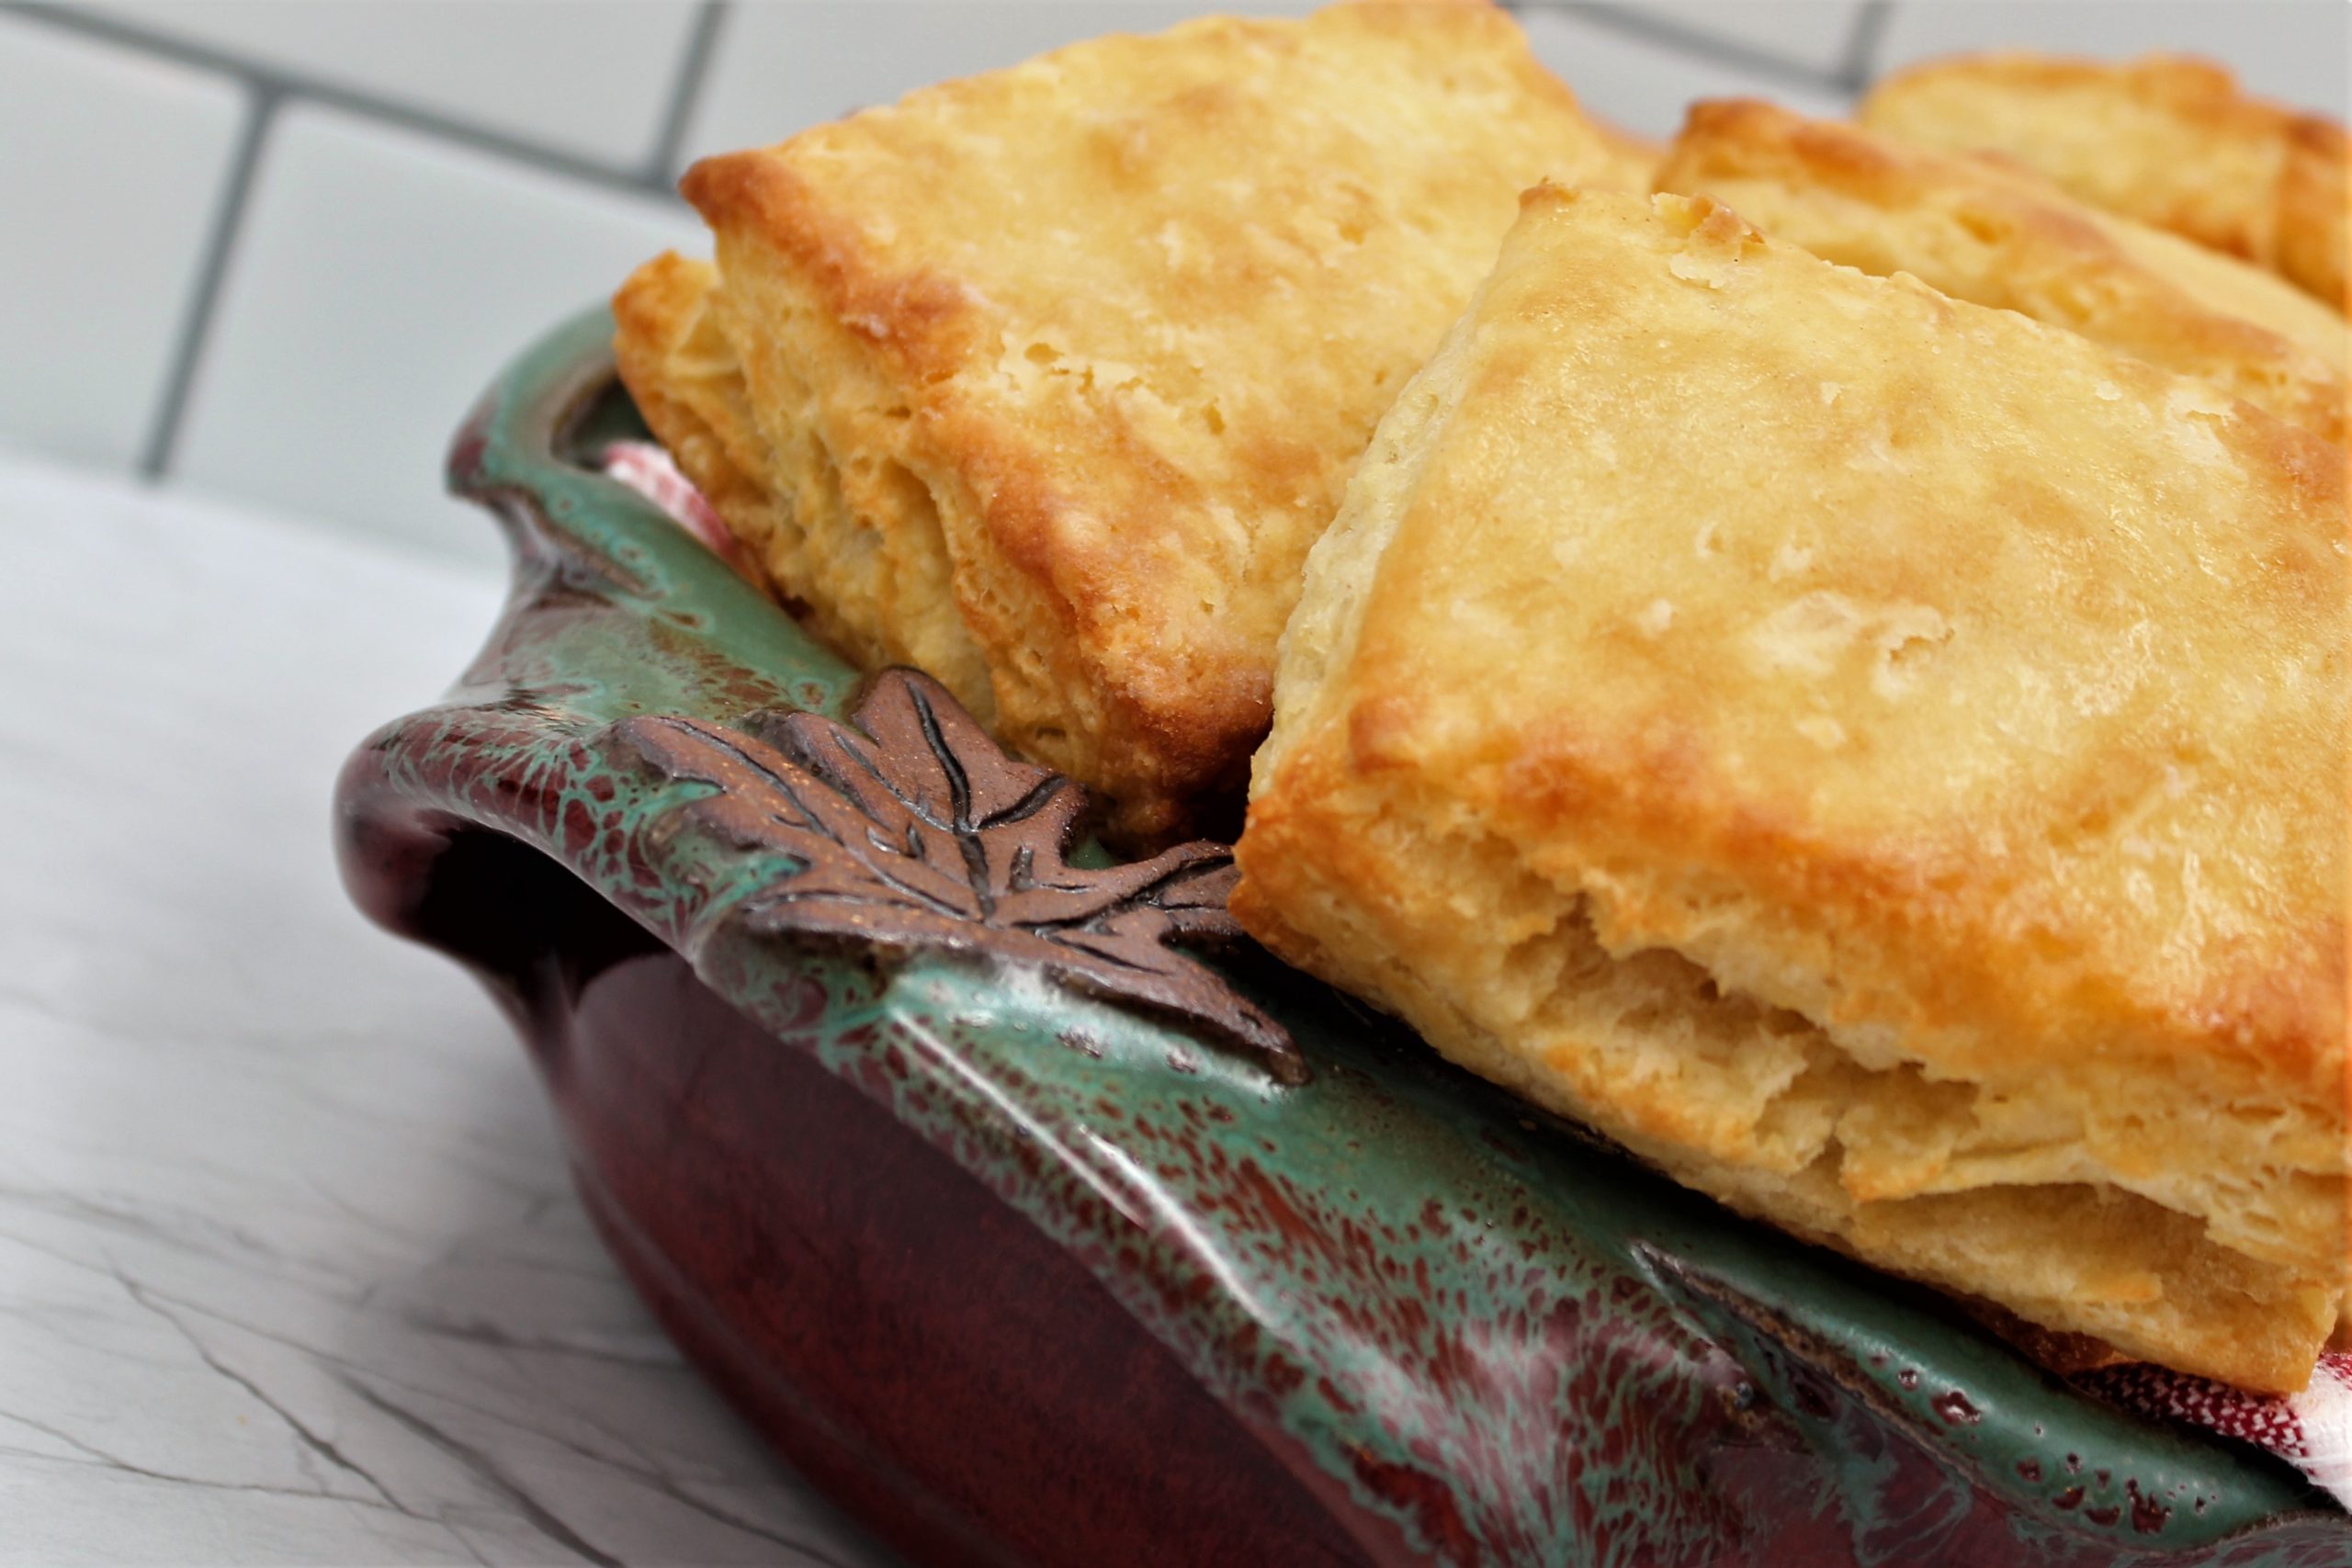
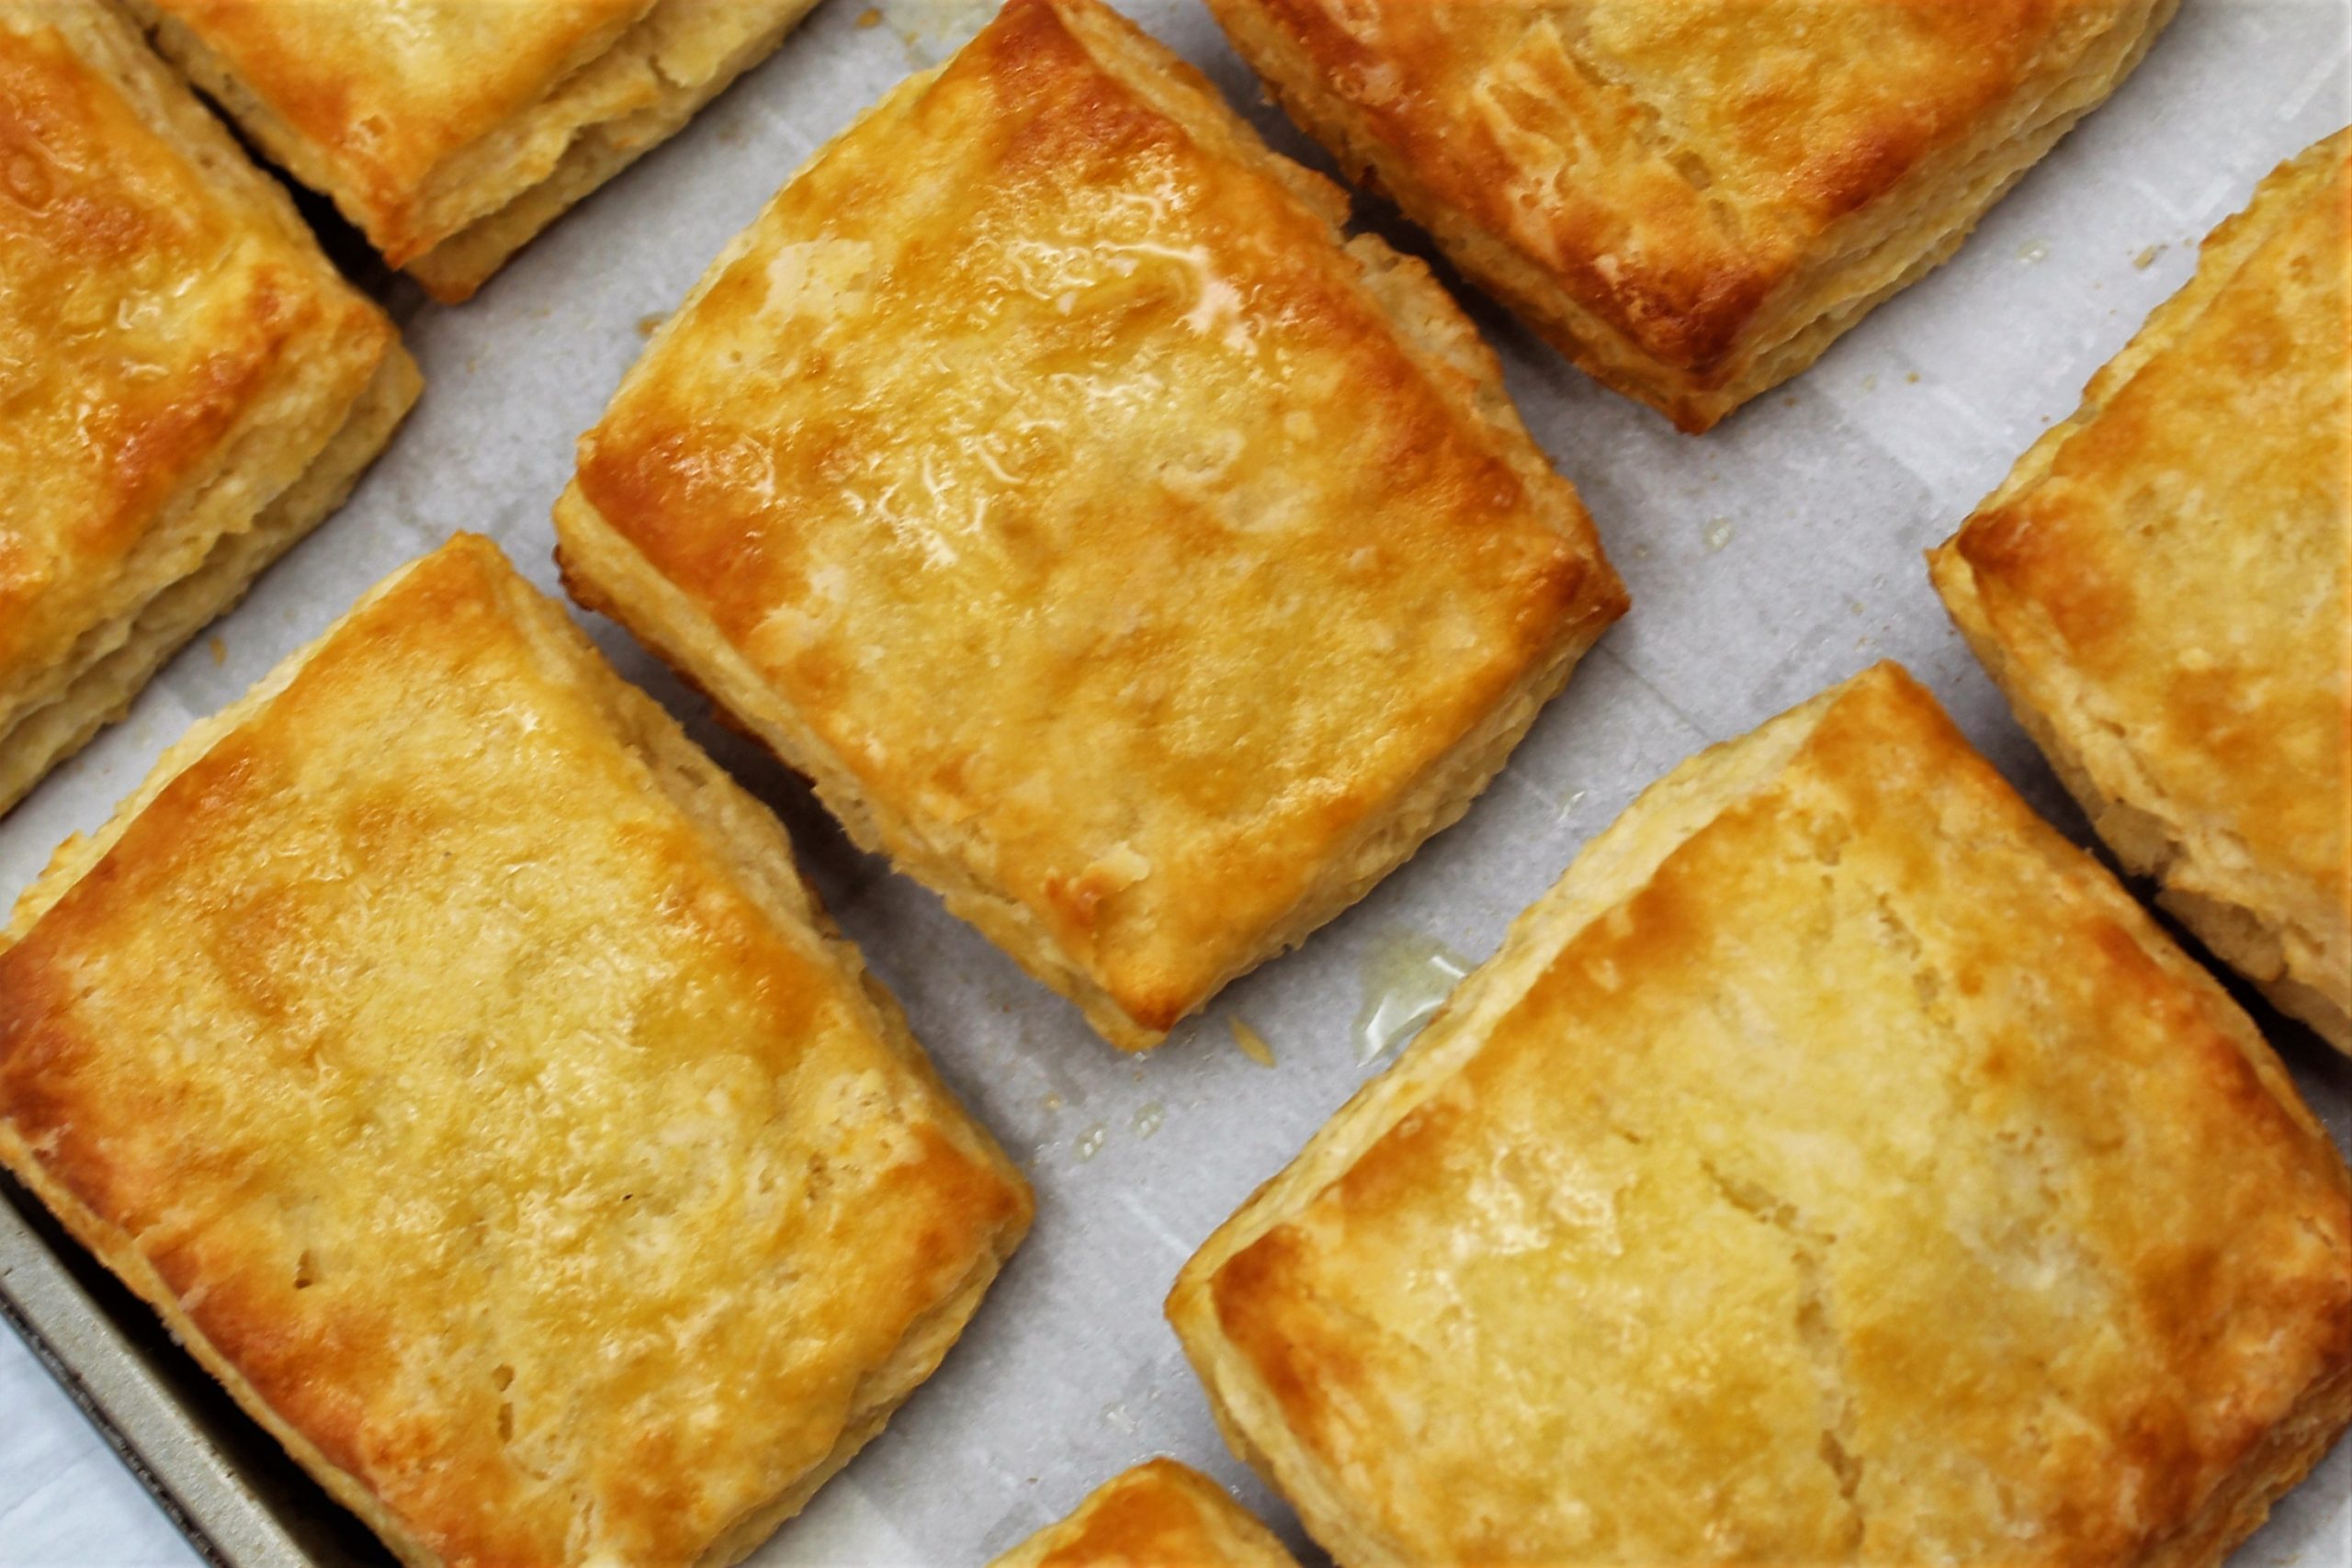
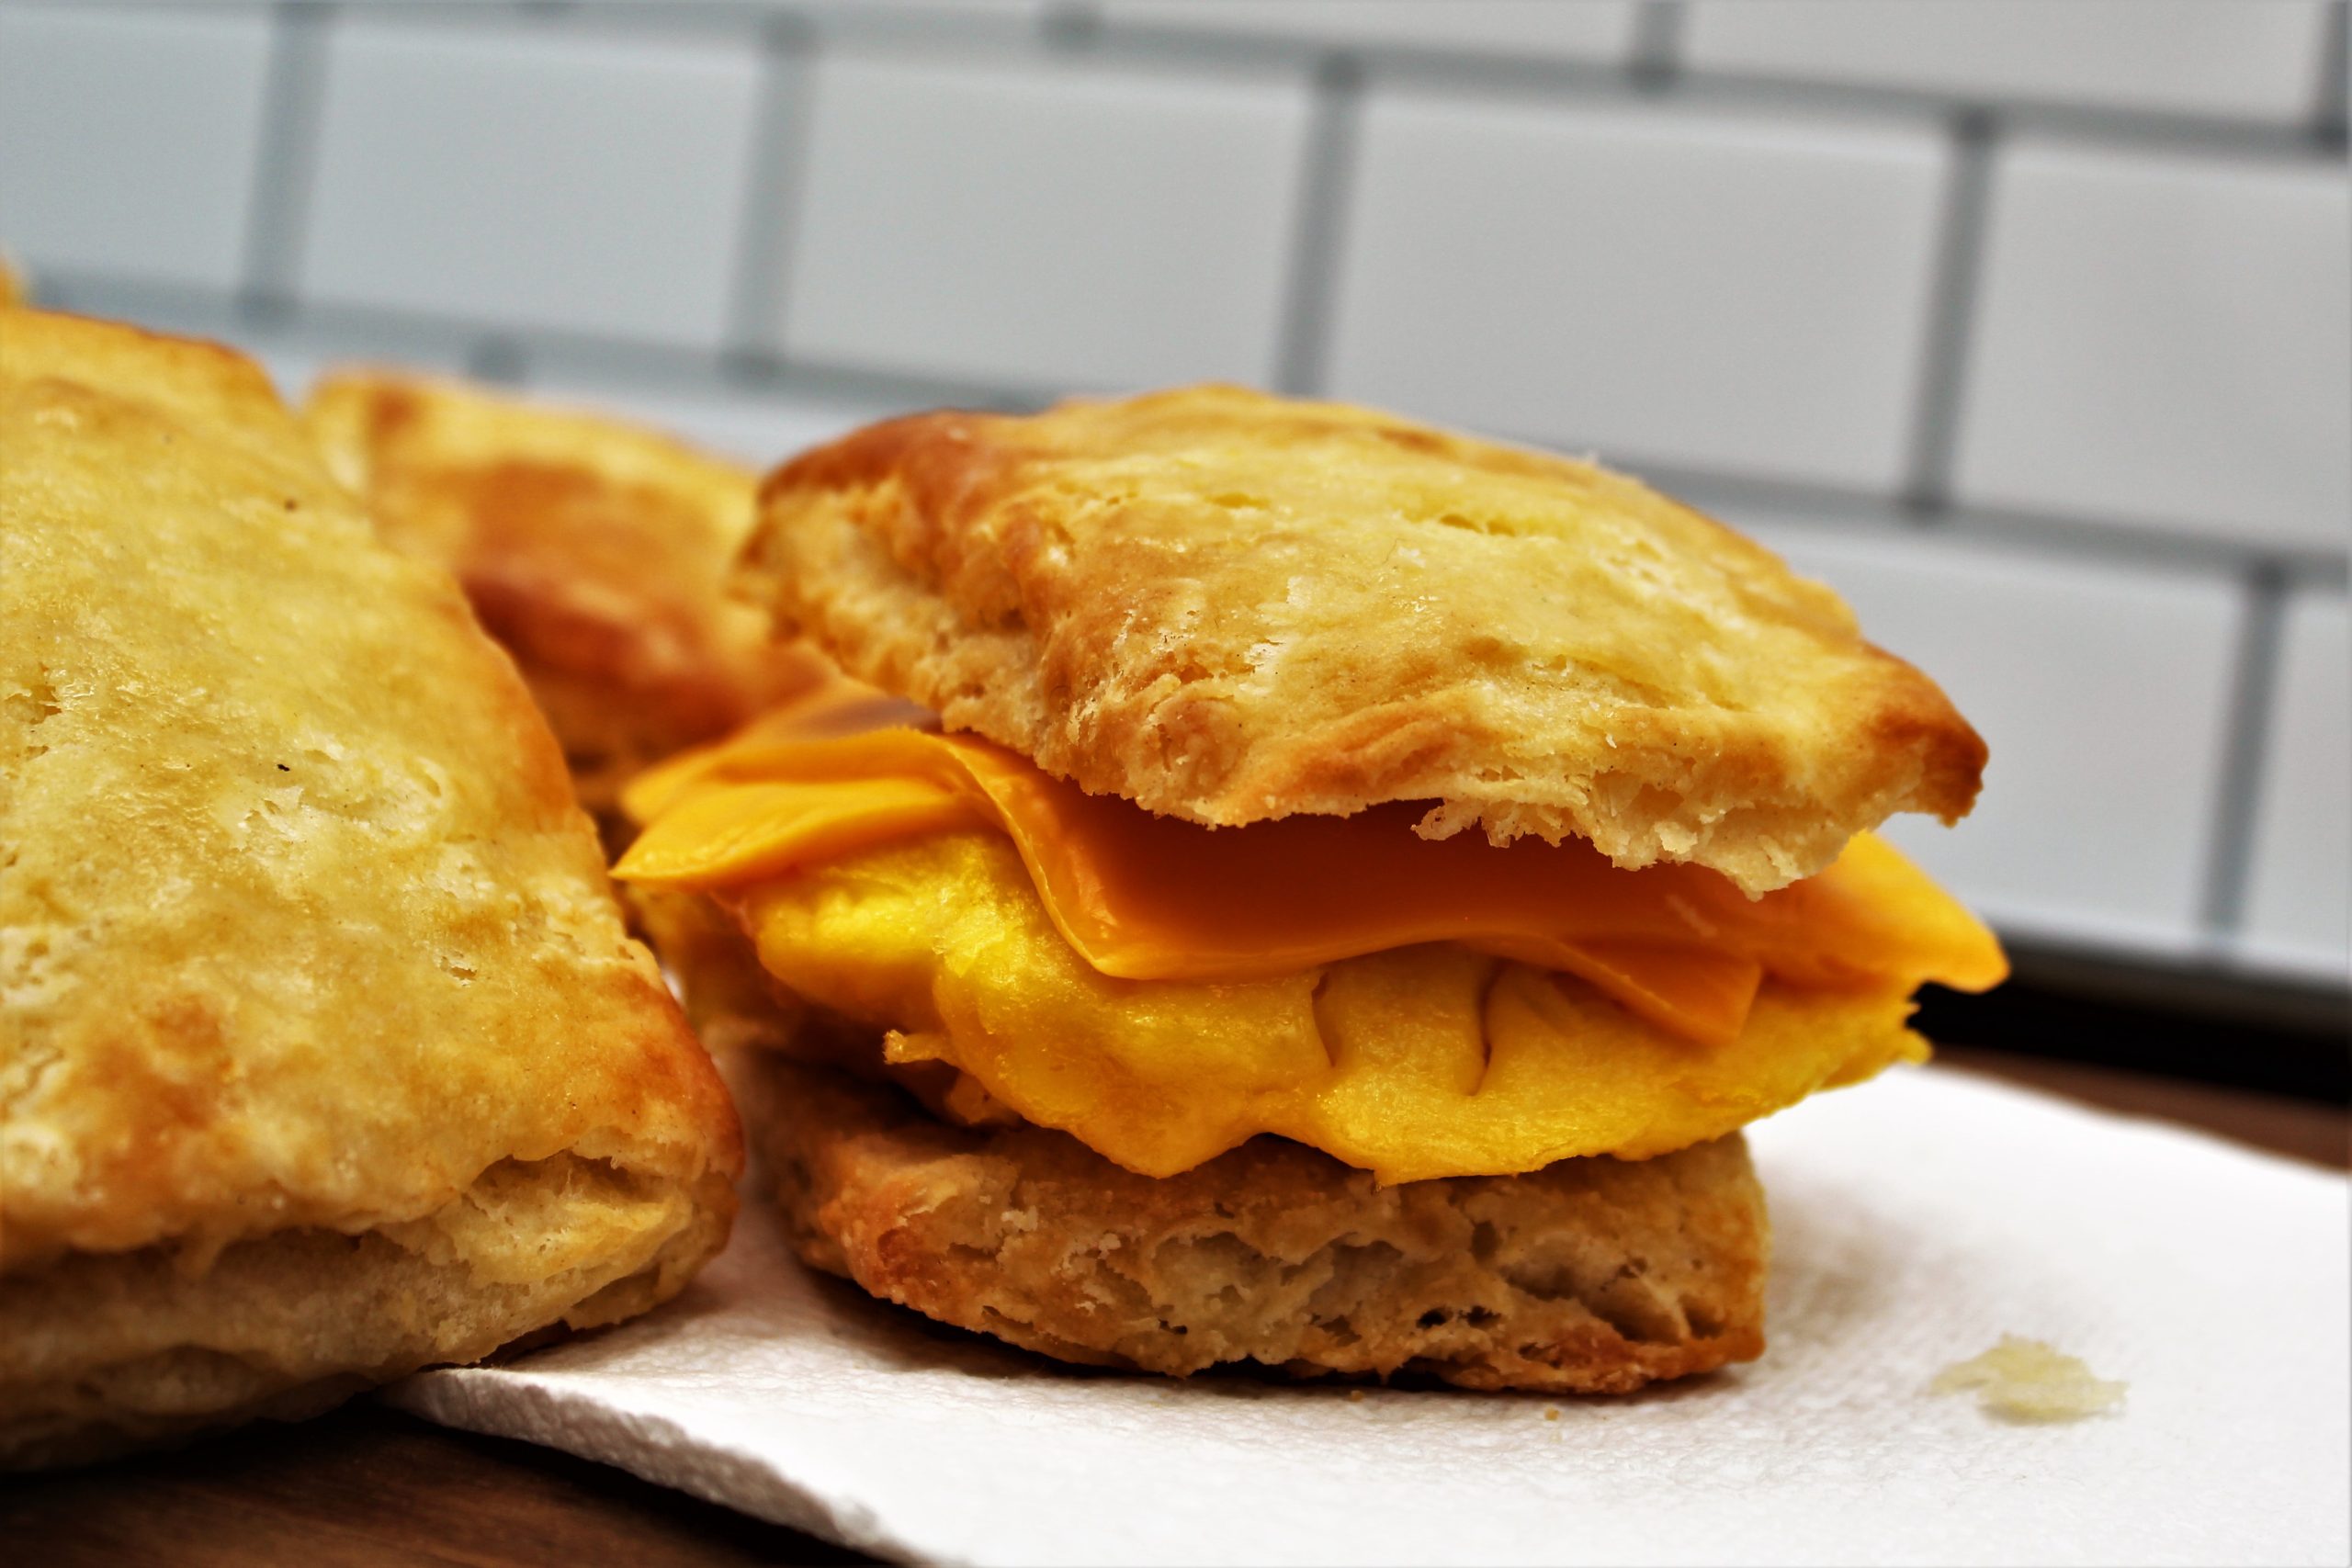
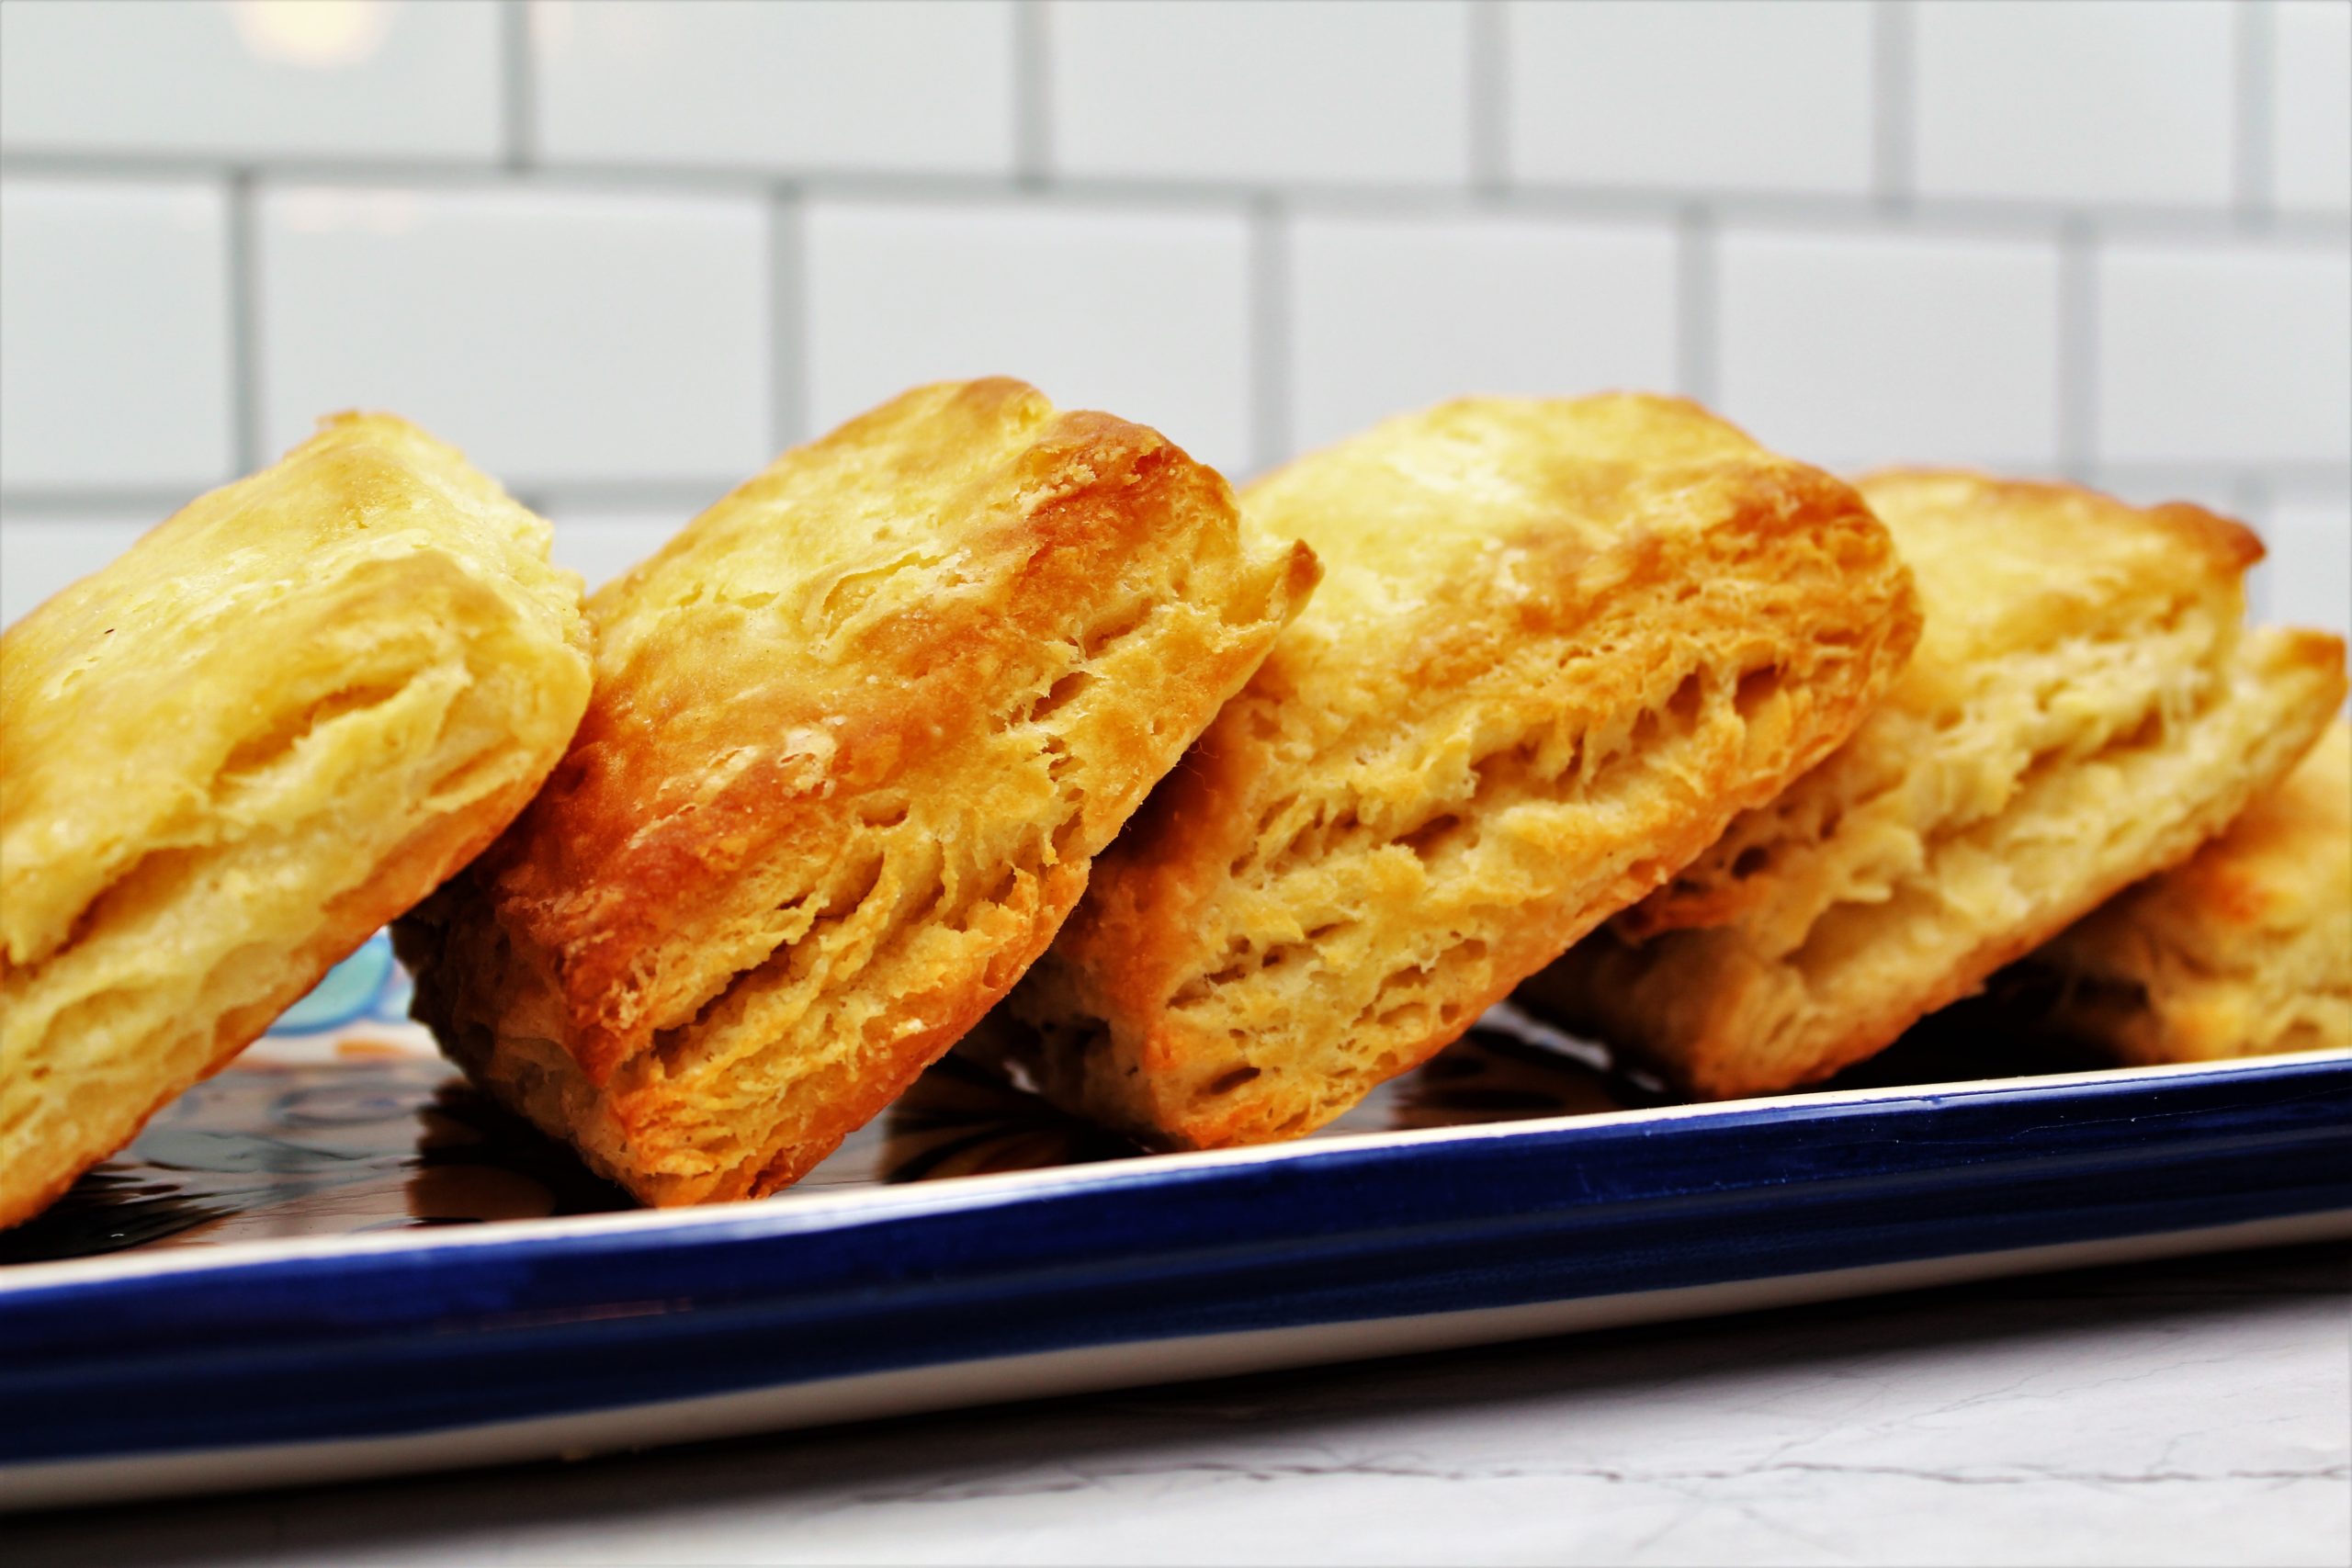
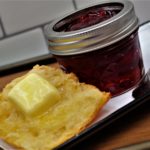
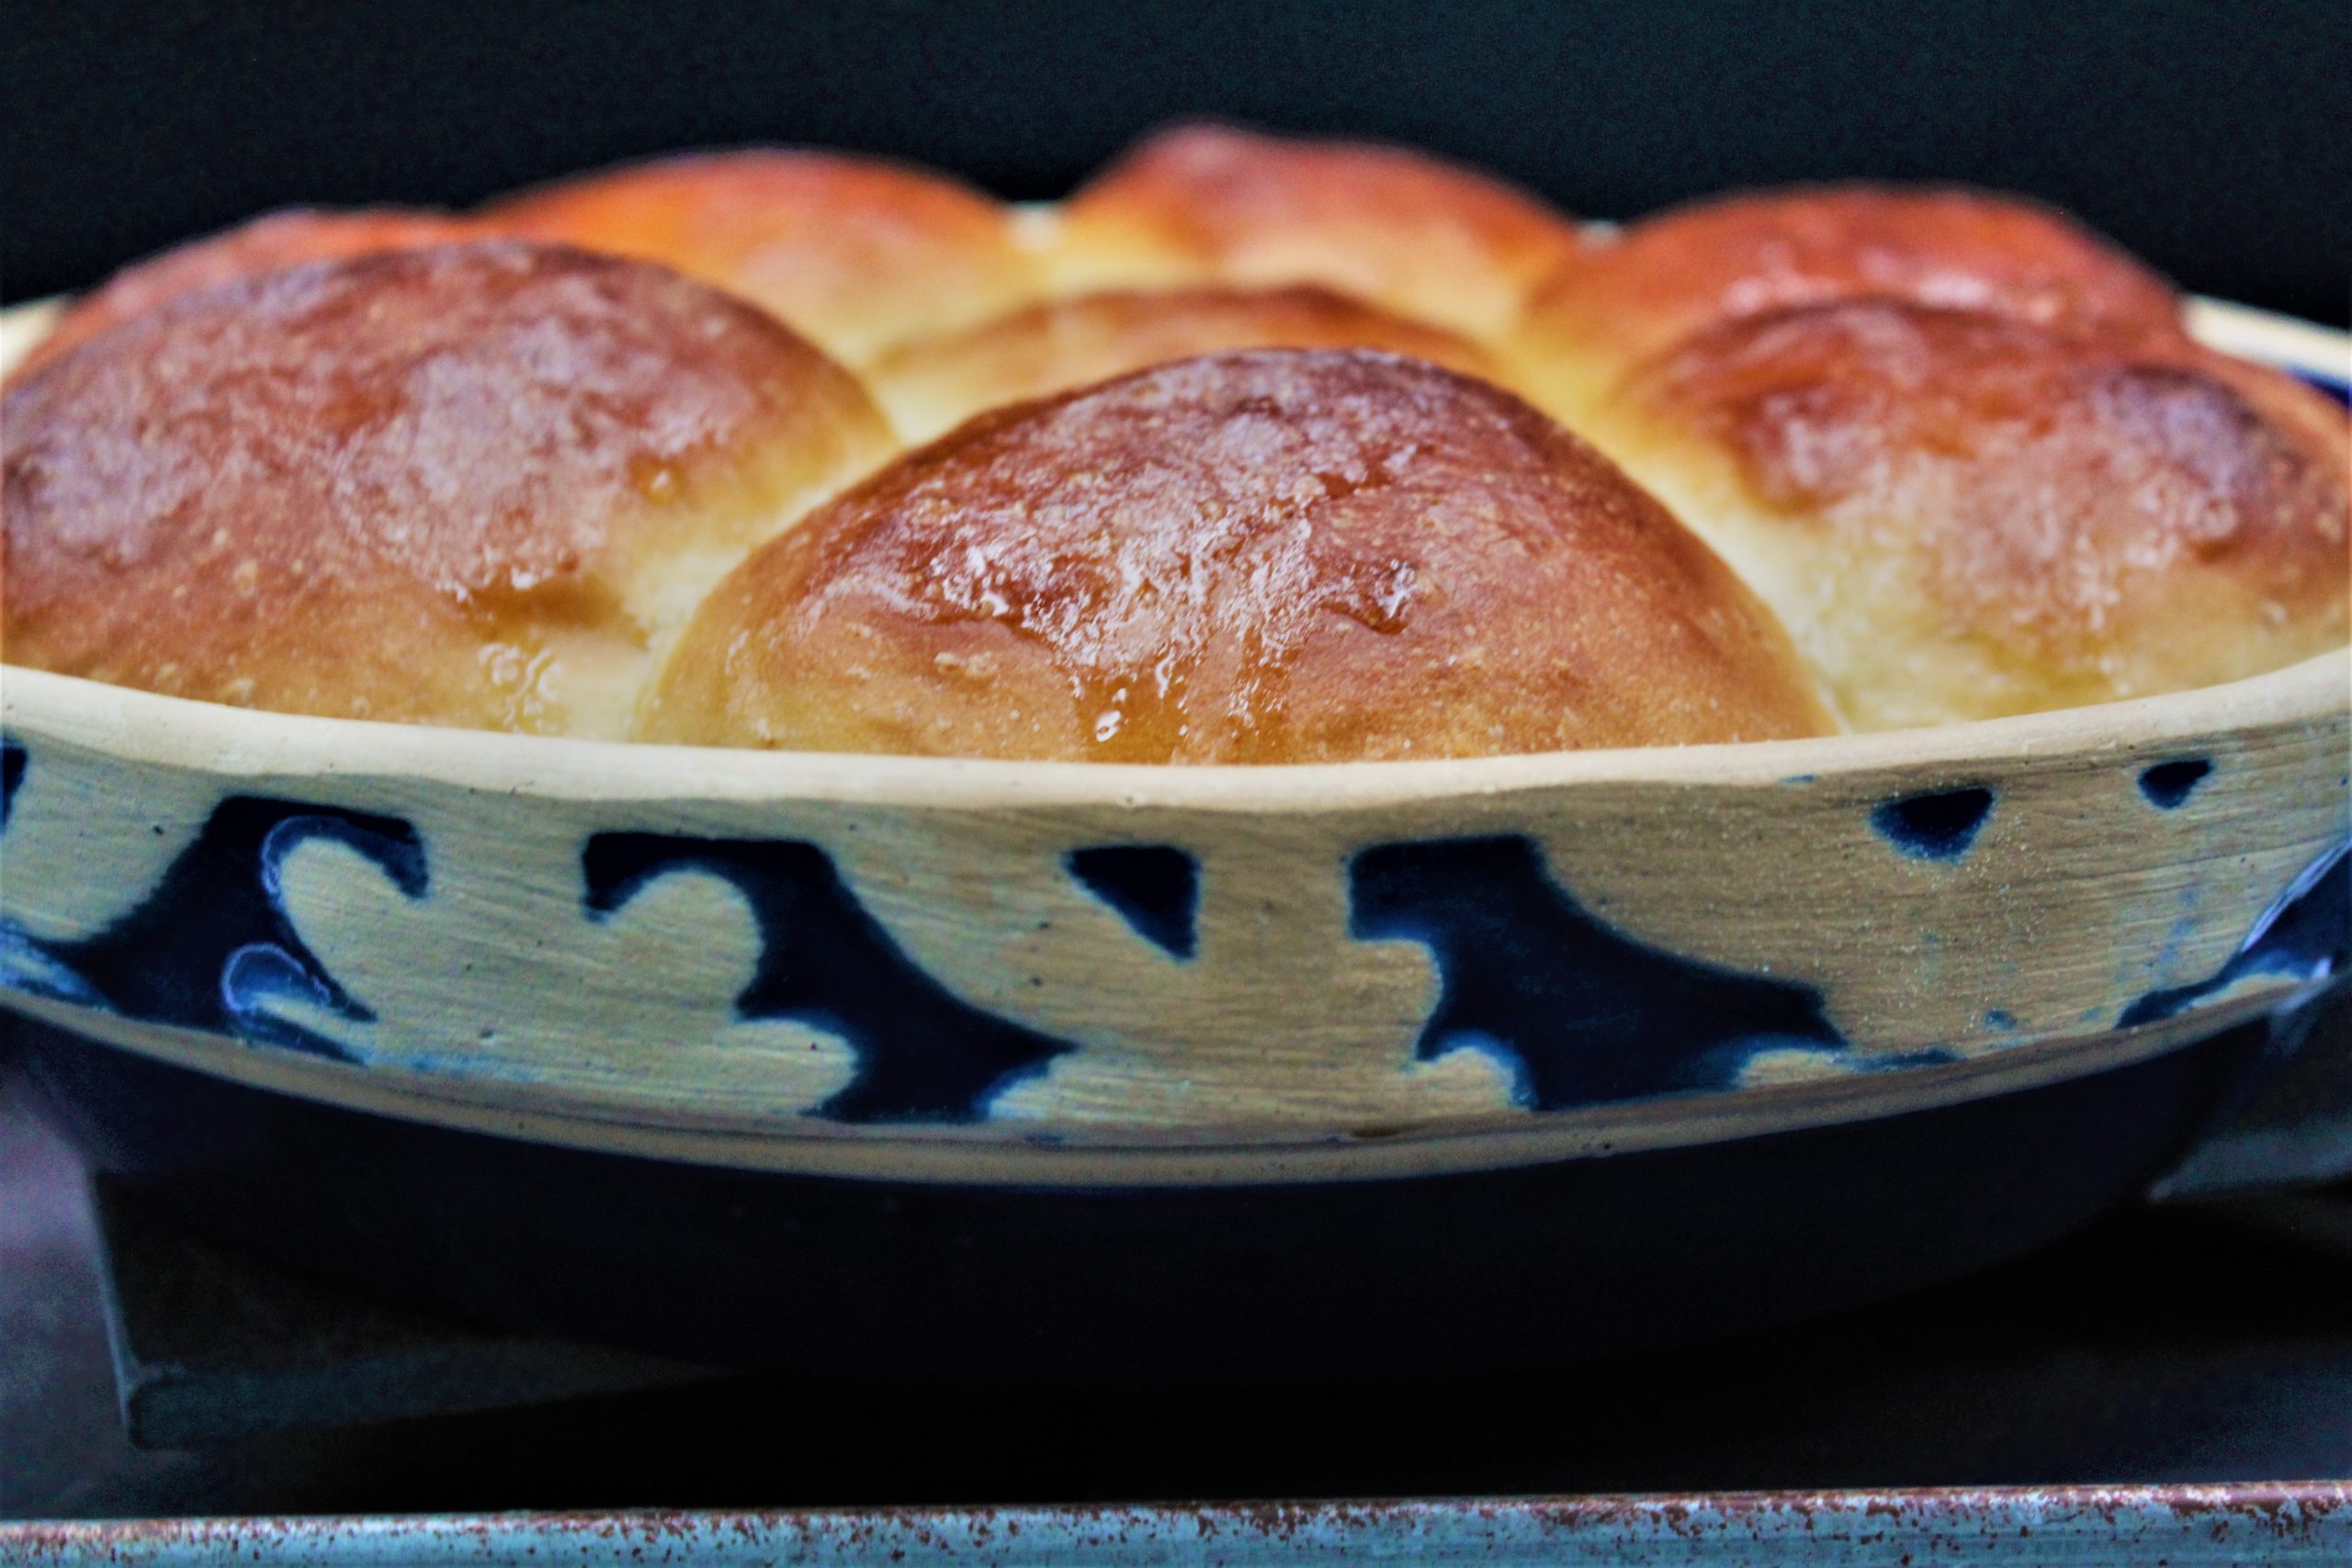
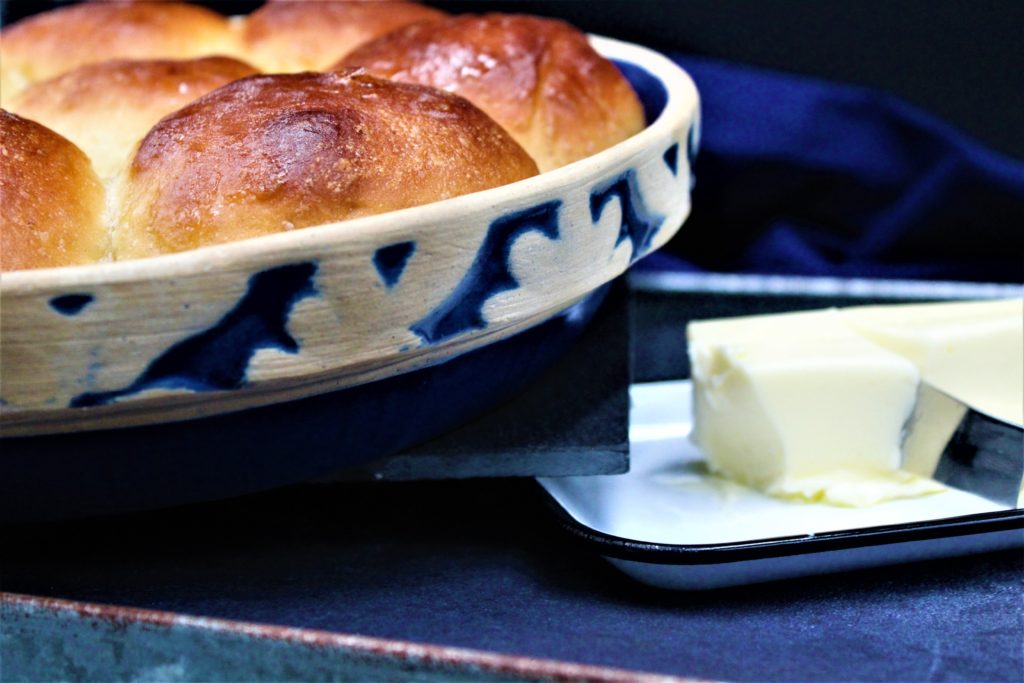
My Flaky Buttermilk Biscuit recipe is the BEST Biscuit recipe you’ll ever try! These easy, homemade biscuits are soft, flaky, and they are made entirely from scratch.
The secret is in the brand of flour used and frozen butter. I use King Arthur Flour because of the high protein levels, and the frozen butter creates the layers that make these biscuits so amazing.
Almost every weekend, I whip up a batch of these easy homemade biscuits. It’s my favorite biscuit recipe by far, and since it’s so easy, we make them all the time.
There is nothing like a hot, buttery, flaky biscuit right from the oven. I love these biscuits slathered with butter and jelly or with sausage gravy.
I used to buy canned biscuits, but these are so much better. So, remember my tricks, use King Arthur Flour and frozen butter, and you will be slathering jelly on these guys in no-time. Enjoy!
You just found the ultimate flaky biscuits! Grating the butter ensures that it’s evenly distributed in the flour, which is important for flakiness. Freezing the butter before grating ensures that it stays in individual pieces while mixing and shaping the biscuits.
Course
bread
Cuisine
American
Keyword
Biscuits
Prep Time30minutes
Cook Time20minutes
Servings9biscuits
AuthorDoug Bakes Staff
Ingredients
3cups King Arthur all-purpose flour
2tablespoonssugar
4teaspoons baking powder
1/2teaspoon baking soda
1 1/2teaspoons salt
16tablespoonsunsalted butter, frozen for 30 minutes
1 1/4cupsbuttermilk, chilled
Instructions
Line rimmed baking sheet with parchment paper and set aside. Whisk flour, sugar, baking powder, baking soda, and salt together in a large bowl. Coat sticks of butter in flour mixture, then grate 7 tablespoons from each stick on large holes of a box grater directly into the flour mixture. Toss gently to combine. Set aside the remaining 2 tablespoons of butter.
Add buttermilk to flour mixture and fold with a spatula until just combined (dough will look dry). Transfer dough to liberally floured counter. Dust surface of dough with flour; use your floured hands and press dough into a rough 7-inch square.
Roll dough into 12 by 9-inch rectangle with the short side parallel to the edge of the counter. Starting at the bottom of the dough, fold into thirds like a business letter, using a bench scraper or metal spatula to release the dough from the counter. Press top of dough firmly to seal folds. Turn dough 90 degrees clockwise. Repeat rolling into 12 by 9-inch rectangle, folding into thirds, and turning clockwise 4 more times, for a total of 5 sets of folds. After the last set of folds, roll dough into 8 1/2-inch square about 1 inch thick. Transfer dough to prepared sheet, cover with plastic wrap and refrigerate for 30 minutes. Adjust oven rack to upper-middle position and heat oven to 400 degrees.
Transfer dough to a lightly floured cutting board. Using a sharp, floured chef’s knife, trim 1/4 inch of dough from each side of the square and discard. Cut remaining dough into 9 squares, flouring knife after each cut. Arrange biscuits at least 1 inch apart on sheet. Melt reserved butter; brush tops of biscuits with melted butter.
Bake until tops are golden brown, 22 to 25 minutes, rotating sheet halfway through baking—transfer biscuits to wire rack and let cool for 15 minutes before serving.
Let’s face It crackers alone do not make for a fun party snack, but swirl the crackers in butter and add spices and brown sugar, and it’s an appetizer!
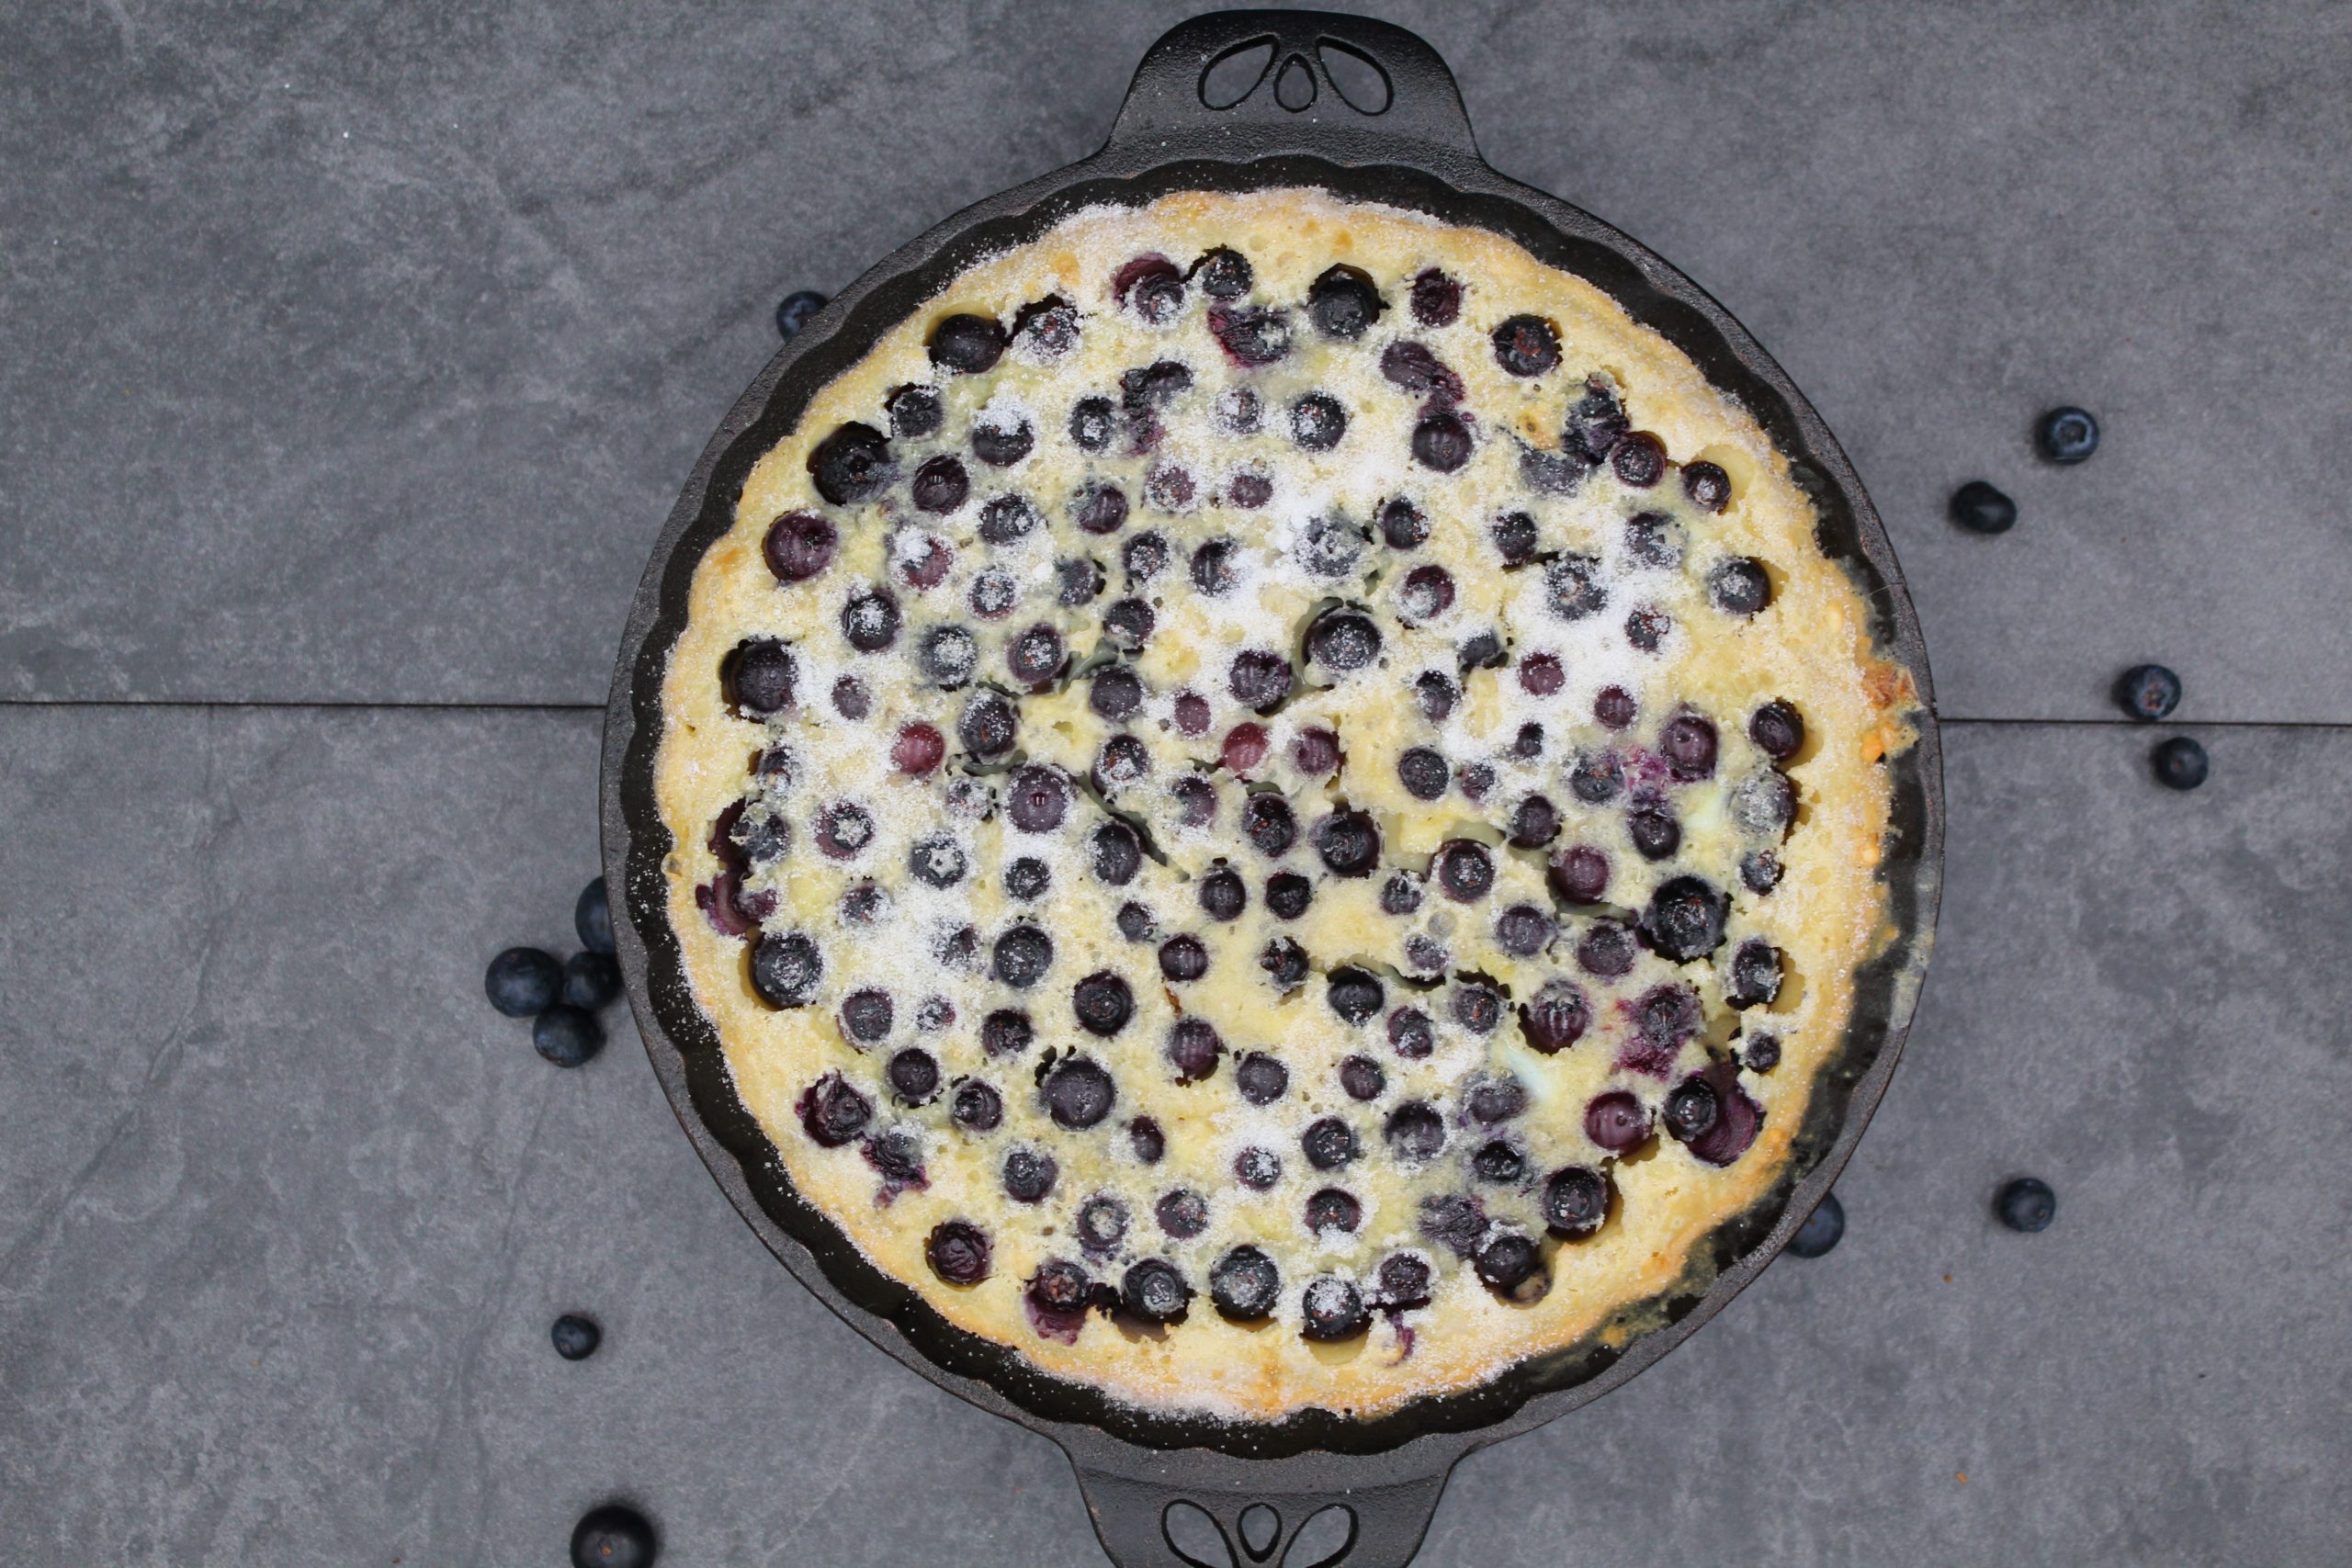
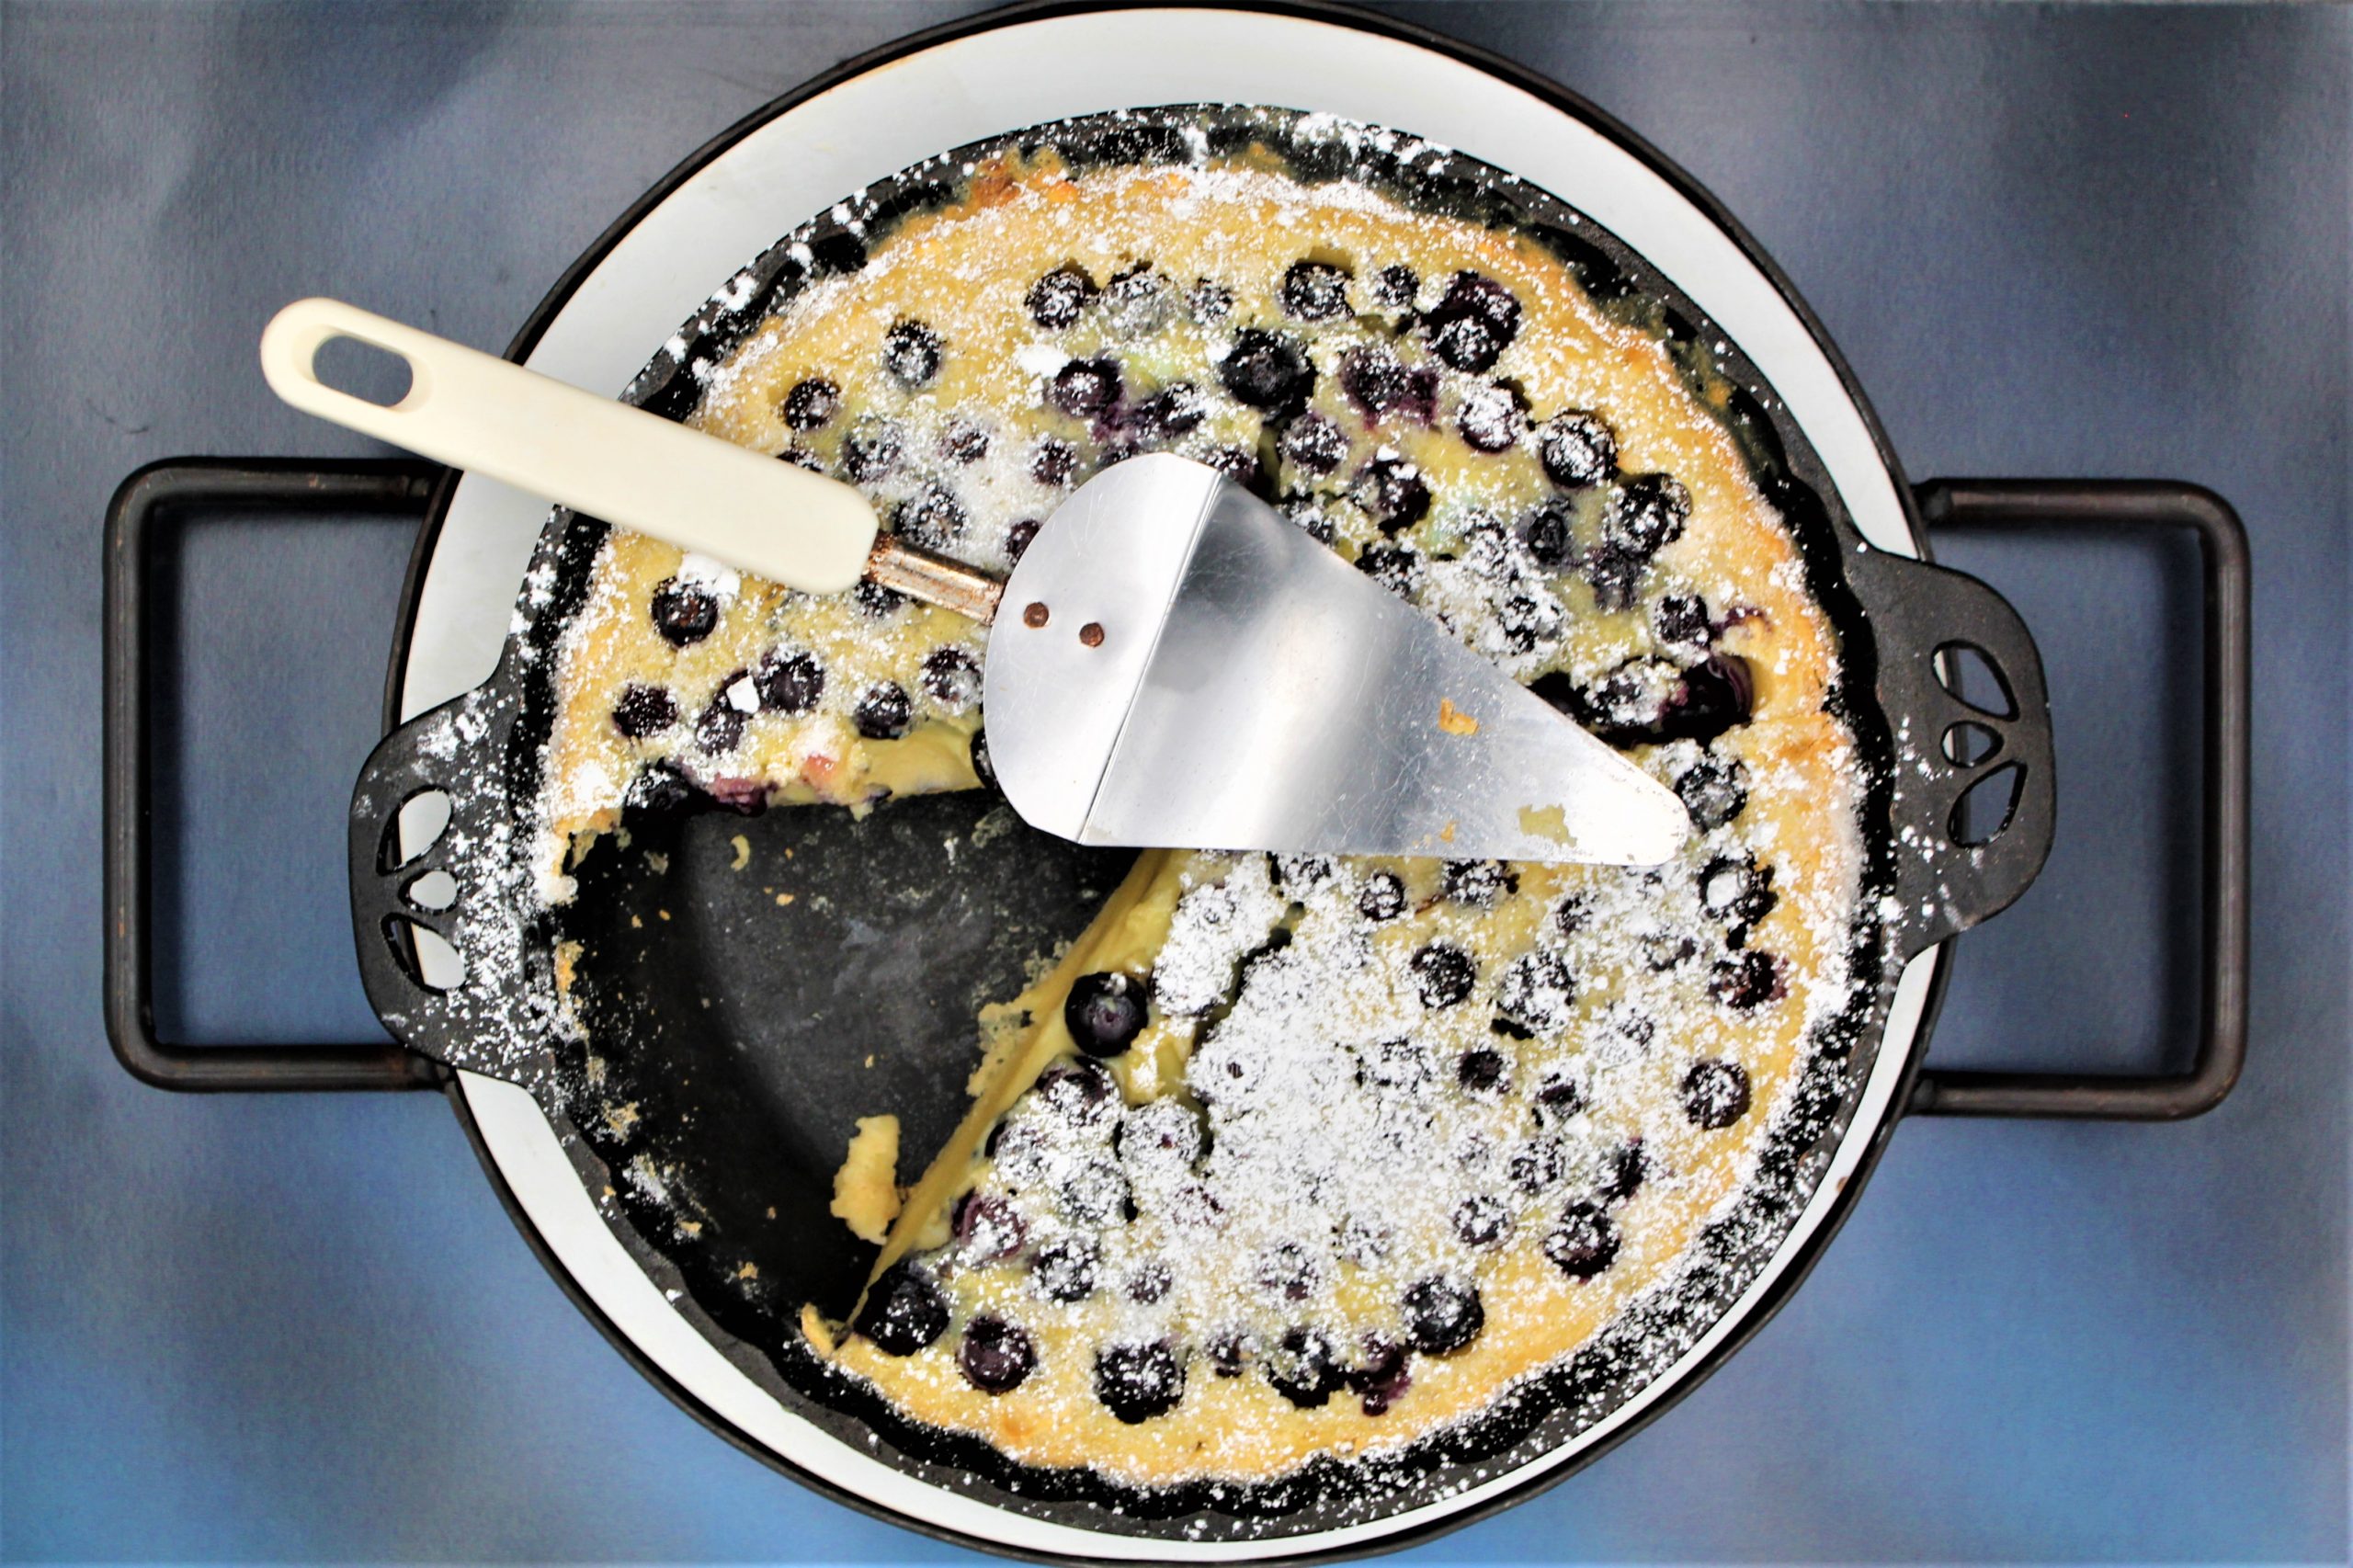
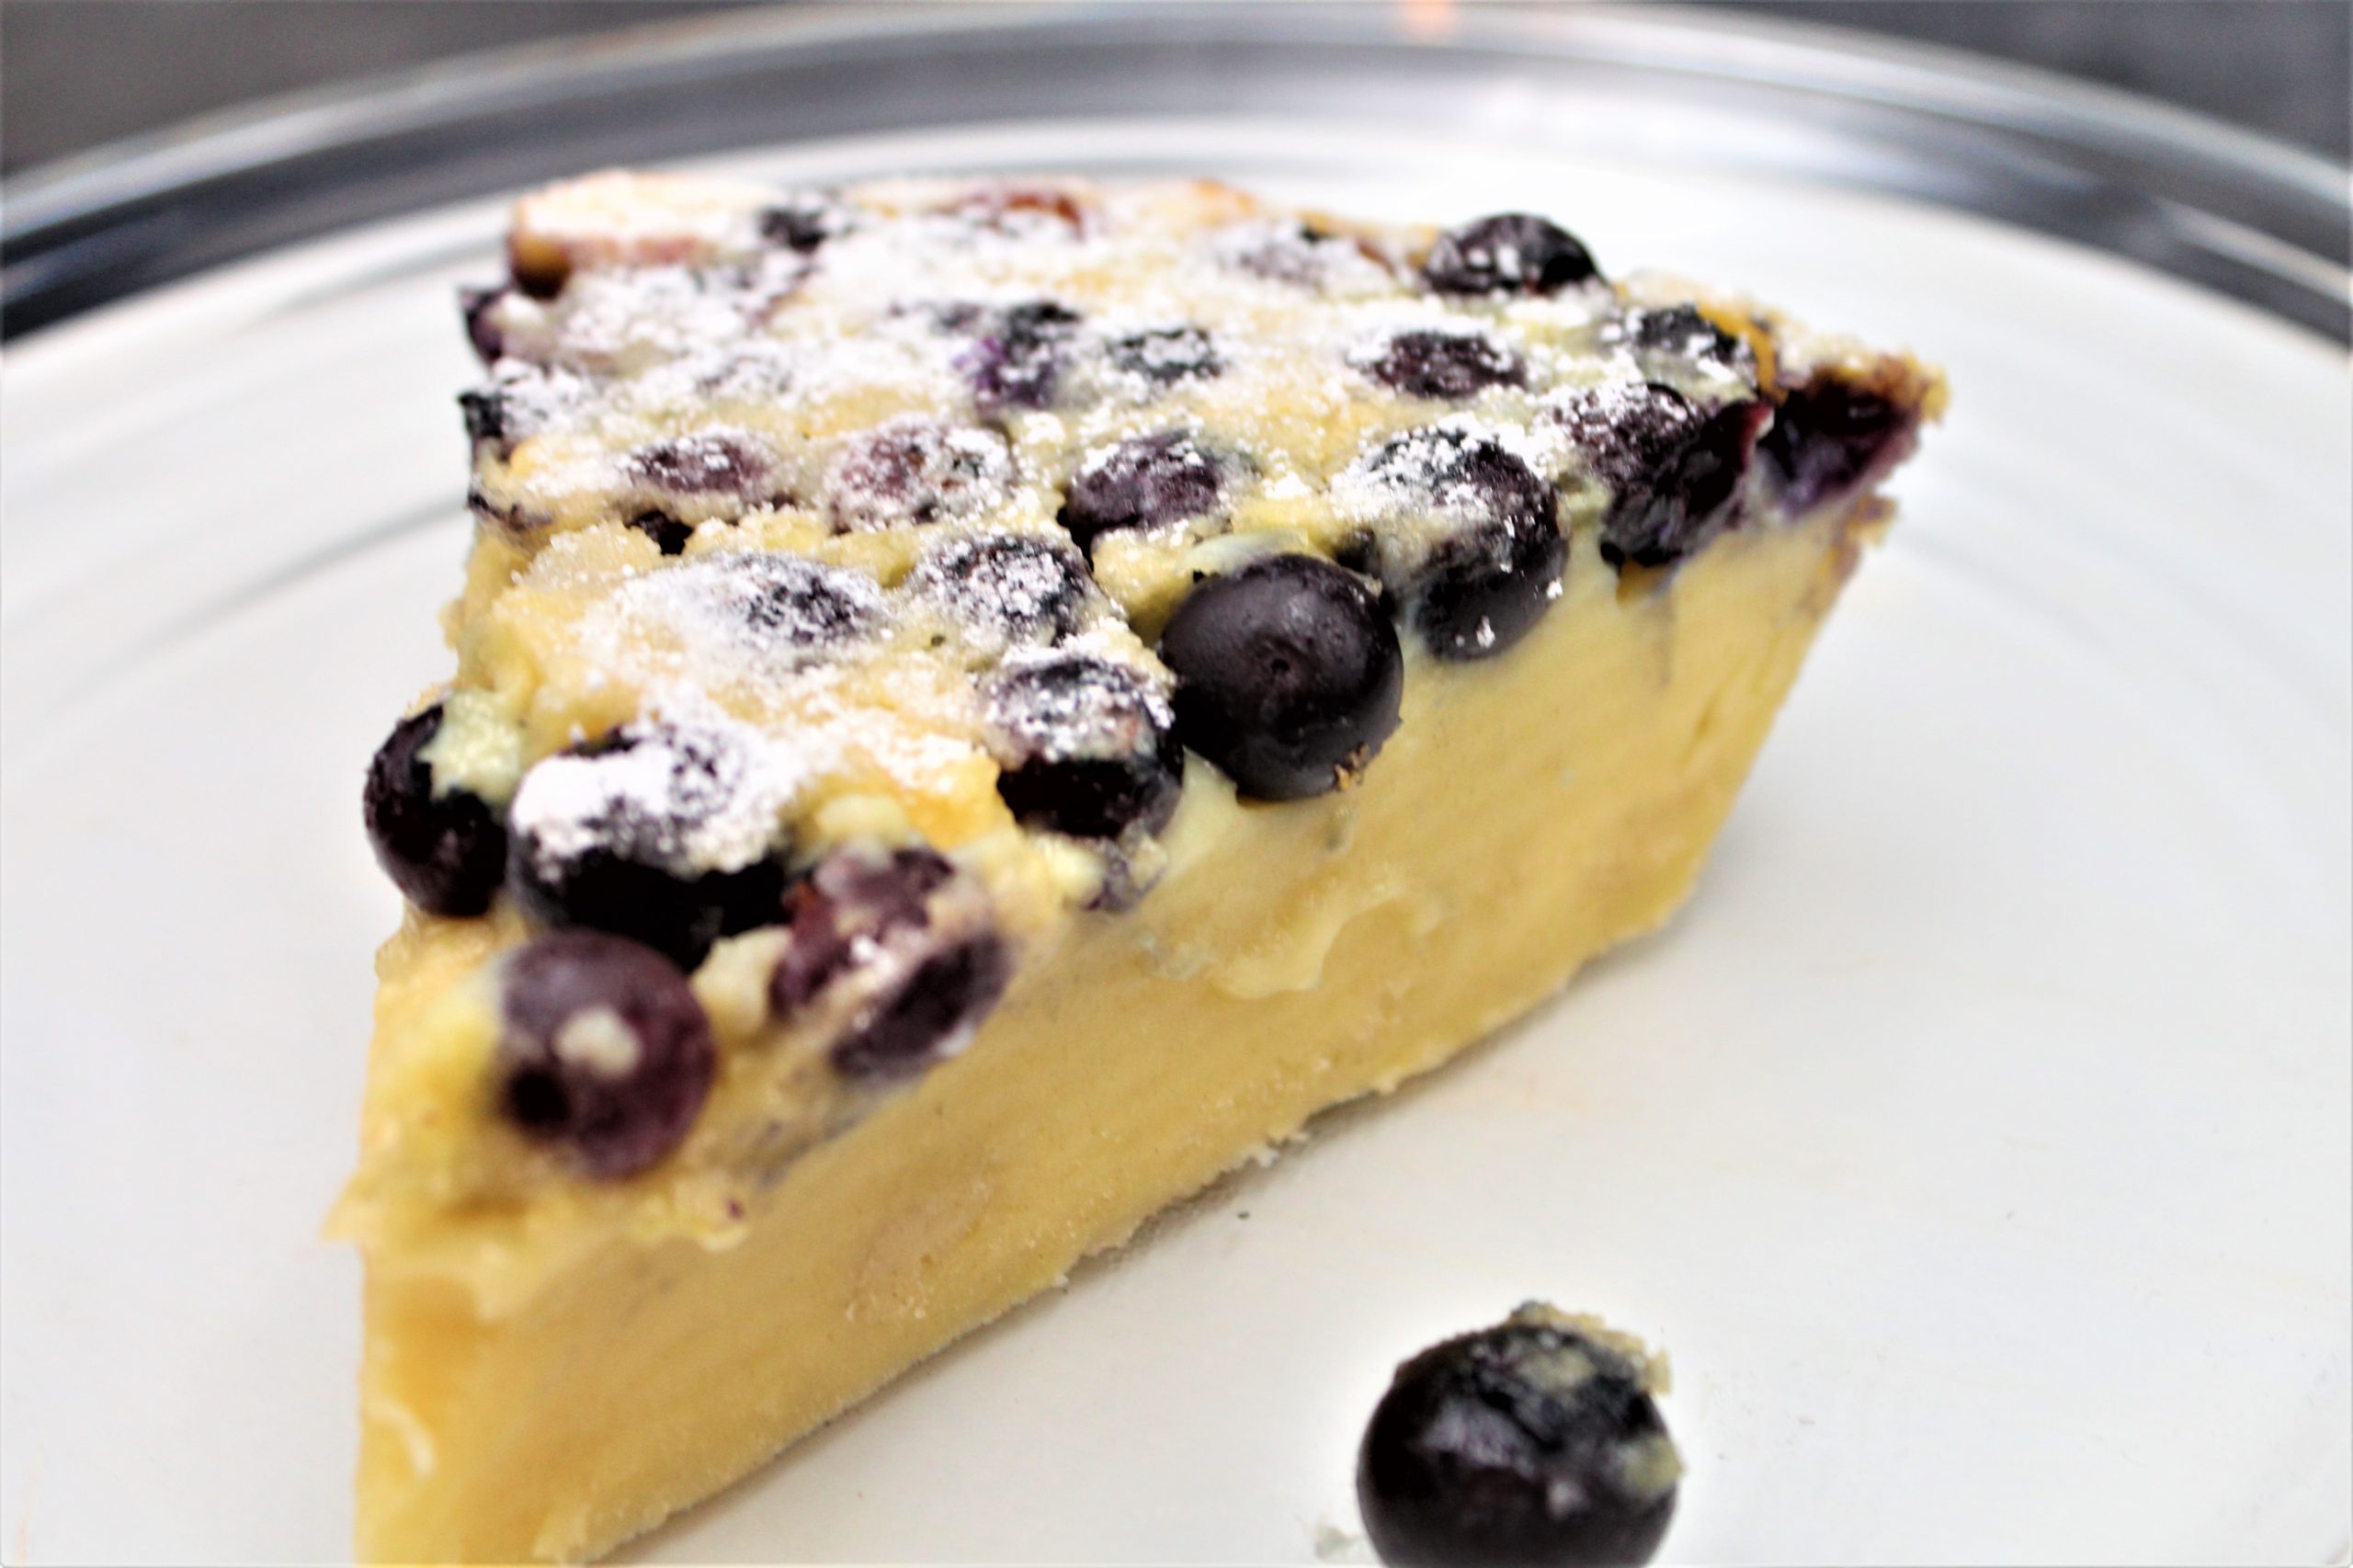
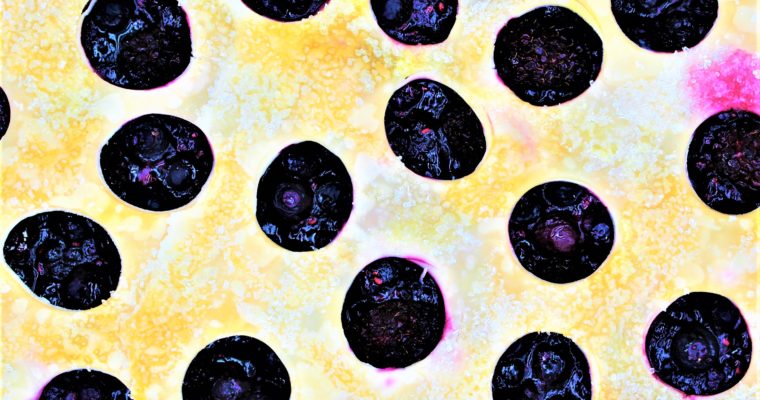
The first time I ordered Clafoutis in a restaurant, it was instant love. The silky texture, not overly sweet dessert, was perfection. I instantly knew I had to try to make it.
There was one problem.
I am intimidated by French baking. The processes used seem fussy and foreign to me. Although truth be known, I haven’t baked anything French to this point.
I was shocked to realize that this recipe is one of the easiest desserts I have ever baked. The process is the same as an American custard pie, without the crust.
A Clafoutis can be made with any fruit or berry. I think I will try peach next. I hope you try this stunning dessert at your next brunch. As the French would say….. Magnifico Dessert!
Clafoutis is a beloved French dessert. It is made with fruit or berries baked into a thick flan like batter. This silky custard like dessert is prefect for brunch or a dessert for after dinner.
Add the milk, sugar, eggs, vanilla, flour, and salt to a blender. You can also whisk these ingredients together in a large bowl if you do not have a blender.
Add the blueberries to the bottom of the prepared baking pan and spread them out evenly. Pour the batter over the blueberries.
When I was a kid, I was friends with a family that was first-generation American. Their family fled Latvia during the takeover of the Soviet Union. As the family settled in America, and the next generation came along, they took on our customs. They had …
I think most Americans, if asked, would think a sausage roll is nothing more than pigs in a blanket? Even though the sausage roll has been popular at pubs and throughout Europe for decades, the fad never caught on here. These little guys are the …
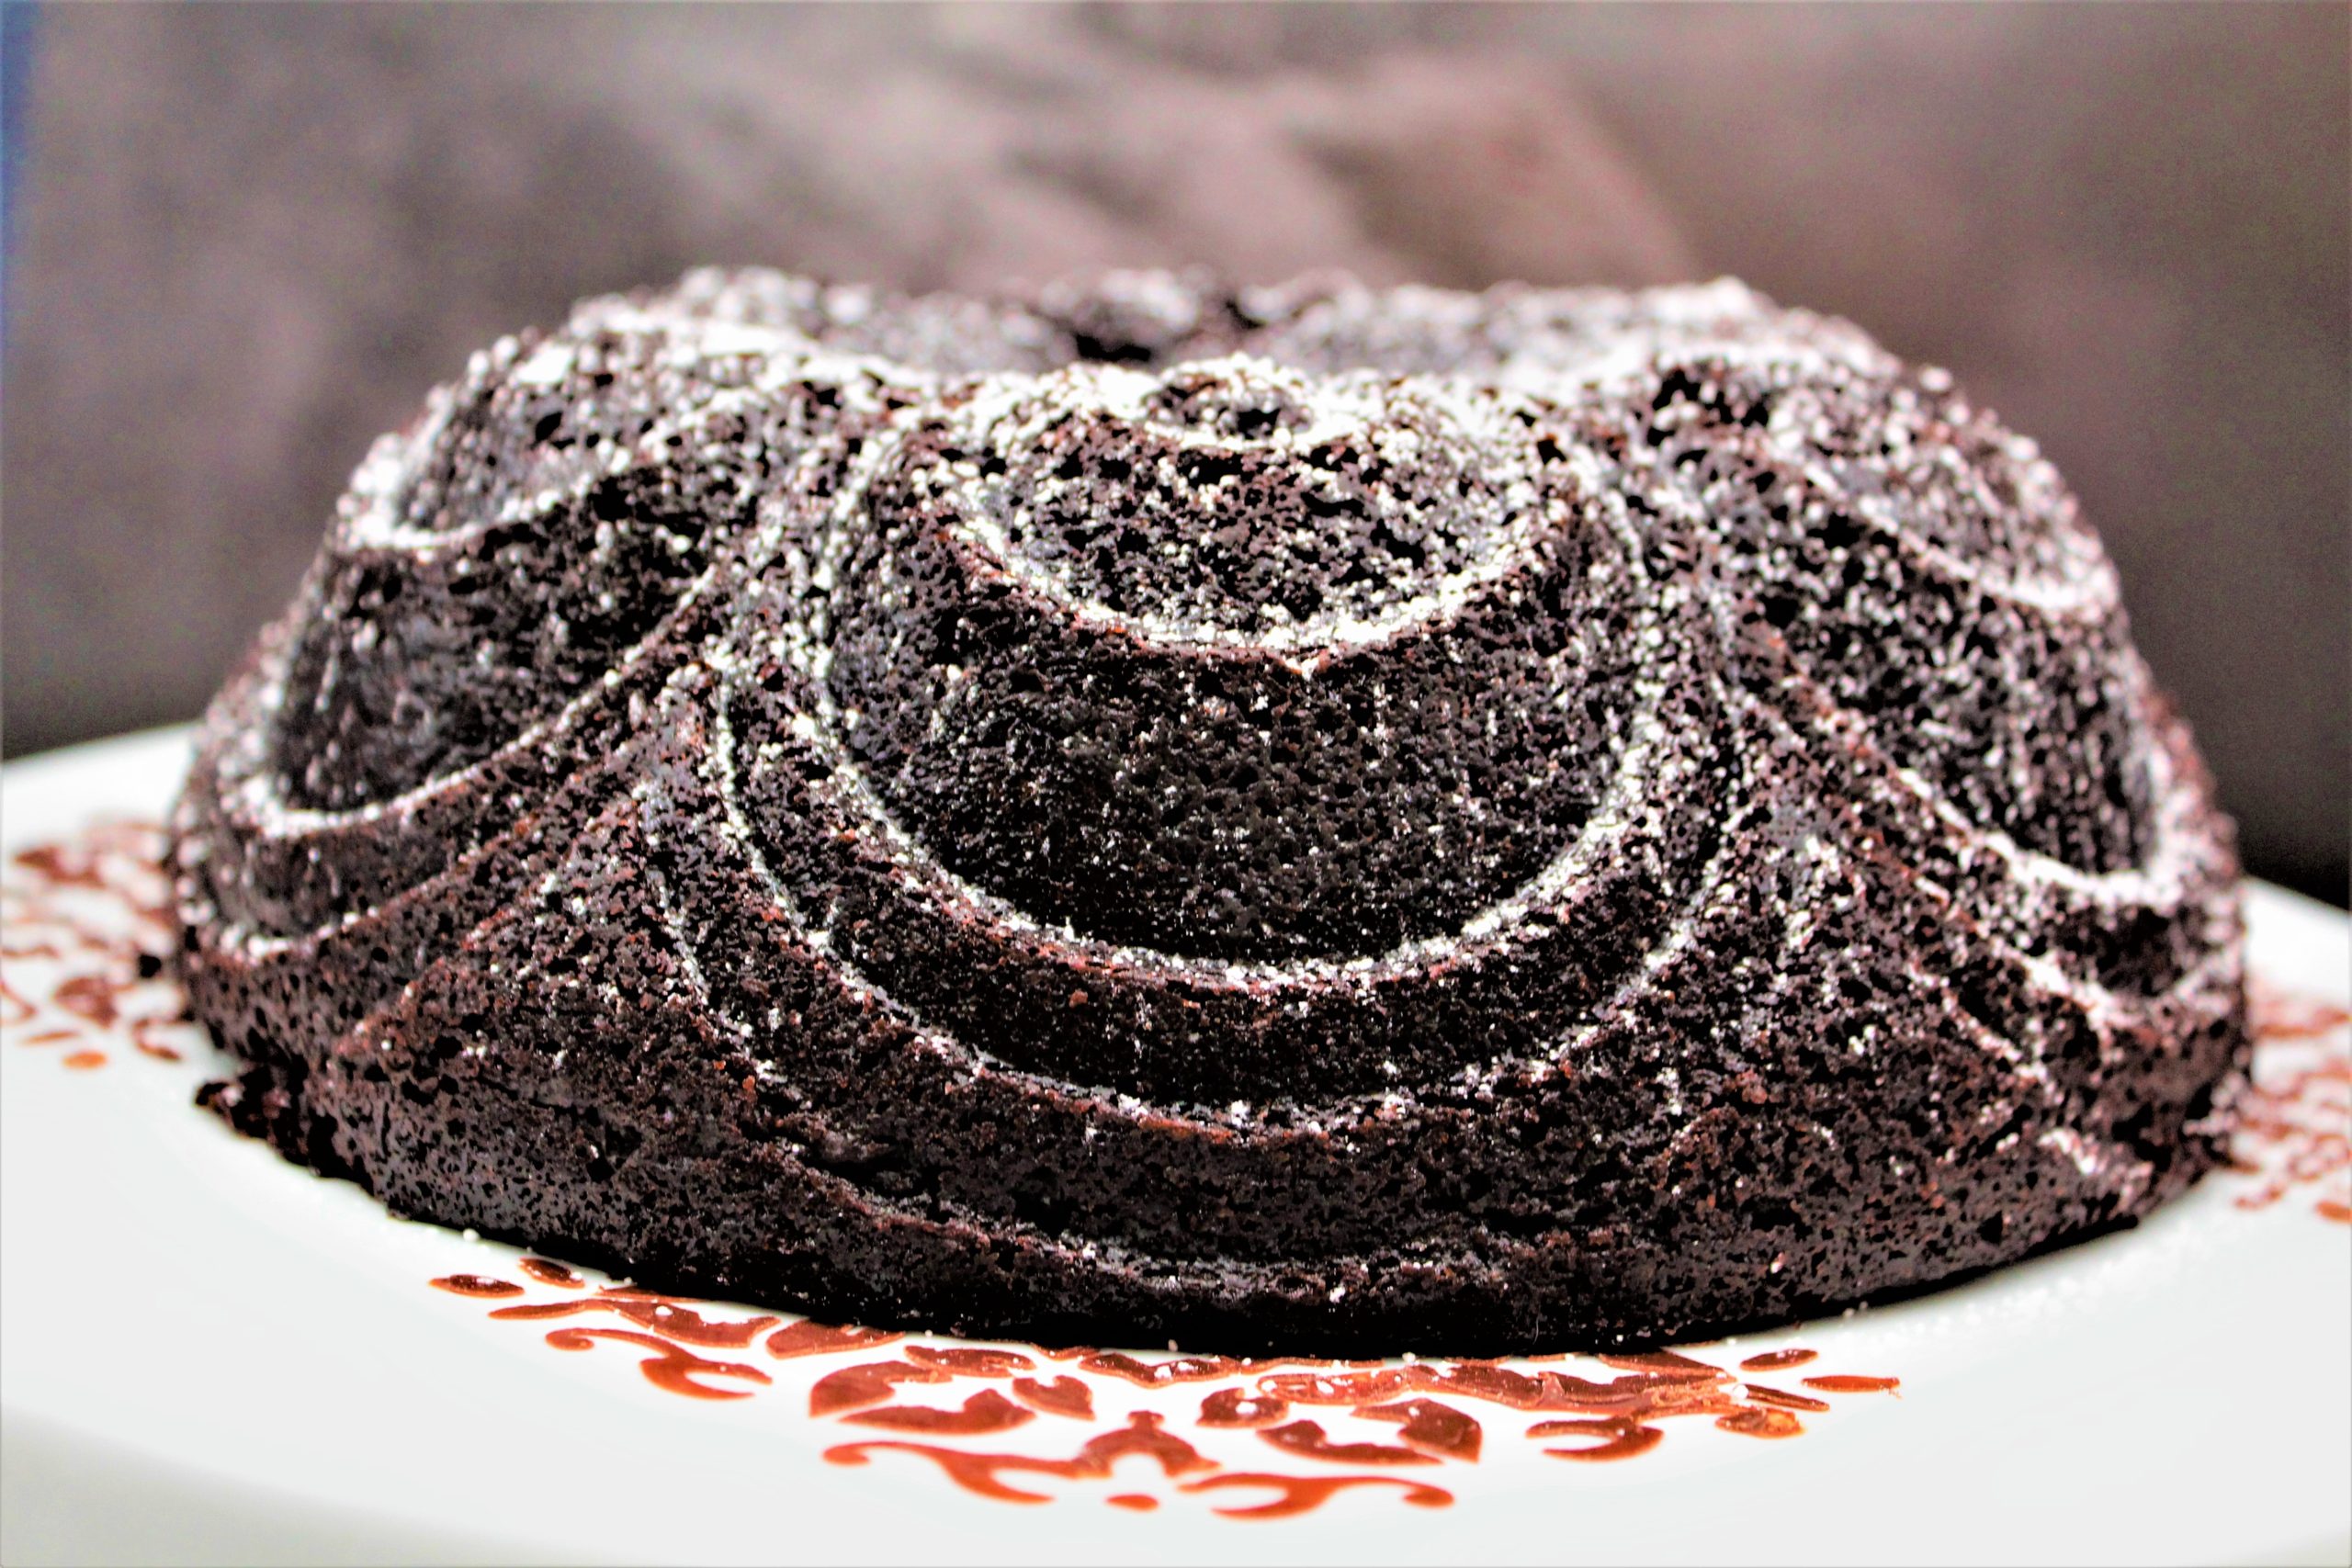
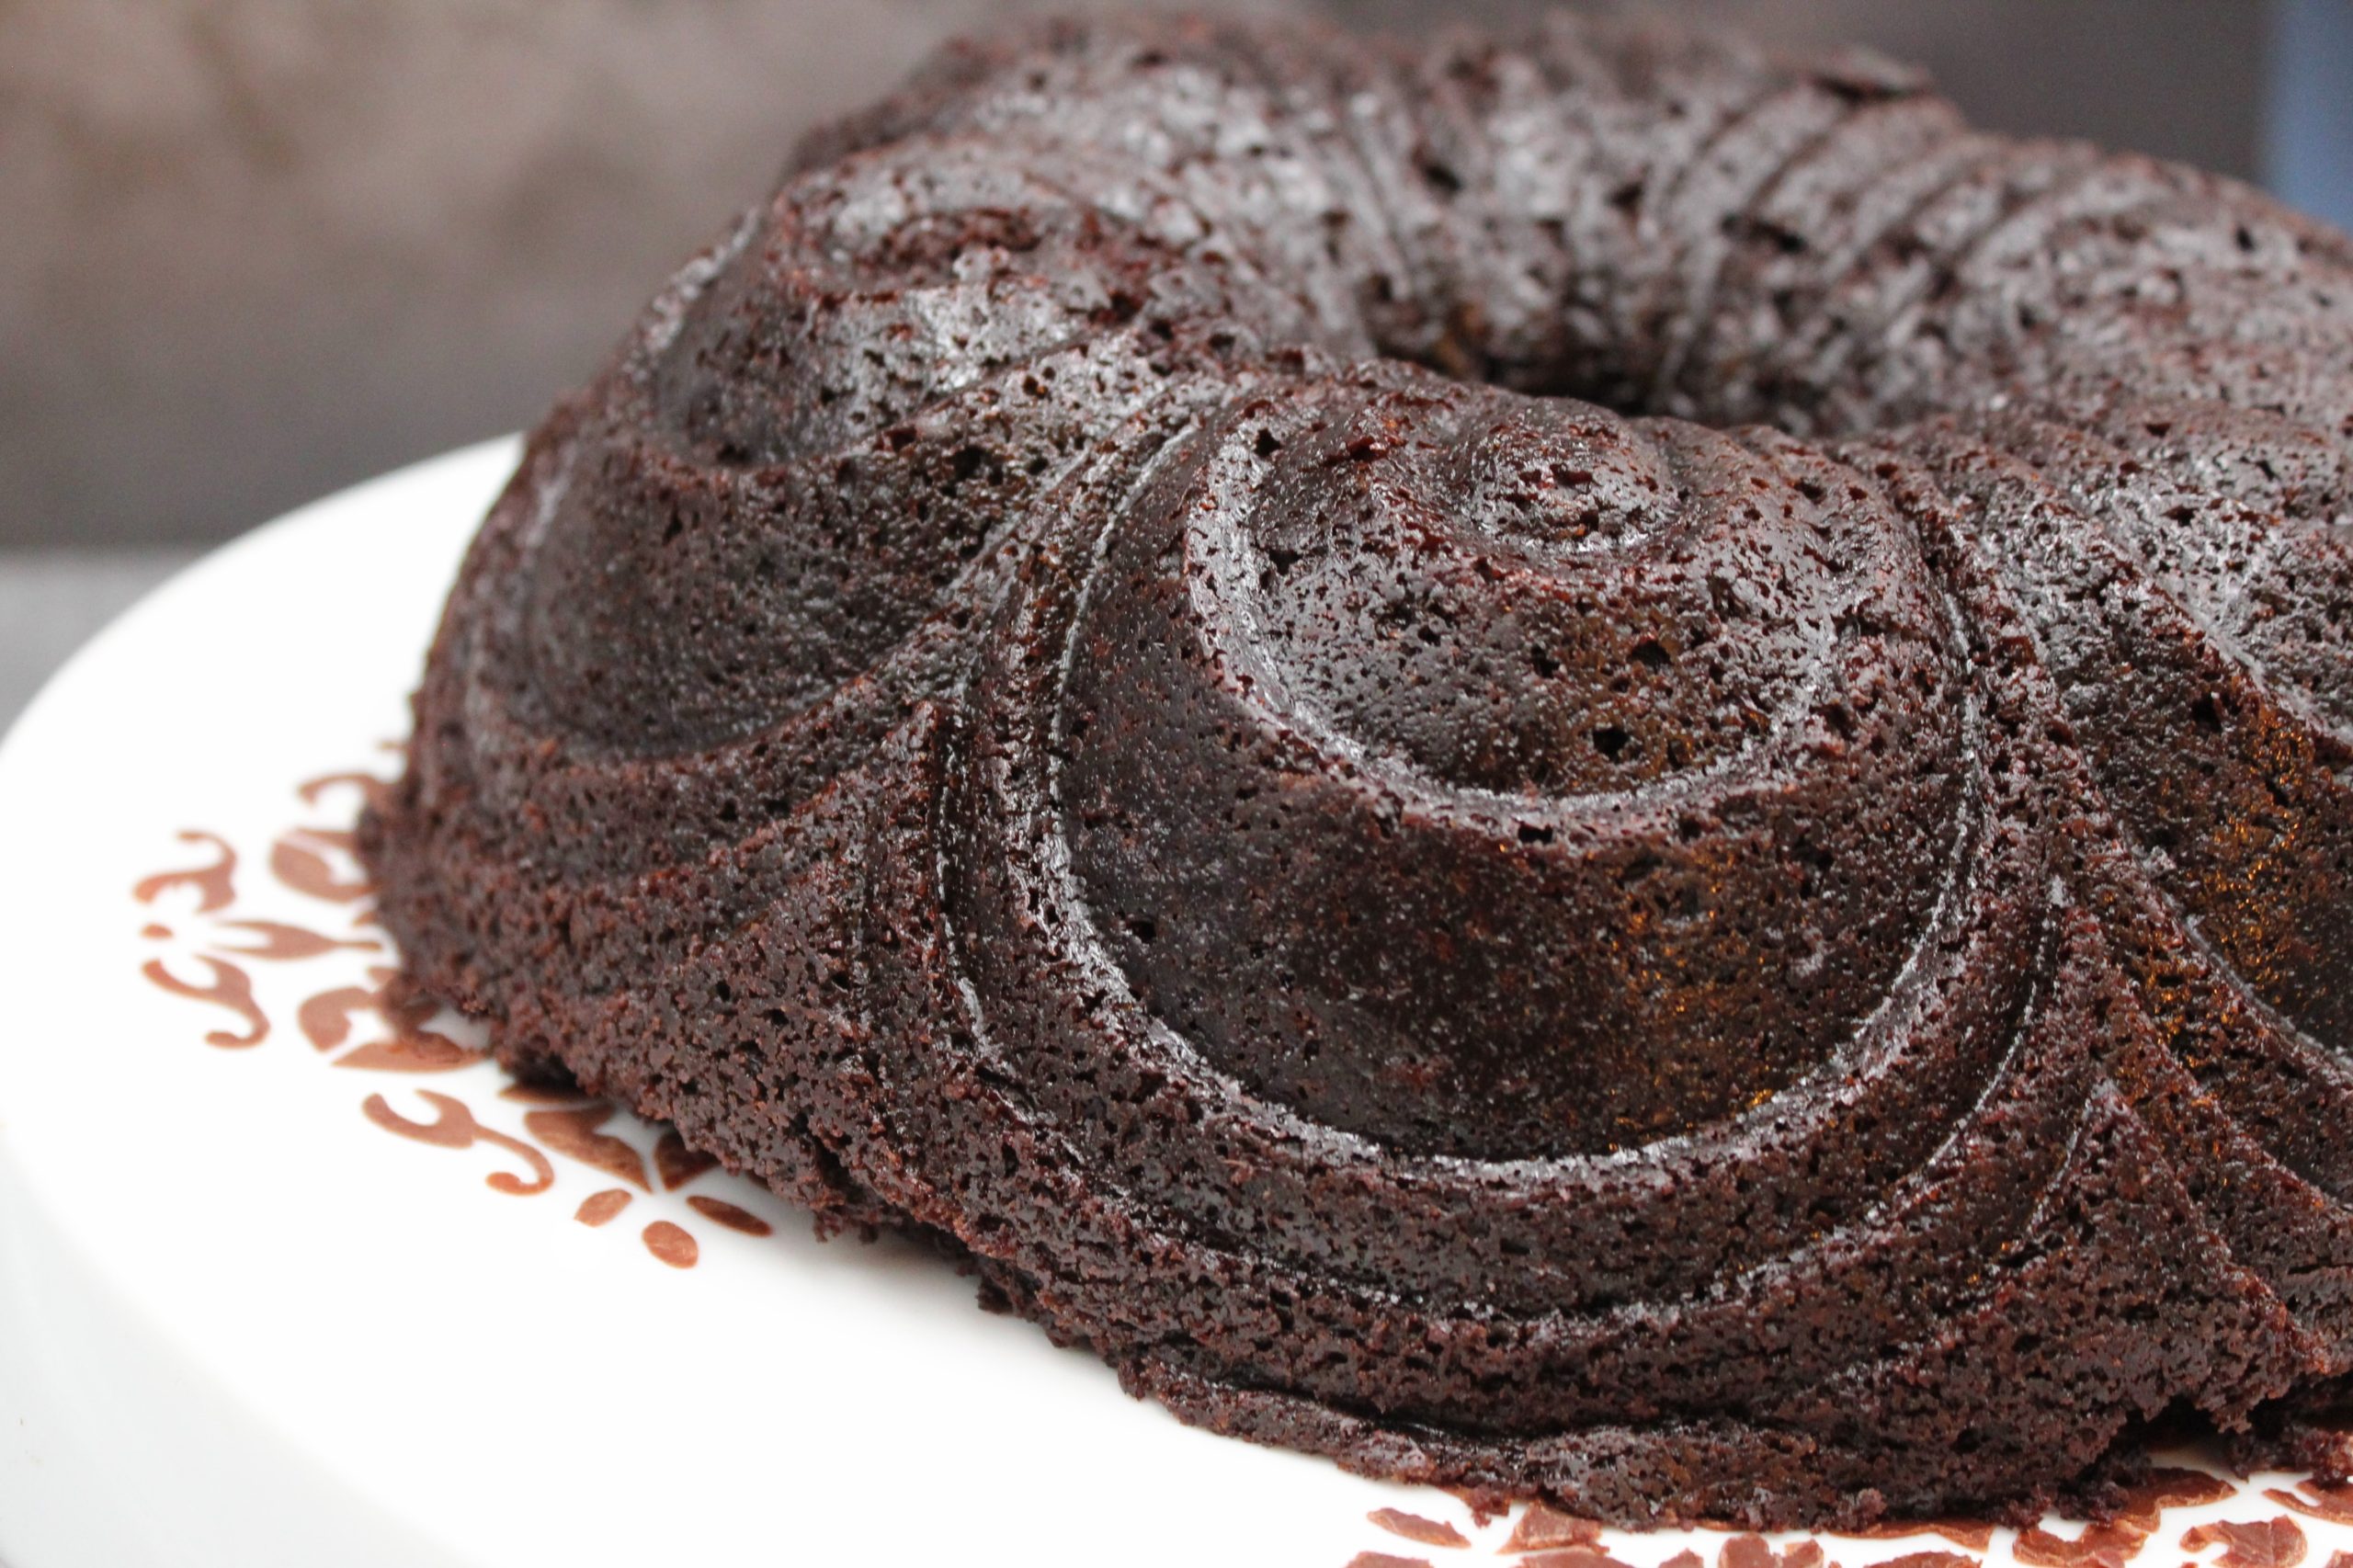
Do you love the intense flavor of dark chocolate? If you do, You’ll love this dark chocolate cake.
Let’s talk about chocolate.
Which is your favorite? Dark chocolate, semi-sweet chocolate, or milk chocolate? I’m a fan of all three. Each one has its unique flavor and characteristic.
Dark chocolate is a bold flavor and is best when it’s paired with other bold flavors. Dale and I visited a winery in Napa Valley that offed wine tastings to its guests. We enjoy wine tastings and have done several, but this particular winery offered dark chocolate with its deep red wines. The flavors worked so well together. I now pair the two all the time.
Semi-sweet chocolate is a favorite in chocolate chip cookies; however, I like to mix dark and semi-sweet together. The cookies always turn out amazing. And then there is milk chocolate, much sweeter and milder in flavor. If I had to choose one for a candy bar, it’s going to be milk chocolate.
With all of that said, I’m a milk chocolate fan. However, if I’m baking a cake, dark chocolate is the winner! For this cake, I used Hershey’s Special Dark Cocoa, along with unsweetened chocolate and coffee. This cake came out almost black. I Sweetened it with brown sugar instead of white. The dark sugar helped the cake stay moist and rich. I hope you try my Black Magic Cake. If you are not a fan of dark chocolate, I believe you will be after your first bite, and don’t forget to open a Shiraz bottle and enjoy.
My Mixed Berry Slab Pie is my attempt to recreate their perfect mixed berry pie. It reminds me of those less stressful times when coffee and pie solved all our problems.
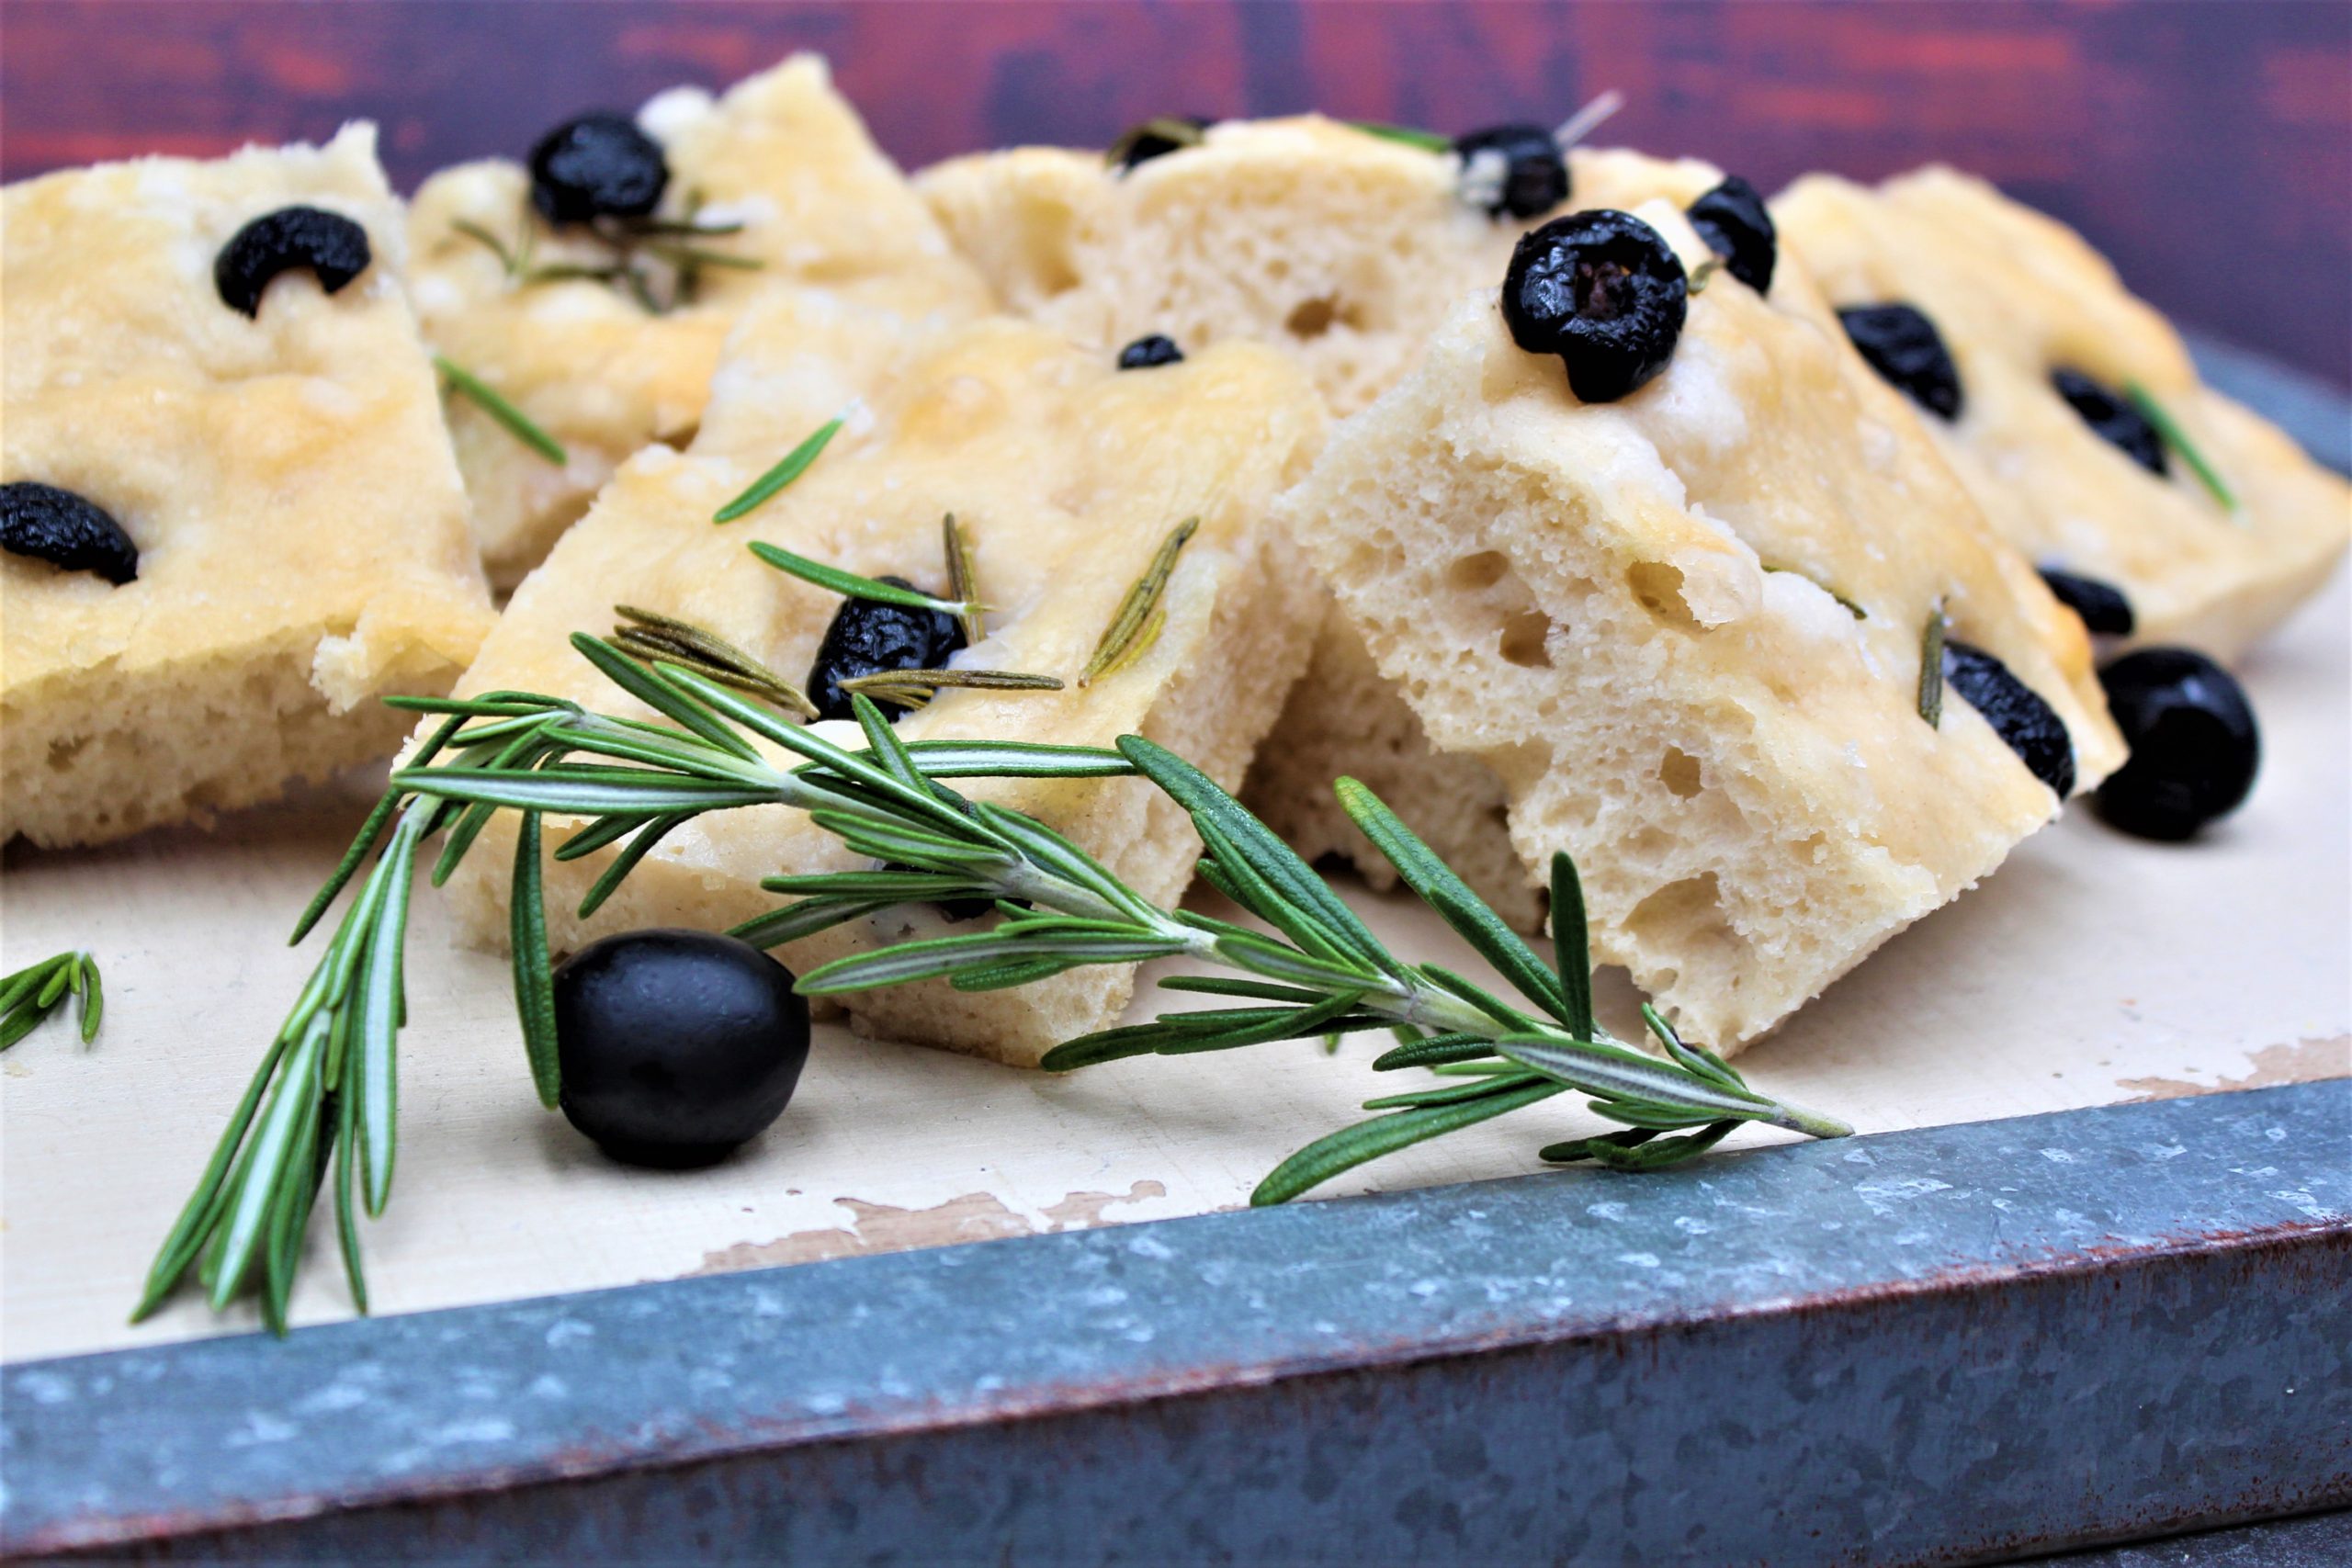
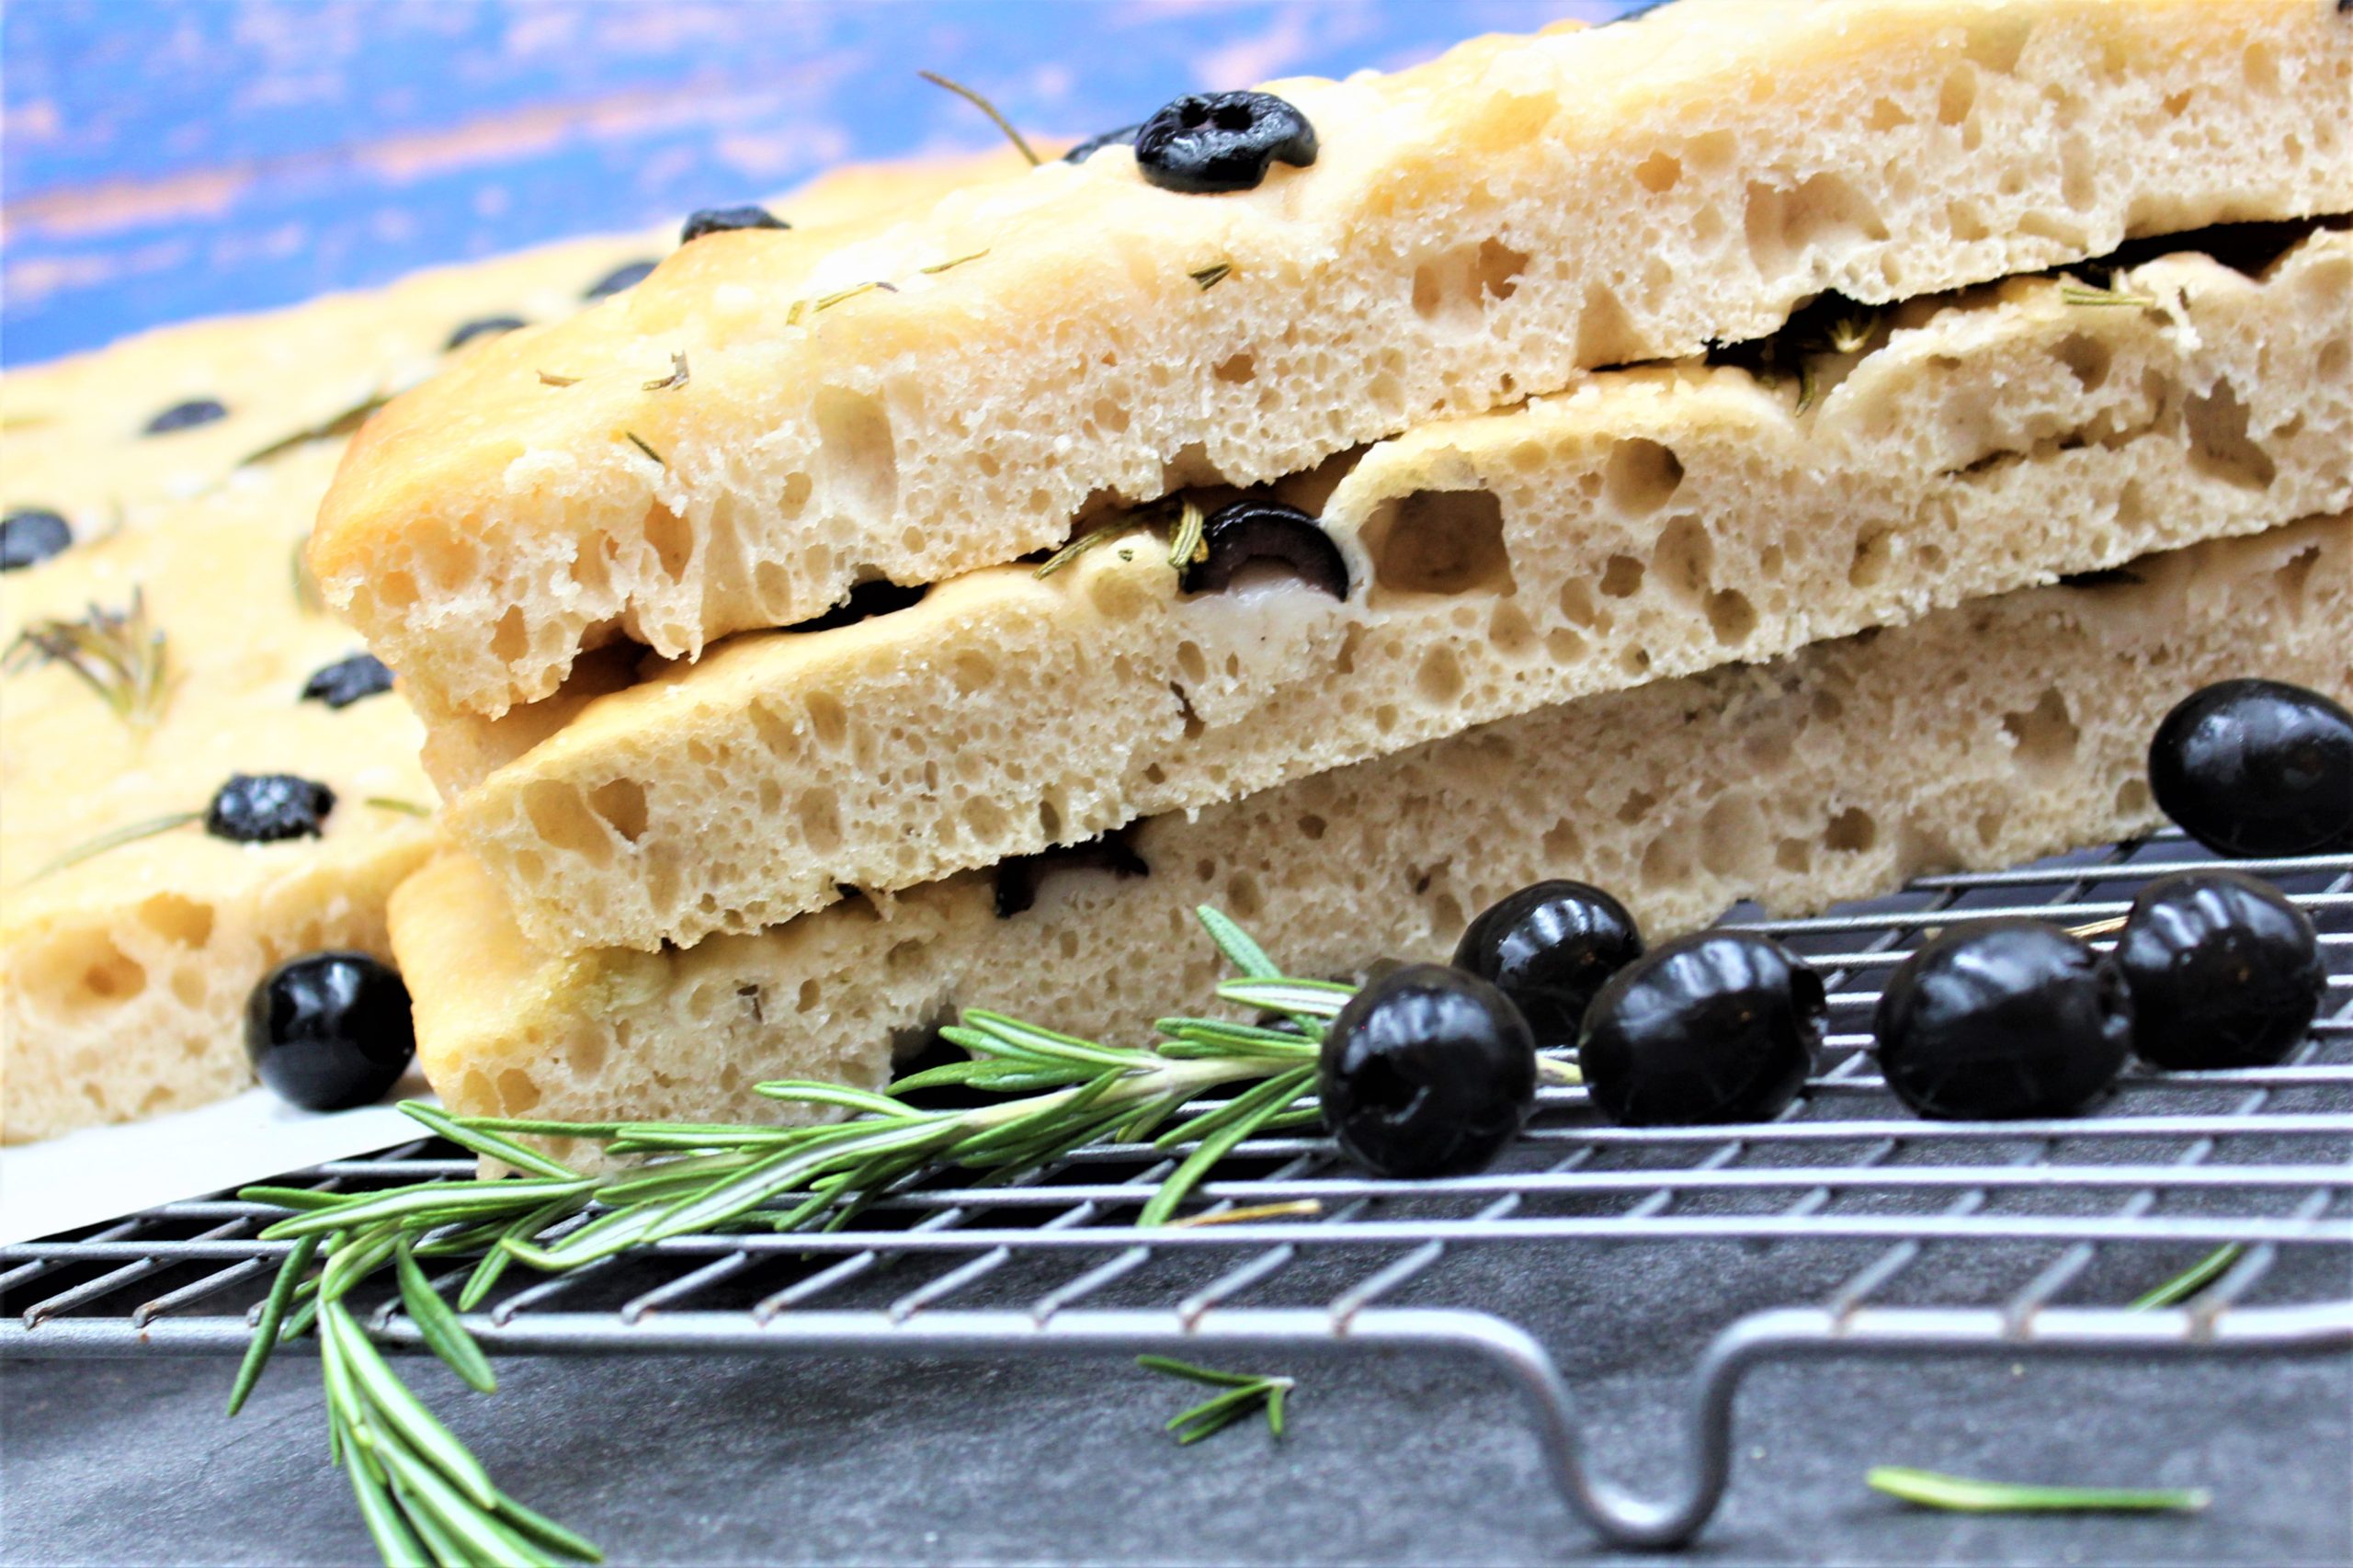
My favorite place to eat in San Francisco makes and sells only one thing: focaccia. Liguria Bakery has been on a corner of Washington Park since 1911. It’s such a quaint, sleepy area of the city. They originated as a full-service bakery, but it became apparent that focaccia was what their customers wanted. They became known for their seven flavors of focaccia.
I am not alone in my obsession with these sheets of olive-oil drenched soft fluffy focaccia bread. Liguria sells out of them every day, usually by noon. Every morning the line wraps around the building and heads down the street.
When we visit San Francisco, Dale and I always go directly to the Liguria Bakery, grab pizza-flavored focaccia, walk across the street to Washington Square Park, and sit on a bench. We sit and savor the best focaccia that we will probably ever have. We do this not only for the fantastic focaccia but also to absorb all the unique things Washington Square offers.
When visiting Washington Square, it’s like traveling back to 1954. It’s a quiet area with groups of people practicing tai-chi, walking dogs, and just enjoying the shady park. Across the street is a beautiful Cathedral. It is the epicenter of the block, and it is where Marilyn Monroe and Joe DiMaggio were married. The entire area is magical.
After 20 years of going to the Liguria Bakery, I finally started working on my focaccia bread recipe. There are many focaccia versions, but I have landed on what I believe is a close second to Laquria’s after trial and error.
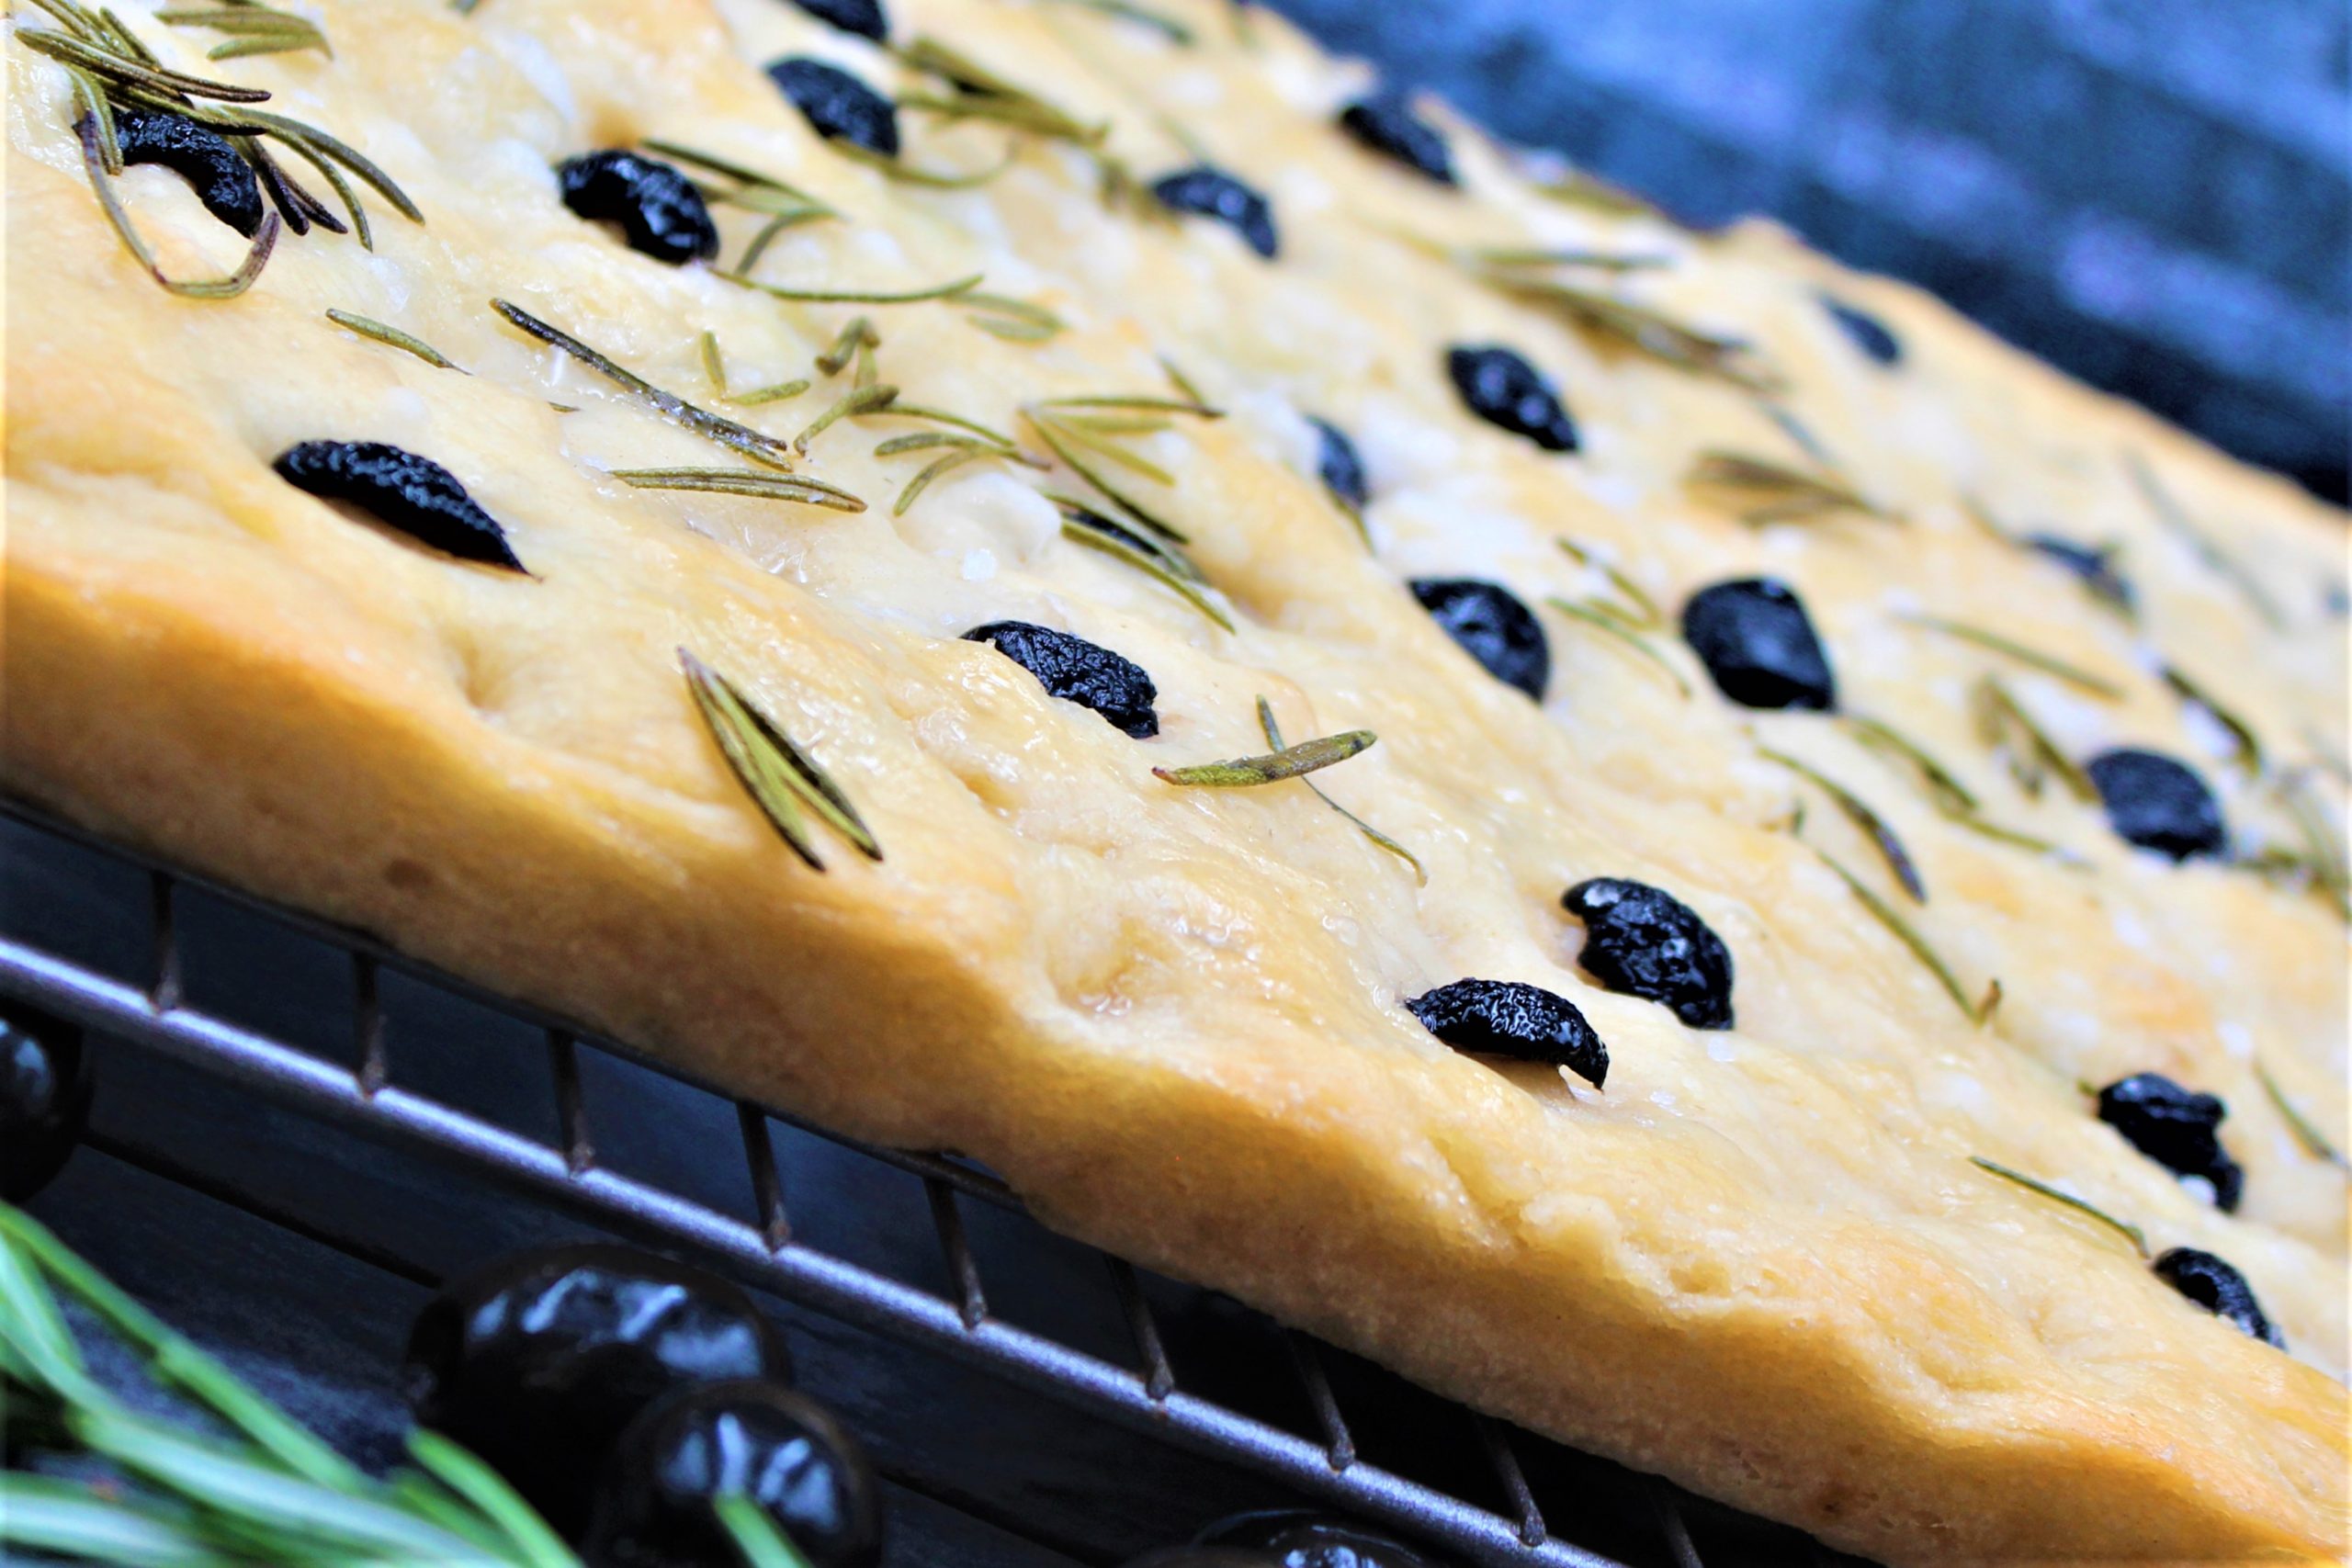
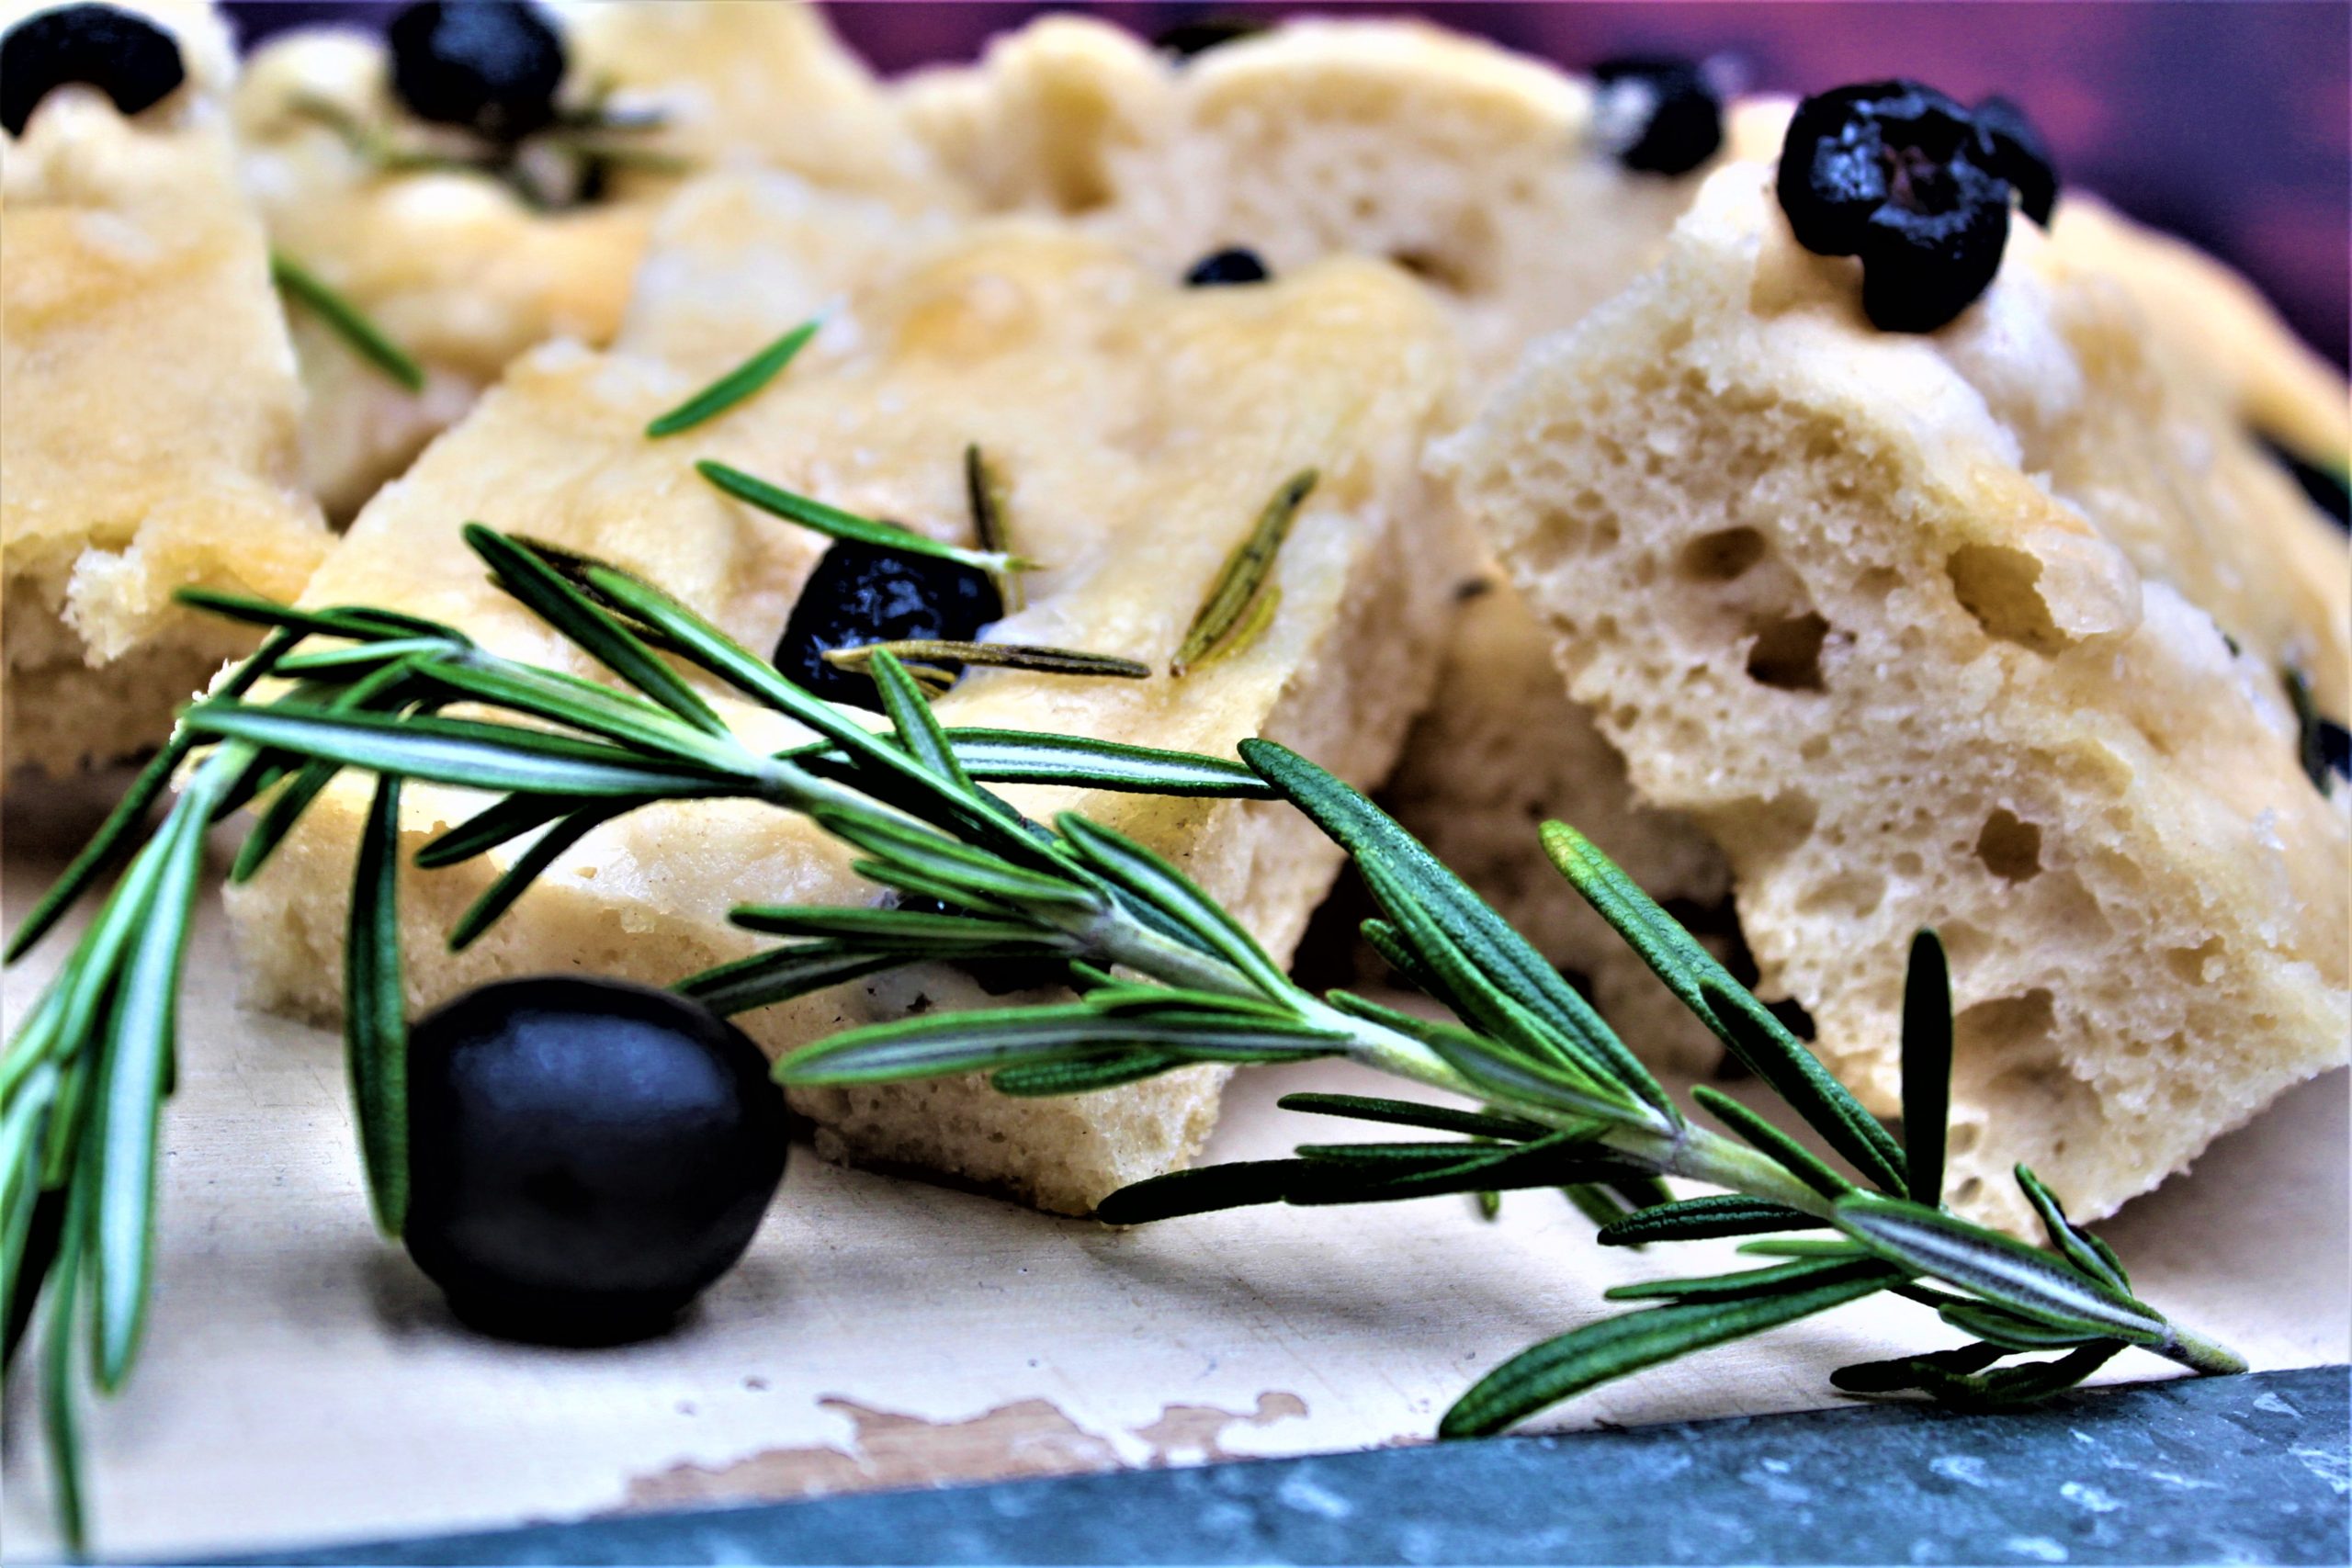
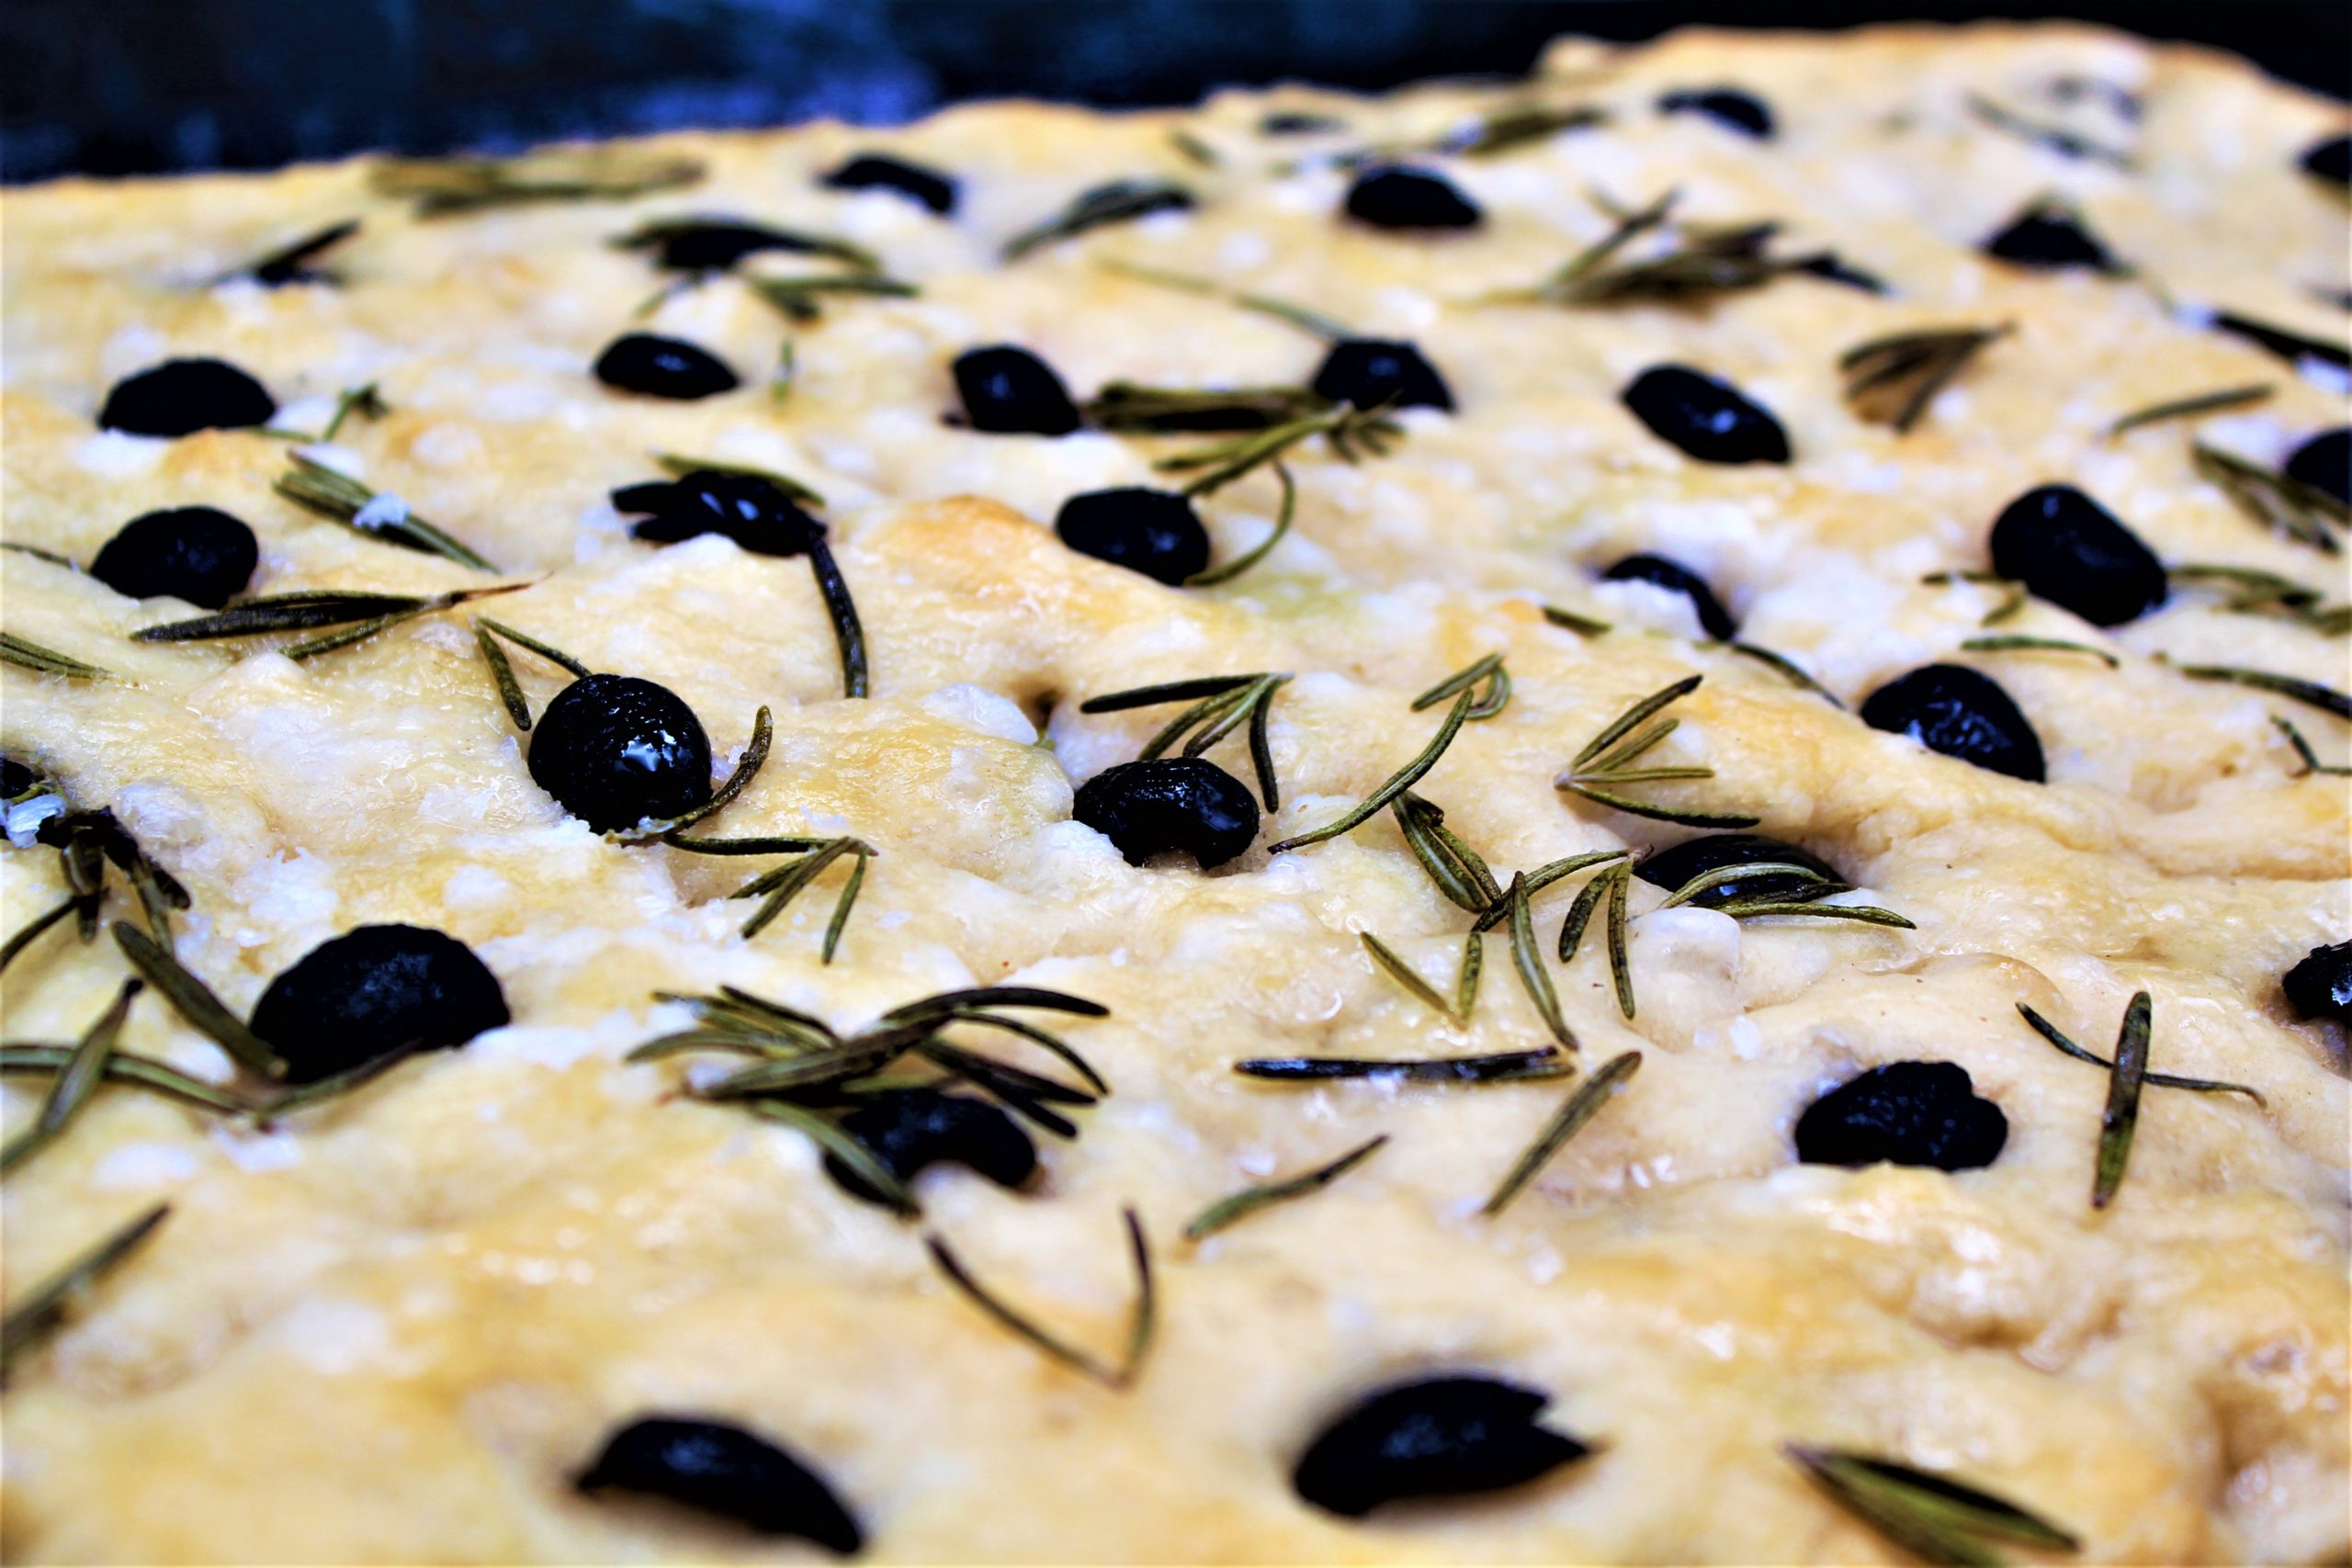
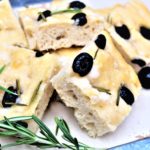
My recipe for Rosemary Black Olive Focaccia is drenched in a saltwater brine just before baking. The results are soft, fluffy, and savory. I love to dip this bread in flavored olive oil. It is perfect with pasta.
I dare to say, it is an ideal bread to take to the park and sit on a bench and enjoy your day, and if you close your eyes and try real hard, you might be able to hear the cheers of a long-ago crowd as Joe and Marilyn run down the church steps of a beautiful cathedral, just like it was 1954.
This delicious Rosemary-Black Olive focaccia Bread recipe is simple to make, and topped with fresh rosemary, olive oil and flaky sea salt.
Course
bread
Cuisine
Italian
Keyword
Black olive, dougbake.com, Focaccia
Prep Time15minutes
Cook Time35minutes
Servings8servings
Ingredients
600gramswater
1/2tsp active dry yeast
15 grams honey
800gramsall-purpose flour
18gramskosher salt
50gramsextra virgin olive oil, plus more for pan and drizzling
3tablespoons rosemary
1cup black olives, sliced in half
Instructions
In a large bowl, stir together water, yeast, olive oil, and honey. Let rest for 5 minutes. Add flour, salt, and herbs and stir with a rubber spatula or wooden spoon until completely combined and no flour streaks remain. Cover bowl with plastic wrap and let rest on your countertop for 12-14 hours, until doubled in volume.
Spread 2-3 tablespoons of olive oil over the surface of a rimmed 12x18” baking sheet. Turn dough out onto the baking sheet and gently stretch the dough towards to the edges of the pan. To do this without tearing the dough, reach hands underneath and gently pull it towards the outside. At this point, it will probably shrink back a bit, but that’s okay. Drizzle it olive oil and cover with plastic wrap. Let it rest for 30 minutes.
After 30 minutes, use your fingers to dimple the entire surface of the dough. Stir together warm water and salt and then pour brine over the top of the dimpled dough. Cover again and proof for another 45 minutes. It will seem like a mistake, but trust me here,
About 30 minutes into your final proof, preheat your oven to 450° F. When the oven is hot and the dough is proofed, remove cover, sprinkle with flaky salt. Bake for 25-30 minutes until golden brown. Make sure to check that the bottom of the dough is crisp and browned.
Remove focaccia from oven and immediately drizzle with more olive oil. Let rest for about 5 minutes and then use a metal spatula to loosen from pan. Enjoy warm with butter or olive oil and more flaky salt.
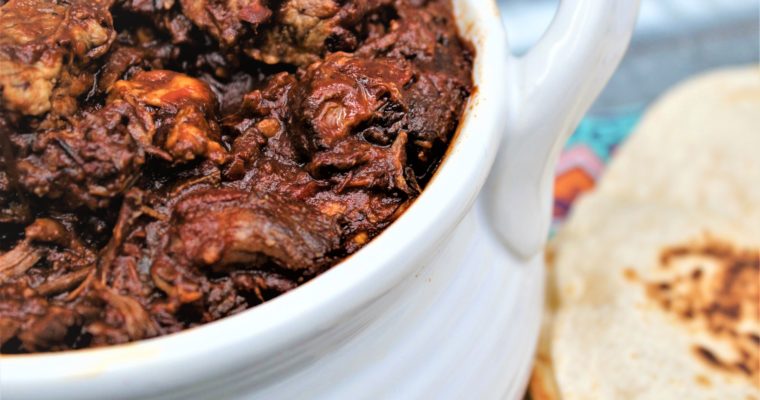
My Chili Colorado is slow-roasted with steak pieces in a lightly spicy sauce made from three different varieties of dried Mexican chili, including guajillo, ancho, and pastilles
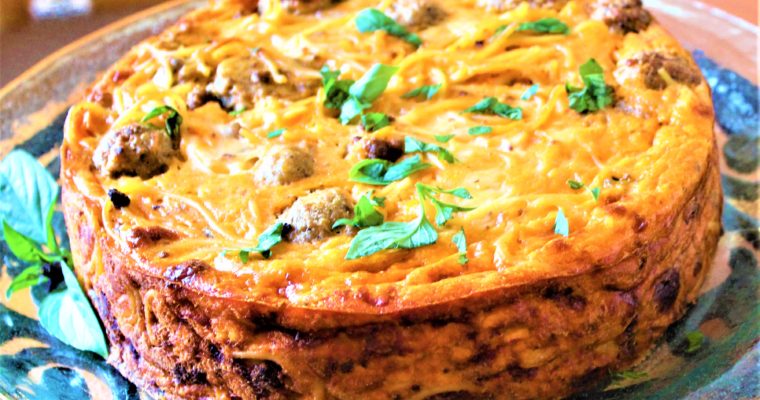
Spaghetti pie is an excellent way to take ordinary spaghetti and present it in a different form that you will love! The “crust” is formed from leftover spaghetti, and the filling is spaghetti mixed with a tangy sauce. Spaghetti Pie is comfort food at it’s finest.
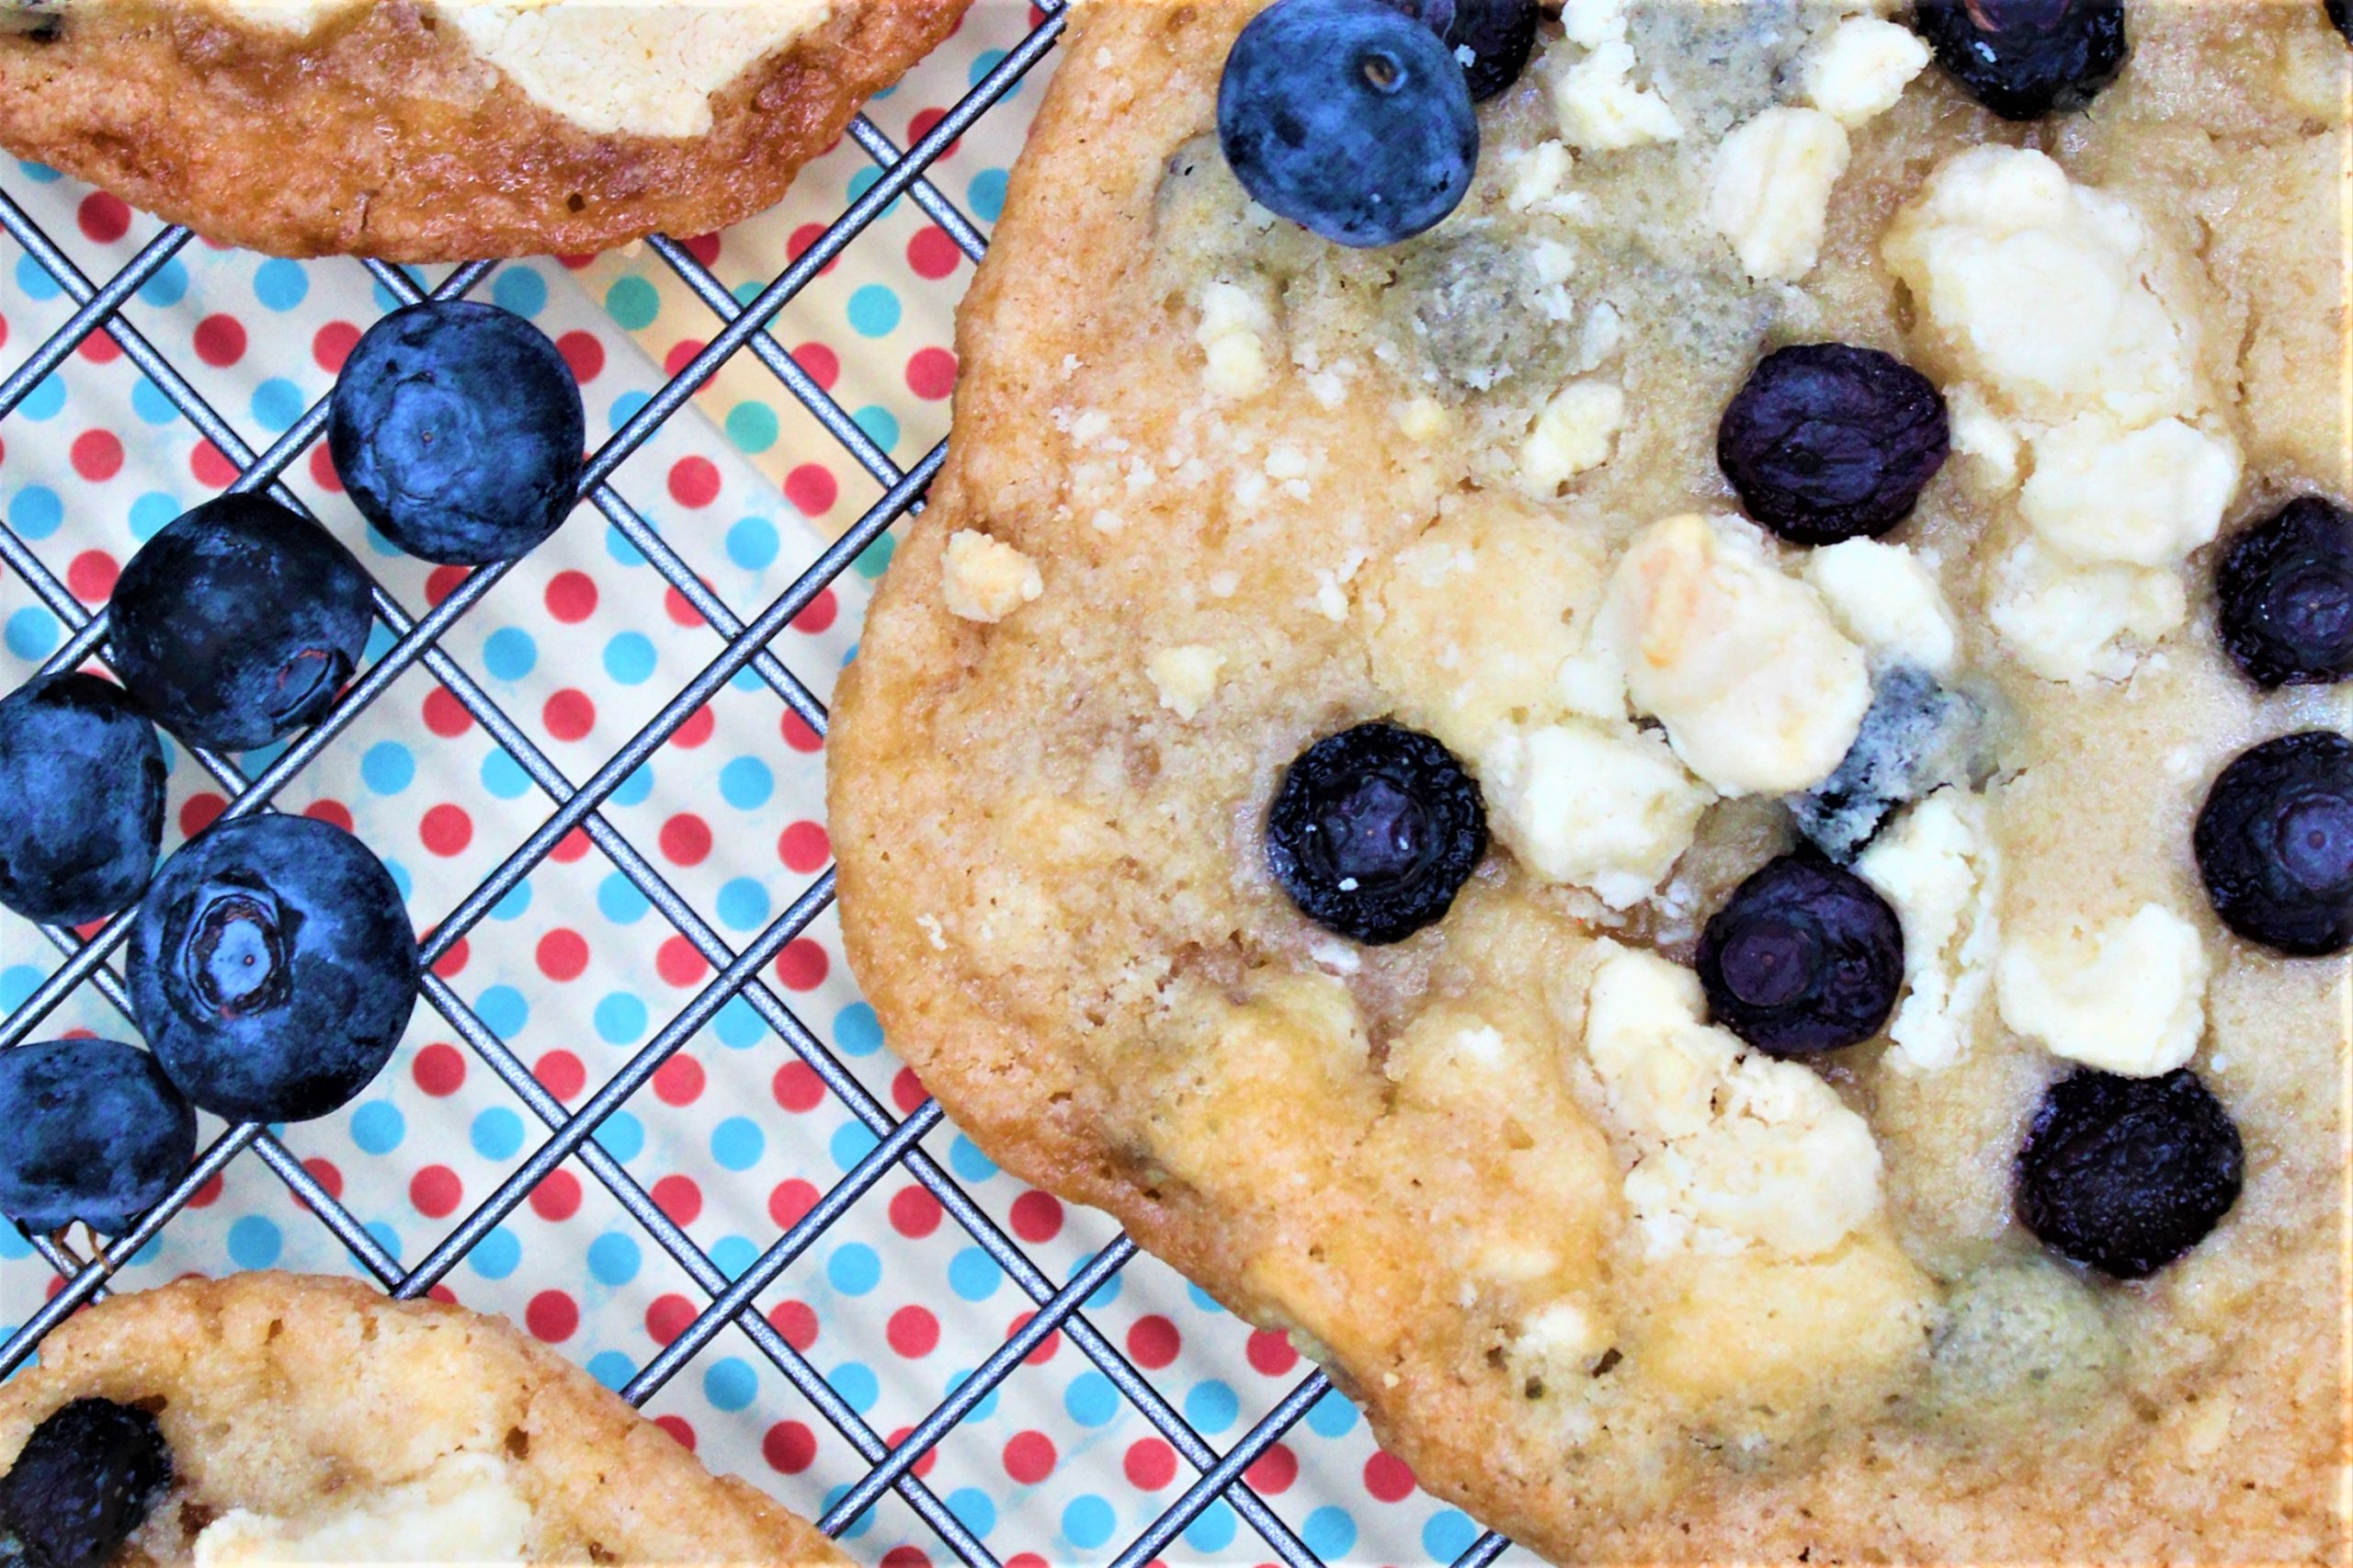
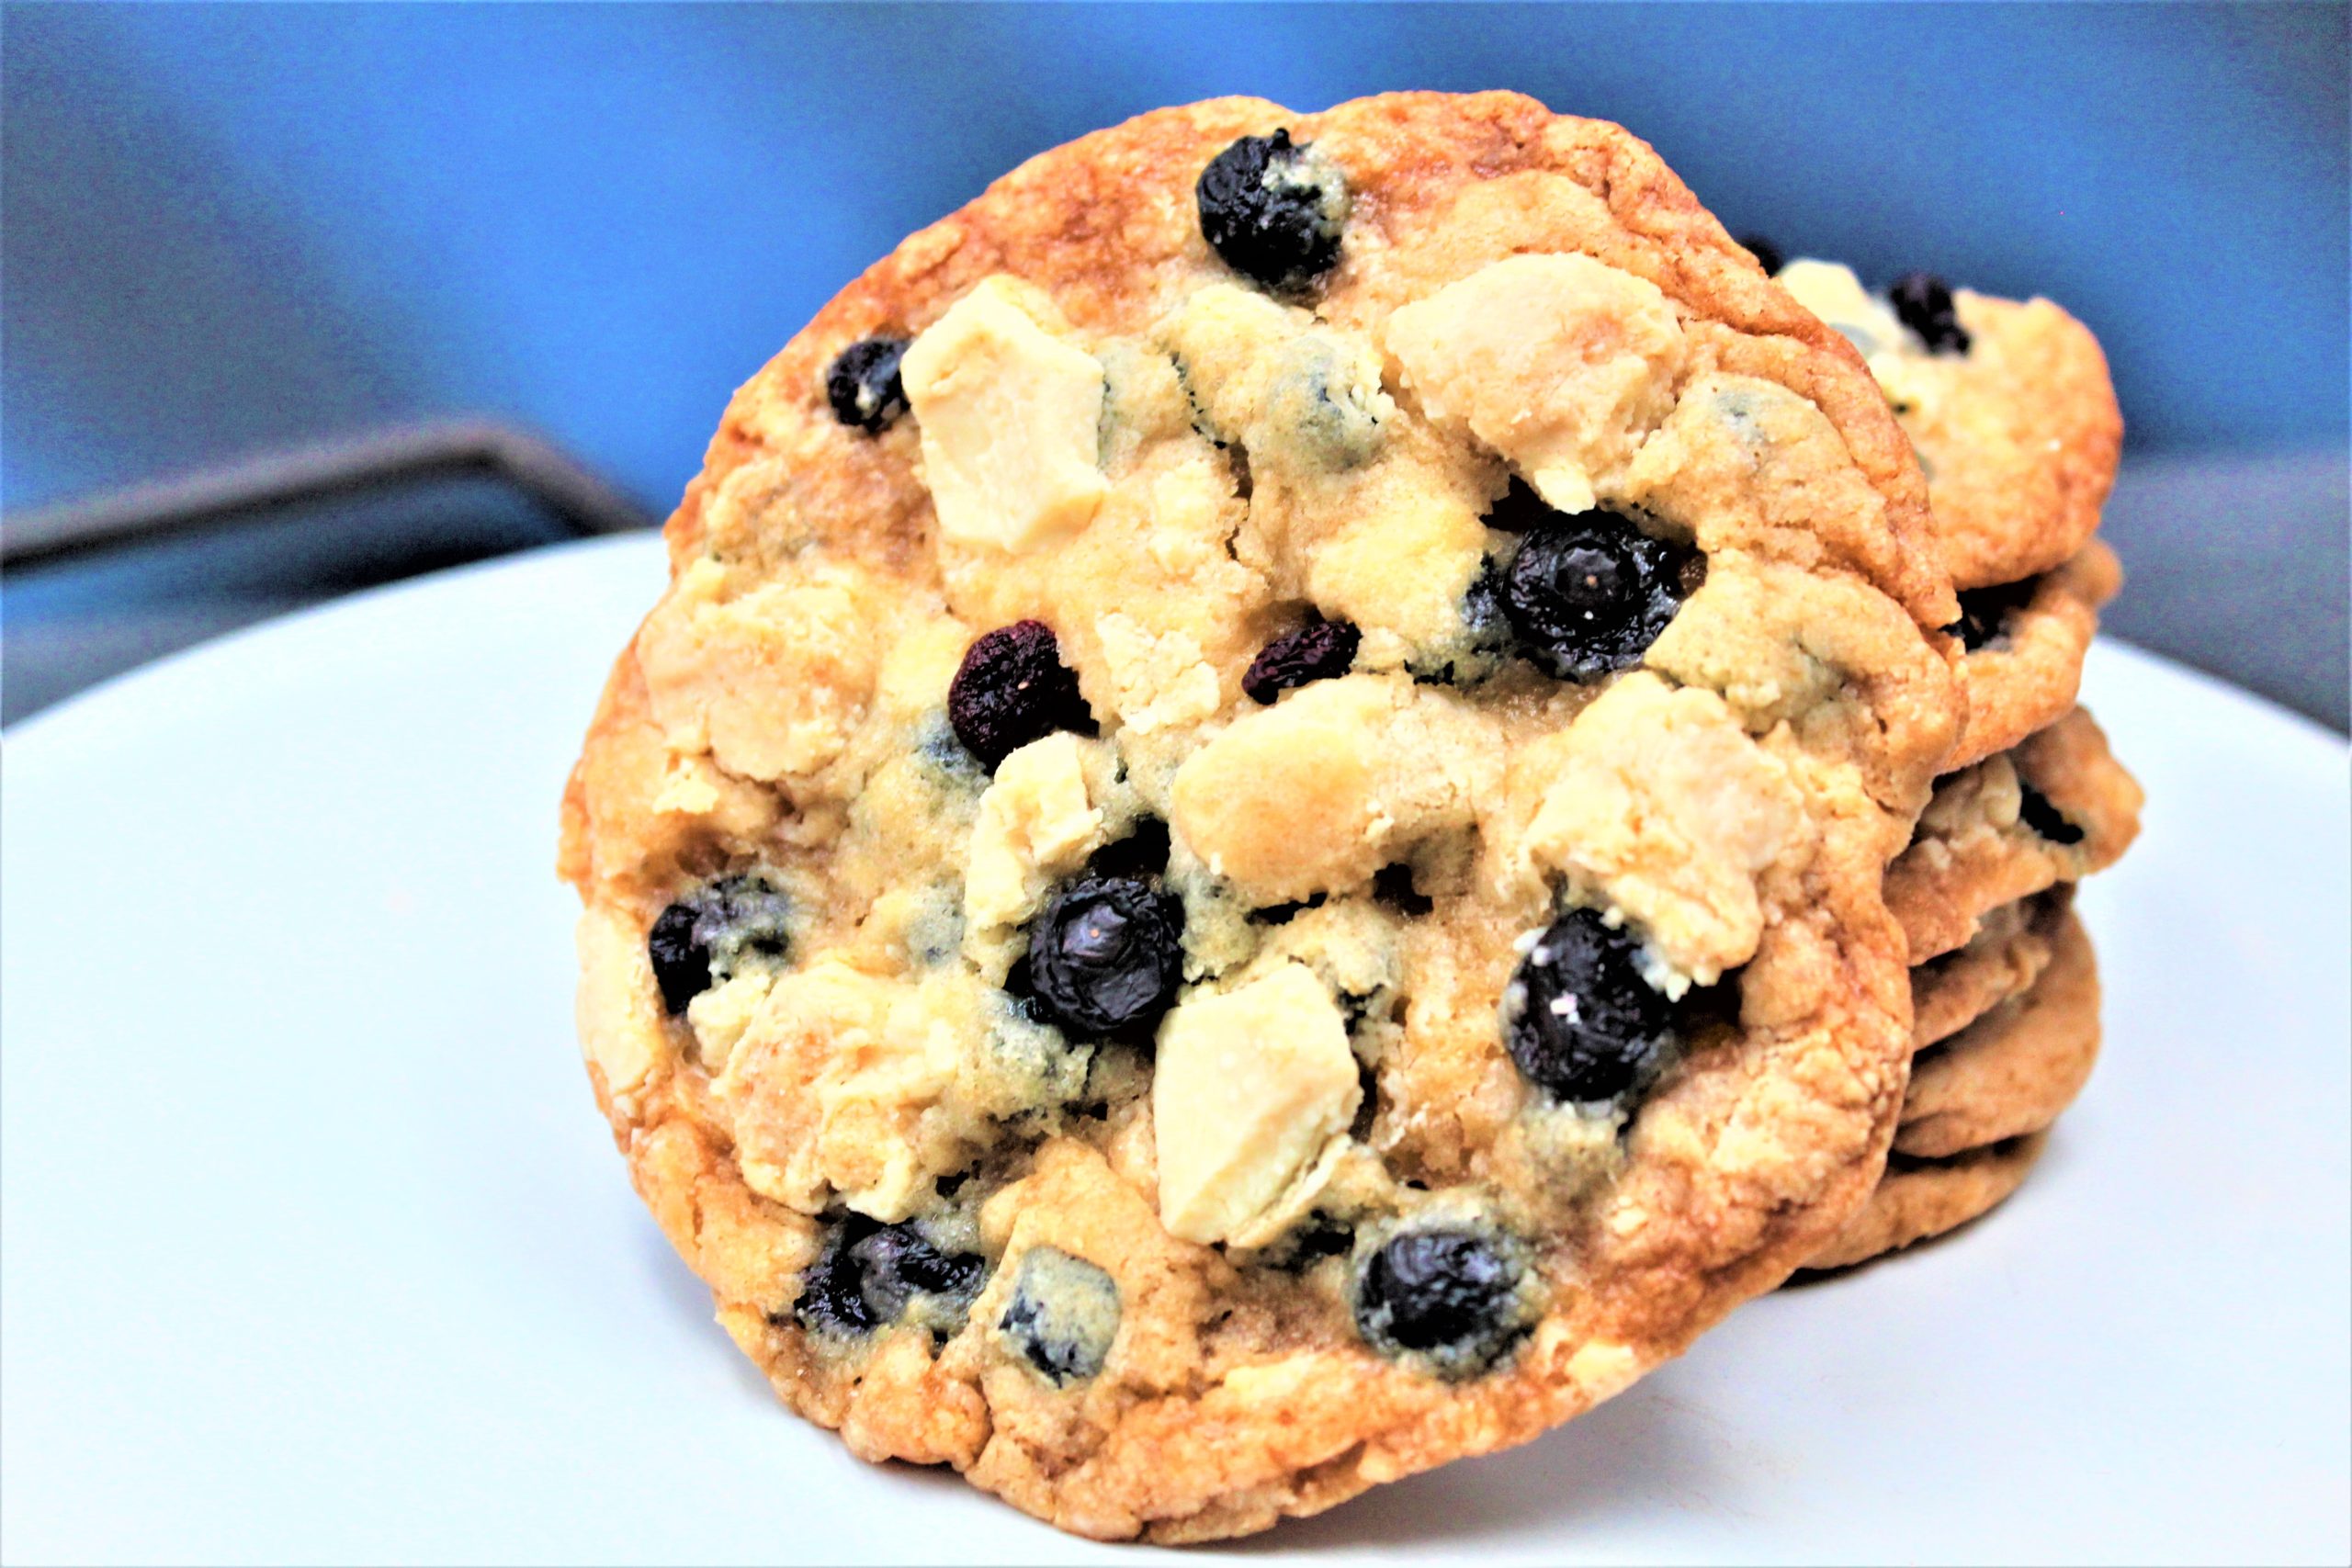
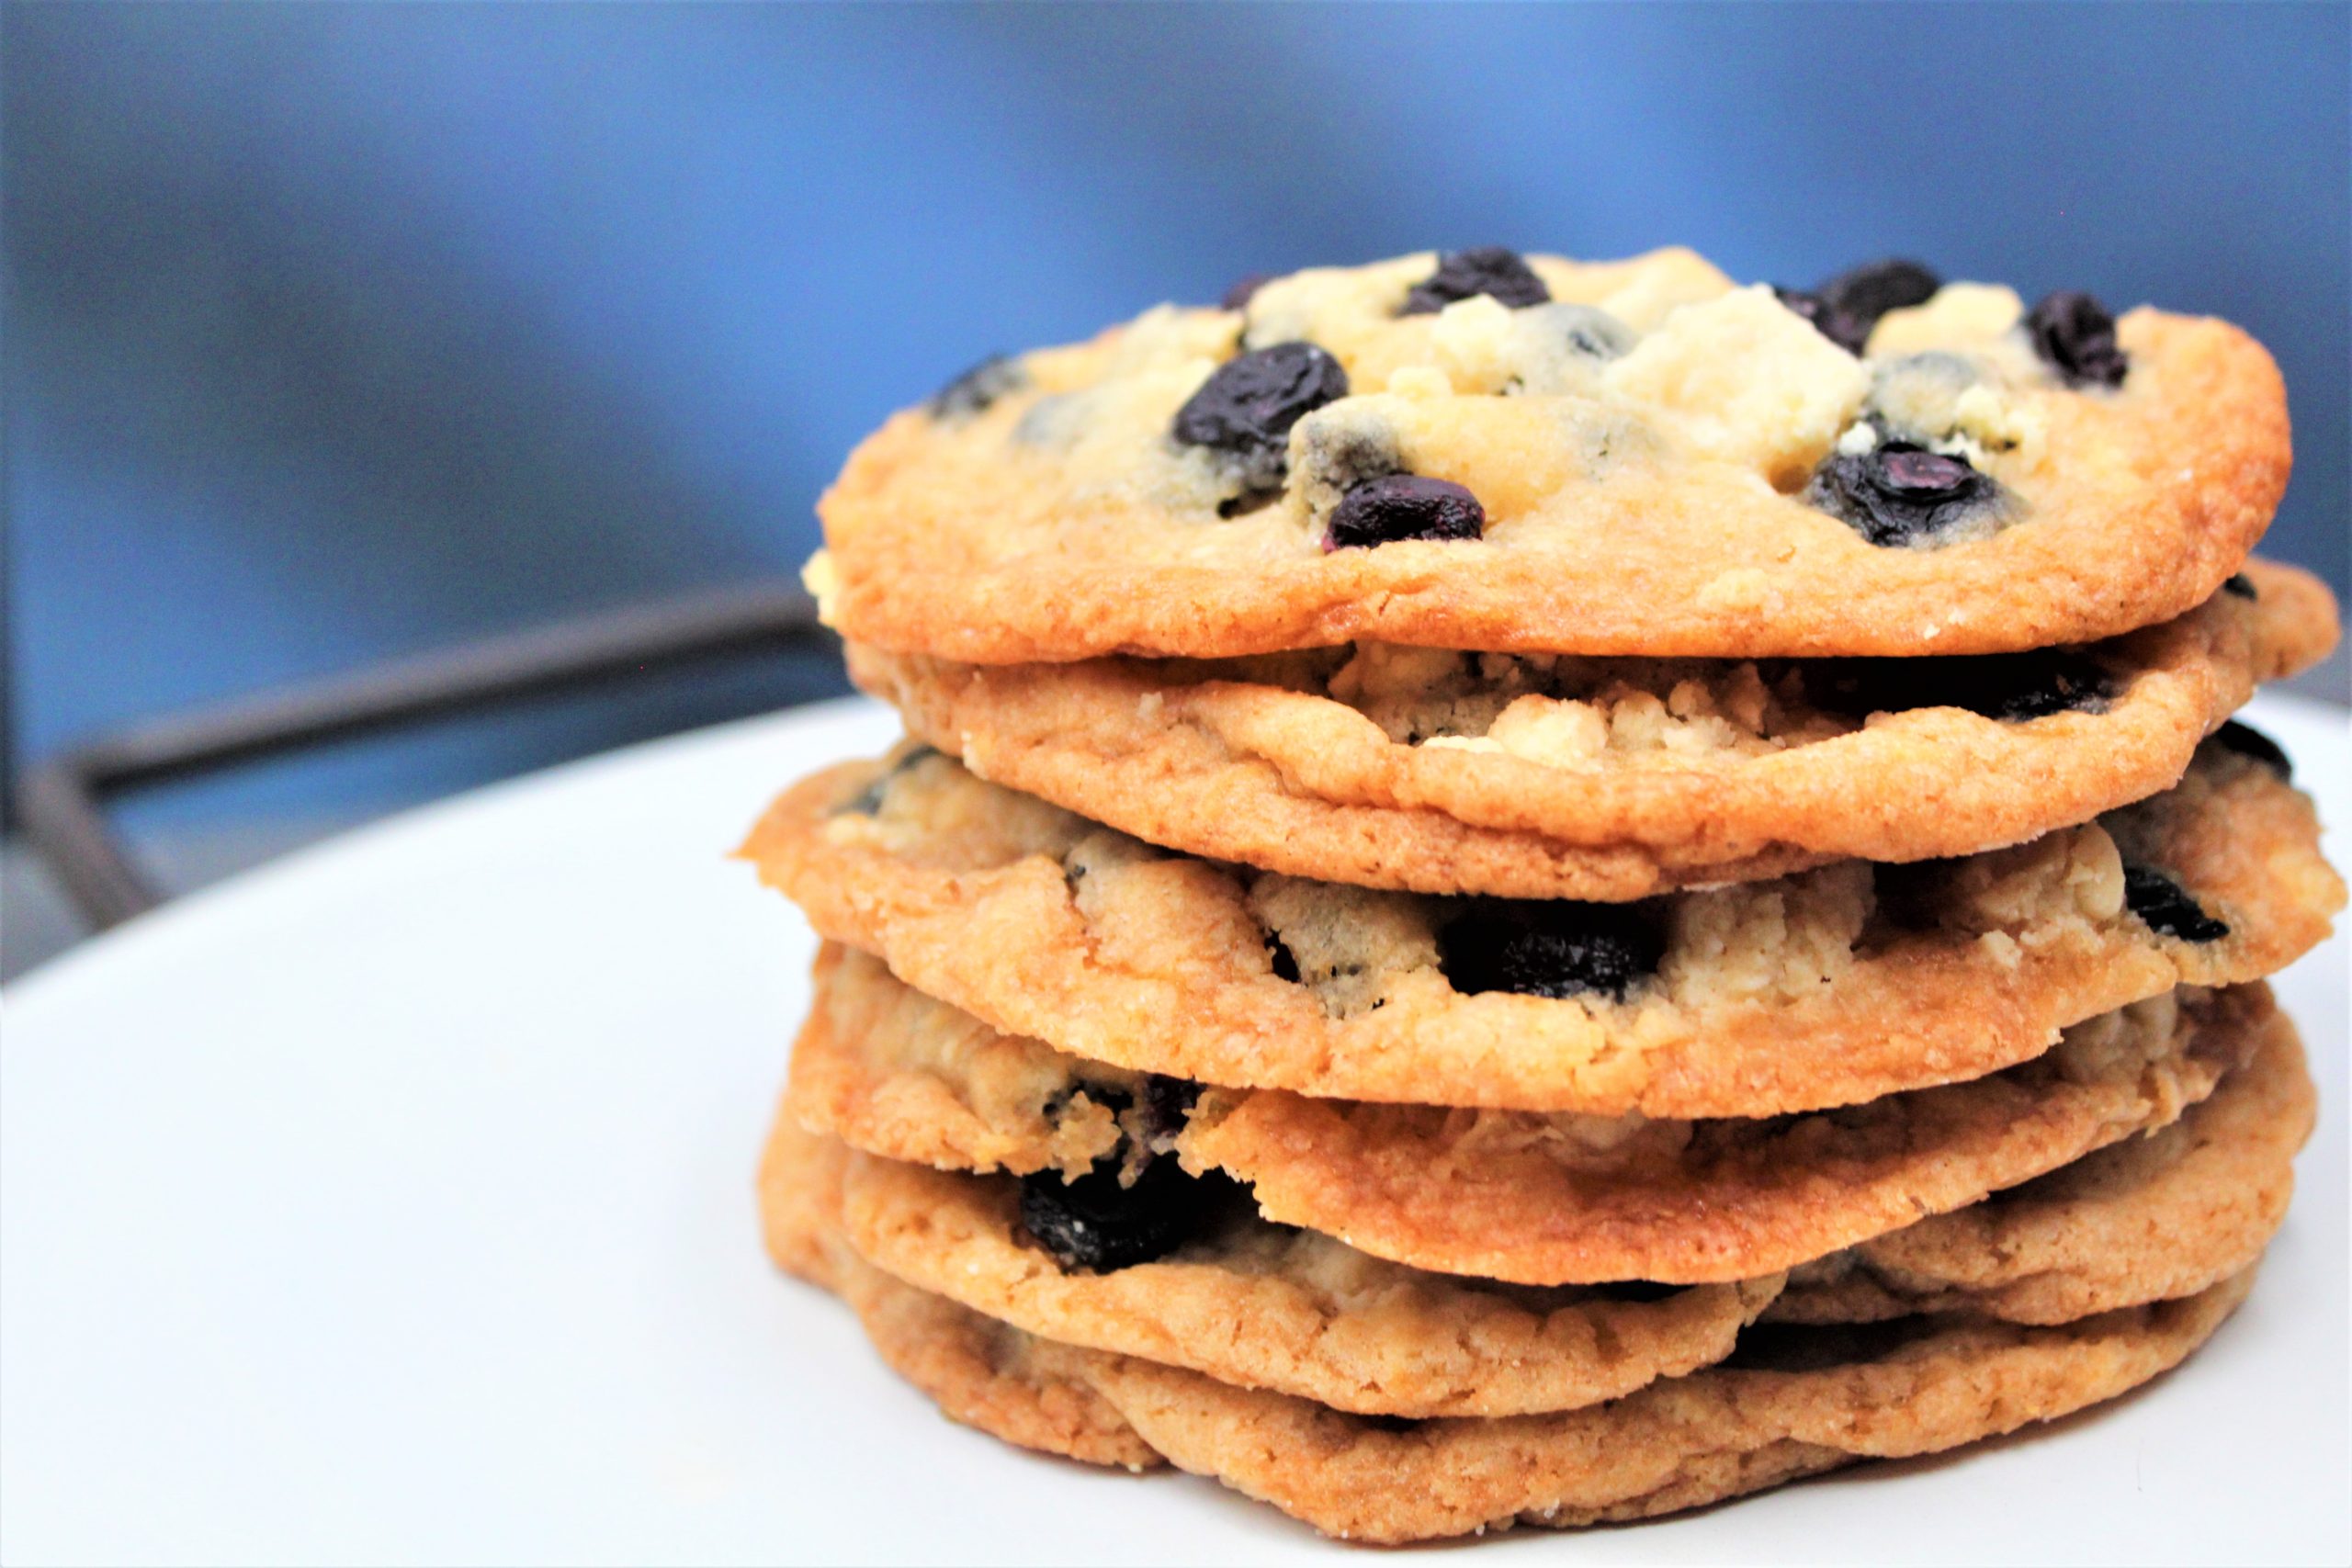
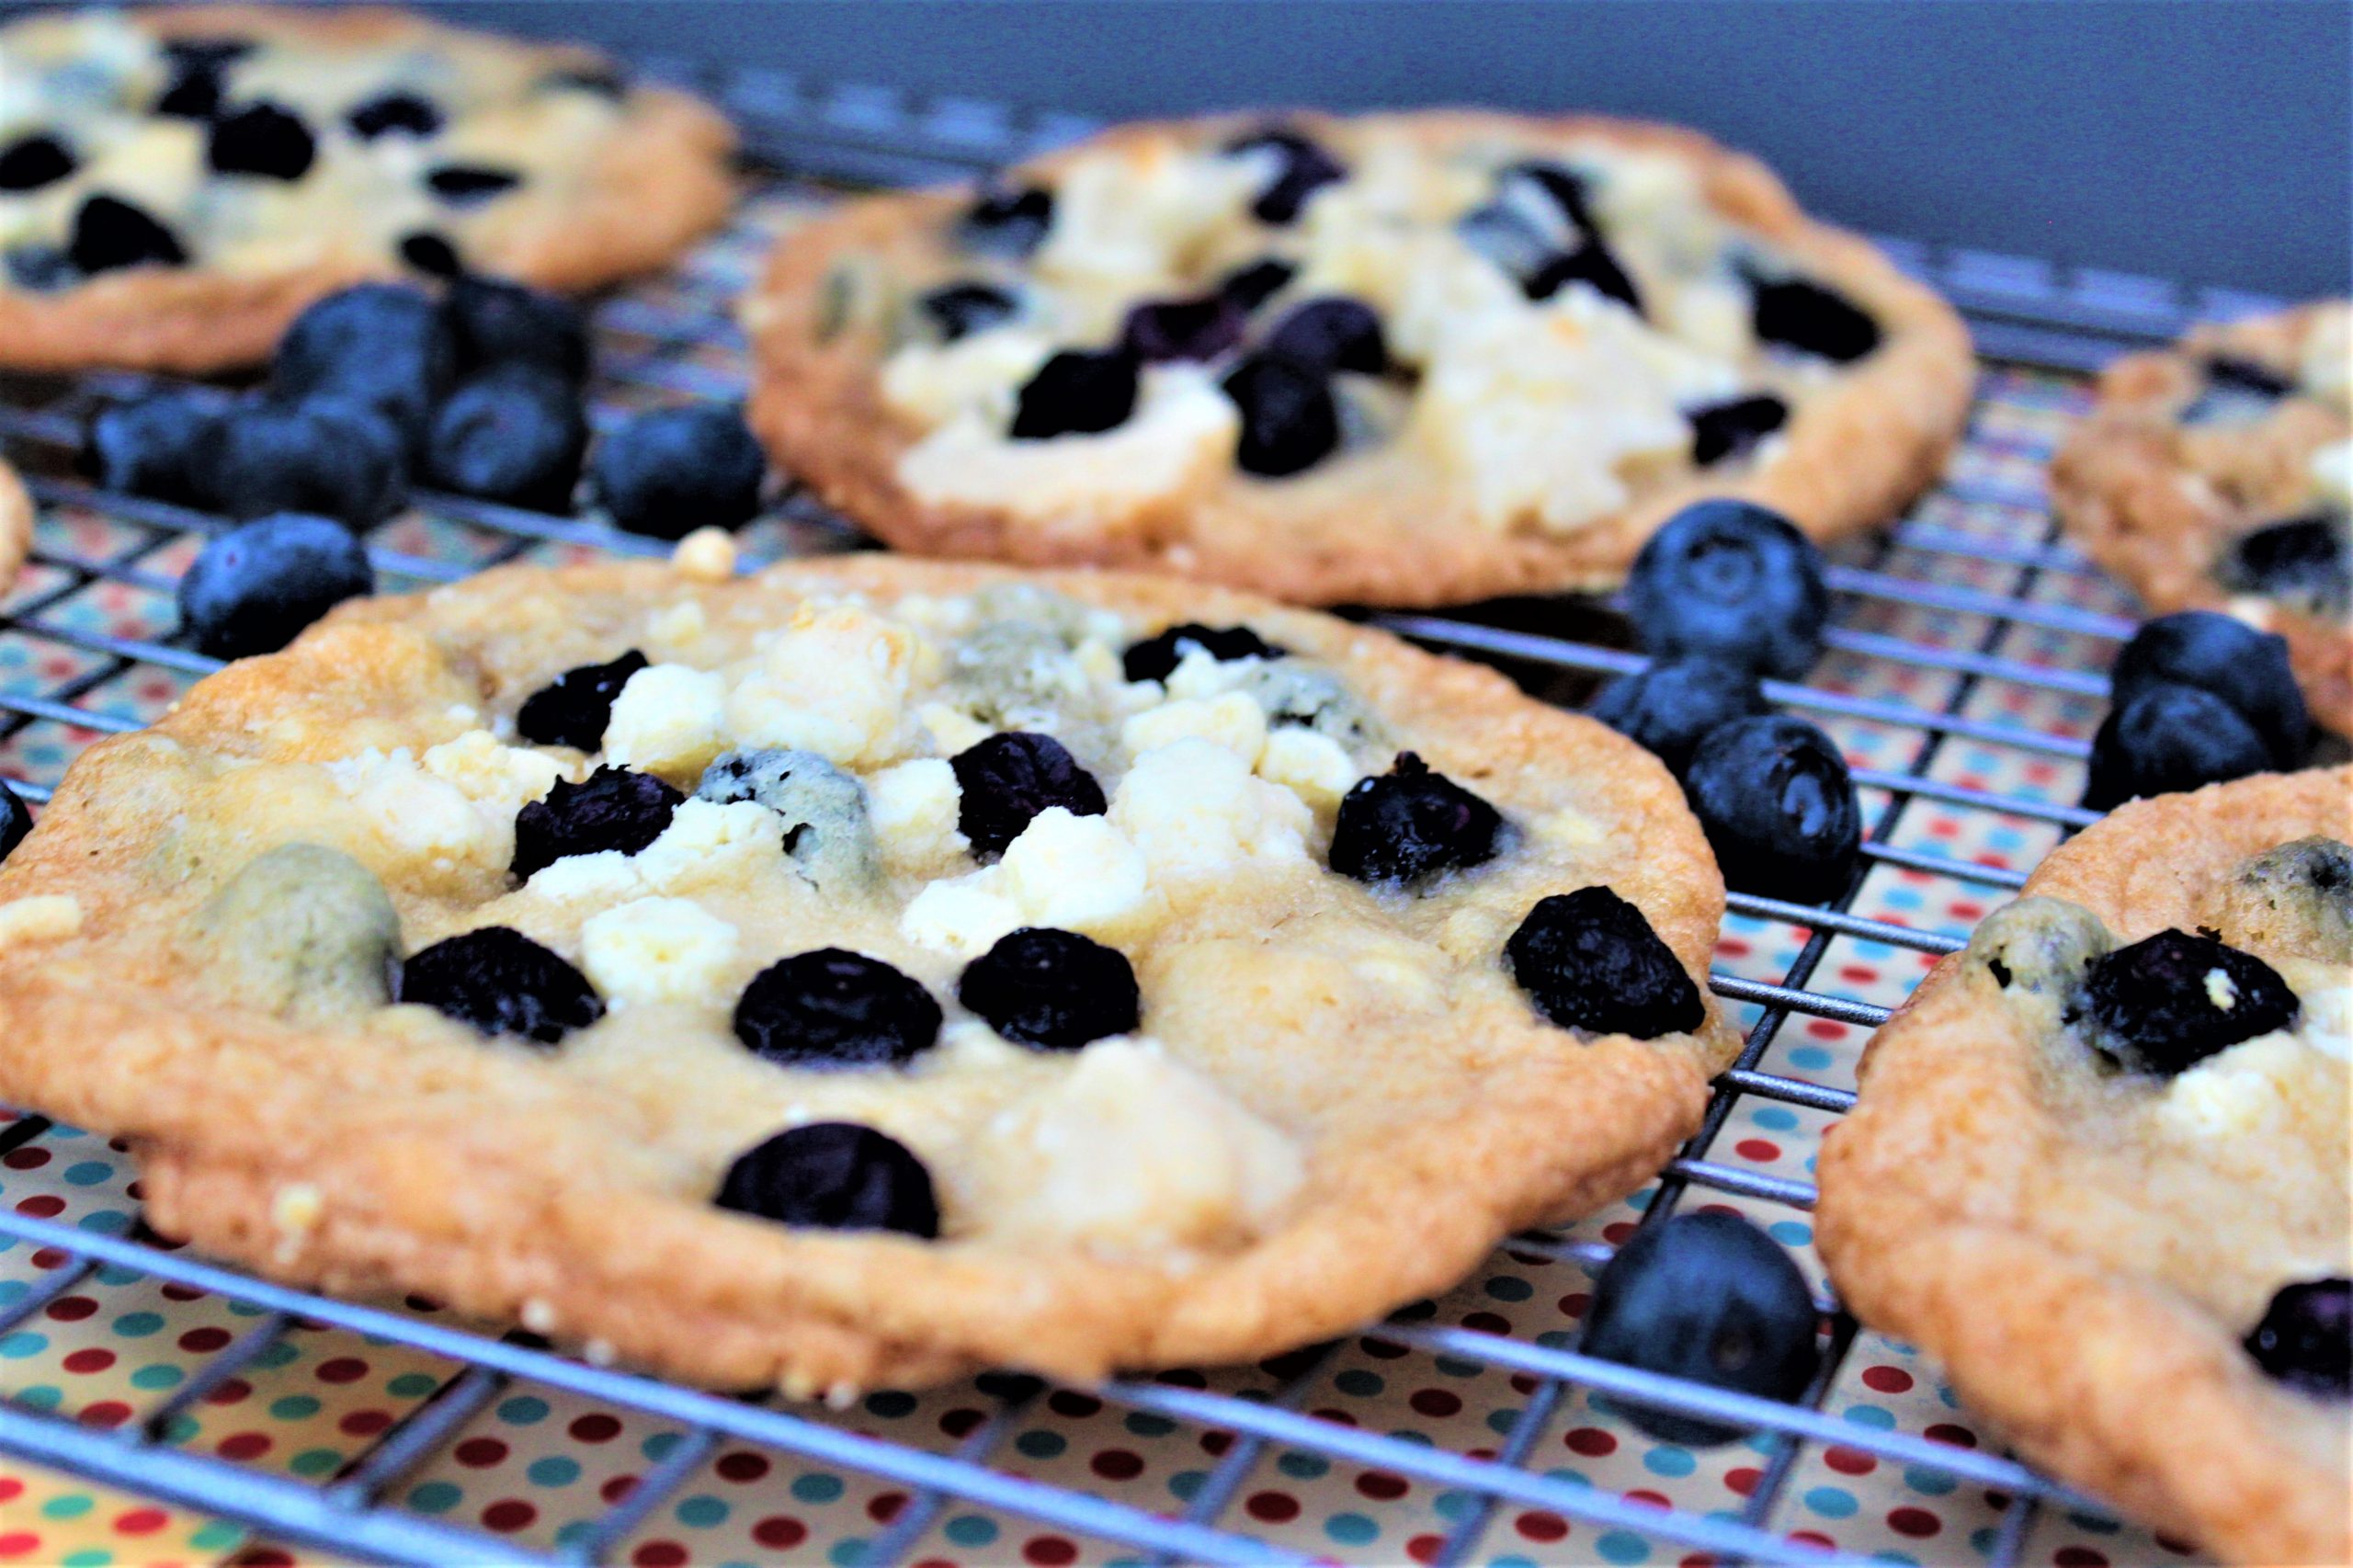
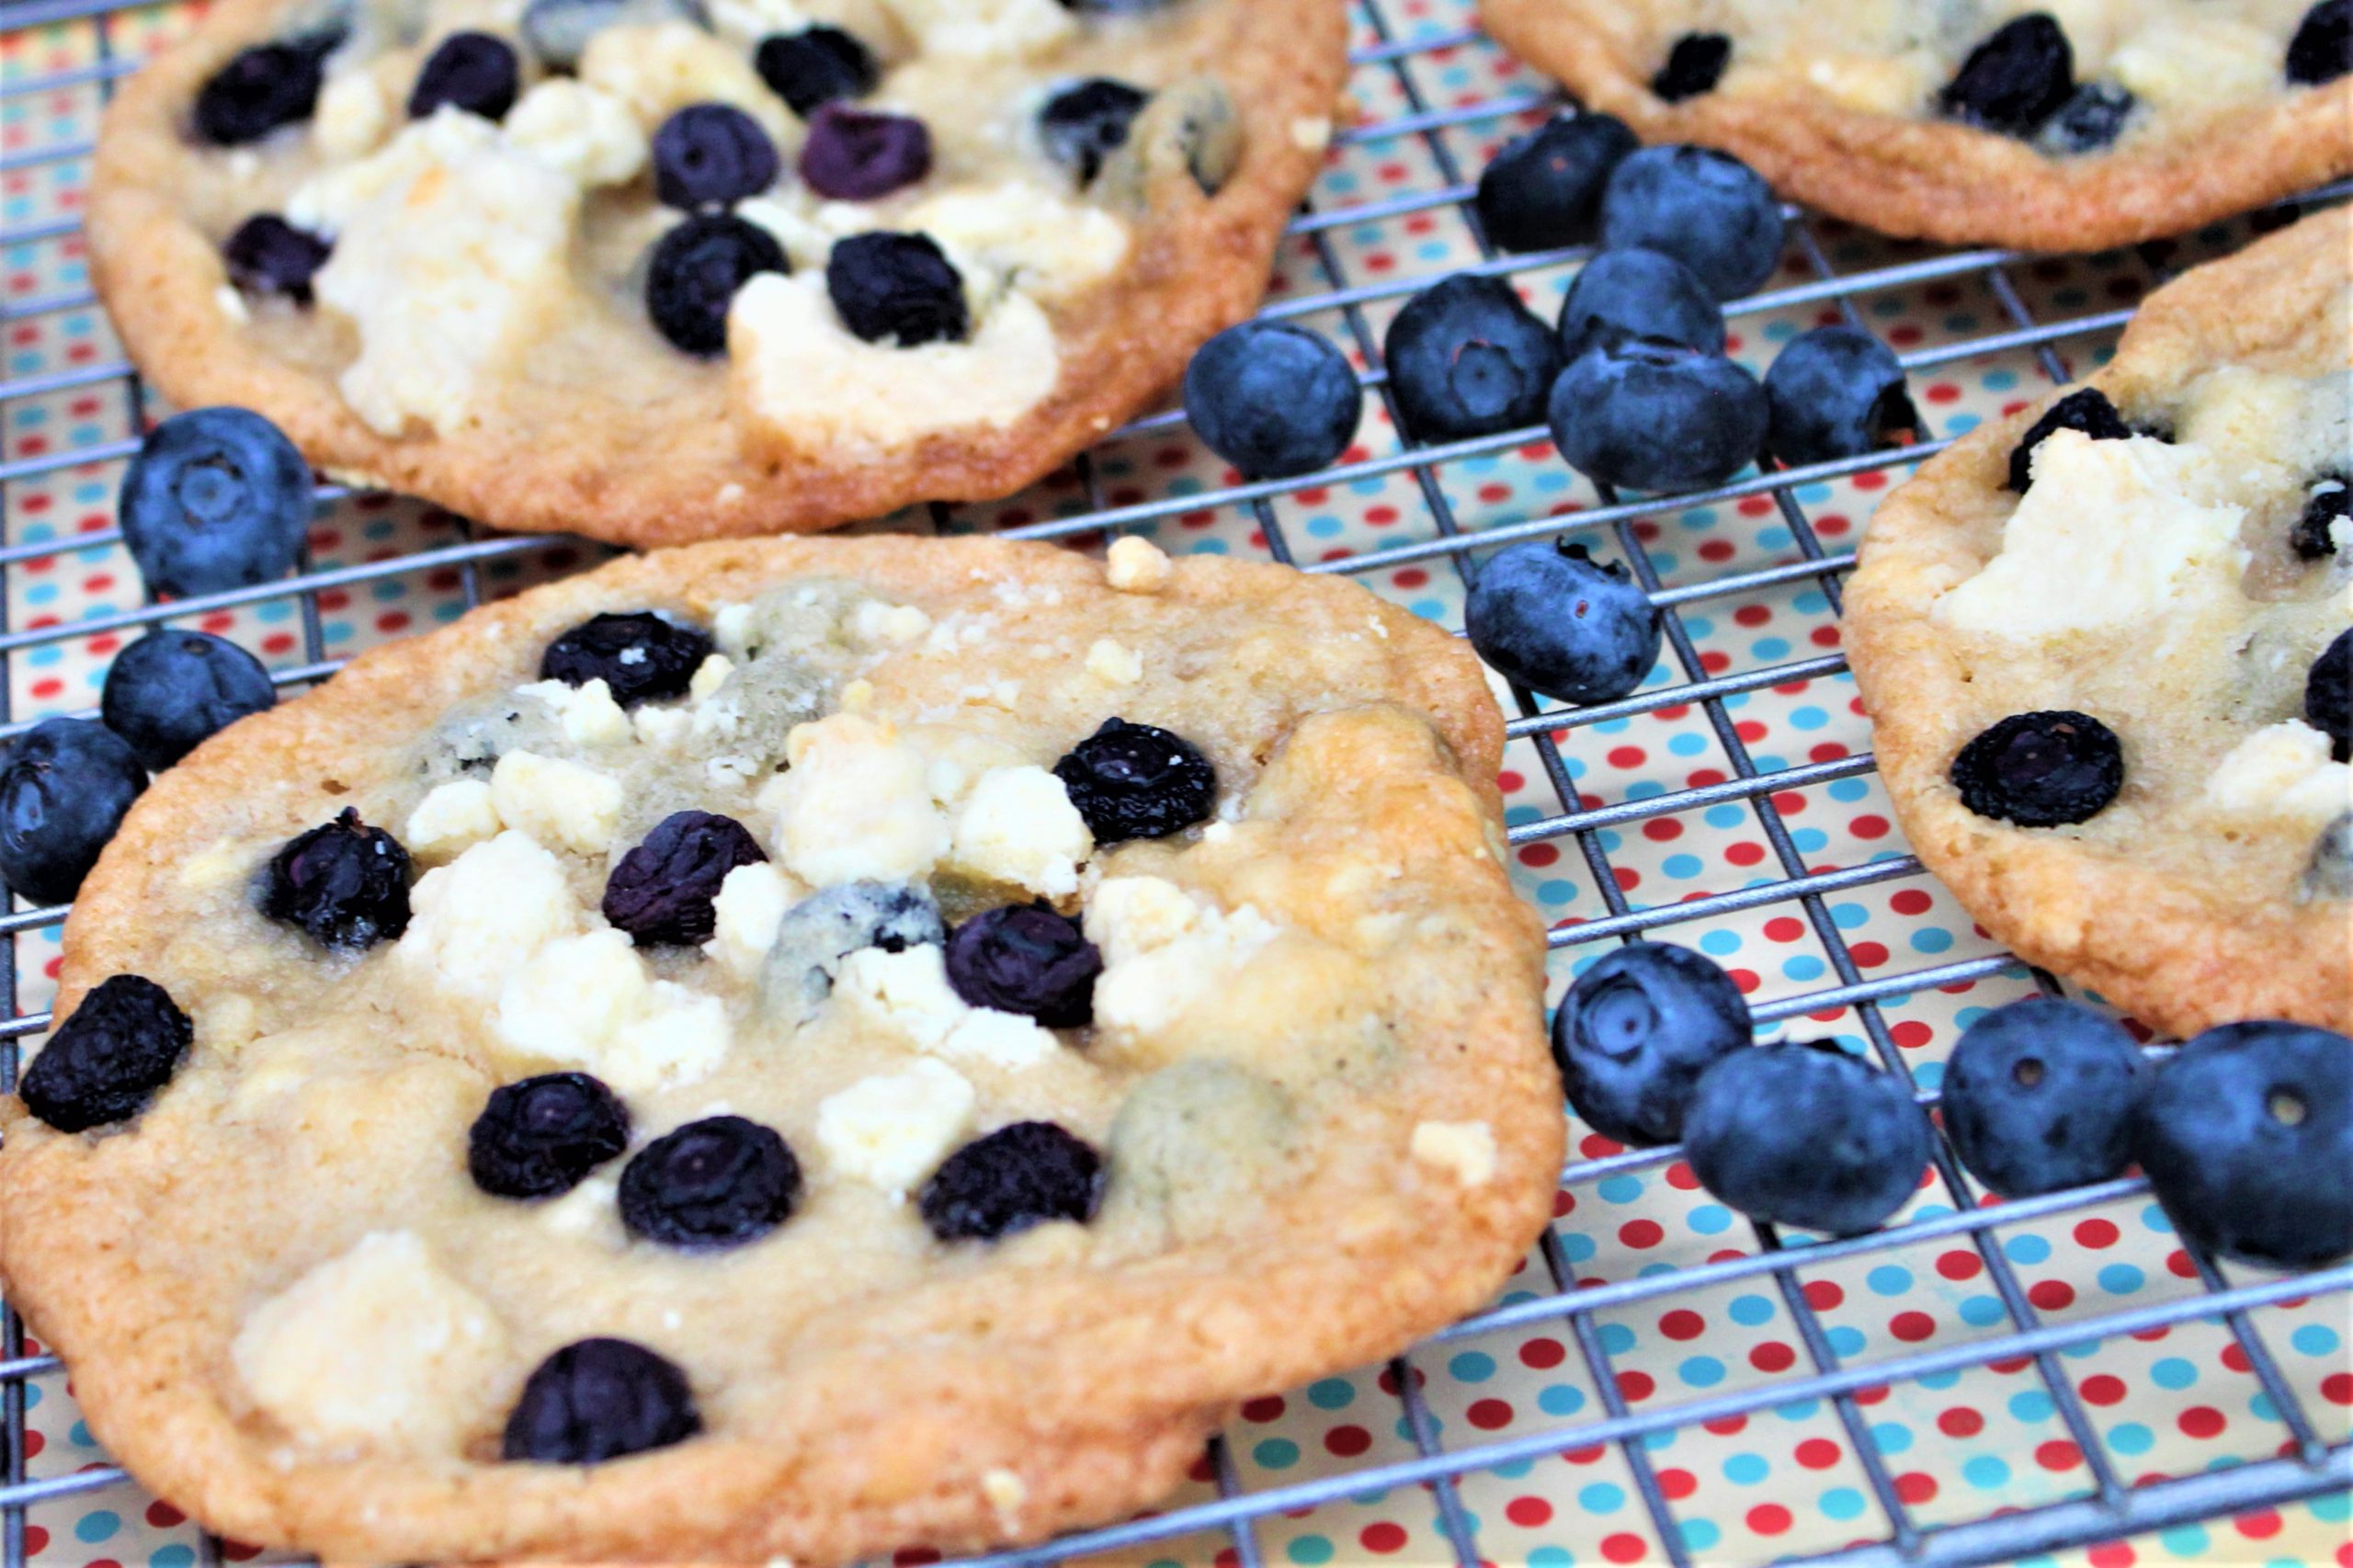
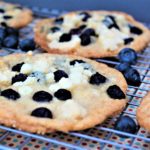
If you love blueberries, you’ll be crazy for these cookies! Recently, I purchased a cookbook from Christina Tosi. She is the owner of Milk Bar, a bakery in New York City, and is known for her amazing cakes. I love her recipes. Her recipes are challenging and they use ingredients that I haven’t seen before in baking. The bottom line is that they are a lot of fun to bake.
Christina’s recipe for these Blueberry White Chocolate Crunch Cookies shows that she is not a one-trick pony. She can master more than just cakes. These cookies are soft with a chewy center, crispy corners, and lots of creamy white chocolate.
Christina’s recipe for these Blueberry White Chocolate Crunch Cookies shows that she is not a one-trick pony. She can master more than just cakes. These cookies are soft with a chewy center, crispy corners, and lots of creamy white chocolate.
These amazing Cookies start with softened butter and brown sugar, which makes for chewy edges and a buttery center. I use dried blueberries for a brighter color, and chew. Dried berries are available at most grocery stores or on-line.
I made these cookies for co-workers and they were a huge hit. One person I work with said that the blueberries make it seem like a healthy cookie, but that is a little wishful thinking. I hope you give these cookies a try. They look impressive, and even taste better than they look. I will defiantly keep these cookies in rotation.
Blueberry White Chocolate Crunch Cookies – blueberries combined with buttery short bread and mildly sweet white chocolate chips for the perfect cookie.
Course
Cookies
Cuisine
American
Keyword
Blueberry Cookies
Prep Time1hour30minutes
Cook Time22minutes
Servings20Cookies
Ingredients
milk crumb Ingredients
1/2cupnonfat dry milk powder
1/4cupflour
3Tbssugar
2Tbs.cornstarch
1/2tspsalt
7Tbsbutter, melted
1/4cupmilk powder
3ounceswhite chocolate, melted
Cookie Ingredients
2 cupsflour
1/2tspbaking powder
1/4tspbaking soda
1 1/2tspkosher salt
16Tbsbutter, room temperature
3/4cupsugar
2/3cupbrown sugar, packed
1/4cupglucose
2eggs
1/2recipemilk crumb
3/4cupdried blueberries
Instructions
Milk Crumb Instructions
Preheat oven to 250°F. Line large rimmed baking sheet with parchment
Combine 1/2 cup milk powder, flour, sugar, cornstarch, and coarse salt in medium bowl; toss to mix evenly. Add butter and stir until clusters form.
Spread mixture evenly on prepared sheet. Bake until crumbs are dry and crumbly but still pale, about 20 minutes. Cool completely
Cookie Instructions
Mix the flour, baking powder, baking soda and salt in a bowl and set aside.
In the bowl of a stand mixer fitted with a paddle attachment, cream the butter, sugars and glucose on high for 2-3 minutes. Scrape down the sides of the bowl. Add the eggs and beat for an additional 7-8 minutes until fluffy and doubled in size. See my confetti cookie post for details on this process.
Reduce the speed to low and add the dry ingredients and mix just until the cookie dough comes together, no longer than 1 minute. Scrape down the sides of the bowl.
While on low speed, add the milk crumbs and the dried blueberries and mix for 30 seconds.
Using a 2 3/4-ounce ice cream scoop (or 1/3-cup measuring cup), portion the dough onto a parchment-lined baking sheet pan. Pat the tops of the cookies down, cover tighly with plastic wrap and refrigerate at least 1 hour, or up to 1 week. Do not bake your cookies from room temperature!
Heat the oven to 350 degrees. Line two large cookie sheets with parchment paper or Silpat liners.
Arrange the chilled dough about 4 inches apart on the prepared baking sheets. Bake for 18 minutes. The cookies will puff, crackle and spread. After 18 minutes, they should be just browned on the edges and still bright in the centers.
Cool the cookies completely on the cookie sheets before transferring to an airtight container.
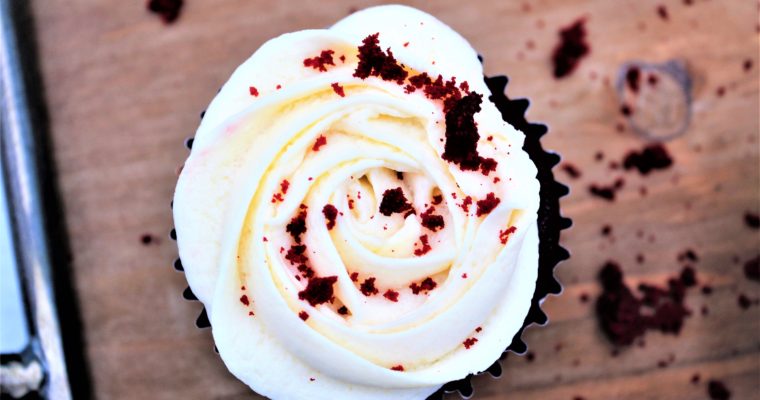
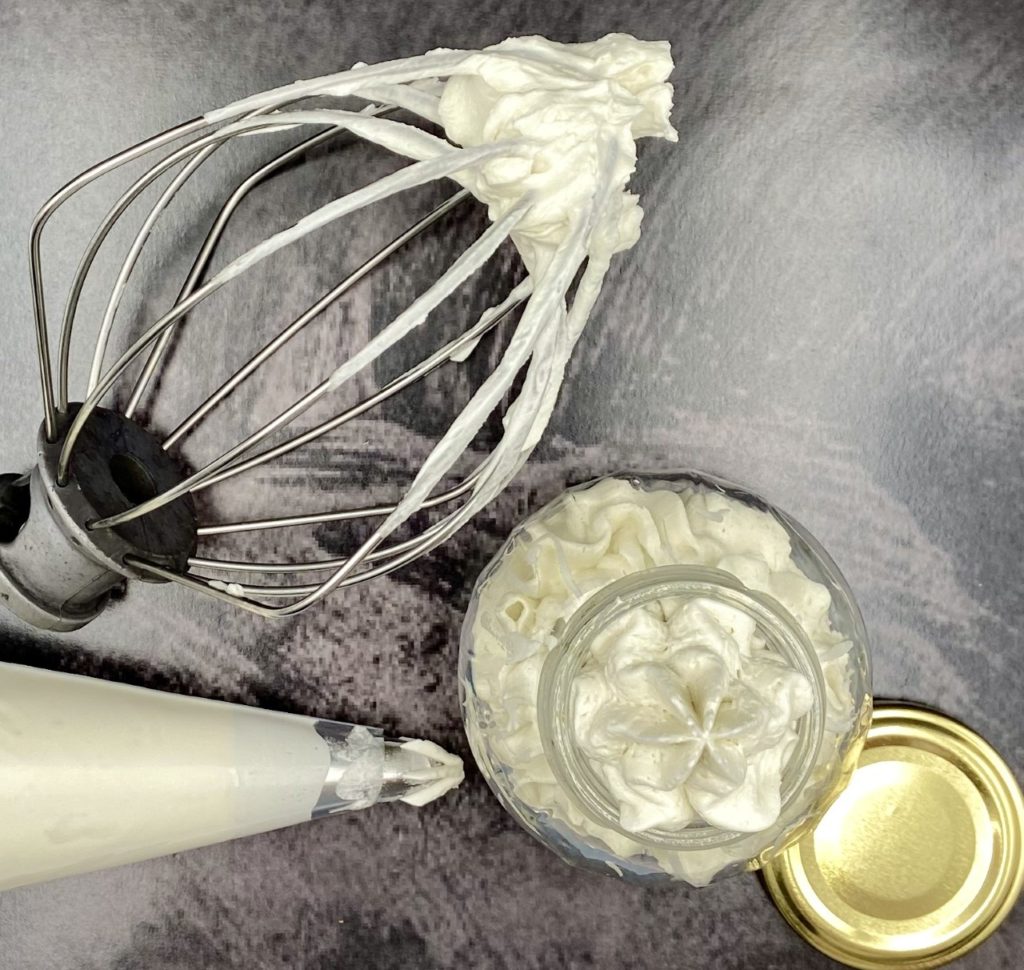
Ermine Frosting is a not-so-sweet alternative to traditional frosting. This Frosting is a classic but has been rediscovered by bakers like me, who want to add a deliciously nostalgic taste to their cakes. Ermine is firm enough to hold its shape when used with a decorating bag and tip; it also makes a creamy, light filling.
Do you know the cream filling in a twinky? It’s light, creamy, and mildly sweet. Ermine is very similar to the Twinky filling.
Ermine frosting is as firm as classic buttercream but much less sweet, with a texture and taste that works best with red velvet, chocolate, or other richly flavored cakes. Today, most Red Velvet Cakes are frosted with cream cheese frosting, but 50 years ago, when Red Velvet first hit the scene, they were frosted with Ermine.
Whether you call it, boiled milk frosting, ermine buttercream, roux frosting, flour buttercream, It is the same silky frosting that is making a comeback today.
There are a few things to keep in mind when making Ermine Frosting; this recipe is enough frosting for two eight-inch cakes. Also, remember to store in the refrigerator and re-whip it before using it.
The next time you are making a red velvet cake, I hope you throw caution to the wind and try this delicious frosting over cream cheese, you will not be disappointed.
This Old Fashioned Frosting is less sweet than today's varieties, but it's silky texture satisfies all cake lovers.
Course
Dessert
Cuisine
American
Keyword
Ermine Frosting
Prep Time15minutes
Cook Time5minutes
Servings4cups
AuthorDoug Bakes Staff
Ingredients
14ozgranulated sugar
3ozflour
16ozwhole milk
16ozunsalted butter room temperature
2teaspoons vanilla extract
1/4teaspoonsalt
Instructions
Whisk together flour and sugar in a medium saucepan over medium heat. Cook for about 2 minutes to toast the flour.
Slowly add in milk, whisk to combine and bring the heat to medium-high. Whisk continuously until mixture is thickened and pudding-like. Cover with plastic wrap (directly on pudding mixture) and let cool completely.
Add butter to the bowl of your stand mixer and whisk on high until light and fluffy. Slowly add in the cooled flour mixture one spoon at a time while continuing to whisk. Incorporating slowly insures a smooth buttercream.
Add in vanilla and salt until everything is creamy.
With a combination of just two recipes, you can pull off this stunning dessert! The White Chocolate Mousse will be a huge hit, complete with an edible chocolate bowl!The mousse is so easy to make, and the chocolate bowls are just as easy. The only …
I am a sucker for a good breakfast bake. I like preparing it the night before if I can. It makes breakfast less hectic, and the leftovers are great too. The Everything Bagel Bake came about because we had leftover bagels from the week before. …
I love Bundt cakes, and if you follow this blog, you will see bundt cakes popping up almost monthly.
Not only do I love bundt cake, but I love bundt pans. The company best known for bundt pans is Nordic Ware. They have been making bake ware since 1946 in Minnesota.
They are family-owned, and the company has been passed down through the generations. There is a resurgence of sorts in regards to Nordic Ware Bundt Pans. With a new generation leading the company, they have worked to reinvent themselves with more modern and intricate designs. Their products are sold in specialty food shops throughout the world, and people collect their bundt pans….like me!
Bundt cakes are a simple cake. They can be frosted, but there isn’t a need. They are fine just the way they are. I hope you try this delicious cake and keep an eye out for another bundt cake that is baked in one of my new Nordic Ware Pans.
This cake has a rich cherry taste that makes it hard to resist. There is something special about a bundt cake.
Course
Dessert
Cuisine
American
Keyword
bundt cake, cherry cake, dougbakes.com
Prep Time15minutes
Cook Time1hour
Servings12slices
AuthorDoug Bakes Staff
Ingredients
1cupsugar
8 ouncescream cheese, soft
1cupbutter
4eggs
2cupscake flour
1teaspoonbaking powder
1 1/2cupmaraschino cherrywell-drained, chopped
Instructions
Heat the oven to 325.
In a large bowl, combine sugar, cream cheese, butter, and vanilla and mix till well blended.
Add the eggs one at a time and mix well after each one.
Gradually add 2 cups of the flour with baking powder.
Mix well and toss the remaining 1/4 cup of flour with cherries and fold into the batter.
Grease a 10" bundt pan; pour the batter in the pan.
Bake 1 hr and 20 minutes to 1 1/2 hours test with a cake tester.
Cool on a wire rack for 5 minutes then remove. Cool thoroughly. Combine icing sugar and milk, mix well and drizzle over the cake. Garnish with additional cherries and nuts if you like.
Over the past twenty years, Dale and I have been fortunate to be apart of the Long family. They are, without a doubt, the most passionate group of people I have had the good fortune to meet. We became acquainted with them when I worked …
Our BBQ Pulled Chicken Sliders are everything you want in a barbecue recipe — sweet, smoky, and fall-apart-tender! It’s also so easy to make, and you don’t have to slave over a hot grill. Instead, toss everything into a dutch oven on the stove, and …
My Chocolate Drop Cookies are made from soft dough and dropped onto a baking sheet in balls; they are a simple, old-fashioned treat that can be customized. If you like nuts, add them in. Prefer mint chocolate chips to semi-sweet chips? Feel free to substitute. No matter what you add, you’re sure to end up with a soft, short-bread cookie that packs on the chocolate flavor.
To drop the cookies on your baking sheet, try using a tablespoon cookie scoop. Not only will it help keep your fingers clean, but it will also make sure your cookies come out even. I like my cookies to be consistent in shape and size. I have been known to use a food scale to ensure they all are the same size.
I hope you give my Chocolate Drop Cookies a try; you will love the versatility as well as a cookie with a chocolate punch.
In a large bowl, cream butter and confectioners' sugar until light and fluffy.
Beat in vanilla. Gradually add flour to creamed mixture and mix well.
Stir in pecans. Roll into 1-in. balls. Place 1 in. apart on ungreased baking sheets. Using the end of a wooden spoon handle, make an indentation in the center of each.
Bake 18-20 minutes or until lightly browned.
Roll warm cookies in additional confectioners' sugar; cool on wire racks.In a microwave, melt chocolate chips; stir until smooth. Stir in corn syrup, water and shortening. Spoon or pipe into cooled cookies.
Anyone who makes deviled eggs believes that they make the best-deviled eggs that the world has ever seen. I know that can’t be true because I MAKE THE BEST DEVILED EGGS EVER! No matter what gathering I attend that has food, there are always deviled …
Here is the deal, if you follow this recipe as written, you will make amazing bagels. It is just that simple! There are a lot of bagel recipes on the internet that promise the same thing that I promise you. What is the difference between their claim and mine? Well, it’s simple; they are lying.
Making the perfect bagel is easy, but the process takes a lot of time. It takes almost 24 hours. Most of that time is allowing the dough to rest. It is so essential to allow this time so the dough can rise.
These bagels are also boiled before baking. Boiling helps set the bagels and allows them to be chewy on the outside and soft inside. It’s crucial to allow them to boil 2 minutes on each side.
Shaping the bagels is much easier than you are probably thinking. It is as simple as making a hole in a dough ball and stretching it out.
I have listed a few toppings in the recipe, but the options are limitless. I like the “Everything Spice Blend,” which can be found in most supermarkets.
The Homemade New York Style Bagel recipe is one of my favorite to make. It has a huge wow factor. Your friends will be skeptical as to if you made them or bought them.
Don’t forget my promise. You are about to make the best Homemade New York Style Bagel that has been. Congratulations!, and you are welcome!
Bagels made the classic way: They are boiled in water for a couple of minutes before baking. This is probably one of the most bizarre things a person can do to the dough, but it works. So, if good bagels cannot be found where you live, worry no more; this recipe is adaptable, and the little bit of effort you put into making these bagels is well worth it.
Course
bread
Cuisine
American
Keyword
Bagels, dougbakes.com, home made, scratch made bagels
Prep Time45minutes
Cook Time20minutes
Servings12bagels
AuthorDoug Bakes Staff
Ingredients
The Poolish
1 1/4cups or 166gall-Purpose Flour
1/4teaspooninstant yeast
3/4cup or 198g lukewarm water (90° to 105°F)
The Dough
1 1/2 cups or 340gwater (90° to 105°F)
5 1/2cups or 663gAll-Purpose Flour
2 3/4teaspoonssalt
3/4teaspooninstant yeast
Water Bath
2 tablespoons or 43gbarley malt syrupyou can substitute molasses
In a medium bowl, stir together the flour and yeast. Add the water, mixing until smooth.
Cover and let rest at room temperature for 8 hours.
To make the dough
In a large mixing bowl combine the poolish with the water, mixing by hand to break up the poolish. Add the flour, salt, and yeast, stirring by hand or on low speed of a stand mixer until the dough forms a cohesive, shaggy, tacky mass. Do not add more flour.
Place the dough in a bowl, cover, and allow it to rest for 2 hours, stretching and folding the dough over onto itself three or four times in the bowl after 1 hour.
Without touching the dough again, place the bowl in the refrigerator overnight, or for 8 to 12 hours.
The next day
The next day, remove the dough from the refrigerator and leave it at room temperature for 1 to 2 hours.
Divide the dough into 12 equal pieces; if you have a scale each piece will weigh about 114g.
Shape each piece into a tight ball, place on a lightly floured surface, then cover and let rest for 15 to 30 minutes.
To shape the bagels: Using your fingers, poke a hole in the middle of each ball, gently expanding the hole until it’s 2” to 3” in diameter
While the bagels are resting, preheat the oven to 475°F. If you have a baking stone, place it on the middle rack in the oven and have ready two pieces of parchment large enough to fit the stone. To bake on baking sheets, line two pans with parchment and set aside.
To prepare the water bath: Put 4” of water in a shallow (wide) 6-quart pot, then add the barley malt syrup and the salt. Bring to a medium boil.
Carefully place three bagels at a time in the water bath. Boil the bagels for 30 seconds on one side. Using a slotted spoon, flip them over. Boil the bagels for another 60 to 90 seconds.
Remove the bagels from the water, allowing them to drip dry for a few seconds before placing them 2” to 3” apart on the prepared parchment or parchment-lined pan; you should be able to get six bagels per parchment/pan
Sprinkle any toppings onto the bagels. Alternatively, dip the bagels into a shallow bowlful of the toppings before returning to the parchment/pan.
Bake the bagels for 20 to 25 minutes, either in two batches if baking on a stone, or rotating the pans halfway through if using baking sheets. The bagels are done when the bottoms and sides are a deep mahogany brown and firm.
Remove the bagels from the oven and cool them on a rack. Store bagels at room temperature for up to one day, or wrap and freeze for longer storage.
A tip from dougbakes.com
To shape bagels ahead of time and bake the following morning (to serve fresh for breakfast or brunch): Shape, place on a parchment-lined or cornmeal-dusted baking sheet, cover, and refrigerate. In the morning proceed with the recipe as written, boiling bagels immediately out of the refrigerator.
The spaghetti, along with the whole milk mozzarella, creates a creamy layer that works perfectly with the tangy tomato sauce. The crispy crust ties this amazing pie together. It is pizza perfection.
When I am looking for a new cookie recipe, it’s kind of like, been there, done that. It is rare to find something that is not on every baking blog out there. I first saw this recipe on the Bon Appetite web site, and I …
As much as I hate to admit it, I am a Wonder Bread kind of guy. I know it’s horrible, nutritionally speaking, but damn it makes the best sandwiches.
Growing up, my mom made a lot of homemade bread, specifically, sourdough bread. I was never a fan. The crust was chewy and not sandwich friendly. I never understood why the homemade bread didn’t taste like my wonder bread.
Lately, I have heard about Japanese Milk bread and how delicious it was. I also heard that it had the same softness as the bread I was raised eating.
As I looked into developing a recipe for this bread, I discovered that the differences between this bread and all the chewy crusted breads of my past isn’t the ingredients, it’s the way it’s made. Japanese Milk Bread starts with a heated roux that is called the tangzong method. The roux is made from flour, water, and milk.
Warming of the roux starts to activate the gluten in the flour before you even mix it with the rest of the ingredients, which helps create the soft texture. They say that this bread will stay fresher for more extended periods than other bread, but it doesn’t last long enough for me to know.
I believe I have found my new “go to” homemade bread recipe. Why would I buy a loaf from the store when I can make this soft, fluffy, and delicious Japanese Milk Bread?
Don’t get me wrong, I am still a Wonder Bread kind of guy, but now I have options.
Japanese bread/Dinner Rolls are pillowy soft thanks to a simple technique involving a roux known as tangzhong. The roux is mixed into the dough, producing a tender bread each and every time.
Course
bread
Cuisine
Japanese
Keyword
Japanese Bread
Prep Time30minutes
Cook Time40minutes
Proofing Time2hours
Servings8rolls
AuthorDoug Bakes Staff
Ingredients
Tangzhong (starter)
3 tbspwater
3tbspwhole milk
2tbspBread Flour
Dough
2 1/2cupsBread Flour
2tbspDry Milk
1/4cupSugar
1tspSalt
1tbspInstant yeast
1/2cupswhole milk
1egg
1/2cupbutter, melted
Instructions
To make the Tangzhong
Combine all of the ingredients in a small saucepan, and whisk until no lumps remain.
Place the saucepan over low heat, and cook the mixture, whisking constantly, until thick and the whisk leaves lines on the bottom of the pan, about 3 to 5 minutes.
Transfer the tangzhong to a small mixing bowl or measuring cup and let it cool to room temperature.
To make the dough
Combine the tangzhong with the remaining dough ingredients, then mix and knead using a stand mixer, for 6 to 8 minutes until a smooth, elastic dough forms.
Shape the dough into a ball, and let it rest in a lightly greased covered bowl for 60 to 90 minutes, until puffy but not necessarily doubled in bulk.
Gently deflate the dough, divide it into 8 equal pieces, and shape each piece into a ball.
Place the rolls into a lightly greased 8" round pan. Cover the pan, and let the rolls rest for 40 to 50 minutes, until puffy.
Preheat the oven to 350°F. Brush the rolls with milk or egg wash (1 large egg beaten with 1 tablespoon cold water), and bake for 25 to 30 minutes, until golden brown on top; a digital thermometer inserted into the center of the middle roll should read at least 190°F.
Remove the rolls from the oven. Allow them to cool in the pan for 10 minutes, then transfer them to a rack to cool completely.